How to get to the Niva fuel pump - Zonare.ru
Removal of an electric fuel pump with a fuel level sensor on a Niva 2121 and 2131 is carried out to replace them in case of failure, as well as when replacing the fuel tank. To carry out repair work, prepare a standard set of tools; this repair is also carried out with a tank filled at least half full. Then do the following sequence of actions:
- We completely remove the pump, working carefully so as not to damage the fuel level sensor float.
- Remove the rubber sealing gasket that seals the connection between the pump and the tank.
At this point, the repair work to remove the electric fuel pump and fuel level sensor on the Niva 2121 and 2131 has been completed. Make any necessary repairs or replacements, then perform installation in reverse order.
Removing and replacing the fuel pump on a Chevrolet Niva with your own hands (+video inside)
Every car engine cannot operate without fuel. It doesn’t matter at all what kind of engine is installed - injection or carburetor, without supplying the required amount of fuel it will not work. The Chevrolet Niva car has distributed fuel injection, then it is equipped with an electric drive. This means that in most cases, if the fuel pump fails, the cause should be sought in the electrical circuit of the car.
Removing and replacing the fuel pump on a Niva Chevrolet
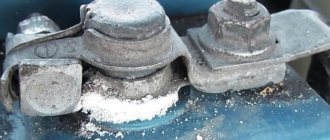
- The negative terminal is removed from the battery.
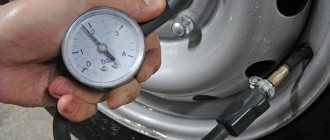
- It is necessary to reduce the pressure level in the power system. One way to unscrew the valve on the fuel rail.
- You need to get to the back seat and fold back the cushion on it on the right side - the fuel pump is located there.
- Having discovered the sound insulation, with a special cutout for the fuel tank hatch cover, you need to bend it.
- Remove this cover by first removing the screws.
Location of the screws securing the decorative cover of the fuel pump. The decorative hatch is removed and the fuel pump is visible. Hose clamps are close. The nuts for securing the fuel pump are marked with arrows. Installation of a new or repaired fuel pump is carried out in the reverse order.
The fuel pump is broken, what should I do?
It is a very unpleasant moment when a fuel pump failure occurs, for example, on a highway or near a traffic light. The situation becomes most tense at times of heavy traffic intensity. If such a nuisance happens and there is no one to help, then the first thing you should do is roll the car off the roadway and try to “reanimate” the fuel pump.
Symptoms of a problem
In the arsenal of automotive tools of any caring driver there should be, along with the keys, a tester, even if in the form of a simple warning lamp and two wires. The first sign of a malfunction on an injection engine is that the fuel pump motor is “silent” when the ignition is turned on. Accordingly, all attempts to start the engine in this case will not be crowned with success. In any unclear situation, remove the terminal. Very useful advice, by the way! The driver will be very lucky if a very simple method helps, which should be taken first. To do this, remove the terminal from the battery for a while, and then put it back in and secure it. Perhaps the fuel pump will start working again.
Checking the power supply at the fuel pump terminals
Well, if this does not happen, continue to look for the problem. Here you should tinker and try to get to the pump itself, and use a tester or test lamp to check whether there is power at its terminals. One end of the tester wire is installed on the car body - this will be “ground”, and the other - on the fuel terminal connector pump If there is voltage, then, unfortunately, it is impossible to avoid replacing the electric motor, and if there is no voltage, the troubleshooting should be continued, already in the electrical circuit of the car.
The fuel pump screen is clogged
Not severe contamination of the filter mesh. It can be worse! In this case, the engine starts, but does not develop full power.
Troubleshooting in an electrical circuit
The electric motor of the fuel pump rarely fails during normal operation. Burning of contacts on the fuel pump The main reason for this malfunction is the inexperience of the driver who does not monitor the fuel level in the gas tank, that is, when the fuel is almost completely finished. Gasoline pumps extremely do not like to work in the absence of fuel.
Fuses and relays
So, having made sure that the electric motor of the fuel pump itself is fully operational, the second thing you need to do is check the fuse and relay responsible for turning on the fuel pump. Location of the fuse and fuel pump relay Unfortunately, getting to them is not so easy: you will have to remove the plastic upholstery, which is located under the glove compartment front panel. Having dismantled it, you can find the relay block and the fuse itself in the depths. You can replace the faulty relay with an adjacent one. It is the same. You also need to carry spare relays and fuses with you; they will be very useful on the road. After checking the fuse, you can bend its legs. Sometimes the contacts in the mounting block can become loose. The relay is checked only by replacing it with a known good one. If this does not help, then you should pay attention to the relay that is part of the alarm system. After all, when the alarm is turned on, it is impossible to start the engine by blocking the power supply circuit of the fuel pump . As you can see, troubleshooting, as well as replacing the fuel pump on a Niva Chevrolet car, is not such a difficult undertaking; if necessary, this can be done even on the road.
Removal and installation of the electric fuel pump of the VAZ-21214 car
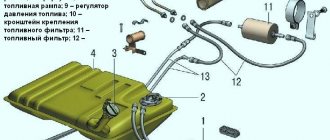
The fuel module is usually removed to replace the fuel coarse filter, repair or replace the fuel level sensor, or to replace the electric fuel pump. The fuel module of the Niva car is submersible and is located in the fuel tank. Before removing the fuel module, you need to make sure that the fuel level in the tank is half or less level .To remove the fuel module, you need to remove the rear seat, to do this: Using a 13 socket, unscrew the four bolts securing the rear seat hinges to the body. Having released the seat back locks, lift the seat and remove it into the tailgate opening. The hatch in the fuel tank compartment lid does not allow removal fuel module, so it is necessary to remove the fuel tank compartment cover. Bend the trunk lining forward. Using the “7” head, unscrew two screws securing the fuel tank compartment cover on the right and left (they simultaneously press the side panel trims) Using the “7” head, unscrew the five screws on the front edge of the cover and three along the back. Sliding forward, remove the fuel tank compartment cover. Disconnect the electric fuel pump connector. Mark the electric fuel pump tubes and fuel drain hoses with paint. Holding the hose fitting with a 17 wrench, unscrew the nut of the electric fuel pump drain tube with a wrench of the same size. The connection is sealed with a rubber ring, which we replace during assembly With a new one, similarly, we disconnect the hose from the fuel supply tube of the electric fuel pump. Using a “7” head, unscrew the eight nuts securing the electric fuel pump to the fuel tank. Lift the electric fuel pump and, turning clockwise, remove it from the tank, trying not to damage the fuel level indicator float. The connection is sealed with a rubber gasket. Install the electric fuel pump in the opposite direction ok. We connect the tubes and hoses according to the marks.
Replacing (removing) the fuel pump and fuel level sensor
The tank should be no more than half full of fuel.
We carry out the work to clean the strainer, replace the fuel level sensor, fuel pump and fuel module assembly. Relieve the fuel pressure (see here). Disconnect the negative cable from the battery.
The hatch in the fuel tank compartment lid does not allow removing the electric fuel pump...
. therefore, it is necessary to dismantle the fuel tank compartment cover. Remove the rear seat (see here). Using a “7” head, unscrew two self-tapping screws securing the fuel tank compartment cover on the right and left (they simultaneously press the side upholstery).. five self-tapping screws along the front edge of the cover. . and three on the rear. Sliding forward, remove the fuel tank compartment cover. Disconnect the electric fuel pump connector by releasing the fasteners. Mark the electric fuel pump tubes and fuel drain hoses with paint. Hold the hose fitting with a 17" wrench and unscrew the nut of the electric fuel pump drain tube with a wrench of the same size. Or (with a different design) Press the hose tip lock... and remove the drain line hose from the fuel module cover tube. In this case, you must be prepared for the fact that a small amount of fuel will flow out of the hose. First unscrew the nut at a small angle, releasing the fuel pressure. Remove the hose. The connection is sealed with a rubber ring, which we replace with a new one during assembly. Similarly, disconnect the hose from the fuel supply tube of the electric fuel pump. Using the “7” head, unscrew the eight nuts securing the electric fuel pump to the fuel tank. Lift the electric fuel pump and, turning clockwise... remove it from the tank, trying not to damage the fuel level indicator float. The connection is sealed with a rubber gasket. Remove the centering plastic ring. The fuel module is in Assembly: Install the electric fuel pump (module) in the reverse order. We connect the tubes and hoses according to the marks. To replace the pump itself, the pump strainer or the fuel sensor, we disassemble the fuel module
How to remove an electric fuel pump with a fuel level sensor VAZ 2121 Niva 2131
The electric fuel pump and fuel level sensor on the VAZ 2121 and Niva 2131 are removed for repair or replacement in case of failure or when performing other work in which its presence will interfere with the progress of their work. Prepare a standard set of tools and perform the following sequence of actions:
- De-energize the vehicle by disconnecting the negative terminal from the battery.
Fuel filter on Niva Chevrolet - where is it installed and which one to choose?
The fuel filter on a Chevrolet Niva differs in size depending on engine size. Also, its location depends on the year of manufacture. The supplier of original spare parts for the conveyor is General Motors. Like most modern cars, in addition to the main one, the Chevrolet Niva also has a fuel pump filter (mesh filter).
Where is the fuel filter located in a Chevrolet Niva
The fuel filter on all Niva Chevrolet trim levels is located separately from the pump. On pre-restyling and restyling modifications, the installation method is different.
Until 2006, the fuel filter on a car was located under the hood, in the engine compartment, on the passenger side.
After 2006, the fuel filter on the car was moved under the bottom of the car. Located near the rear right wheel, covered with a plastic casing. To change it, it is better to use an inspection hole.
Fuel filter for Niva Chevrolet - features of choice
The fuel filter on all Niva Chevrolet trim levels is located separately from the pump, and is removed from the fuel tank. The car can be equipped with one of two gasoline engines, differing in displacement: 1.7 liters (VAZ-2123) and 1.8 liters (manufactured by Opel). Depending on this, the manufacturer installs different fuel filters.
Article number Engine capacity Tube diameter, mm Height, mm Housing diameter, mm
| GM 90353562 | 1.7 | 8 | 163 | 56 |
| GM 25121074 | 1.8 | 8 | 160 | 55 |
Since both filters differ little in size, and are attached to all shnivy using a clamp, they can be interchangeable. Similar filters can be found under other article numbers - Lada 21230111701082, Opel 0818568 (for Corsa B, Omega B, Vectra B), Peugeot 156788 (for BOXER), VAG 6X0201511B (for BA3, Golf, Polo).
When replacing a fuel filter on a VAZ 21236, substitutes are most often chosen. The following are the most popular models. All engines have common analogues.
ManufacturerArticlePrice, rub.
| MAHLE | KL 83 | 540 |
| MANN | WK 512 | 420 |
| SCT | ST 342 | 150 |
| BOSCH | 0450905969 | 350 |
BOSCH 0450905969
MAHLE KL 83
MANN WK 512
The fuel pump filter (coarse fuel mesh) differs in shape depending on the year of installation. Before 2006, it had the article number 21121139200 or 21101139200, after 2006 - 21101113920000 or 11181139200. According to driver reviews, they can be freely interchanged. A more convenient form is the filter mesh installed after 2006. Regardless of the year of manufacture of the car, it is installed on the fuel pump, which is located in the tank.
Which fuel filter is best for Niva Chevrolet
According to reviews from Chevrolet Niva owners, the best fuel filter is MANN (WK 512). It is not cheap, but it is capable of operating for more than 20 thousand km without any complaints. The most important thing is to replace it on time.
Also a worthy option is the MAHLE filter (KL 83), it has a larger filter element, which is why it often sells for more, but at the same time the resource is slightly shorter, more than 15 thousand km.
When to change the fuel filter on a Chevrolet Niva
The manufacturer recommends replacing the fuel filter on the Chevrolet Niva every 30 thousand km. According to the experience of many drivers, this should be done 2 times more often - every 15 thousand km. The fuel pump filter at each service station can simply be washed with carburetor cleaner.
You can tell when it’s time to replace the filter by the following signs:
- Engine thrust decreases when climbing a mountain.
- Fuel consumption increases significantly.
- The engine begins to operate unstably (intermittently) at high speeds.
- The engine does not start on the first try.
Interchangeability of electric fuel pumps
Until 2006. Since only one pump was installed on the conveyor, interchangeability is possible with other manufacturers who claim interchangeability. For example, Pekar produces pump 2123-1139009-20, claiming it as an analogue to the original one from Utes.
After 2006. This period can also be divided into several stages, using the FLS used as a basis.
K3. Pumps 00, 01, 02. As indicated in the catalogs, these three EBNs are interchangeable.
K3-01. Pump 10 can be used instead of pumps from group “K3”. In the opposite direction - GM-Avtovaz does not advise.
21236. Well, the last group, which includes pumps 15 and 16, are interchangeable with each other, and also interchangeable with 10. They can be used instead of pumps from the “K3” group, but GM-Avtovaz also does not recommend doing the opposite.
Chevrolet Niva fuel pump fuse
The operation of a Chevrolet Niva car engine is impossible without a fuel pump. If one day the car simply does not start, then do not rush to get upset, perhaps the breakdown is minor and it takes five minutes to fix it. The main thing is to determine the cause and try to eliminate it. The reasons for the failure of the fuel pump will be discussed in this article.
If earlier Niva cars were produced with carburetor engines, then the modern Shniva is equipped with a fuel injection system. This means that fuel is supplied from the tank to the injector via a fuel pump, which operates on a 12V DC voltage. On carburetor engines, fuel pumps operate through mechanical action. But since the Chevrolet Niva is equipped only with an electrical device, then we will talk about it accordingly.
Location of the fuel pump in Shniva
So, the function of supplying fuel from the gas tank to the injection system is determined using an electric fuel pump. It sucks fuel from the tank and delivers it through a supply system consisting of tubes to the intake manifold of the injection system. If you imagine for a second that the download device is not working. In this case, the driver simply will not be able to start the engine, because the fuel pump initially starts and pumps fuel to the injector, and if it does not work, then it is impossible to start the engine.
The fuel pump is powered by electricity and therefore the electronic system of the car is responsible for its operation. When the ignition key is turned to the ignition on position, a signal in the form of electrical voltage is sent to the fuel pump, which is controlled by the on-board computer.
There is an electric motor inside the pump, which begins to rotate and create pressure in the system. After this, the ignition key is turned to the engine start position, after which it starts.
But if the driver does not turn the key to the “start” position, then after two seconds the gas pump stops pumping fuel so as not to create critical pressure in the system.
What is included in the fuel pump power system?
Two wires “+” and “ground” are connected to the device itself, which provide the actual 12V power supply. But before this power is supplied, the following parts are installed in front of the pump to ensure its correct functioning. These details include:
- relay;
- on-board computer consisting of a board with controllers;
- fuse.
The relay itself is designed for switching large currents. That is, the fuel pump consumes a lot of current, especially during startup, and the wiring and electronics cannot withstand such currents and will instantly burn out. The relay is triggered by a pulse of small currents within itself and closes more powerful contacts. As a result, the device starts up. Judging from this, we can conclude that a malfunction of the relay will lead to disruption and inoperability of the fuel supply system in the Chevrolet Niva.
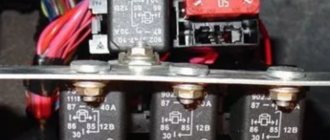
The pump power relay in the Chevrolet Niva is located inside the car under the glove compartment. There are four types of relays located there, responsible for different circuit closure nodes. The relay of our device is the third in a row. Nearby there are fuses, which will be discussed further. Replacing the relay is quite simple: unscrew the mount and pull out the relay, after which a new one is installed in its place.
The functionality of the relay is checked by operating the pump.
Fuse and its role in electrical circuits
Actually, we smoothly approached our main topic of the article - “fuel supply circuit fuse”. It is designed to protect the electrical circuit of the pump. The main function is protection, which consists of breaking the circuit when large currents, surges or thermal overloads occur.
All these phenomena can occur unpredictably, since a failed relay can supply a large current through the wiring or to the controller, which will disable them. And repairing an on-board computer is very expensive, so the only way out is to try to get rid of such unpredictable situations through constant monitoring.
The main parts and components that may be damaged if the fuse fails:
- On-board computer;
- Directly the electrical power supply circuit of the pump, consisting of wiring;
- Fuel supply device;
As you can see, it plays a very important role in the car and is an important element responsible for the proper operation of the electric fuel pump.
What does the fuse consist of?
Each car model uses different types of fuses, but the Chevrolet Niva has the types shown in the photo.
Contact thread
Its design is very simple, consisting only of two aluminum contacts and a special plastic shell that does not catch fire or smoke when melted. If high temperatures act on the plastic of the fuse, it simply melts. There is a chamber inside it, and in it there is a connecting contact thread, which performs that very protective function. The contact thread is made of aluminum, and its thickness depends on the current for which the fuse is designed. It is marked “15A”, which means it can withstand currents of constant amplitude up to 15A.
Replacing the Chevrolet Niva fuel filter
Thanks to the general knowledge of the design, replacing the Chevrolet Niva fuel filter with your own hands can be done even by a novice car enthusiast. Let's consider both the procedure for replacing the fine fuel filter on 1.7 and 1.8 liter engines, and installing a new fuel pump mesh.
Choosing a fuel filter for a Chevrolet Niva
The fine fuel filter on the Chevrolet Niva is unified with many other GM models (Lacetti, Matiz, Nubira). Among the manufacturers with the best reputation are:
- Bosch,
- Knecht (KL83),
- Mahle Original,
- Mann-Filter (WK512).
How often should I replace it?
It is recommended to change the fine filter every 45 thousand km (in some sources - 30,000 km) or once every 3 years. Replacing the fuel pump mesh is not regulated, so it is done in case of clogging or for preventive purposes every 100 thousand km.
Clogged filter elements lead to a decrease in filter capacity, which can cause you to experience the following problems:
- “sluggish” engine responses to pressing the accelerator pedal;
- difficult starting the engine;
- dips when pressing the gas pedal hard at low speeds. In particularly advanced cases, the engine begins to slow down and may even stall.
Power system design
Until 2006, a fine filter was installed in the engine compartment near the engine shield.
But on most Chevrolet Niva the TF is located near the tank under the bottom. In the absence of an inspection hole, from which it is most convenient to carry out work, the rear part must be fixed on stops in a raised state. The coarse fuel filtration mesh is an integral part of the fuel module and is located in the tank.
When purchasing, be careful, as there are 2 types of design: “rectangle with a cut side” and “sector of a circle” (installed on cars until 2006). For TF of this shape, there is a special molding at the bottom of the glass, so installing a rectangular filter element is undesirable.
The check valve in the fuel module prevents gasoline from draining into the tank after the engine is stopped, so a certain gasoline pressure is always maintained in the system. Before starting replacement, the pressure must be relieved. To do this, you need to start the engine, and then remove the fuel pump fuse. After working for some more time at the residual pressure, the engine will stall.
- Using a 10mm socket, unscrew the plastic TF protection.
- Disconnect the fuel inlet and outlet hoses (there will be 2 clips on the sides of the snap connections that need to be pressed into the connector when removed). Despite the lack of pressure in the line, some gasoline will flow out of the hoses.
- Loosen the nut of the metal clamp tightening the bolt (if the nut is stuck, the bolt will most likely turn while turning, so in addition to a 10mm socket, you will also need a 10mm spanner).
- Remove the old fuel pump from the clamp and pour the remaining gasoline in it into a container prepared in advance.
- Install a new filter. Remember that the arrow on the filter housing indicates the direction of fuel flow. All that remains is to install the hoses until the connectors click and assemble the remaining elements in the reverse order of removal.
After replacing the fuel filter on your Chevrolet Niva yourself, turn on the ignition several times for 5-8 seconds so that the fuel pump fills the system with fuel before starting the engine for the first time.
Replacing the fuel pump mesh
Let's look at how to change the coarse filter yourself.
- Raise the right rear seat cushion.
- Unscrew the two screws securing the service hole plug.
- Disconnect the power connector.
- Clean the top cover and the contact areas of the thrust plate as thoroughly as possible from dirt and dust.
- Disconnect the clamps and remove the fuel hoses.
- Unscrew the 8 x 10 bolts and remove the metal plate holding the fuel module housing.
- When removing the module, try not only to drain the gasoline from the glass as carefully as possible, but also not to damage the FLS float.
- Assess the condition of the rubber gasket. A seal in satisfactory condition can be turned over during installation. If necessary, replace the gasket with a new one so that there is no depressurization of the tank in this place.
- To begin disassembling the fuel module, disconnect the power supply chips.
- Pull the fuel return pipe out of the groove.
- Unclip the 4 plastic latches around the perimeter of the glass, then detach the glass from the top lid.
The fuel pump mesh sits tightly on the mounting fitting. There is another type of fuel module on the Chevrolet Niva. To replace the TF, just unfasten the glass. When installing a new filter element, the fuel pump must be held by hand.
How often should I replace it?
It is recommended to change the fine filter every 45 thousand km (in some sources - 30,000 km) or once every 3 years. Replacing the fuel pump mesh is not regulated, so it is done in case of clogging or for preventive purposes every 100 thousand km.
Clogged filter elements lead to a decrease in filter capacity, which can cause you to experience the following problems:
- “sluggish” engine responses to pressing the accelerator pedal;
- difficult starting the engine;
- dips when pressing the gas pedal hard at low speeds. In particularly advanced cases, the engine begins to slow down and may even stall.
Power system design
Until 2006, a fine filter was installed in the engine compartment near the engine shield.
But on most Chevrolet Niva the TF is located near the tank under the bottom. In the absence of an inspection hole, from which it is most convenient to carry out work, the rear part must be fixed on stops in a raised state. The coarse fuel filtration mesh is an integral part of the fuel module and is located in the tank.
When purchasing, be careful, as there are 2 types of design: “rectangle with a cut side” and “sector of a circle” (installed on cars until 2006). For TF of this shape, there is a special molding at the bottom of the glass, so installing a rectangular filter element is undesirable.
The check valve in the fuel module prevents gasoline from draining into the tank after the engine is stopped, so a certain gasoline pressure is always maintained in the system. Before starting replacement, the pressure must be relieved. To do this, you need to start the engine, and then remove the fuel pump fuse. After working for some more time at the residual pressure, the engine will stall.