Repairing the rear beam of a VAZ 2109
The rear beam of the VAZ 2109 is an unreliable thing, and the owners of this car may have a large number of reasons to remove it. For example, the owner of a vehicle may hear unusual noises: grinding metal, quiet impacts, etc. These “special effects” will be heard in the rear of the VAZ 2109. The sound can be either constant or occur occasionally, for example, when there are bumps on the road.
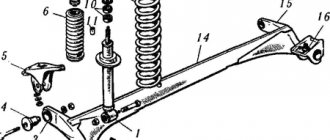
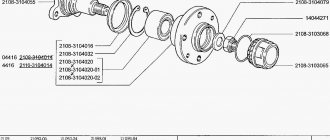
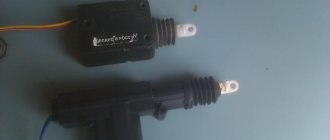
1 — rubber-metal hinge; 2 — rear suspension arm mounting bracket; 3 — shock absorber casing; 4 — compression stroke buffer; 5 — casing cover; 6 — support washer; 7 — shock absorber cushions; 8 — spacer sleeve; 9 — shock absorber; 10 - insulating gasket; 11 — rear suspension spring; 12 — lever connector; 13 — rear suspension beam arm; 14 — shock absorber mounting bracket; 15 - flange; 16 — lever bushing
It is very difficult for a person who does not have the necessary experience to determine on their own what caused new noises in a car. This is due not only to a lack of practice, but also to the large number of variants of the problem.
So, for example, a knocking stabilizer can “move” the silent block to the side, the noise can often be caused by bearings on the axle shafts - in general, there are many options. Therefore, to find out the exact problem, it is recommended to go to a service center and carry out the repair yourself.
Installation and dismantling of beams
The VAZ 2109 beam is very convenient to install and dismantle when using a lift. But if your garage is not equipped with such an addition, then carefully lift the “back” of your swallow with a jack. For greater reliability, place special shoes or at least bricks under the wheels and engage the gear.
Once the vehicle is raised, the wheels can be unscrewed. Then remove the shock absorbers from the rear suspension. The parking brake cables are disconnected and the “shirts” are removed. The brackets securing the cables to the vehicle body are bent, and the cables themselves are removed from the brackets.
When dismantling the brake hoses located on both sides of the beam, be sure to plug the resulting holes with something. Otherwise, brake fluid will leak.
Unscrew the nut on both sides that serves to secure the beam to the brackets. Carefully knock out the bolts. Now you can pull out the beam. Some useful tips:
- Before you begin work on removing the beam, loosen the tension on the nuts on the hub in advance.
- If you need to replace a rubber-metal hinge, it is better to contact a specialist for this. Without a special tool and skills for such work, something good is unlikely to come of it.
- If you look at the documentation of the VAZ2109, which is given by the manufacturer, then you need to remove the rear beam from the car along with the brackets. For this manipulation you need to unscrew the 3 nuts holding the structure. But the operating time of the vehicle makes its own adjustments. After a certain period of time, the studs begin to become corroded, and in some cases they may crack. It is because of this that it is more expedient to dismantle the beam by simply disconnecting it from the bracket and leaving it suspended.
- The rear beam of the VAZ 2109 is fastened in the reverse order of removal.
- After returning the vehicle to a solid surface, all nuts must be tightened. The tightening procedure should be repeated after 80 km.
- After installing the beam, it is important to bleed the brake system, adjust the parking brake, and check the wheel alignment.
As you can see, removing and installing the rear beam of a VAZ 2109 is not at all difficult; all car owners can do this work. The main thing is time and desire.
Useful tips
- Before disassembling the beam, you need to loosen the tension of the hub nuts and other connections that are tightened with a large torque.
- It is recommended to change rubber-metal hinges in a specialized workshop - this requires special tools, as well as experience in such work.
- The instruction manual states that the beams must be dismantled together with the brackets by unscrewing the three nuts holding them in place. But due to long-term use of the machine, the studs can rust and therefore easily crack. For this reason, it is recommended to remove the beam by disconnecting it from the brackets - it is better to let them remain on the body.
The beam is installed in place in the reverse order; there are no pitfalls here. After the car is already on the ground, you need to tighten all the nuts. It is also necessary to check everything after 80-100 km. After installing the beam in place, the brake system must be bled, the parking brake must be adjusted, and, if necessary, the camber and toe must be adjusted.
Replacing rear beam silent blocks on a VAZ 2109
Silent blocks produced by AvtoVAZ can safely be called one of the highest quality parts. It is not surprising that other foreign manufacturers also use them for their cars.
Element appearance
The durability of almost any part, including the silent block, directly depends on the driving style of the motorist. The service life of the element is more than 30 thousand kilometers.
Features of elements
The main function of silents is to eliminate vibrations and deformations that occur during vehicle operation.
When choosing new silent blocks for the rear beam of a VAZ 2109, pay attention to the markings. It should be 2109-2914054. For VAZ 2114-15 models, the markings are different, but the elements themselves are very similar.
In principle, it is possible to install a silent block from a dozen on a VAZ 2109, but you will have to work hard with pressing in the rubber bushing due to the difference in size. The reverse procedure is not possible.
Problem areas of the body of VAZ 2108, 2109, 21099 cars
When purchasing a used car (for example, VAZ 2108, 2109, 21099), you should first of all pay attention to the condition of its body and body covering.
This is not surprising, since the body is the most expensive component of the car. Let's consider the most problematic areas of the bodies of VAZ 2108, 21081, 21083, 2109, 21091, 21093, 21099 cars. The term “problematic” means the most susceptible to corrosion and destruction. This information may also be useful for self-body repair of VAZ 2108, 2109, 21099 cars. In the first positions we will place problem areas that require immediate repair, since operating a car with such damage can lead to a sad outcome. Toward the end of the list are problems that are mainly cosmetic and functional.
List of main weak points of VAZ 2108, 2109, 21099 car bodies and their modifications
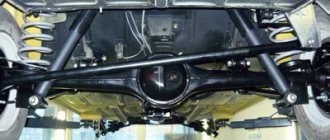
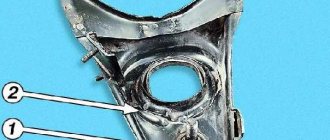
— Places for attaching the rear beam to the car body
The rear beam of VAZ 2108, 2109, 21099 cars is attached with its levers through rubber-metal hinges to triangular brackets on the right and left sides of the body. The brackets, in turn, sit on studs and are secured with nuts (three studs and three nuts per bracket). The studs are welded to a special thicker metal reinforcement located inside the rear of the sill.
Over time, a corrosion center appears around the brackets (possibly due to a violation of the protective layer of the threshold, untimely treatment of its internal cavity with a protective composition, or vibration loading of this part of the body). First, corrosion eats away the metal of the threshold around the bracket, then it is taken over by the amplifier. After some time, the attachment of the beam to the body is simply torn out, and the car becomes uncontrollable. It is very important to repair this connection at an early stage of destruction (before the amplifier inside the threshold is destroyed).
In this case, the metal of the threshold under the brackets can be replaced with a thicker one. In severely advanced cases (for example, when a beam has already been torn out), repair is also possible, but it is more labor-intensive, since it requires the restoration of destroyed elements in compliance with geometric parameters (otherwise the car may pull to the side and the rubber of the rear wheels may be eaten away). For more information about the repair of the rear beam fastenings, see “Repair of the rear beam fastening points to the body on VAZ 2108, 2109, 21099 vehicles.”
— Places for attaching the front suspension brace brackets (“crabs”) to the car body
A similar situation occurs when corrosion forms in the area where the “crabs” are attached to the lower part of the radiator frame. In the places where the brackets are attached, the radiator frame also has reinforcements made of thicker metal. Basically, the destruction begins around them. Repair inserts for brackets are available for sale, which need to be welded in place of the damaged ones. Repairs must be carried out in compliance with all geometric dimensions, since otherwise the alignment of the wheel angles is disrupted, which cannot be adjusted in the future. See “Repair of places where the front suspension extension brackets are attached to the body of VAZ 2108, 2109, 21099”.
— Glasses of front suspension struts
Dirt accumulating in the front wheel arches eventually leads to the destruction of the engine mudguards and, accordingly, the front strut cups. The constant vibration load of the places where the upper part of the struts (support bearings) are attached to the body causes cracks to appear near their studs and nuts. The repair part is commercially available, but replacing it is labor-intensive. As a preventative measure, it is recommended to periodically renew the protective coating of wheel arches and use plastic wheel arch liners. Rear suspension strut cups (rear wheel arches)
The same situation occurs with the rear suspension strut cups. Rust here usually begins to appear from the side of the wheel arches, behind the pillars. If the rack glasses themselves have not collapsed, then everything can only be done by replacing the rotten areas with fresh metal, which is not so difficult. Recommendations for prevention are the same: protective coating of wheel arches, filling hidden cavities with special compounds and using fender liners.
— Thresholds
Destruction of thresholds is the most common problem with the bodies of VAZ 2108, 2109, 21099 cars. Operating a car with rotten thresholds is generally possible, but the rigidity of the body decreases sharply in direct proportion to the degree of destruction. Rust especially progresses under plastic decorative door sills. Replacing thresholds in most cases is impossible without restoring the floor elements to which the thresholds are attached. The threshold of VAZ 2108, 2109, 21099 cars consists of four elements (two amplifiers, a lower part and an external lining). Replacement is carried out either as a whole or those elements that are most corroded.
To prevent destruction and prolong the life of car sills, it is recommended not to use decorative trims or carry out additional processing under them, periodically treat hidden cavities and external elements with special compounds, and clean the drainage holes in the lower edge of the sills. For more information about replacing thresholds, see “Replacing thresholds on a VAZ 2108 car.”
— Trunk door (rear door) VAZ 2108, 2109, trunk lid on VAZ 21099
Constantly flying dirt settles on the car's tailgate and causes corrosion of its lower edge, which eventually leads to destruction. In principle, repairing this part is possible, but the price is comparable to replacing the door with a new or used one, but in good condition. As a preventative measure, it is recommended to install a spoiler on the rear upper part of the body above the tailgate. Door contamination will be greatly reduced.
Symptoms of a problem
There are several main signs of failure of the rear beam silent blocks, including:
- Unstable behavior of the car on the roads;
- Tires wear unevenly, which is not difficult to notice from the tread pattern;
- When driving on a bad road (that is, 95% of all our roads), unpleasant squeaks and impacts on the car body are observed.
These signs are indirect, since they may be associated with other failures of the vehicle’s chassis. For example, dull knocks are also a sign of a faulty rear pillar. Therefore, in order to make sure that there is a particular problem, you will need to fully diagnose the chassis.
Malfunctions
Often, replacing the rear beam bushings is due to the fact that defects arise in the design of the element. They are like this:
- The elasticity of the rubber element deteriorates;
- The rubber breaks;
- The central bushing is displaced;
- Rotations occur in the seat.
If problems are detected with the silent block of the rear beam, you will need to drive the car into the garage in the near future and replace the damaged components. Unlike foreign cars, changing the silent seal on a VAZ 2109 is quite simple and without outside help. Plus it costs almost pennies.
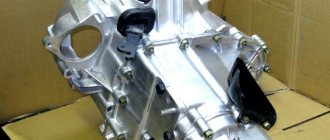
Replacing the rear right side member 2109
The condition of the rear spar is determined by external inspection; if the body element has traces of severe corrosion and is thoroughly rotten, it must be replaced; in many cases its repair is impractical. Even before performing work, it is necessary to inspect the car body itself; often the iron on the 2109 rots to such an extent that there is practically nothing to weld to.
To carry out repair work you will need:
- welding machine;
- electric drill with drills;
- screwdrivers;
- a set of keys;
- hammer;
- core;
- chisel;
- cleaning wheels.
You must first buy the floor spar itself (LP), the average retail price of the body element in auto stores is from 1800 to 2500 rubles, catalog number is 2108-5101372. This spare part is suitable for model 2108-09-13-14, with minimal modifications it can be installed on VAZ cars 21099 and 2115. Since when replacing a spar you basically have to work under the car, you need to think about how to make it easy to get to below. There are several options here:
- use a car lift;
- carry out work in the inspection pit, hanging the rear part of the body on “goats” or other stands;
- turn the car over on its side, using a reliable support.
Choice
Before you start replacing the silent blocks of the rear beam, you need to decide what exactly you will replace the old, worn bushings with.
We figured out the markings and realized that for the VAZ 2109 you need to take only those that are suitable in size and diameter for the rear beam of the nine.
Today, for the VAZ 2109 they offer two types of silents, differing in the material of manufacture.
Silent block type
Peculiarities
They are not as durable, but provide greater softness when operating the car's suspension.
A more rigid modification, in which the increased rigidity is the main disadvantage. At the same time, these products are more resistant to temperature changes, do not deform so quickly, and remain operational longer.
Size difference
Replacement
To replace you will need:
- New rear silent blocks;
- A small wooden beam;
- A device for pressing in a silent block (you can do the job without it);
- Open-end wrenches;
- Socket wrenches;
- Spanners;
- Hammer.
Dismantling work
When everything is ready, you can start working.
- Place the car on a level surface in the garage above a pit or overpass. Be sure to place wheel chocks and shoes under the wheels. All for your safety.
- It is better to remove the rear wheel to make it easier to work.
- But it is not at all necessary to remove the rear beam. Just complicate your work with unnecessary dismantling processes.
- On the left side of the driver is the pressure regulator rod for the rear brakes. It will disturb you while you work, so we advise you to remove it. This is done by removing the locking bracket of the rod and the handbrake cable. You will remove the latter from the right side from the mount.
- Unscrew the nut from the bolt with a 12mm wrench that holds the rear beam to the bracket. This may cause problems. Place a socket wrench on the driver to increase leverage on the fastener. Remove the bolt, lift the car with a jack and move the beam down. It will come out of the eyelet this way. Do not overdo it to avoid damaging the nearby brake hose. If you press too hard on the pry bar while moving the eye, you risk breaking the hose.
- Take a pre-prepared wooden block and insert it between the body and the beam. This must be done so that the beam is below the eye.
- Using a hammer and a drift (regular metal tubing will do), knock out the old worn bushings. By the way, if you come across such a concept as “fungi”, don’t worry. This is what car enthusiasts often call these bushings because of their external similarity.
- Clean the seat from accumulated dirt and rust. Be sure to lubricate the areas with soapy water. Without it, it will be difficult to press in new silent blocks. Or use a simple dish detergent. Under no circumstances should you lubricate the seats with grease or oil, as these substances will soon begin to corrode the element.
- Now it presses in new elements. Ideally, you should have a special pressing tool. If you don't have one, use a regular hammer.
- Take out a wooden block.
- Armed with a second jack, lift the beam and insert the mounting bolt into place and tighten it with a nut.
- Reinstall the rear wheel and lower the car to the ground.
Lada 21099 › Logbook › Replacing the rear beam
Salute, people! How are you?
I put it off for a long time, but finally decided to do it! I decided to change the beam at a self-service station, because everything I need is there, i.e. lift, press, vice, some tools, assistants.
I drove the car onto a lift, removed the wheels, drums, their guts, threw off the cables, etc. In general, the most unpleasant thing is the brake pipes and hoses. Firstly, ideally it’s better to stock up on new ones, because it’s scary to break them, and secondly, the fluid leaks, and then bleed the brakes.
I didn’t remove the sorcerer, I just took off the lever. Before replacing, I watched on YouTube how to do everything, so I didn’t remove the muffler either.
In general, in principle, I removed the beam quickly, but I didn’t buy the bolts that hold the beam. And they soured tightly in the silent blocks. I had to force my friends to bring the bolts and nuts and the brackets themselves.
By the way, what's wrong with my old beam? Here's what:
Before installing the new flat beam, I pressed in new silent blocks (2110) and screwed spacers under the racks. Don't ask why. I want higher and that’s it. I chose the best hubs out of four.
Before installation, I treated all threaded connections, as well as silent block bolts, with lithol. It definitely won't be redundant. Well, there's bleeding the brakes, etc.
By the way, my ass has become noticeably taller. I screwed the posts into the middle holes of the spacers. I will definitely raise the face.
Well, in conclusion: I recommend, but do not advertise, the self-service station on 2nd Kamyshenskaya. Located on the territory of Elektromash.
Replacing rear beam silent blocks on a VAZ 2109
For VAZ-2109 owners at the 100,000 km mark.
mileage, special attention must be paid to the rear suspension. Usually, by this moment one of the elements of its design, the silent block, becomes unusable, although when the car is used on bad roads, wear accelerates significantly. The need for replacement is determined very simply: when it is worn out, you will hear characteristic creaks and knocking sounds on the right or left behind. In more severe cases, increased (and uneven) tire wear may occur, coupled with unstable behavior of the rear of the car in corners. Fortunately, domestic cars are extremely repairable even in spartan conditions, so you can easily replace a damaged part in your garage. How to change silent blocks on a VAZ 2109, read below.
Tools and materials:
What you will need:
- wheel wrench:
- new silent block (article 2108-2914054)
- 2 spanners for 19;
- hammer and drift;
- 2 jacks;
- a small piece of wood of a certain size.
Silent blocks come in two types: rubber and polyurethane. According to the standard, “Samara” is placed first. They are quite soft and have a reasonable price, although they are not very durable. The latter last longer, withstand temperature fluctuations better, but are also noticeably tougher (and even significantly more expensive).
If we talk about manufacturers, there are a lot of them - from VAZ, which is well known, to SS20 and SEVI, which are unfamiliar to a wide range of car enthusiasts. So there is a choice, and it’s up to you to decide what to install – original or non-original, polyurethane or rubber.
Replacing the silent blocks of the rear beam of a VAZ 2109
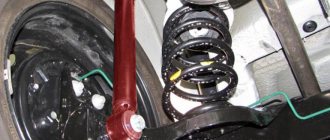
1) To begin, place the car on a jack and remove the wheel from the desired side using a wheel wrench.
2) Next, take the 19mm wrenches and unscrew the nuts on the bolts securing the bracket and rear beam.
3) Then you need to remove the mounting bracket (it will be on the left) and disconnect the pressure regulator rod in the brake system.
4) Now you can pull out the bolt itself and move the rear beam eye downwards. Keep in mind that it must be fixed in this position. The ideal option for this is a small wooden block, which should be placed in the space between the beam and the body.
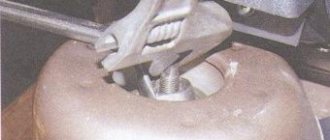
5) Arm yourself with a hammer and a drift, then knock out the old silent block.
6) Take a new part and a device for pressing it in, generously coat the seat and the silent block itself with soapy water (it will act as a lubricant) and install it.
7) Take another jack, remove the block and raise the beam to the desired level, then insert the bolt and tighten the nut, but do not tighten it. Place the mounting bracket and rod in place.
 Place the wheel and remove the car from the jack. Having opened the trunk, sit in the opening and try to rock the car up and down with a large amplitude so that the silent block fits completely into place. Now the nuts of the mounting bolts can be tightened completely.
Important nuances and points
If the nuts are very rusty, clean them with a wire brush, spray them with WD-40 and unscrew them with a wrench with a pipe on it. The long lever of force will help you move the nut, and then you can do it without the pipe.
There is no need to move the beam down particularly much - there is a risk of breaking the brake hose, which could result in its replacement, coupled with pouring in new fluid and bleeding the system due to airing.
Under no circumstances try to lubricate a new silent block with oil or grease/lithol before installation! They will quickly corrode the rubber, so the best choice is a soap solution or dishwashing detergent.
It is easy to see that there is nothing extremely complicated about replacing the silent block in the rear axle, however, this procedure is not entirely simple. So if you are doing this for the first time, it is advisable to ask a more experienced person to assist you in some stages, and then you will succeed.