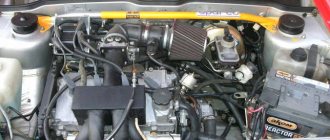
Reasons for replacing VAZ-2109 valve guides
Among the reasons that lead to replacing the valve guide element of the VAZ-2109 engine, experts cite wear of this part. It can be determined by the following characteristics:
- Engine oil entering directly into the combustion chamber (this can be judged by increased oil consumption and gray smoke from the exhaust pipe).
- Tapping from the side of the engine block head (this is the bushing and valve knocking against each other).
- Reduced car engine power.
Also, a malfunction of the guide element can be noticed visually when replacing a set of valves and during a major overhaul of the engine block head.
As soon as the car owner notices signs indicating failure of the guide elements, without wasting time, they should be replaced with new ones. This can be done either independently in a garage or with the help of qualified car service specialists.
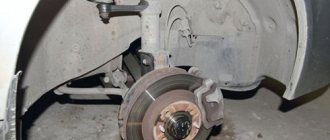
VAZ-2109 replacement of rear struts: rules and replacement process
On a VAZ-2109 car, replacing the rear struts is necessary in case of excessive wear or damage. If we compare the suspension of the “nine” with the “classic”, then it is more advanced, higher efficiency, and the design is a little simpler. Although there are still common features - the design has springs and shock absorbers.
Only on “nines” they are assembled into a single unit, and on “classics” they are installed independently of each other. Repair and maintenance of the suspension on a VAZ-2109 car can be done independently, you just need to know the general design of the car and be able to use the tool.
How to correctly replace VAZ-2109 valve guides
Of course, if you really want to replace the elements that serve to guide the movement of the engine bushing, you can do it yourself in a garage. But such a procedure can cause some difficulties. This is due to the fact that the bushing itself is pressed tightly in order to prevent the appearance of a gap through which engine oil can enter the combustion chamber.
To carry out the procedure for replacing guide elements, you will need tools (every car enthusiast usually has them in the garage):
- puller/mandrel for pressing out;
- presser;
- 8.03 mm reamer (a special long drill with which the hole is brought to the desired size).
It is also advisable to prepare the coolant. All these tools will be needed, since before replacing the guide element you will have to remove the bushings themselves.
On the VAZ-2109, the replacement procedure is carried out in the following sequence:
- The first stage is preparing the engine for removing the valve bushings from it:
- the valve cover is removed;
- the bolts that secure the block head are unscrewed (there should be ten of them);
- the cylinder head is removed;
- the camshaft is removed from it;
- the studs are unscrewed (primarily the end ones).
- The second stage, cleaning the cylinder head, should be done on a workbench using a solvent or diesel fuel.
- The third stage is pressing out or knocking out the bushings:
- the mandrel is placed on this element from the side of the combustion chamber;
- the head heats up to a temperature of 100-120 degrees;
- use a hammer to knock out each of the bushings (the blows should be relatively light);
- the areas from under the knocked-out parts are washed with gasoline using a rag or a rag made of soft material;
- After washing, the seats are blown with compressed air.
- The fourth stage is the replacement of the engine valve guides with the subsequent assembly of the entire mechanism:
- the block head heats up;
- a repair kit of new bushings is pre-cooled in a regular freezer;
- mounting holes for bushings are processed using a reamer;
- New guide elements are placed in the machined holes.
- The fifth stage is pressing, which is carried out by hammering using a mandrel.
If such a procedure causes difficulties for a car enthusiast, then it is best to contact a car service center.
Replacing valve seals on a VAZ 2109 and replacing valve seals on a VAZ 2108 is, in fact, the same work process and completely identical, since the engines on these VAZ models are the same. As a rule, blue smoke is not a good sign, the appearance of which means that engine repair is necessary. The job of valve seals, in general, is to remove excess oil that gets onto the valve stem. They remove excess oil, not all of it; the remaining small amount of oil should lubricate the valve with the bushing. You can study the operation of valve seals in more detail using special videos and photos.
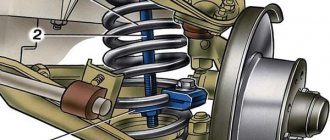
Replacing springs with your own hands
The lowering solution discussed above is expensive, so it may not be affordable for many fans of tuning VAZ 2109 cars. Most prefer to do it themselves using budget methods, for example, by trimming the springs. How many coils of spring need to be cut on a VAZ 2109? Experts recommend no more than three.
Each turn provides the suspension with additional shock absorption, and shortening it tightens the position of the body and reduces the stroke of the strut rod. Too much lowering will make the car feel every hole and bump: the strut will not have any free play until the spring is fully compressed, and both the cup and the support bearing will come under impact. Of course, over time this will negatively affect their performance.
So how many coils of the spring need to be cut on a VAZ 2109 in this case? Sometimes the ground clearance is reduced by moving the spring cup slightly down the rack
In this case, special attention should be paid to the welded joint. In addition, a problem with the stand may arise due to local overheating at the welding site
How many coils of the spring need to be cut on a VAZ 2109 in this case is also a controversial issue.
Again, there is a need to turn to specialists for help, which means additional financial costs. The simplest and most convenient option from any point of view is to replace the springs with special ones, whose coil stroke is less than that of standard ones. They are more rigid and hold the load in the same way as stock ones. How many turns of the spring need to be cut on a VAZ, this issue has already been resolved.
For example, springs on a VAZ with a progressive coil pitch provide the suspension with optimal softness and do not sit down the car when driving on uneven surfaces. The main thing is to remember that a low-slung car is designed for driving on a flat asphalt road. Therefore, when deciding how many coils of spring you need to cut on a VAZ, think about what you need the car for.
It is best to lower the car by a maximum of 30 mm, but even then there is a risk of damage to the suspension. Driving off-road, rough terrain or picnics in nature is not the element of the owners of lowered “nines”. In such cases, high ground clearance is needed, and changing the standard suspension characteristics will be unnecessary.
replacing the rear shock absorber and rear suspension spring on a VAZ 2108, VAZ 2109, VAZ 21099
WARNING Before lifting the rear of the vehicle, engage first gear and chock the front wheels of the vehicle. Raise the rear of the vehicle and place secure supports next to the jack. Supports cannot be installed under the rear suspension beam, since the rear suspension must be unloaded.
1. Remove the protective cap of the upper mounting of the rear strut in the luggage compartment, unscrew the nut of the upper mounting of the rear strut, holding the shock absorber rod from turning, and remove the support washer with the upper cushion. 2. Remove the wheel.
WARNING Loosen and tighten the rear wheel mounting bolts only on a VAZ 2108, VAZ 2109, VAZ 21099 vehicle standing on the ground. The tightening torque of the rear wheel bolts is 65-95 Nm (6.5-9.5 kgf-m).
3. Unscrew the rear shock absorber lower mounting nut and remove the bolt.
4. Lower the rear shock absorber down and remove the lower cushion with the support washer and spacer from the shock absorber rod through the spring coils.
5. Push the rear shock absorber rod down.
6. Remove the rear spring with its protective boot, cover and compression buffer.
7. Remove the rear shock absorber from the rear wheel well.
8. Remove the insulating gasket from the upper rear spring support cup (if the gasket is not left on the rear spring).
9. Remove the rear shock absorber boot from the rear suspension spring and remove the compression stroke buffer from it. 10. Check the rear shock absorber in the same way as the front suspension shock absorber.
11. Replace the defective silent block of the lower mounting of the rear shock absorber. 12. Rear shock absorber cushions that have lost their elasticity or are torn.
13. Replace the torn rear shock absorber boot. When replacing the rear shock absorber boot, remove the cover from it. 14. A damaged or destroyed compression stroke buffer also requires replacement. 15. Replace the torn or loose insulating gasket.
16. The rear spring requires replacement if cracks or deformation of the spring coils are found on the spring. Check the settlement of the rear suspension spring by compressing the spring three times until the coils touch. Then apply a load of 3188 N (325 kgf) to the rear suspension spring. The length of the rear suspension spring H under the specified load must be at least 201 mm (182 mm for VAZ 2108, VAZ 2109, VAZ 21099, exported). If the length of the rear suspension spring with yellow markings (class A) is less than 207 mm (188 mm for VAZ 2108, VAZ 2109, VAZ 21099, exported), replace the spring with a spring with green markings (class B). Compress the rear suspension spring along the axis of the spring, and the supporting surfaces must correspond to the surfaces of the shock absorber support cups and the body. On a VAZ 2108, VAZ 2109, VAZ 21099, it is recommended to replace both rear suspension springs, and the rear suspension springs must be of the same group.
17. Assemble the rear suspension strut in the reverse order of disassembly. When installing the cover onto the housing, tuck the edge of the cover onto the cover flange.
18. Install the insulating spacer on the rear suspension spring first so that the end of the spring rests against the protrusion of the spacer. Secure the spacer to the spring with electrical tape to prevent the spacer from slipping off when installing the spring.
19. Secure the rear suspension strut and place the boot with a cover on the rear strut. Pull out the shock absorber rod and install the lower cushion with the support washer and spacer onto the shock absorber.
The rear shock absorber rod can be easily pulled out by screwing a nut onto the shock absorber rod.
20. Install the rear spring on the rear strut so that the beginning of the first coil of the spring hits the stamping in the lower cup.
21. To compress the rear suspension spring when installing the rear strut, place a jack under the beam. Gradually lifting the beam with a jack and thereby compressing the spring, insert the shock absorber rod into the hole in the body arch. 22. Install the upper cushion with a washer on the rear shock absorber rod and tighten the rear strut upper mounting nut, holding the rear shock absorber rod from turning with a second wrench. 23. Having lowered the VAZ 2108, VAZ 2109, VAZ 21099 car to the ground, rock the car several times. Tighten the nut of the lower fastening of the shock absorber to the beam with a torque of 6.8-84 Nm (6.8-8.4 kgf-m), the nut of the upper fastening of the shock absorber to 51-63 Nm (5.1-6.3 kgf-m). After driving 100 km, tighten these threaded connections again to the required torque.
Procedure
Valve adjustment is carried out at an engine temperature of no more than 15 - 20 degrees. Care must be taken to ensure that the gap level is within the normal range. With a narrower gap, the valve will not completely close the hole, and thereby significantly reduce compression in the engine. And with a wide gap, the fuel will not have time to completely enter the combustion chamber, and exhaust gases, on the contrary, will exit it. This will reduce the volume of the combustion chamber, and accordingly the power.
To adjust you will need:
- Spanners;
- Screwdriver (flat and Phillips);
- Tweezers;
- Measuring probe;
- Adjusting washers;
- Device for adjusting valves;
- Set of gaskets.
When everything is prepared, you can start working. First of all, put the car on the handbrake and engage fourth (if possible, fifth is better) gear. One drive wheel needs to be placed in a position in the air.
Next, disconnect all mechanisms from the cylinder head and unscrew the spark plugs. Remove the cover and clean the cylinder head of oil. When the cylinder block is free and the cover is removed, rotate the crankshaft to a position where the piston of the first cylinder is at top dead center. This can be done by turning the drive wheel. You can monitor the position of the piston through a window located in the clutch housing.
The valves are adjusted depending on the order of their operation. On the VAZ 2109, the exhaust valves are in the order of 2, 3, 6, 7, and the exhaust valves are in the order of 1, 4, 5, 8.
Before starting work, mark with a marker every 90 degrees around the circle of the cylinder. Rotate the camshaft so that the mark on the timing belt casing and on the pulley meet. After this, continue rotating the camshaft another 2-3 teeth using a 17mm wrench. Now, check the gap size with a feeler gauge. Move the dipstick between the camshaft cams with little force.
If the gaps are larger or smaller than normal, then you need to remove the washer from this valve using tweezers. Using the special formula H = A + (B – C), calculate the required washer size and replace it.
Decoding the formula for adjusting the VAZ 2109 engine:
Sources
- https://ladaautos.ru/vaz-2109/samostoyatelnaya-zamena-napravlyayushhix-vtulok-klapanov-vaz-2109.html
- https://masteravaza.ru/dvigatel/obsluzhivanie-dvigatelya/vaz-2108-i-vaz-2109-zamena-salnikov-klapanov-308
- https://vashalada.ru/mashiny/vaz-2109/regulirovka-klapanov-vaz-2109.html
How to replace the rear suspension spring on a VAZ 2108-VAZ 21099?
Removal: We will not show you the process of replacing the spring in more detail in this article, because on our website there is already an article that is devoted to this, it is called: “Replacing the rear strut on cars of the Samara family”, you will study this article in detail, and then After studying, you will understand that in order to replace a spring on a car, you won’t need much effort; in addition to all this, the article is supplemented by a video clip on replacing the rear springs on a car.
Installation: The spring is installed in its place in the reverse order of removal, but only during installation, be sure to inspect (in the event that you are going to install the removed spring earlier) the spring itself, there should not be any signs of wear on it, otherwise replace the spring in the car with new, but before buying a new spring (If your car is already quite old), do not take a spring that is too stiff, because the body weakens over a very long time and therefore it can be more easily damaged, but a spring that is too stiff is and can do it when hitting a sharp bump.
Additional video clip: You can find more details about how to change the spring on cars in the video located below, but even more information, as we said earlier, you will find in a completely different article by clicking on the links just above.
Replacing springs VAZ 2108, 2109, 21099
All car parts have their own resource and suspension springs are no exception. Sooner or later, every driver faces the question of how to replace the springs on a car. Some people have sagged springs, some want to increase the vehicle's ground clearance and install spacers under the springs, while others need to increase the load capacity and replace regular springs with reinforced ones.
Of course, you can contact a car service, but if you have a standard set of tools, you can do everything yourself, saving quite a significant amount. The only thing is that to replace the springs of VAZ 2108, 2109, 21099 you will need a special puller, which can be purchased at almost any auto parts store.
Replacing front springs
First, you need to drive the car onto an overpass or inspection hole, put it on the parking brake, and secure the rear wheels with “shoes” or improvised means - boards, bricks or just cobblestones.
After this, you need to loosen the wheel bolts, jack up the side of the car where the work will take place and support the car with something. After this you need to remove the wheel.
First of all, you need to loosen the central nut of the VAZ shock absorber, which is located in the engine compartment. Now unscrew the nut from the steering end pin and press it out of the steering arm.
For this work, you can use a puller, or just lightly tap it with a hammer. Then disconnect the brake hose from the holder, unscrew and press out (or knock out) the stabilizer link pin and unscrew the two mounting bolts that secure the shock absorber strut to the steering knuckle.
Now you need to place a jack under the spring and unload it so that it is in its normal position. After this, you need to unscrew the three bolts securing the shock absorber strut in the engine compartment and lower the jack to remove the strut.
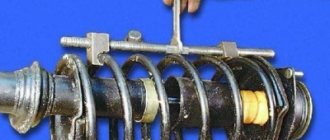
After the strut is removed, you need to tighten the spring of the VAZ 2108, 2109, 21099 with special pullers in order to be able to remove the support bearing. Then you need to remove the bearing and old spring.
In the same way, use zip ties to tighten the new spring and install it on the strut. Then install the support bearing and remove the ties. When working with couplers, you must remember that they must be installed strictly opposite each other, and when compressing and stretching the springs, unscrew them alternately, one or the other by 5-10 turns, depending on the thread pitch. After the new spring is installed, assembly is performed in the reverse order.
Replacing rear springs
The work of replacing the rear spring of VAZ 2108, 2109, 21099 can be done without a pit or overpass on a flat surface. As with replacing the front springs, you must secure the vehicle with the parking brake and chocks before replacing the rear spring.
First of all, it is necessary to remove the wheel from the side where the spring will be replaced. After this, in the cabin you need to unscrew the shock absorber mounting nut, which is located on the wheel arch.
In this case, the VAZ shock absorber rod must be held with pliers from turning. Then remove the shock absorber pad and thrust washer. Now you need to lift the car with a jack until the upper or lower part of the spring comes out of the seat.
If the height of the jack is sufficient, you can recess the shock absorber rod and remove the spring from it from the side of the wheel arch. If the jack does not allow you to raise the VAZ car to the proper height, you will have to unscrew the shock absorber mounting bolt and remove the spring along with the shock absorber.
When installing a new spring on a VAZ 2108, 2109, 21099, you will need to put the old o-ring on it. The sealing ring has a spiral-shaped collar into which the spring should fit as tightly as possible.
To avoid problems during installation, the spring ring must be secured with electrical tape or tape. The lower part of the spring rests against the seat in the same way. After it has been installed in its seat, you need to rotate it around its axis until it is in place.
After this, you can install the shock absorber and support cushion and fix them. When installing the spring, you can compress it by lowering the car with a jack, or you can lift the spring itself by resting the jack on the beam.
Replacing springs VAZ 2108, 2109, 21099
3.7 — Ratings: 72
Replacing rear struts and springs with your own hands
The rear shock absorber struts on VAZ 2109-2108 models have to be changed less frequently than the front ones, since the load on the rear of the car is somewhat less. And as for the replacement process, it is also much simpler, and you can cope with this work without any problems. To get started, here is a list of the tools you will need for this repair:
- keys for 17 and 19
- mount
- penetrating lubricant
- knob
- ratchet
- head for 17 and 19
- a special key for unscrewing the support (to keep the strut rod from turning)
First, you need to slightly loosen the nut securing the upper support of the rear drain, which is located in the body glass - you can get there from the trunk:
At this time, you need to keep the rod from turning with a special key. Although I did all this with ordinary wrenches, it is possible to get to the nut with open-end wrenches, although it is problematic.
Then you need to break off the rear wheel bolts, jack up this part of the car and completely remove the wheel from the car. And unscrew the nut securing the lower part of the rear drain of the VAZ 2109-2108:
And remove the bolt from the reverse side. If it cannot be removed by hand, you can carefully knock it out using a wooden block and a hammer:
Now we take the pry bar and pry the stand from below to disengage it, as shown in the photo below:
Now all that remains is to unscrew the rear drain support nut from the top to the very end:
And now you can remove the stand from below with your hands:
Now you can easily remove the spring if you need to replace it:
If you need to replace the strut, you should first remove the boot and bumper:
After which you can take a new strut, install a boot, bump stop and spring on it, and put the finished rear suspension module in its place. The price of rear struts for a VAZ 2109-2108 varies from 2500 to 5000 rubles depending on the manufacturer, per set - of course! Installation is carried out in the reverse order and there should be no difficulties!
Replacement of rear struts on VAZ 2108, 2109, 21099 cars
The need to replace the rear struts on VAZ 2108, 2109, 21099 vehicles arises when the following malfunctions occur: the strut shock absorber has leaked and/or started knocking, the strut spring has broken or sagged.
In addition, the rear struts will have to be removed from the car when replacing silent blocks, rubber shock absorber cushions, gaskets, protective casing, strut compression buffer, removing the rear suspension beam, carrying out repair work on the body, etc.
Necessary tools and equipment
— Open-end wrench at “6”
— Curved socket wrench “17”
Or a special device for unscrewing the rear suspension shock absorbers of VAZ 2108, 2109, 21099 cars.
— Two spanners on “19”
— Assistant (preferably, but not required)
Preparatory work
The work of replacing the rear struts can be carried out both in a pit and on a flat area. It is advisable to replace shock absorbers and strut springs in pairs rather than individually.
— We hang and remove the rear wheels of the car
To do this, loosen the wheel bolts, jack up the car on both sides, place stands under the sills, and remove the wheels.
— We clean the lower fastenings of the struts to the rear beam from dirt
You can treat it with WD-40 and tap the fastening bolts.
The procedure for replacing rear struts on VAZ 2108, 2109, 21099 vehicles and their modifications
— Unscrew the shock absorber rod nut
We remove the rubber plug of the support cup in the trunk of the car and unscrew the nut with a curved spanner set to “17”, holding the rod from turning with an open-end wrench set to “8”.
Unscrew the shock absorber rod nut using two wrenches
Remove the nut, under it the spring and support washers, and the upper rubber cushion.
To unscrew the nut, instead of keys, you can use a special device.
Unscrew the upper shock absorber mounting nut using a special tool
— Unscrew the bolt securing the shock absorber to the beam
Using a wrench or socket set to “19”, unscrew the bolt and hold the nut with another wrench set to “19”. Remove the bolt from the mount.
Unscrew the bolt and nut of the lower shock absorber mounting
Problems may arise with unscrewing and removing the bolt, since it is constantly exposed to an aggressive environment and very often becomes very sour. If you managed to unscrew its nut, you can try to knock it out using a mandrel and a hammer. In some cases, heating the bolt with a blowtorch or gas torch helps. In especially severe cases, cut off the bolt with a grinder or a hacksaw blade.
— We remove the rack
Make sure that the upper rubber gasket of the strut spring is removed. If it is not there, then remove it from the support cup from below.
That's it, the rear pillar has been removed.
We repeat the removal procedure for the second rack.
Features of installing a rear pillar on a VAZ 2108, 2109, 21099 car
— We attach the upper rubber gasket to the spring with electrical tape or tape, for ease and accuracy of installation, install the spring on the stand
— Pull out the shock absorber rod until it stops; a spacer sleeve and a lower rubber cushion should be put on the rod
— Insert the shock absorber rod into the hole in the body cup
An assistant puts on the upper rubber cushion, support and spring washers and tightens the nut.
If there is no assistant, then first we attach the shock absorber to the beam, then, placing a stop on the beam, we slowly lower the car body with a jack, periodically checking that its rod fits into the hole. You can pre-tie a wire to the rod and thread it through the hole in the cup. By pulling it out you can direct the movement of the rod.
When installing the shock absorber, it is necessary to rotate it so that the rising part of the spring cup is directed towards the wheel.
— We secure the lower part of the shock absorber, do not tighten the nut completely
— Install the rear wheels and lower the car to the ground
— Press the rear of the car several times to self-install the suspension elements
— Tighten the rod fastening nut and the lower mounting bolt of the strut shock absorber
Notes and additions
— The rear struts of VAZ 21088, 2109, 21099 cars fail less often than the front struts. Therefore, the need to replace them arises no earlier than 100 - 120 thousand kilometers.
Twokarburators VK - More information on the topic in our VKontakte group, on Facebook Twokarburators FS and on Odnoklassniki - Twokarburators OK
More articles on the suspension of VAZ 2108, 2109, 21099 cars
— We check the shock absorbers of VAZ 2108, 2109, 21099 cars
— Shock absorber malfunctions
— Replacement of front suspension struts for VAZ 2108, 2109, 21099 cars
— Replacement of ball joints of the front suspension of VAZ 2108, 2109, 21099 cars
Replacing the rear spring on a VAZ 2108, VAZ 2109, VAZ 21099
Welcome! Rear spring - in general, if you are going to change springs, it is recommended to change both on both sides at once, because when installing a new spring, the old one remains sagging and because of this the car does not look very nice (It does not stand level), so if you have If possible, we recommend that you immediately change both rear springs on your car.
Note! In order to change the spring, you will need to stock up on tools, namely: You will need wrenches, an adjustable wrench will also come in handy, but if you don’t have one, you can use large pliers instead, you will also have to stock up on ring wrenches and tape or instead tape!
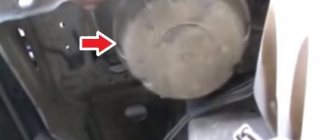
Where is the rear spring located? In order to be able to fully see it, you will have to remove the wheel from the car or simply lift the rear part of the car with a jack; after the rear part is raised, a good view of the spring itself will open (Indicated by the red arrow) and the shock absorber on which the spring itself is located.
When should you change the rear spring? It changes in case of deformation of the coils and in case of sagging, but many car enthusiasts do not always decide to replace the spring when it sag, because some people like a car with a lower suspension, but with a sagging spring the car begins to be more sensitive to bumps and the suspension itself becomes stiffer In addition, a sagging spring destroys the shock absorber, since after each collision with a bump it receives a much stronger blow, which is why such springs need to be replaced.
Replacement of Rear Springs of VAZ 2109
replacing a strut in a VAZ 2109 in stages
The front and rear pillars become unusable over time. You do not need to contact a service center to change them. The substitution function can be completely performed without the help of others.
Changing the front supports
Step 1: Select tools.
In order to replace the front supports 2109
Happened in accordance with the requirements established by the manufacturer, you need to have a set of equipment that allows you to perform these manipulations without negative consequences for the machine.
Before you begin, you will need the following tools:
- hydraulic spring
; - Screwdriver Set;
- wrench;
- tank for shock-absorbing fluid;
- bit.
Step 2: Determine the extent of damage.
effective replacement of front supports of VAZ 2109
impossible without first determining the extent of the damage. Before you can perform it, you need to determine whether intervention is necessary, since in many cases the stands can take some time.
So, replacing the front supports of a VAZ 2109
suitable if:
- the body has lost elasticity;
- there is a gap in the body;
- metal fittings peel off from the rubber shell;
- the axial movement of the vehicle bearing is observed directly in the uppermost bearing housing;
- When turning, the car begins to grab the bearing and brake;
- fat begins to seep out from under the special protective rings;
- cracks appeared in the spring;
- deformations of the spring coils are observed;
- if the total length of the spring, including the manufacturer's class A mark, is less than 20.7 cm
READ Replacement Oil Pressure Sensor Gazelle Business 4216
In some cases, only one replacement may be made: housing, car bearing or spring. But professionals advise, if you notice a malfunction, to completely replace the front supports
. This will protect your car and you from unforeseen road situations.
Step 3: Replace the 2109 front mounts.
To do the job well, you need to do it in stages.
replacement of rear springs VAZ 2108-099.
I set up the video using YouTube Video Editor()
replacement of VAZ rear struts. Do it yourself!
shown replacement back
racks in
VAZ
21099 at home.
- remove the front support and carefully clean it of dirt;
- take the ties and press the spring against them until it stops pressing on the car’s support cups;
- take a screwdriver and unscrew the nut from the upper shock absorber strut of the car;
- Now the support stop, the top support and its support should be removed;
- remove the spring and the upper cup;
- check the process of releasing the front strut from the compression stroke buffer and housing;
Replace rear posts
Step 1: Prepare for replacement
We know it Replacement rear struts 2109
requires careful preparation. Rear struts are much more difficult to change than front struts. However, you can do it yourself if you know the machines well or want to understand how to repair them.
READ Renault Starts and Stalls Reasons
To get started, prepare the necessary tools:
- stops under the wheels;
- Screwdriver Set;
- wrench;
- tank for shock-absorbing fluid;
Step 2: Which faulty rear struts should be replaced?
Before this happens Replacing the rear supports of a VAZ 2109
, it is necessary to determine which faults should be replaced with parts:
- the appearance of cracks or other deformations on the surface of the silent block;
- if the saw has lost its elasticity or is broken;
- if the compression buffer is deformed, damaged or completely destroyed;
- if the insulating gasket has lost its elasticity or broken;
- if the spring coil is deformed or the spring is covered with cracks;
- if the class A spring length is less than 20.7 cm.
Step 3: Replace the rear struts of the VAZ 2109
To replace the rear struts, follow these instructions:
- Place chocks under the car's wheels, lift the vehicle itself, then install additional supports near the jack and remove the rear struts. the car must be in first gear;
- Remove the boot and shock absorber from the spring if they are in poor condition. replace;
- the shock absorber should be thoroughly washed and then secured in a vice;
- The strut should be installed vertically, raise and lower the shock absorber all the way, repeat the procedure several times, as in the case of the front struts, if you find bumps, diving or jamming, you should replace the shock absorber with a new one;
- If necessary, replace the silent rear support block, cushion shock absorber, trunk, shock absorber, spacer and spring;
- fully extend the damper rod, unscrew the nut using a wrench, then remove the rod itself, its parts and the working cylinder;
- pour the shock-absorbing liquid into a bottle or other container, and the container should be clean;
- replace the shock absorber parts with new ones;
- Assemble the entire shock absorber, after assembling the compression valve, check the movement of the discs and valve plates, it should be absolutely free.
READ Replacement Rear Struts Passat B3 Sedan
Now you can make sure the shelves are replaced 2109
quite a capable ordinary car owner. However, if you are afraid to risk your car, contact a specialized center where you will find qualified assistance at an affordable price.
Causes of rear strut failure
There may be several reasons why the rear shock absorber strut is not functioning properly:
- It is possible that the rear wheel wears out the plastic locker that protects the strut while driving. This leads to the fact that over time the wheel “makes its way” to the rack.
- If the strut breaks off along the lower silent block, then most likely the bolt that holds it was not tightened under load.
Note: therefore, when replacing the rack, you need to pay attention to this bolt if you do not want to carry out repair work again soon.
How to understand that the rear pillar needs repair
Signals that repairs need to be done can be different:
- The silent block has changed slightly. Perhaps there are cracks or other types of flaws on it.
- The boot and rubber gasket have become limp and less elastic.
Note: if they haven't broken yet, they definitely will soon. Therefore, it is advisable to replace them in a timely manner.
- The compression buffer is deformed or damaged. Because everything in the system works under high pressure, and the rubber gasket does not work normally, but all this pressure “presses” on the compression buffer. Ultimately, this leads to its breakdown.
- Small cracks appeared on the spring (see Replacing the springs of a VAZ 2110 on our own).
Note: if the spring is somehow deformed, it should be replaced immediately. At the same time, some drivers, wanting to “lower” their car, deliberately cut off several coils of the spring.
Causes of failure
There are two main reasons why rear shock absorbers begin to misbehave:
- When driving, the rear wheel can gradually wear out the locker, made of plastic. It serves to protect the rack. Over time, the wheel gets closer and closer to the stand;
- If the breakage occurs along the lower silent block, the culprit is the bolt holding it in place. It was simply not tightened to the required load.
Worn out old shock absorbers
the strut, pay special attention to this bolt. If you make the same mistake again, you will soon have to make repairs again.
Symptoms of a problem
Pay attention to the telltale signs that tell you that you need to take action to correct problems with your rear struts.
Sign
Peculiarities
Cracks, various kinds of defects, and flaws may appear on this element. This indicates wear, so the shock absorber should be replaced.
The gaskets and boot have lost their elasticity
While these elements are working, they are clearly limp in appearance. This is a serious signal that the rubber components will soon break and this will lead to sad, expensive consequences.
The compression buffer is damaged or deformed
Everything in the system operates under high pressure. And if the gasket doesn't do its job properly, pressure is applied to the buffer and it breaks.
The spring has cracks
Everything here is more than logical and understandable. If signs of spring deformation appear, it must be replaced. At the same time, you can check the condition of the remaining nodes
Silent block