08 August 2017 Lada.Online 19 287 2
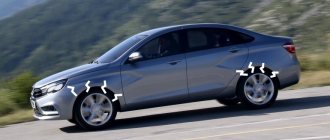
The front and rear suspensions of Lada XRAY and Largus are equipped with telescopic hydraulic gas-filled shock absorbers. During operation they have to be replaced with new ones. The process of replacing them with XRAY and Largus is similar, because both cars are produced on the same B0 production line.
Attention.
Suspension shock absorbers should be replaced as a set for both sides. Replacing the shock absorber on one side is not allowed.
Front shock absorber strut
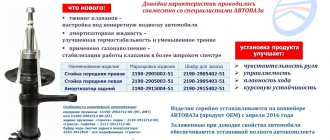
Front strut shock absorber part number:
- Lada XRAY: 543020550R
- Lada Largus: 543024989R, 543027245R, 543024989R, 543027245R.
- Remove the wheel.
- Remove the speed sensor wiring harness from holder No. 6.
- Remove bolt No. 7 securing the sensor wiring harness.
- Remove holder No. 6 (replaceable head 10, ratchet wrench).
- Disconnect the front brake assembly from the steering knuckle (instructions) and secure it to the lower arm of the front suspension.
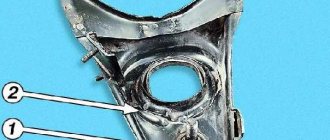
- Unscrew two nuts No. 1 of the bolts securing the steering knuckle to the front suspension strut.
- Remove the boots and disconnect the rack No. 5 from the steering knuckle (spanner 18, replaceable head 18, wrench).
- Attach the steering knuckle to the car body.
- Unscrew nut No. 3 securing the rod No. 4 of the front suspension strut to the car body (ring key 21, angled hexagon 6).
- Remove the upper cup No. 2 of the front suspension strut.
- Remove strut No. 5 of the front suspension.
Fastening elements that must be replaced:
- nut for fastening the upper support of the strut;
- nut securing the front suspension strut rod to the car body;
- nuts of the bolts securing the steering knuckle to the front suspension strut.
When assembling the front suspension strut, check the position of the outer coils of the spring relative to the profile of the support cups. The spring should be located in the grooves of the support cups, as shown in the figure:
- Compress the spring (device for disassembling racks KT01-22 (PKF "TEP", Ir-Kutsk) or device for compressing springs type 12625 code 96 71 06 00 f. "Stahlwille").
- Install the upper support cup No. 8 of the spring, bearing No. 7, upper support No. 6 on the rack and tighten nut No. 5. Nut tightening torque 62 N.m (6.2 kgf.m) (angular hexagon 6, ring wrench 27, replaceable insert 27 type 58 22 40 27 f. "Stahlwille", torque wrench type 50 18 00 12 f. " Stahlwille").
- Unload the spring.
- Install the suspension strut on the car, install the upper cup No. 4 of the strut and screw nut No. 3 onto the strut rod. Nut tightening torque 44 N.m (4.4 kgf.m) (angular hexagon 6, ring wrench 21, replaceable insert 21 type 58 22 40 21 f. “Stahlwille”, torque wrench type 50 18 00 12 f. “Stahlwille” ).
- Connect the strut to the steering knuckle, insert the mounting bolts and tighten the nuts. The tightening torque of the nuts is 105 N.m (10.5 kgf.m) (spanner 18, replaceable head 18, wrench, torque wrench).
- Next, assemble in reverse order.
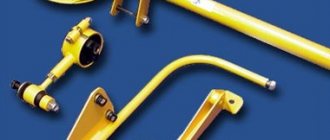
Anti-roll bar, front suspension - removal and installation
Figure 8-1 — Front suspension anti-roll bar: 1 — stabilizer pad mounting bolt (subframe mounting bolt); 2 — nut securing the stabilizer cushion bracket; 3 — stabilizer strut; 4 — stabilizer strut mounting nut; 5 — anti-roll bar; 6 bracket for mounting the stabilizer cushion; 7 — stabilizer cushion
Place a transmission stand under the rear part of the subframe and tighten the subframe (transmission stand type OMA 604).
Unscrew nuts 2, Figure 8-1, securing the stabilizer bar cushion brackets (10mm head, extension).
Unscrew bolts 1 securing the stabilizer bar cushion brackets and remove brackets 6 (bolts securing the rear part of the subframe) (18mm head, extension).
Unscrew the nut 4 bolts securing the stabilizer bar to the front suspension arm (Torx T40 wrench, 13mm socket).
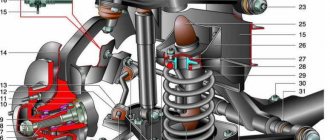
Remove the stabilizer strut elements from the front suspension arm: lower rubber-to-metal joint 5, Figure 8-2, fastening bolt 1, two rubber bushings 4, upper rubber-to-metal joint 2 and washer 3.
1 — stabilizer link mounting bolt; 2 — upper rubber-metal hinge; 3 — washer; 4 — rubber bushings; 5 - lower rubber-metal hinge; 6 — stabilizer strut fastening nut; 7 — front suspension arm; 8 — anti-roll bar
Disconnect the anti-roll bar from the front suspension arm on the other side.
Remove the anti-roll bar from the vehicle.
Attention . You cannot use the bolts securing the stabilizer pad brackets (bolts securing the front suspension subframe) a second time! Bolts must be replaced!
Check the condition of the anti-roll bar struts and cushions and replace if necessary.
Install the stabilizer bar on the car, install the stabilizer pad brackets and tighten the bracket nuts.
Tighten, but do not fully tighten, the bolts securing the stabilizer bar mounting brackets (bolts securing the rear part of the subframe).
1 — clamp Sus. 1413 or Sus. 1734
Install the elements of the stabilizer bar on the lever: a washer, an upper rubber-to-metal hinge, install two rubber bushings between the lever and the stabilizer. Install the fastening bolt, the lower rubber-metal hinge, tighten the package of rack elements with a clamp and tighten the nut without tightening (clamp Sus. 1413 or Sus. 1734, Torx key T40, head “13”).
Install the anti-roll bar link on the other side.
The order of tightening the anti-roll bar mounting elements:
1 — nuts securing the stabilizer struts.
The tightening torque of the nuts is 14 N.m (1.4 kgf.m);
2 — bolts for fastening the stabilizer bar cushion brackets.
The tightening torque of the bolts is 105 N.m (10.5 kgf.m).
Video
Source
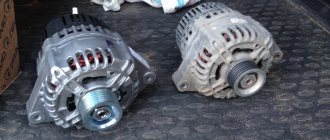
Rear shock absorber
Rear strut shock absorber part number:
- Lada XRAY: 562109913R
- Lada Largus: 6001549248, 8200779901, 6001549248, 8200779901.
Attention. To prevent damage to the rubber-metal hinges of the rear suspension arms, it is not allowed to hang the rear suspension arms with the hinges tightened by an amount exceeding the position of the arms with the rear suspension springs completely unloaded.
- Move aside the lining of the rear wheel arches (for Lada Largus), remove the lining of the sides of the trunk (for Lada XRAY).
- Remove plugs No. 1 from the shock absorber mounting points to the rear wheel arches.
- Raise the car, install a transmission strut under the rear suspension arm and lower the car until the spring begins to compress.
- Lock rod No. 2 and unscrew nut No. 3 securing the shock absorber to the body (wrench 6, 16).
- Remove washer No. 4, upper pad No. 5 of the shock absorber joint and bushing of the shock absorber joint.
- Remove bolt No. 3 securing the shock absorber to arm No. 1 of the rear suspension.
- Remove shock absorber No. 2 (replaceable head 21, knob).
- Remove the lower shock absorber joint pad and washer from the shock absorber rod.
Reusing the nut securing the shock absorber rod to the rear wheel arch and the bolt securing the shock absorber to the rear suspension arm is not permitted.
- Install the washer, lower cushion and shock absorber hinge bushing onto the shock absorber rod.
- Install the shock absorber rod into the rear wheel arch hole.
- Connect the shock absorber to the rear suspension arm and tighten, without tightening, a new fastening bolt (replaceable head 21, wrench).
- Place the shock absorber rod into the mounting hole of the wheel arch, install the upper shock absorber hinge pad, washer and screw on the rod with a new fastening nut. The tightening torque of the nut is 14 N.m (1.4 kgf.m) (spanner 6, 16, replaceable insert 16 type 58 22 10 16 f. “Stahlwille”, torque wrench type 50 18 00 04 f. “Stahlwille”).
- Reassemble in reverse order.
- The final tightening of the bolts securing the shock absorbers to the rear suspension arms is carried out with the car standing on its wheels (tightening torque 105 N.m).
Replacing shock absorbing struts
It is necessary to change the Lada Largus shock absorber when a factory defect is detected or when a certain mileage has been covered. Unscheduled work is carried out in the presence of obvious defects or leakage of technical fluid. And also, in case of loss of their performance.
On a note! Replacement of a failed set must be carried out in pairs.
Carrying out technical work is preceded by diagnostics, and the tightening of the bolts securing the shock absorbers to the levers is also checked.
Front shock absorber strut
Note
: The following describes how to replace the shock absorber strut on the right side. Replacement on the left side is performed in the same way.
Removal and installation
1. When the car is still on wheels, open the hood and loosen the nut securing the shock absorber strut to the car body. For this:
- We install a 21 deep head on the nut...
... and then insert a 6mm hexagon into it.
- While holding the shock absorber rod from turning with this hexagon, use the head to loosen the tightening of the strut mounting nut.
2. Loosen the wheel bolts. We lift the front of the car with a jack, install stands or lift the car on a lift. Unscrew the wheel bolts and remove the front wheel.
3. Using a metal brush, clean the lower bolts and nuts of the shock absorber strut from dust and dirt and apply a penetrating liquid (such as WD-40) to them.
4. Using an 18mm wrench, unscrew the lower nuts securing the strut to the steering knuckle, holding the fastening bolts from turning with a second 18mm wrench.
5. Remove the bolts from the rack.
6. When removed, the bottom bolt will rest against the brake caliper as shown below. In order to completely remove this bolt, we will need to tilt the top of the brake caliper to the side. For this:
- Using a 13mm wrench, unscrew the upper bolt securing the brake caliper, holding the 17mm wrench to hold the guide pin by the hexagon.
- After the bolt is unscrewed, remove it...
... and turn the caliper down around the axis of the lower guide pin to get enough space to remove the bolt.
- Remove the lower strut mounting bolt.
7. Remove the steering knuckle and disc assembly and release the shock absorber strut.
8. Finally unscrew the nut securing the strut from above...
... and remove it from the recess.
9. Remove the upper rubber-metal support washer...
... and from below, through the wheel arch, we remove the front shock absorber strut from under the car.
10. Installation is carried out in reverse order, and the following must be observed:
- We tighten the nuts of the bolts securing the strut to the steering knuckle with a torque of 105 N∙m.
- We tighten the nut of the upper fastening of the strut to the body with a torque of 44 N∙m. We tighten this nut completely when the car is standing on its wheels, under its own weight.
Disassembly and assembly
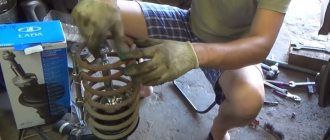
1. Clamp the stand in a vice and install two spring ties diametrically opposite each other, so that they engage three coils of the spring.
2. Evenly rotating the tie screws, compress the spring.
Attention
: From this moment on, the spring is under greater tension. Be extremely careful when further working with the stand.
3. After the spring stops pressing on the support cups, holding the shock absorber rod from turning with a 6mm hexagon, use a 27mm spanner to loosen the tightening of the nut securing the upper strut support.
4. Unscrew the nut by hand and then remove the upper support assembly with the bearing.
5. Remove the bearing from the upper support.
6. Remove the upper spring cup.
7. Remove the spring with ties...
Note
: Replace springs only in pairs (right and left at the same time).
... and the bumper assembly with boot.
8. Assembly is carried out in reverse order, and the following must be observed:
- We check the condition of all removed elements and replace them if necessary.
- We change shock absorbers only in pairs (right and left at the same time).
- To bleed the new shock absorber, pull out and press in the piston rod several times.
- We install the spring so that its lower coil rests against the protrusion of the lower spring cup, and the upper coil rests against the stamping of the upper spring cup.
- We tighten the nut securing the upper support of the strut with a torque of 62 N∙m, while holding the shock absorber rod from turning with a hexagon of 6.
How to select and replace stabilizer links on Largus
The design of any modern car includes an anti-roll bar, which improves handling, reduces body sway on bumps and prevents rollovers during sudden maneuvers. In Largus, built on the Renault Logan platform, the stabilizer is attached to the subframe through the original stabilizer struts. The service life of these rubber-metal elements is usually 40-50 thousand km, and sometimes much more. You can replace a damaged part yourself if you have minimal car repair skills plus a few wrenches.
Suspension Lada Largus (front and rear)
Replace shock absorbers (left and right) in pairs. As a rule, shock absorbers wear evenly; if you replace only one shock absorber, you will not get equal damping characteristics on each side of the suspension, which will affect the handling of the car. The main malfunction of shock absorbers is the leakage of shock-absorbing fluid, which is visually manifested in the oiling of the shock absorber housing. If we talk about handling, then when driving over bumps and when turning, the car takes longer to stabilize its original course of movement.
Stabilizer strut: device and functions
Lada Largus differs from other front-wheel drive VAZs by a rigid subframe to which the lower suspension arms are attached. A ball support for the shock absorber strut with a hub is pressed into the lever, and it is attached to the subframe through 2 silent blocks. The entire lever is replaced along with the ball joint. An anti-roll bar with a diameter of 22 mm is attached to the bottom of the subframe, and its ends are already attached to the arms using rubber-metal bushings. This design has its advantages: rigidity of the connection, ease of repair and diagnostics, a solid margin of safety of the unit, and compactness.
The Largus stabilizer link differs from similar units on other cars. There are no ball joints in it, and the entire unit consists of 4 parts: a long bolt, rubber dampers, a rubber-metal body, and a fastening nut. A similar design solution is found on all B0 platform cars, including cross versions.
Main functions of racks:
- dampen machine vibrations on uneven surfaces;
- provide constant pressure of the wheels to the road;
- improve maneuverability and speed of rearrangement;
- evenly distribute the load on the front wheels of the car.
When to change the shock absorber on Largus?
According to the Lada Largus maintenance regulations, all shock absorbers must be checked at every scheduled inspection. They change, as usual, depending on the condition. Obvious signs for replacement are the same as on other cars - loss of stability, poor road holding, body sagging, leaking shock absorber struts, etc. The average mileage on original shock absorbers can be up to 60 thousand km. But you should not rely on this figure, since it greatly depends on many factors, including operating conditions and driving style.
Typical signs of stabilizer link malfunctions
Despite the omnivorous nature of the Lada Largus suspension, it can also quickly fail. The main reasons for this are driving on broken roads, active driving and sudden maneuvers, and overload. The malfunction can be easily diagnosed visually by examining the unit, or by indirect signs:
- increased roll and the appearance of diagonal rocking;
- demolition of the car axle during rearrangement;
- metallic knock in the front;
- longitudinal swing during braking;
- inadequate operation of the braking system with abs;
- deterioration in controllability, acute reaction to asphalt rutting.
Advice ! Failure to promptly replace the stabilizer struts can lead to wear of the stabilizer mounting silent blocks and the lower suspension arm.
This is the most accurate way to diagnose the problem. Turn the wheel all the way and rock it back and forth. Excessive play indicates that the rack has exhausted its service life. Also, on the inspection hole, use a pry bar or hand to press the lever at the place of its attachment. Squeaks and rattles, as well as free movement, are all signs of a faulty part. An indicator for replacement is cracking of the rubber or uneven wear, even if there is no play.
Choosing stabilizer struts for Lada Largus
Since the suspension on Largus remains unchanged from Logan, the range of spare parts in stores is very wide. On sale you can find both original spare parts produced by AVTOVAZ OJSC and original repair kits for Renault Logan (Sandero). The standard stabilizer link comes complete with rubber dampers, bushing, washers and nut.
In the tuning rack, rubber is replaced with polyurethane. It is harder and provides minimal play in this connection. The use of polyurethane slightly increases the sensitivity of the car on the road, makes it more collected, and the steering wheel more accurate. The disadvantages will be a slight decrease in comfort, stiff suspension, and increased load on other components in the suspension. Installation of tuning parts will be justified for the powerful 16-valve version.
Factory part number – 8200277960 (or 6001547138) manufacturers Renault, AvtoVAZ.
Non-original parts may have their own markings and article numbers. Approximate prices for January 2021:
- JSC AVTOVAZ, original – 500-570 rubles;
- BalZap, duplicate – 280 rubles;
- FR, duplicate – 260 rubles;
- Forward, duplicate – 276 rubles;
- TORK, duplicate (article TRK0069) – 115 rubles;
- Trialli, duplicate (article SP0101) – 305 rubles.
Advice ! It is recommended to purchase racks from well-known brands, for example Lemforder (catalog number 3124301), or original Renault, Lada. The service life of a cheap substitute can be only a few thousand kilometers. There were cases when parts did not fit without modification.
When to change shock absorbers on Lada Largus
It is important to know when to make repairs. To do this, you need to have information about the actual operating life of shock absorber struts.
Information can be gleaned from the technical specifications and service documents provided by the manufacturer.
Manufacturers indicate different service life, which ranges from 50-60 thousand km of car mileage. However, taking into account the state of the road surface in the countries of the post-Soviet space, you can confidently reset the manufacturer’s data by 10 thousand km.