The VAZ 2110 can already easily lay claim to the role of a classic VAZ car, given its age and genetic inextricable connection with previous generations of front-wheel drive cars. The tenth family did not cause such a sensation as 2108 did in its time, but is not inferior to it in popularity. Despite all the constructive archaism and unpretentious design, the top ten is respected by the public. It is easy to maintain, almost any repair can be carried out in a garage and with an average set of tools, and only the injection system, if this is the latest model, or the electronic engine control system requires special equipment. Although electronics, with the right approach, can be serviced independently. The main thing is the knowledge base. The base is not that big and not very tricky.
In the photo, the VAZ 2110 is a classic that is respected by the public
Repairing a VAZ 2110 with your own hands is easy only if you know exactly how the car works. Since the ten is not a particularly expensive vehicle, many people begin their acquaintance with automobile life with it. This is a fertile material for study, a good basis for tuning, and a practical means of transportation in space. But, of course, not without problems. The characteristic troubles that can be expected from this car have been studied far and wide, so there is no need to expect surprises from dozens, and the high degree of unification with other VAZ models makes any piece of hardware accessible, and in several versions at once.
For example, you can take advantage of the surging wave of tuning mania and the companies that have grown on its crest, which are already producing fairly high-quality modified spare parts, which could only be dreamed of five years ago. These are special timing camshafts, and drive gears of this same camshaft with a variable phase angle, and a whole bunch of power steering. Not to mention the suspension and optics, for which there are a great many options for components.
Video tutorial on how to remove and disassemble a VAZ 2110 generator with your own hands
In order not to get lost in this diversity, so that dozens of DIY repairs go smoothly and without surprises, we tried to systematize the main problems in the components and mechanisms of this car, where we will consider troubleshooting methods, options for replacing spare parts, tolerances, dimensions, shrinkage and their compliance or non-compliance with factory standards.
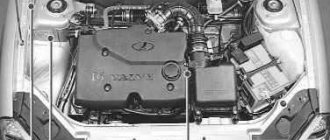
VAZ 2110 engine repair
More precisely, engine repair, since at different times completely different engines were installed on the car. Both carburetor ones, very close to eight and nine, and injection ones. With timely engine maintenance and compliance with regulatory maintenance standards, the engine can easily show the speedometer what 500 thousand mileage is. Not without surgical intervention, but even such figures are almost a feat for him, considering the kind of gasoline he has to pour into the tank. The Ford Focus starts to warp already at the 50th thousand mileage, and it requires a sanatorium-resort examination. The Ten can easily do without this, although it is still better to take care of the fuel system, especially the injection system.
VAZ 2110 comes with both carburetor and injection engines
Repairing the fuel system, as a rule, does not require any special expenses. Maintenance of the injector, fuel pump, timely replacement of the fuel filter and cleaning of the mass air flow sensor (MAF) are carried out in a garage without any particular problems. To carry out all maintenance and repair work on the VAZ 2110 fuel system, a special tool will rarely be required, and the only thing worth taking care of is a high-quality product for cleaning fuel system elements. They are inexpensive and can be useful when washing injectors, cleaning the air flow sensor, and on carburetor engines - when working with the carburetor, as well as when washing the lock and other hard-to-reach places. It should be borne in mind that the use of solvents and aggressive chemicals is extremely undesirable. If you handle them carelessly, you can destroy some rubber seals and cuffs, which are sufficient in both carburetor and injection systems.
Repair of the ignition module, ECU, and on-board computer can, in principle, be entrusted to services if necessary. Nowadays, it is not at all uncommon to find improved injection system control modules and ignition modules with prompt changes to their settings. Therefore, there is no need to carry out chip tuning of the 2110 on a full scale. Thus, the January injection system controller of the latest releases can provide the greatest opportunities for making changes to the operation of the fuel system and ignition system.
This is a very convenient thing. The January controls are located in the cabin, and in order to make changes to the settings mode, you just need to press the corresponding button, and the system will reprogram the injection and ignition algorithm, which will allow you to change the dynamic and operational characteristics of the engine in real time without any surgery or digging in the brains of the car. A module has been developed specifically for the tenth family, which allows you to simply switch the injection system to economy mode or sports mode on the go. And at any time you can reset the settings to standard factory settings.
Repair of the VAZ 2110 fuel system can be carried out within your garage
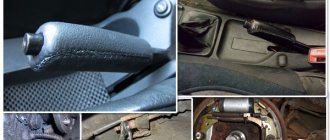
Repairing electrical equipment and power electrical devices - starter, generator and the relays that serve them, also does not present any difficulties. The main thing here is to know the location of the relays and fuses. In 2110 they are already more or less systematized and collected almost in one place, so there is no need to spend a long time searching for this or that relay. There are, of course, some oddities in their systematization, especially since the plant made changes throughout the entire production of the car. But there is still a certain logic in their placement.
VAZ 2110 engine injector, operation diagram
Power units with an injector differ from carburetor versions in the principle of supplying fuel to the combustion chamber of a gasoline engine. If a carburetor engine needs to “suck” fuel from the carburetor chambers, then in the injection version fuel is injected under pressure through nozzles. This is much more economical, since the solenoid valves of the injectors allow only the required amount of fuel to pass through and not a drop more. This is closely monitored by electronics, which gives commands using information from various sensors; after analyzing all the data, the necessary impulse is sent to the injector and it supplies fuel to the engine. Moreover, the entire process occurs almost instantly. Below is a detailed diagram of the operation of the VAZ 2110 engine injector.
- 1 – ignition relay
- 2 – battery
- 3 – ignition switch
- 4 – neutralizer
- 5 – oxygen concentration sensor
- 6 – nozzle
- 7 – fuel rail
- 8 – fuel pressure regulator
- 9 – idle speed regulator
- 10 – air filter
- 11 – diagnostic block
- 12 – mass air flow sensor
- 13 – tachometer
- 14 – throttle position sensor
- 15 – indicator lamp “CHECK ENGINE”
- 16 – throttle assembly
- 17 – immobilizer control unit
- 18 – ignition module
- 19 – coolant temperature sensor
- 20 – controller
- 21 – spark plug
- 22 – knock sensor
- 23 – fuel filter
- 24 – fan switch relay
- 25 – electric fan of the cooling system
- 26 – relay for turning on the electric fuel pump
- 27 – fuel tank
- 28 – electric fuel pump with fuel level indicator sensor
- 29 – gasoline vapor separator
- 30 – gravity valve
- 31 – safety valve
- 32 – speed sensor
- 33 – crankshaft position sensor
- 34 – two-way valve
The most important element of the power system of the “ten” injection engine is the electric fuel pump, which is located in the tank; it is this that constantly provides the necessary pressure in the ramp with injectors through which fuel is supplied to the intake manifolds. The fuel pump in the VAZ 2110 injector is quite noisy. It is enough to insert the ignition key and turn it, and you will hear the characteristic “buzzing” of the electric fuel pump inside the car. If you do not hear a buzzing sound before starting the engine, but the engine still does not start, then the fuel pump is faulty. And therefore, it will not be possible to start an injection engine from the “pusher”, because there is still no pressure in the ramp and injectors, which means that fuel will not be supplied.
VAZ 2110 suspension repair
The simple, understandable and reliable suspension 2110 does not require any special or costly measures for maintenance and repair. Chassis repair involves, first of all, eliminating the consequences of driving on our less than ideal road surfaces. In this regard, the top ten also compares favorably with more recent and much more expensive foreign cars in the budget segment. If you have a lift or, in extreme cases, an inspection hole, any part of the front suspension can be easily replaced or repaired with your own hands using basic tools. There are some peculiarities in the repair of front struts, support bearings and stabilizer bars, but they are present in every car.
Steering rack repair requires special attention. Its dismantling is simple, but the reassembly process itself can cause some difficulties, since there is a need for some pullers and calibrated samples. But it is enough to disassemble it yourself once, and in the future its maintenance will not cause problems. When repairing a steering rack, it is imperative to use the correct repair kits. And full. They can be sold either as a simple set of seals and a bushing, or as a complete repair kit with a bearing, corrugations, the same bushings and seals, as well as retaining rings. Considering that you will have to spend a good half day replacing a repair kit, it is better to replace the complete set.
Body and transmission repair
The VAZ 2110 gearbox very rarely causes any complaints. Most often, the cause of difficult gear shifting is wear or breakage of the linkage. This is not the worst problem, and it can be solved quite simply. Moreover, you need to make it a rule to inspect the condition of the gearbox and rocker bearings during every repair or maintenance of the clutch. It often requires attention, especially if a disc with low-quality friction linings is installed. They wear out many times faster than branded ones, and rivets can damage the working surface of the flywheel and clutch basket.
In a VAZ 2110 you need to check the condition of the gearbox very often
Body work can be carried out with a minimum of experience, which is gained as the same body work is carried out. So this vicious circle must be broken and learn to independently replace thresholds, treat the bottom and cavities with anti-corrosion compounds, wheel arches and internal door cavities. There are now all the conditions and necessary anti-corrosion mastics and compounds for this. Epic Movil and construction bitumen mastic are a thing of the past, so there will be no problems with choosing such products. And if you do a complete anti-corrosion treatment of the body at least once every two years, then you can forget about rust for a long time.
This is interesting: Do-it-yourself repair of the starter retractor relay
Repairing the bumper and other plastic body elements, covers, panels, and heater casings can be done independently, using several methods. This does not require any special skills or material costs, and saving a damaged bumper or plastic body kit with your own hands is much cheaper than buying a new one. These issues can be solved with the help of a powerful soldering iron, plastic electrodes and a hair dryer. The entire work, depending on the size of the injury received, may take no more than two hours. And the money saved on repairs can be spent on purchasing good putty and a set of spatulas, which will undoubtedly be useful for minor repairs to the body or the same bumpers.
There are archaic and some imperfect solutions in the design of car brakes, but taking into account their simplicity and the availability of components, everything can be solved in the conditions of an average garage. Front disc brakes are repaired in extreme cases and when the brake disc is critically worn, and the brake pads can be selected to suit your preferences and driving style. If the driver prefers a softer and more leisurely driving style, then it is worth choosing soft pads.
They are less noisy, operate softer, and do not wear out the brake disc as much. If your driving style is aggressive, then with soft pads you will have to change them quite often, and the braking force at high speeds may be insufficient. In this case, you should pay attention to the so-called sports brake pads. They are noisier, harsher and grip very sharply; with active use they wear out the brake disc. The rear brakes are a separate matter, since their design goes back to the days of the Fiat 124.
The design of the VAZ 2110 brakes has some imperfections
The factory never bothered to replace them with disk ones. Under normal operating conditions, they do not cause leaks, they just need much more attention than they deserve. As a last resort, there is always the option of replacing it with a disc brake with some modifications. Nothing is impossible.
The reliable, well-made, but somewhat outdated VAZ 2110 has not yet finished its song, and it may well be useful and teach a novice car enthusiast to hold a screwdriver in his hands and distinguish a switch from a radiator. And for an experienced driver, this is an indispensable car for every day and a reliable assistant.
Reasons for repairing a VAZ 2110 with your own hands
- Relatively low prices for spare parts.
- Aerodynamics of high quality.
- Galvanized metal body.
- Soft suspension.
Do-it-yourself maintenance and repair of the VAZ 2110 is accessible and inexpensive. Buyers' interest is also caused by relatively low fuel consumption. The car is represented by a five-seater cabin with a front engine in the car, the drive is located on the front wheels. The body has a supporting structure of an all-metal welded type.
General diagram of the injector operation
Note. A certain amount of air corresponds to a certain amount of fuel (if this ratio is violated, then the engine power will correspondingly decrease significantly).
VAZ 2110 injector relay diagram
The price of an injector (see VAZ 2110: flushing the injector on your own) is a flexible concept and depends on a number of components. However, the cost of fixing an injector problem at a car service center is very significant. The DIY repair instructions allow you to fix the problem, but you need to have a good understanding of the injector circuit. Photos and videos - materials in this matter will become the most valuable practical assistant.
Source
Types of repair work
Important repair stages are scheduled and seasonal repairs. Mandatory vehicle maintenance includes diagnostics, repairs and adjustments. There is a simple, non-labor-intensive job that you can easily do yourself. For difficult work you will need additional equipment and good tools. If the machine is operated in particularly harsh conditions, experts recommend reducing the mileage for routine maintenance to 5 thousand km. Routine car repairs include:
- replacing used oil;
- replacing filters (oil, fuel, air);
- engine diagnostics with inspection of the brake system;
- replacement of steering mechanisms with chassis.
If necessary, after inspecting the VAZ 2110 car, the following is carried out:
- injector cleaning work;
- economizer adjustment;
- replacing brake pads;
- adjustment of wheel camber angles;
- replacement of brake cylinders with hoses;
- replacement of shock absorbers.
Repair and operation of VAZ must be carried out in strict accordance with the rules. A seasonal inspection is done every six months. The repairman is not limited to replacing tires on a car during the season. VAZ repairs can be carried out both in showrooms by qualified specialists and on our own. Based on work experience, year of manufacture and condition of the car, the master can easily tell the approximate mileage before subsequent repairs.
Types of maintenance
Today it is customary to divide maintenance depending on the complexity, frequency and time of its implementation. Based on these factors, the following maintenance of the VAZ 2110 :
- Daily inspection (DI) - performed every day before the trip and consists of checking the components and condition of the vehicle as a whole.
- Zero maintenance (TO-0) – found application for new cars after reaching a certain mileage. The oil filter and engine oil are checked.
- First maintenance (TO-1) – must be done after every 15,000 km, helps prevent unwanted breakdowns and keep the car in the best possible condition.
- Second maintenance (TO-2) - used after a mileage of 60,000 km, includes EO and TO-1, and some vehicle components are also subject to additional diagnostics.
- Seasonal maintenance (MOT) - includes changing tires, engine oil, checking heating and air conditioning systems.
Car repair tips
To carry out ordinary simple repairs of a VAZ 2110 on your own, you need to have a minimum of tools. Repair includes the following operations.
- Adding used fluid (brake, coolant, for washing external windows) or new oil to the engine.
- Adjusting the headlights.
- Replacing filters.
- Replacing brake pads
- Recharging batteries, replacing sensors, checking tire pressure.
To carry out routine repairs, you will need an inspection ditch (pit) and a special lift. To carry out complex repairs, where it is necessary to replace parts of all suspensions, you will have to invite competent and physically trained assistants. You need to use a professional tool. The most labor-intensive and expensive are the major repairs of the body and engine.
Experts do not recommend performing this work in artisanal conditions. This is especially true for those who do not have practical skills, the necessary special equipment and the necessary tools. It may be impossible to eliminate the consequences of incorrectly and unprofessionally performed major repair work on an engine; it is often necessary to replace it completely.
Engine repair and tuning
| Changing the engine oil | 500 R |
| Engine repair | from 15,000 R |
| Engine repair, including transition from engineer. 8V to 16V (front drive) | from 20,000 R |
| Transition from carburetor to 8V injector (front-wheel drive, Classic) | RUR 20,000 |
| VAZ engine replacement | 8,000 R |
| Installing a 16V front-wheel drive engine in a Classic | RUR 25,000 |
| Replacing the front crankshaft oil seal (front-wheel drive) | RUB 3,500 |
| Replacing the front crankshaft oil seal (Classic, Niva) | RUR 3,000 |
| Replacing the rear crankshaft oil seal | RUB 3,700 |
| Replacing the oil pump (front-wheel drive) | 4,000 R |
| Replacing the engine oil sump (front-wheel drive) | RUR 2,500 |
| Replacing the engine oil sump (Classic, Niva) | RUR 3,000 |
| Replacing the cylinder head gasket | 5,000 R |
| Cylinder head repair: replacement of guide bushings and/or valves (front-wheel drive 8V, Classic, Niva) | 7,000 R |
| Cylinder head repair: replacement of guide bushings and/or valves (front-wheel drive 16V) | 8,000 R |
| Installation of a sports cylinder head with camshaft adjustment (front-wheel drive 8V, Classic, Niva) | 7,000 R |
| Installation of a sports cylinder head with camshaft adjustment (front-wheel drive 16V) | 8,000 R |
| Refinement of the client’s cylinder head (enlargement and polishing of intake and exhaust channels) | from 15,000 R |
| Installing a sports camshaft (front wheel drive 8V) | from 3,000 R |
| Installation of sports camshafts (front-wheel drive 16V) | from 5,000 R |
| Installation of a sports camshaft (Classic, Niva) | from 5,000 R |
| Adjusting valve clearances (front drive 8V) | 1,500 RUR |
| Adjusting valve clearances (Classic, Niva) | 1,000 R |
| Replacing hydraulic compensators (front-wheel drive 16V) | 5,000 R |
| Replacing hydraulic compensators (Niva) | 4,000 R |
| Installing a lightweight flywheel (front-wheel drive) | 4000 R |
| Installing a lightweight flywheel (Classic) | 4500 R |
| Installing a lightweight flywheel (Niva) | 5000 R |
| Replacing the timing belt and roller (front-wheel drive 8V) | RUR 2,500 |
| Replacing the timing belt and rollers (front-wheel drive 16V) | RUR 3,000 |
| Replacing the alternator belt | from 700 R |
| Replacing the water pump or gasket (front wheel drive 8V) | RUR 2,500 |
| Replacing the water pump or gasket (front wheel drive 16V) | RUB 3,500 |
| Replacing the water pump or gasket (Classic, Niva) | 1,500 RUR |
| Replacing the thermostat | 1,000 R |
| Replacing the cooling radiator and/or electric radiator cooling fan | 1,000 R |
| Replacement of all cooling system hoses | 1,500 RUR |
| Replacing the carburetor | 1,000 R |
| Replacing the throttle pipe | 800 R |
| Installation of a sports receiver (front-wheel drive 8V, Classic, Niva) | 4,000 R |
| Installing a sports receiver (front-wheel drive 16V) | from 3,000 R |
| Replacing the fuel pressure regulator (on the ramp) | 1,000 R |
| Replacing fuel injectors (front-wheel drive 8V, Classic, Niva) | 1,000 R |
| Replacing fuel injectors (front drive 16V) | 2,000 RUR |
| Replacing the electric fuel pump | 1,500 RUR |
| Replacing the fuel filter (injector) | 400 R |
| Installing a replacement cat collector (front-wheel drive 8V) | RUR 3,000 |
| Installing a replacement cat collector (front-wheel drive 16V) | RUR 2,500 |
| Replacing the exhaust system corrugation | from 1,000 R |
| Installation of a sports exhaust manifold 4-1 / 4-2-1 (front-wheel drive 8V, Classic, Niva) | from 3,500 R |
| Installation of sports exhaust manifold 4-1 / 4-2-1 (front wheel drive 16V) | from 3,000 R |
| Muffler replacement (without modifications) | 500 R |
| Replacing the resonator (without modifications) | 500 R |
| Installation of a direct-flow universal muffler (with welding) | from 1,500 R |
| Installation of a complete direct-flow exhaust system | from 5,000 R |
| Installing/replacing one engine mount | 1,000 R |
| Replacement of front, rear and side engine mounts (front-wheel drive) | RUR 2,500 |
| Starter replacement | 1,000 R |
| Generator replacement | 1,000 R |
| Installation of a 4-throttle intake (without modification of wiring and settings) | from 4,000 R |
| Installation of the “AutoTurbo” compressor /without changing the engine compression ratio and settings/ (front-wheel drive 8V) | from 8,000 R |
| Installation of the “AutoTurbo” compressor /without changing the engine compression ratio and settings/ (front-wheel drive 16V) | from 12,000 R |
| Installation of the “AutoTurbo” compressor /without changing the engine compression ratio and settings/ (Classic, Niva) | from 12,000 R |
| Turbocharged VAZ 16V engine from 250 hp. (all spare parts + labor + turnkey setup) | from 180,000 R |
| Chip tuning: adjustment of the engine control program | RUR 3,000 |
| Chip tuning: online configuration of the engine control program (MAF) | 8,000 R |
| Chip tuning: online configuration of the engine control program (DBP+DTV, turbo) | 9,000 R |
| Chip tuning: online configuration of the engine control program (E-Gas, atmospheric) | 14,000 R |
| Chip tuning: online configuration of the engine control program (E-Gas, turbo) | RUR 20,000 |
The indicated prices are indicative. You can get accurate information about the cost of the services provided by calling us.
Sign up for repairs and tuning by phone: +7(903) 129 32 50 +7(903) 124 78 25 from Monday to Friday from 11-00 to 20-00, Moscow
VAZ 2101, 2103, 2106, 2107, 2108, 2109, 21099, 2110, 2112, 21124
The engine is rightfully considered the heart of the car - not only the durability of the vehicle, but also the reliability of movement depends on its correct and stable operation.
That is why it is extremely important to diagnose the car immediately after any problems appear in the engine, as well as to implement scheduled maintenance.
Our service repairs and maintains not only modern front-wheel drive VAZ cars, but also classic rear-wheel drive Lada models. Regardless of the degree of complexity of the breakdown and the age of the vehicle (be it repairing a VAZ 2101 engine or, for example, repairing a VAZ 21124 engine), our specialists guarantee high quality work and the shortest turnaround time. We will equally professionally carry out both minor adjustment work and major repairs of the VAZ engine, and if necessary, replace the faulty unit with a new one.
In addition, we provide our customers with the opportunity to purchase all the necessary components for VAZ cars at the best prices directly in our store - this way you will not only save money, but also avoid long and labor-intensive searches for the required part in other retail outlets in the city.
Classic
Engine wear increases gradually and for a certain period of time has virtually no effect on engine operation. However, once a certain critical point is reached, wear begins to progressively increase, which immediately leads to multiple malfunctions.
So, for example, engine repair of a VAZ 2106 may be necessary if oil and gasoline consumption increases above established standards, smoky exhaust appears, the maximum speed and power of the engine decreases, interruptions in the operation of the cylinders are observed, noise appears in the engine, the engine overheats, etc. In such cases, our specialists first diagnose the engine, determine the degree of wear and the cause of the problem. If the problem is old and has already seriously damaged the unit, then a major overhaul of the VAZ 2106 engine is carried out, during which the operational characteristics of the parts are restored. Therefore, it is important to seek qualified help in a timely manner.
Repair work on various models of Lada cars is similar in essence and differs only in the nature of the problem. So, repairing a VAZ 2103 engine, for example, can be done by replacing the camshaft drive chain, replacing the camshaft itself and piston rings, repairing the cylinder head, thermostat, fuel pump and coolant pump. The VAZ 2107 engine is repaired in the same way.
Front-wheel drive
Our specialists will provide support and carry out high-quality overhaul of the VAZ 2109, VAZ 2108, 2110 and any other models of this domestic manufacturer.
As for the nature of the work, for example, repairing a VAZ 2108 engine, as well as repairing a VAZ 2109 engine, may involve eliminating malfunctions of the timing drive (for example, replacing the timing belt, tension rollers and timing pulleys). If the source of the problem lies in the oil seals, which tend to dry out and crack over time, or the valve mechanism, which when worn, gives a distinct knocking sound in the engine, then, for example, when repairing a VAZ 21099 engine or repairing a VAZ 2110 engine, these parts are simply replaced for new ones. If the source of the malfunction is the cylinder block, then, for example, repairing a VAZ 2112 engine or any other model includes disassembling it, thoroughly washing all channels, internal cavities of the block and drying them. It is especially important to properly clean the parts after honing - otherwise, remaining dirt and abrasive particles will significantly reduce the life of the unit.
In addition, repair of a VAZ engine may involve replacing hydraulic compensators, camshafts, valve guides, and gas distribution mechanism drive.
At the request of the client, we can carry out technical tuning of any complexity for cars of an early year of production, increasing the number of valves (where possible) and engine displacement, as well as engine power. So, you can, for example, install a sports camshaft, a receiver and an exhaust manifold, and turbocharge the engine. The result of competent work of professionals and the use of only high-quality spare parts will be a powerful and reliable car.
Purpose
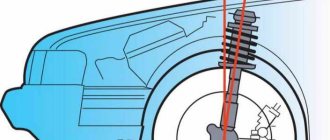
The wheels are attached to the front suspension; the unit provides shock absorption for the “front” of the car, is responsible for stability while driving, wheel adjustment, camber, and toe-in.
The front suspension design of the VAZ 2110 is quite complex, but any of you can figure it out. The main thing here is to arm yourself with an instruction manual, as well as understand the essence of the main angles.
Main front suspension components
The main element of the front suspension is considered to be a hydraulic telescopic strut , which is simply irreplaceable in the matter of shock absorption and ensuring a comfortable ride on the car. The car won’t shake much, and going through every hole won’t turn your trip into a nightmare.
To change the wheel camber, there is a strut in the front suspension. To be more precise, the steering knuckle and the upper bolt, which has an eccentric washer and a belt, are responsible for this process.
Mounted on the rack:
- Special springs;
- Buffer to limit the compression stroke. On the VAZ 2110 this element is made of polyurethane;
- Upper support. It is attached to the rack, to which, in turn, the mudguard is attached. Please note that only self-locking nuts are used for fixing. Therefore, ordinary nuts will not work for repairs;
- Bearing to ensure rotation of the stand together with the wheels;
- Shock absorbers with spring and plunger.
By the way, the cross member of the front suspension of the VAZ 2110 is a bar to which the lower arms are connected. In the center it is attached to the body using a rubber cushion.
This is a brief diagram of the front suspension of the VAZ 2110, your instruction manual will help you get to know it better. Many motorists underestimate the importance of this literature, which the manufacturer attaches to each of its cars. But in fact, the necessary, useful and important information about each component, unit and system of the machine is presented in detail and in all colors. Including the front suspension, of course.
VAZ 2110: injector diagram and basic information about it
Injector wiring diagram
Today, in practice, many motorists replace the carburetor with an injector, since the latter has a number of advantages. At the same time, installing an injector contains a number of nuances. In this situation on the VAZ 2110, the injector circuit plays a certain role as a guide that will help you understand all the nuances that will be encountered during installation. Plus, the electrical diagram of a VAZ 2110 injector with 8 valves or 16 is necessary for a practical understanding of the functioning of this device, and if there is none, then all repair work will simply be ineffective.
Injection engine VAZ 2110
The injection system is represented by two components:
- fuel distributor;
- ignition control system.
Wiring diagram VAZ 2110 16 valves injector
The systems presented above are controlled by an electronic unit that coordinates the operation of the two systems, and thereby increases the overall degree of efficient functioning of the injection system.
Typical faults
The front suspension is characterized by certain breakdowns, which are determined by two phenomena:
They should be considered separately, since the reasons for their appearance are different.
Knocks
If you start to hear knocking noises coming from the front suspension, this could be caused by several reasons:
- The rack has certain faults;
- The ties on the cross member, the cushions are worn out or the bolts are loose;
- The attachment to the body was not strong enough;
- The springs have failed;
- The hinges are worn out;
- The rubber part of the suspension has broken its integrity. The knock should be clear, like the impact of metal on metal;
- Wheel alignment is out of balance.
If you do not hear a knock, but a noise, then the causes of front suspension problems may be as follows:
- The bolts that secure the stabilizer bar to the body have become loose;
- The rubber components in the strut support have collapsed;
- The rubber pads of the coupler or rod are worn out;
- The suspension spring has broken or violated its geometry;
- The wheels are unbalanced;
- The compression stroke buffer has collapsed.
Increased tire wear
If you are not a fan of fast acceleration, harsh braking, or do not overload the car, then the reasons for increased wear may be:
- The wheel alignment angles are incorrect;
- The hinges are worn out;
- Wheel balance is off.
Why does the car pull to the side?
Sometimes drivers notice how, when driving in a straight line, the car begins to pull to the side. There are several reasons for this phenomenon:
- Each spring has its own specific compression ratio. If it loses elasticity, the element must be replaced;
- Tires may have different pressures. Check this first;
- A rubber component on one of the strut supports has collapsed. In such a situation, a characteristic knock may appear. The situation can be corrected by simply replacing the element;
- The wheels are set at the wrong angle. A common cause of tire wear. It is better to trust such a problem to a specialist, since it is difficult to repair the front suspension on a VAZ 2110 with your own hands in case of such a malfunction.
This is interesting: How mechanics treat your car when you hand it in for repairs (video)
Examination
- Experts recommend paying special attention to the protective covers of the joints, monitoring their condition, and also checking the front suspension for mechanical damage.
- Make sure that neither the front suspension arm of the VAZ 2110 nor any other element has cracks or other visible damage. Pay attention to checking the connection points of the elements.
- If the components are deformed, the angle of the wheels will most likely be disrupted and they will no longer be able to be adjusted.
- Check ball joints, hinges, upper stack mounts, cushions. If there are breaks in the rubber elements, they must be replaced.
- Measure the distance between the lower arm and the brake disc. This way you can check the condition of the suspension joint. If the distance is more than 0.8 millimeters, the hinge must be replaced with a new one.
- If the buffer shows signs of destruction, it should be replaced immediately.
- The spring is replaced if it has failed or sagged.
- Ball joints are replaced when they are worn or deformed. Other hinges must be replaced if they or the stabilizer bar struts are worn out.
- All rubber elements change under conditions of deformation or failure.
- If the fastening of the upper strut mount to the body is loose, simply try to tighten the fastening. Most likely, no major intervention will be required.
Understanding the structure of the front suspension, as well as audibly or visually identifying its malfunctions is quite simple, despite the apparent complexity of the assembly. But you should approach the issue carefully and periodically check the condition of the suspension, even if its malfunction is not indicated by any noise, knocking or behavior of the car on the road.
For any car, it is better to organize preventive maintenance than to later pay exorbitant prices for a full repair. Like a disease, it is better to prevent problems with the front suspension of the VAZ 2110 from occurring. It is cheaper, simpler and more correct on the part of the car owner.
Tags: repair, maintenance, VAZ tuning, faq
Comments 52
Good afternoon everyone! I ran into trouble that circumstances forced me to install an unloading relay on the starter, but I have a question about the correctness of the circuit that I used in this community: www.drive2.ru/c/48003/ why is it better or worse than this www.drive2.ru /c/595839/ There is no selenium in the electrics, I’m afraid of burning the car
Have a good time everyone. Need help, the dashboard lights are constantly on, when you turn on the ignition, not a single light comes on. Maybe someone had this.
hi all! Tell me what to do, I changed the sensor, drove 500m, and everything is new (the check light is on) ps there are no deviations in the car, everything is normal. NOT troit,
maybe the hall sensor is working, if only the switch or coil?
VAZ 2110 carburetor at first troubled then everything, tried with A3-1, thought hall sensor, silence
here not long ago there was a 2112 that had a muzzle and rear arches made under the coupe, I can’t find it, help
I just have the first ten, I don’t really know anything about it, I just found the manual from you)
Yes, I have. If viburnum or Priora, or. you'll find it too
thank you, a lot of useful and necessary information) I wish there were more such wonderful people)))
that's exactly why) good luck
Add a topic! Replacing the foam lamp socket with a cigarette lighter. In my blog, here is the link www.drive2.ru/cars/lada/2…3/glebing/journal/202385/
There are no priors in the family yet. I’ll definitely take the advice. Thanks
Thanks for the info. I downloaded it on both Kalina and 10.
I saw an electronic version of Murzilka somewhere, but I can’t find it anymore, can anyone tell me? Not PDF, but in program form.
Whoa! Like this! In fact, I forgot that I needed it.))) I’ll go look for it on the tracker. Py-Sy. Here, I hope it will be useful to many! yadi.sk/d/JBFUaKkqdD5GW
What about removing and installing the internal combustion engine? Also a useful topic: How to do what, you can look in my blog
how to pull the power wire through the elastic band of the hydraulic corrector?
And also, I have a proposal to create a topic on consumables, what kind of oil, brake pads and timing belt, etc. I can even fill it out myself
Thank you, the manual has been added to the community FAQ. Everything is well written and the photos are on point! We need a topic regarding consumables; the same type of questions are asked every day. Will you do it?
I’ll do it, but the topic will need to be fixed in the same way as the faq.
And also, I have a proposal to create a topic on consumables, what kind of oil, brake pads and timing belt, etc. I can even fill it out myself
+1. suspension, pads, calipers, tips and all that from me
I would like to know something about the power steering and rack, otherwise the Murzilkas don’t have anything on the power steering, mine is leaking, I plan to sort it out when it gets warmer. I would like to know what to prepare for and where the difficulties are.
on the treatment of outgoing corners on the dashboard near the air intakes
How to distinguish original MAFs from fakes, a very useful link
Maybe someone will be interested in what an absorber is. The feedback injection system uses a fuel vapor recovery system. It consists of an adsorber installed in the engine compartment, a separator, valves and connecting hoses. Fuel vapor from the tank partially condenses in the separator, and the condensate is drained back into the tank. The remaining vapor passes through gravity and two-way valves. The gravity valve prevents fuel from leaking out of the tank when the vehicle rolls over, and the two-way valve prevents excessive increase or decrease in pressure in the fuel tank.
Then the fuel vapor enters the adsorber, where it is absorbed by activated carbon. The second fitting of the adsorber is connected by a hose to the throttle assembly, and the third to the atmosphere. However, when the engine is turned off, the third fitting is closed by an electromagnetic valve, so that in this case the adsorber does not communicate with the atmosphere. When the engine starts, the injection system controller begins to send control pulses to the valve with a frequency of 16 Hz. The valve communicates the adsorber cavity with the atmosphere and the sorbent is purged: gasoline vapors are sucked through the hose into the receiver. The greater the engine's air consumption, the longer the duration of the control pulses and the more intense the purging.
In an injection system without feedback, the system
Lada/VAZ-2110, -2111, -2112 operation, maintenance and repair
VAZ-2110 and its modifications (VAZ-2111 and VAZ-2112) are a five-seater passenger car with a front engine, front-wheel drive and an all-metal welded body with a supporting structure. Body types: VAZ-2110 – sedan, VAZ-2111 – station wagon, VAZ-2112 – hatchback. Cars of the “tenth” family are equipped with four-cylinder, four-stroke, eight- and sixteen-valve gasoline engines with a volume of 1.5 and 1.6 liters and a power (according to GOST 14846–81 net) from 52.0 to 66.7 kW. Power supply systems: carburetor and distributed fuel injection. To comply with modern Euro-2 and Euro-3 exhaust gas toxicity standards, cars with injection engines are equipped with catalytic converters or cat manifolds with oxygen concentration sensors. Cars with carburetor engines do not have neutralizers in their equipment.
Engine VAZ-2111 Gasoline, four-stroke, four-cylinder, in-line with a transverse arrangement, eight-valve, with an overhead camshaft. The operating order of the cylinders is: 1-3-4-2, counting from the crankshaft pulley. The power supply system is distributed injection. Engine control – controller (Bosch, “January” or GM). Most engines are equipped with an exhaust gas converter. To meet the maximum power requirements (58.3 kW according to DIN), some engines are equipped with a receiver with shortened channels and a camshaft 2110. Some engines are equipped with a phased injection system. In this case, there is a pin for the phase sensor on the camshaft (camshaft index - 2111). The engine, gearbox and clutch form the power unit - a single unit mounted in the engine compartment on three elastic rubber-metal supports. The right support is attached to the engine bracket, and the left and rear ones are attached to the gearbox housing brackets. The right and left supports are similar in design. On the right side of the engine (along the direction of the car) are located: the drives of the camshaft and coolant pump (by a toothed belt) and the generator (by a V-ribbed belt). On the left are: thermostat, coolant temperature sensors, starter (on the clutch housing). Front: spark plugs and high voltage wires, knock sensor, oil dipstick, crankcase ventilation hose, alternator (lower right). Rear: receiver, fuel rail, injectors, intake and exhaust manifolds, oil filter, oil pressure sensor. The cylinder block is cast from cast iron and does not differ from the engine block 21083 and 2110. The cylinders are bored directly into the block. The nominal diameter is 82 mm; during repairs it can be increased by 0.4 or 0.8 mm. The class of the cylinder is marked in Latin letters on the bottom plane of the block in accordance with the diameter of the cylinder in mm: A – 82.00-82.01, B – 82.01-82.02, C – 82.02-82.03, D – 82 .03-82.04, E – 82.04-82.05. The maximum permissible cylinder wear is 0.15 mm per diameter. At the bottom of the cylinder block there are five main bearing supports with removable caps, which are attached to the block with special bolts. The holes for the bearings are machined together with the covers, so the covers are not interchangeable and are marked with marks on the outer surface to distinguish them (see the figure in the section “Disassembling and assembling the engine”). The middle support has slots for thrust half-rings that prevent axial movement of the crankshaft. The steel-aluminum half-ring (white) should face the crankshaft pulley, and the cermet (yellow) should face the flywheel. In this case, the grooves on them should face the surfaces of the crankshaft. Half rings are supplied in nominal and 0.127 mm larger sizes. If the axial clearance (play) of the crankshaft exceeds 0.35 mm, then replace one or both half rings (nominal clearance 0.06-0.26 mm). The main and connecting rod bearing shells are thin-walled steel-aluminum. The upper main bearings (installed in the cylinder block) of the first, second, fourth and fifth bearings have a groove on the inner surface. The lower main bearings and the upper bearing of the third support are without a groove, just like the connecting rod bearings. Repair liners are produced for crankshaft journals, reduced by 0.25, 0.50, 0.75 and 1.00 mm. The crankshaft is made of high-strength cast iron, with five main and four connecting rod journals. The shaft is equipped with eight counterweights cast integrally with it. To supply oil from the main journals to the connecting rods, there are channels whose outlet holes are closed with pressed-in plugs. At the same time, the channels also participate in oil purification: under the influence of centrifugal force, solid particles and resins passing through the filter are thrown back to the plugs. Therefore, during any dismantling of the shaft, it is advisable (and when balancing the shaft, it is mandatory) to clean the channels from accumulated deposits. The plugs cannot be reused - they are replaced with new ones. At the front end (toe) of the crankshaft, a toothed camshaft drive pulley is mounted on a segment key. The generator drive pulley is attached to it on a pin, which simultaneously serves as a damper for torsional vibrations of the crankshaft (due to the elastic element between the central and outer parts of the pulley). It has a ring gear for operating the crankshaft position sensor. Two teeth out of 60 are missing (forming a cavity) - this is necessary for the TDC sensor to determine. The flywheel is secured to the rear end of the crankshaft with six self-locking bolts through a common washer. It is cast from cast iron and has a pressed steel ring gear, which is used to start the engine with a starter. The flywheel is installed so that the cone-shaped hole near its crown is opposite the connecting rod journal of the 4th cylinder - this is necessary to determine TDC after assembling the engine. The connecting rods are steel, I-section, processed together with the covers. To avoid mixing up the caps during assembly, they, like the connecting rods, are marked with the cylinder number (it should be on the same side of the connecting rod and the cap). A steel-bronze bushing is pressed into the upper head of the connecting rod. According to its internal diameter, connecting rods are divided into three classes with a pitch of 0.004 mm. The class number is stamped on the connecting rod cover. Connecting rods are also divided into classes based on weight, which is marked with paint or a letter on the connecting rod cover. All engine connecting rods must be of the same weight class. The piston pin is steel, tubular in cross-section, floating type (rotates freely in the piston bosses), secured from falling out by two retaining spring rings located in the grooves of the piston bosses. On some engines, the piston pin is pressed into the upper head of the connecting rod and rotates freely only in the piston bosses (as on the VAZ-2108). Such engines have a different entire connecting rod and piston group. Based on the outer diameter, three classes of fingers are distinguished (every 0.004 mm): 1 - with a blue mark (smallest diameter), 2 - green, 3 - red. The piston is made of aluminum alloy. The piston skirt has a complex shape: cone-shaped in the longitudinal section, oval in the transverse section. In the upper part of the piston there are three grooves machined for piston rings. The oil ring groove has drillings that go into the bosses. Through these drillings, the oil collected by the ring from the cylinder walls flows to the piston pin. The hole for the piston pin is offset by 1 mm from the center plane of the piston, so when installing it, you must follow the arrow stamped on the bottom: it should be directed towards the crankshaft pulley. The pistons of 8-valve engines (2111 and 2110) have an oval recess on the bottom, while the piston bottom on the 2112 engine is flat, with four recesses for the valves (do not confuse the parts). Pistons according to their outer diameter (measured in a plane perpendicular to the piston pin, at a distance of 51.5 mm from the piston bottom), like cylinders, are divided into five classes (markings are on the bottom). Piston diameter (for nominal size, mm): A – 81.965-81.975, B – 81.975-81.985, C – 81.985-81.995, D – 81.995-82.005, E – 82.005-82.015. Spare parts include pistons of classes A, C and E (nominal and repair sizes), which is quite sufficient for selecting a piston to a cylinder: the design gap between them is 0.025-0.045 mm, and the maximum permissible gap during wear is 0.15 mm. At the same time, it is not recommended to install a new piston into a worn cylinder without boring it: the groove under the upper piston ring in the new piston may be slightly higher than in the old one, and the ring may break on the “step” formed in the upper part of the cylinder when it wears out. For pistons of repair sizes, a triangle (+ 0.4 mm) or a square (+ 0.8 mm) is knocked out on the bottom. Based on the diameter of the hole for the piston pin, pistons are divided into three classes: 1 – 21.978-21.982, 2 – 21.982-21.986, 3 – 21.986-21.990. The piston class is also stamped on its bottom. The piston and pin must be of the same class. To reduce the imbalance of the crank mechanism, the pistons of one engine are selected by weight: the spread should not exceed 5 g. The piston rings are located in the grooves of the piston. The top two rings are compression rings. They prevent gases from breaking through into the engine crankcase and help remove heat from the piston to the cylinder. The lower ring is an oil scraper ring. The cylinder head is made of aluminum alloy, common to all four cylinders. It is centered on the block with two bushings and secured with ten screws. A non-shrinkable metal-reinforced gasket is installed between the block and the head (on dry surfaces). Its reuse is not permitted. If the length of the screws exceeds 135.5 mm, they should also be replaced with new ones. The order and tightening torque of the block head screws are indicated in the appendix. There are five camshaft bearings located at the top of the cylinder head. The supports are detachable, and the holes in them are machined together with the bearing housings (front and rear), so the latter should be replaced together with the cylinder head. During assembly, sealant type KLT-75M or Loctite No. 574 is applied to the surfaces of the cylinder heads mating with the bearing housings in the area of the outer camshaft supports. The procedure and torque for tightening the nuts of the bearing housings are indicated in the appendix. The camshaft is cast, cast iron, five bearing. Driven by a toothed belt from the crankshaft. To ensure correct installation of the camshaft relative to the crankshaft, there are marks (marks) on the drive gears. If the mark on the crankshaft pulley coincides with the mark on the oil pump housing (the mark on the flywheel is opposite the middle scale mark on the clutch housing), then the mark on the camshaft pulley should coincide with the bent antenna on the toothed belt cover. The valve seats and guides are pressed into the cylinder head. The holes in the bushings are finally machined after pressing. On the inner surface of the bushings, grooves resembling threads are made for lubrication: for the intake valve bushings - for the entire length, for the exhaust valves - up to half the length of the hole. Oil deflector caps made of oil-resistant rubber are placed on top of the bushings. The valves are made of steel, the outlet valve has a head made of heat-resistant steel with a welded bevel. They are arranged in a row, inclined to the plane passing through the axes of the cylinders. The area of the intake valve disc is larger than that of the exhaust valve. The clearance in the valve drive is adjusted by selecting the thickness of a special adjusting washer installed in the pusher seat (marked down). The spare parts kit includes washers with a thickness of 3.00 to 4.50 mm with a pitch of 0.05 mm. The washers are made of 20X steel; their surface is nitro-carburized to increase wear resistance. Pushers are cylindrical cups that move in the holes of the cylinder head and rest on the ends of the valve stems. To increase wear resistance, the surface of the pusher in contact with the valve is cemented. When the engine is running, the pushers rotate due to the displacement of the cam axis relative to the pusher axis by 1 mm, which contributes to their more uniform wear. The valve closes under the action of two springs. Their lower ends rest on the washer, and the upper plate is held in place by two crackers. The folded crackers have the shape of a truncated cone on the outside, and on the inside they are equipped with three persistent flanges that fit into the grooves on the valve stem. Engine lubrication is combined. The main and connecting rod bearings and the support-camshaft journal pairs are lubricated under pressure. Oil is sprayed onto the cylinder walls (further to the piston rings and pins), to the camshaft cam-pushrod pair and to the valve stems. The remaining components are lubricated by gravity. The oil pump is gear-type, with internal gears, and a pressure reducing valve. Mounted on the front wall of the cylinder block (from the crankshaft side). The drive gear (smaller diameter) is mounted on two flats on the front end of the crankshaft. The maximum diameter of the socket for the driven (large) gear when worn should not exceed 75.10 mm, the minimum width of the segment on the body separating the drive and driven gears is 3.40 mm. The axial clearance should not exceed 0.12 mm for the drive gear and 0.15 mm for the driven gear. The oil receiver is bolted to the second main bearing cap and pump housing. The oil filter is full-flow, non-separable, with bypass and anti-drainage valves. The crankcase ventilation system is closed, forced, with gas suction through an oil separator (in the cylinder head cover).
VAZ-2111 engine: 1 — supply pipe of the coolant pump; 2 — cylinder block; 3 - thermostat; 4 — engine control system coolant temperature sensor; 5 — exhaust pipe; 6 — cylinder head plug; 7 — cylinder head cover; 8 — fuel pressure regulator; 9 — oil filler cap; 10- throttle valve drive cable; 11 — throttle assembly; 12 — idle speed regulator; 13 — throttle position sensor; 14 - receiver; 15 — rear cover of the camshaft drive; 16 — front cover of the camshaft drive; 17 — nozzle; 18 — fuel rail fitting plug; 19 — fuel rail; 20 — intake manifold; 21 — right support bracket of the intake manifold; 22 — generator drive pulley; 23 — oil filter; 24 — crankshaft position sensor; 25 — oil pan; 26 — exhaust manifold; 27- connecting rod; 28 - crankshaft; 29 — left exhaust manifold support bracket; 30 - flywheel. Cross section of a VAZ-2111 engine: 1 - oil pan drain plug; 2 — oil pan; 3 — oil filter; 4 — coolant pump; 5 — exhaust manifold; 6 — intake manifold; 7 - nozzle; 8 — fuel rail; 9 — receiver; 10 — cylinder head cover; 11 — camshaft bearing cover; 12 - camshaft; 13 — crankcase ventilation hose; 14 — valve adjusting washer; 15 — valve cotters; 16 — pusher; 17 — valve springs; 18 — valve stem seal; 19 — valve guide; 20 - valve; 21 — spark plug; 22 — cylinder head; 23 - piston; 24 — compression rings; 25 — oil scraper ring; 26 — piston pin; 27 — cylinder block; 28 — connecting rod; 29 — crankshaft; 30 — connecting rod cover; 31 — oil level indicator; 32 — oil pump receiver.
A book from a series of multi-colored illustrated manuals on how to repair cars on your own. The manual contains a detailed description of the designs of components and systems of VAZ-2110, -2111, -2112 cars with a carburetor engine 2110 (1.5 l) and engines with distributed fuel injection 2111, 2112 (1.5 l), 21114 and 21124 (1, 6 l). The main malfunctions, their causes and solutions are described in detail. The sequence of disassembly and repair is shown in photographs with comments. The Appendices provide a list of lubricants and operating fluids, tightening torques for threaded connections, show tools, lamps, lip seals and bearings used on vehicles of this family, as well as electrical diagrams. The book is intended for drivers who repair the car themselves, as well as for service station workers.
DIY VAZ 2110 repair
In the photo there is a red Lada Ten - a four-door front-wheel drive domestic sedan.
VAZ-2110 is a small class car made in Russia. Production began at the VAZ plant in 1995. In 2007, the last car, model 2110, rolled off the assembly line.
The model was produced under the VAZ 2110 and Lada 110 brands. The “folk” names of the model are Zhiguli, Desyatka.
Initially, the VAZ 2110 was produced only as a sedan with four doors. The car was equipped with front-wheel drive and an electronic engine control system. For the first time, an on-board computer was installed on a Russian car model.
Main characteristics
The displacement of the engine is of particular interest to the consumer, and the displacement of the VAZ-2112 engine (16 valves) can be different. There are three types in total:
- Engine VAZ-21120. Engine capacity is 1.5 liters. Power is 93 horsepower. Motor life is up to two hundred thousand km.
- Engine VAZ-21124. Displacement - 1.6. Power - 90 horsepower. The resource is the same.
- Engine 21128. Volume - 1.8. The power is slightly higher - 98 hp. With. Piston diameter 82.5 mm. The mileage before overhaul has been increased to 250 thousand km.
- The cylinder block is cast, casting material is cast iron.
- The connecting rods are forged, have an I-section and are fully interchangeable with similar parts of the 2110 model.
Average fuel consumption for all engines is 7.5 liters.
As you can see, the engines are not much different, judging by their main characteristics.
Engines
On the domestic market, the model could be purchased with one of three engine options:
- 1.5-liter 8-valve engine, 69 hp. Model 2110 base carburetor powertrain;
- 1.5-liter 8-valve engine, 79 hp. Accelerates to hundreds in 14 seconds;
- 1.5-liter 16-valve engine, 94 hp. The most powerful version of the power unit. Acceleration to 100 km/h takes 12.5 seconds.
8-valve engines have valve protection - they do not bend if the timing belt breaks. There is no such protection on a 16-valve power unit.
All VAZ engines require timely maintenance. Failure to meet replacement deadlines may result in major repairs.
During operation, the intake manifold fails. Repairing a problem yourself requires a lot of time and effort. Repairs at a service station will cost twice as much. If you have no experience in such work on your own, it is better to turn to specialists.
Known modifications of the VAZ 2112 model
Despite its short existence, the model received a number of modifications :
- VAZ 21120 or standard assembly had the mentioned 16-valve engine with a volume of 1.5 liters;
- VAZ 21121 received a 1.6 liter engine with 8 valves;
- VAZ 21122 became the owner of a 1.5 liter engine with 8 valves. The model was known as a budget option, as it was produced without electric windows , used non-ventilated brakes and was equipped with 13 discs;
- VAZ 21123 is a three-door modification called Lada 112 Coupe. Produced in limited editions from 2002 to 2006. The car had a 16-valve luxury engine with a volume of 1.6 liters ;
- VAZ 21124 is a car with minor changes that solved the problem of bent valves and increased engine capacity to 1.6 liters. Produced from 2004 to 2008;
- VAZ 21128 is the most powerful version of the car , which received a 16-valve engine with a displacement of 1.8 liters and a maximum power of 105 hp.