The gas distribution mechanism ensures that the cylinders of the internal combustion engine are filled with a combustible mixture with an optimal ratio of fuel and air. The timing belt is also responsible for the release of exhaust gases in the fourth stroke of the engine. According to statistics, belt replacement is considered one of the most popular services provided in car repair shops. However, every motorist, including the owner of a Priora, can carry out this procedure independently. Actually, the gas distribution mechanism is one of the main components of the power unit.
Purpose of the timing belt
As a rule, cars are equipped with a timing chain or belt drive, and the second, due to its low cost, is gaining more and more popularity. The gas distribution mechanism drive, regardless of the type, always performs the same function: it synchronizes the rotation of the camshaft (or several camshafts) with the rotation of the engine crankshaft. Only during rotation of the camshaft are exhaust gases removed from the cylinders and replaced with a fresh air-fuel mixture. It is logical to assume that if the timing belt breaks, the normal operation of the engine will stop and the normal operating cycle will be interrupted.
When is it necessary to replace the timing belt on a Priora car?
If we take into account the factory maintenance regulations, then he recommends rotating the rubber-mechanical product after 200,000 km . But, as practice shows, motorists prefer to change this part earlier - some at 60,000, and some at 100,000 km. It is believed that during urban travel the element wears out faster.
In any case, the condition of the element must be monitored every 45 thousand km . The first signs that a timing belt replacement is already necessary on a Lada Priora are the following factors:
- extraneous noise during engine operation;
- discoloration of exhaust gases;
- problems when starting the engine;
- extraneous vibrations.
Low mileage does not always guarantee trouble-free operation of the car. Quite often in reviews from car enthusiasts you can come across a situation where the belt drive wears out ahead of schedule due to oil and dirt getting on it. These components enter through seals and cracks in the casing, so it is important to eliminate the causes of leaks and inspect the part.
It is important to understand that replacing the Priora timing belt must be done in a timely manner; in no case should the matter be delayed until it breaks. Otherwise, the cost of repairs may unpleasantly surprise the owner. This is largely due to the absence of recesses for the valves on the pistons, so a break in the part leads to their direct contact, after which the latter usually bend.
Problems with the strength of the belt drive at high speeds generally lead to catastrophic consequences, including breakage of the pistons and even deformation of the connecting rods. In order not to expose themselves to risk, experienced motorists are advised to periodically monitor the condition of the rubber transmission, as well as the degree of its tension.
Causes and consequences of a break in the timing mechanism drive
The reasons may lie in the following:
- Untimely replacement of a worn out drive.
- The belt tensioner or pulley is jammed.
- Natural “aging” of the belt material.
- Oil getting on the drive surface.
- Initial low drive quality.
- Defects in the form of cracks that appear during operation.
- Climatic conditions.
- Manufacturing defects.
Consequences of a break:
- Damage to valves.
- Failure of pistons and cylinder heads.
- Stopping the camshaft and crankshaft.
The result of the work
Upon completion of installation, start the engine and listen to its operation. If the belt tension is normal, there should be no extraneous sounds. If the belt is too tight, the tension roller may make a hum or whistle. In this case, it must be released by turning it counterclockwise.
How to check the timing belt on a Priora and after how long to change it? How to change the timing belt on a Priora with your own hands? The timing belt on the Priora broke, what should I do?
1.Check and inspection of the drive and timing belt
To check the timing belt on a Priora: First, remove the + terminal from the battery
Remove the drive belt for the generator and air conditioner by unscrewing the tension roller with a 17 key.
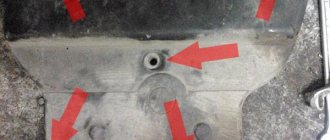
We remove the Priors engine casing with the inscription 16 valve, then remove the lower and upper timing drive covers, using a T30 head, unscrewing 7 bolts
We pull the Priora air filter off the mounts and snap off the wire from the air flow sensor.
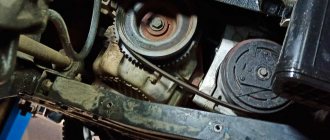
There is a small window under the thermostat, it is covered with a rubber plug. It is needed for labels
window for labels
We hang the front wheel, engage 4th gear and spin the wheel until the marks on 1) the rear timing cover of the Priora and on the pulleys 2) the flywheel and on the clutch shield in the window match
Lowering the car from the jack For convenience, I fixed the camshaft pulleys and the belt on them. And unscrew the tension roller with a 15mm wrench, then the support roller.
We check - we spin the videos. There should be no play or jamming. If it turns too easily, there may be no lubrication.
It turned out that the timing rollers are normal.
We remove the belt from the pump pulley and twist and wiggle. If there is play or spins strangely, replacement is necessary
We inspect the belt.
There should be no traces of oil or cracks. We bend it, look at the fold
We collect everything, look at the marks - they should be in place
We tighten the belt - turn the tension roller counterclockwise to cold, then tighten the fastening bolt. A bicycle wrench is suitable for tensioning
After tightening, look at the marks again. If everything is in order, put on the Priora timing belt covers, install the air filter, air flow sensor, and close the window
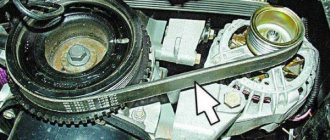
I made a small cut on the top cover of the timing drive of the Priora to see the position of the belt on the pulleys. If the belt starts to slip, it means the roller bearings or pump are worn out.
2.Replacing the timing belt frets priors 16 valves, rollers and pumps
It is better to take reliable kits for the 126th Priora engine - these are INA and Gates. Installed at the factory
I purchased a belt and rollers as a set (Red Power Grip box) - 2700 rub. and a pump.
The pump was also purchased from the factory - TZA Includes gasket and instructions.
First, remove the front right wheel. Remove the wheel locker. Now you need to remove the crankshaft pulley cover. It is screwed onto TORX T27 screws and one small screw for a Phillips screwdriver.
Remove the engine protection. Remove the Priora engine casing.
Unscrew the tension roller of the generator belt. We move the belt to the side. If this belt is not changed, then there is no need to jack the engine. In our case, the alternator belt is in excellent condition.
Remove the timing belt cover.
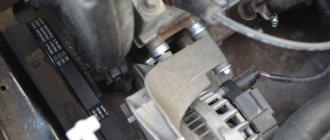
This is what it all looks like with the front top protection cover removed
The timing belt cover of the Priora consists of two parts, upper and lower. The top one is screwed on with 5 hex bolts. Bottom 2 bolts.
Fixed the location of the mark on the tension roller
The car has traveled 80,000 kilometers and the timing belt is in excellent condition. Next we'll see what's going on with the Priora pump and the rollers. Unscrew the crankshaft pulley. We put it in 4th gear, my partner presses on the brake and unscrews it.
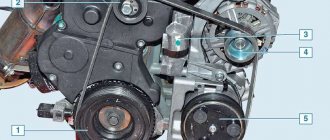
NOW WE SET TDC (top dead center) - this is a very crucial moment. There are castings on the camshaft pulleys, and recesses on the plastic casings - let's compare. There is a point on the small crankshaft pulley; it should coincide with the cast of the block (you can see it in the photo). In order to make sure that everything is at TDC, we take out the oil probe, unscrew the spark plugs, insert the dipstick into the hole of the spark plug of the first cylinder - you're done. Loosen the tension roller. Remove the belt and rollers.
Having removed the oil seals from the bypass roller, they were surprised - there was no lubricant in the roller. The pump had play.
Maybe the belt is still coming off, but not the pump and rollers.
To replace the pump, you need to remove the plastic casing behind the camshaft pulleys.
The pump is located behind the rear timing belt protection cover,
That is, you need to remove both camshaft pulleys.
Unscrew the bracket securing the tension roller of the generator. Using a 10mm wrench, unscrew the casing fasteners. To remove it you have to suffer. Now we drain the antifreeze at the bottom of the radiator using a plastic drain bolt.
To change the pump, you need to drain the coolant from the engine block. As always, it was not possible to do this without spilling a drop)))))
We also unscrew the drain bolt in the block. Immediately screw everything back in. You can remove the pump. Three hex bolts and the pump is removed. We thoroughly clean the seat from the remnants of the old gasket and put the pump back.
The new pump is in its rightful place
Do not confuse the hole for the casing mounting bolt; it should be at the bottom left when looking at the pump while standing near the right wing. Tighten the three hex bolts. We install the belt cover. We fasten the camshaft pulleys of the priors. We fasten the tension and parasitic rollers.
We put on new videos
We place the camshafts at TDC according to the marks.
We put the pulleys back.
We place the small crankshaft pulley at low tide. We check with a dipstick where the piston of the first cylinder is. We put on the belt.
And a belt.
We start with the left camshaft pulley clockwise. We tighten the tension roller. (It’s better to buy a key in advance or get ready to “conjure”) let’s delay.
P
After setting the marks, tighten the belt with a roller until it matches
We turn the camshaft pulley several times. We control TDC again.
Everything is assembled and ready for a test run.
Start the engine
3. What happens if you don’t change the belt - a good example.
Here is another Priora standing in my workshop... Yesterday a man called me asking me to replace the timing belt tensioner pulley on the Priora. He speaks and buzzes loudly. Knowing well that in the Priora it is not only the assembly roller that is humming, but also the timing mechanism, which is much worse and leads to greater costs, I suggest you come for diagnostics. Having listened to the tension roller of the accessory belt with a stedoscope, I understand that the roller does not hum, but the clicking comes from under the timing cover. I suggest you take it apart. Having removed the cover I saw this:
There are no teeth on the left side of the timing belt...
The timing shafts did not turn only because of the 2 remaining teeth. It would be enough to press the gas several times and the teeth on the timing belt would break and the owner’s wallet would be emptied by 30 rubles.
4. Broken timing belt on a Priora and the consequences - an unfortunate coincidence
I would like to remind car enthusiasts once again - do not believe the words of official dealers that timing belts need to be changed after 100,000 km. In my practice, there were cases when the original belts lasted for more than 100 thousand km, and when they broke even at 50 thousand. Use only original Gates kits (in relation to VAZ cars).
In June, my timing belt broke and 9 valves were bent, and before that the belt was changed 8 thousand ago, most likely it was either a defective tension roller or a defective belt!
The replacement work cost 6 thousand rubles, spare parts 9 thousand! I changed all 16 valves, bought a GATES roller and belt set, it costs 3700! You definitely need to check that the marks and stamps are clearly visible on the video, cheap kits for 1500 rubles are fake! don't take it, don't save!
video about replacing the timing belt on a Prior:
The power unit of the Lada Priora has 16 valves, a rather problematic unit in the sense that a broken timing belt entails expensive repairs. In the event of a rupture, pistons and valves may collide. And the consequences are not only damage to the valves, but also destruction of the piston system. According to the instructions, the Priora timing belt must be replaced after 70 thousand kilometers. But check its condition, and possibly change it on a 16 cl engine. it is necessary after 20 thousand kilometers without waiting for it to break.
An unscheduled replacement on a Lada Priora with a 16 cl engine may be necessary if grease is found on the belt. Or mechanical damage is detected that can lead to a break. How long it takes to change is an individual matter, but you need to treat this with full responsibility, since the consequences of a break can cost you very dearly.
Differences in mechanisms with 8 and 16 valves, operating diagram
Operation on a 16-valve engine is not fundamentally different from that on an 8-valve engine. Its gas distribution system has two camshafts and an additional pulley that holds the timing belt, which is slightly longer in the 16-valve engine. Therefore, when tensioning the belt, you need to monitor the position of not two pulleys, but three. Each of them is marked for this purpose, as in the 8-valve system.
For clarity, you can use the diagram below. Using it, it will be easier to replace the timing belt on a 16-valve engine.
Timing belt diagram for a 16-valve Lada Priora engine
When to change: consequences of untimely change
It is recommended to replace the timing belt on a Priora after different periods of time. The manufacturer claims that it can withstand one hundred thousand mileage, but experience shows that a change may be needed much earlier.
The optimal period is every fifty thousand kilometers. Some argue that over such a short service life, rubber is simply not capable of failure. However, no one takes into account the conditions - roads, fuel quality, etc.
Also, during the operation of the mechanisms, it wears out, the rubber stretches, and therefore does not provide the correct tension of the timing belt, and slippage is possible. The teeth can wear off - because of this, traction with the gears is not ensured.
There is no exact time for a change that would suit all motorists. Some take good care of their vehicles, drive carefully, and use only high-quality fuel. Others use a more extreme type of driving, foreign liquids get on the rubber, etc.
In order not to lose your car during the repair period and not to spend a fortune on restoring the mechanics, write down or remember the date of the last timing belt change on the Priora. Next, regularly check the condition of the rubber; if worn, replace it with a new device.
Signs of possible failure
There are several characteristic signs that should alert the driver:
- When the engine is turned on, extraneous noise occurs. Sometimes drivers confuse a timing belt malfunction with a poorly functioning tension pulley.
- If the color of the exhaust gas has changed.
- The engine doesn't start well.
- An unusual vibration is felt.
Pay attention to these “symptoms”, even if the Priora’s mileage with a new timing belt has not yet reached 50 thousand km. It may fail earlier if foreign liquid gets onto the drive - oil, coolant, as well as dust or dirt.
It’s worse if it’s the coolant that gets onto the drive. Firstly, this means that the gasket that ensures the pump is sealed has failed, or there is a problem with the pump. Then the rubber is damaged and service life is reduced tenfold.
Even if the belt is new, but coolant or antifreeze gets on it, it will fail even after operating for 10 thousand miles. You will have to replace the Priora timing belt and figure out why foreign substances get on it.
How to check the serviceability of the belt yourself
If you suspect that it is time to replace the Priora timing belt, it would not hurt to check the serviceability of this rubber product. Visual diagnostics will allow you to check the serviceability and absence of scuffs on the Priora timing belt.
You should have a choice of one of the tools at hand, or two at once - a 5-point hex key, or a T-30 sprocket bit. If one doesn't work, try the second.
Procedure:
- Open and lift the hood.
- You will see the front panel covering the mechanism and timing belt.
- Take the key and unscrew the five bolts that hold the front panel, remove it.
- In front of you you will see a mechanism, including a tension roller.
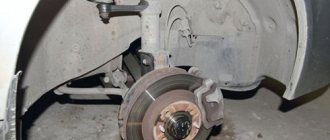
- Place a jack on the passenger side and place the wheel in a suspended position. Engage fifth gear while it is working, look at the surface of the belt for damage, even small defects.
- If you notice cracks of any size, mechanical cuts, or threads sticking out, be sure to replace it by contacting a specialist or yourself.
- Check the pump. If any traces of coolant leakage from the pump are noticeable, then the rubber will also have to be changed, even if there is no mechanical damage.
- Check the tension roller. Auto mechanics advise changing it less often than tires. The average lifespan is approximately one hundred thousand kilometers. Change it every other time you change the belt.
- Measure the belt tension. To do this, press on the stretched rubber in the area between the gears of the two camshafts. You need to press with a force of about ten kilograms. Correct tension of the timing belt should not bend more than seven millimeters.
- Check that the rubber is not too loose. Make sure that the Priora timing marks match the original condition. The first, similar to a recess, is located on the outer race of the tension roller. The next one is located at the base of the roller. The maximum deviation is four millimeters; if the tension does not meet the standards, the product will have to be changed.
Found a discrepancy with the standards? Change the product. A belt set with rollers for the Priora 126 engine costs only five thousand rubles. This is a much smaller amount than the cost of a major repair if a component ruptures.
Video instructions
Working with a 16-valve engine
Replacing the drive on an 8-valve engine
Auto mechanics recommend carrying out a scheduled technical inspection of the Lada Priora timing belt every month. This part must be replaced if cracks, abrasions, cuts or other defects appear. Replacing the alternator belt on a Priora is carried out when a high-frequency whistle appears as a result of turning on electrical appliances.
- Author: Konstantin Kostin
In my free time, I read a lot, play airsoft (a team military sports game) and amateur radio communications. Lots of professional connections. My strengths: communication skills, endurance, responsibility. Rate this article:
- 5
- 4
- 3
- 2
- 1
(1 vote, average: 4 out of 5)
Share with your friends!
Changing the belt yourself
Replacing the timing belt of a Lada Priora with 16 valves is not the most difficult procedure. Buy a kit that includes tension rollers, stock up on tools, and you’re good to go.
Instructions
- Lift the hood, use a hex wrench to unscrew the five bolts on the cover, and remove it. Unscrew the two bolts from the lower timing cover.
- Disconnect the crankshaft sensor.
- On the passenger side, place a jack under the wheel, lift the car with it, and place the wheel in a suspended position. This will make it easier to align the marks of the mechanism and camshafts - they should be parallel, opposite each other. Combine them with fifth gear engaged, turning the wheel to the correct position. Turn off gear transmission.
- Find the flywheel and remove the rubber plug with a regular screwdriver. Under the muffler you will see a flywheel with a mark, it should be located opposite the mark on the left side.
- You need to get to the crankshaft pulley; to do this, remove the wheel or turn it to the right, you need to turn it all the way. Unscrew the five bolts that secure the mudguard.
- Ask a friend to engage fifth gear and press the brake, at this time, using ratchet No. 17, unscrew the bolt that secures the crankshaft pulley. Rotate in the opposite direction clockwise.
- Remove the thrust washer
- Unscrew the bolts securing the tension and thrust rollers. Use key 15. Remove the rollers, remove the belt.
- Now install new rollers, do not tighten the tensioner type, they will be used for adjustment. Reinstall the camshaft pulleys, then the crankshaft pulley.
- Put on a new belt - pull it onto the crankshaft, then around the pump, then onto the camshaft pulleys.
The new product is installed, all that remains is to adjust the tension:
- Pull the tensioner pulley in the opposite direction clockwise - when you installed the new kit, you did not tighten this pulley.
- All that remains is to align the marks on the tension roller, just tighten the bolts tightly.
- Turn the crankshaft pulley exactly two turns. Rotate the pulley in a clockwise direction. Be sure to make sure that the marks on the two shafts match.
To make sure the tension is correct, press the stretched rubber with a force of about ten kilograms. If the product bends by more than seven millimeters, you will have to carry out the rubber tensioning procedure again. In ideal condition, the rubber should not be pressed under a pressure force of 10 kg.
Engine Specifications 21126
The lifespan of Lada Priora engines is about 300 thousand kilometers. However, the specific number depends on the engine model and its care. For example, some eight-valve engines, according to experienced mechanics, can run up to half a million km without major repairs, if they are not seriously loaded.
Let's take a look at the modifications of eight-valve and sixteen-valve engines:
- VAZ 21114 is an eight-valve engine that has been installed on domestically produced cars since 2007. Inherited from the 110th Lada;
- VAZ 21116 is another eight-valve car. This Priora engine already had a lighter piston-rod group;
- VAZ 21126 is already an engine with sixteen valves. And again the connecting rod and piston group was lightened. This helped increase the engine's power, but reduced its lifespan;
- VAZ 21127 - installed on Priora with an intake manifold of variable length.
Now let's take a look at the powers of the Priora engines described above and their torques:
- VAZ 21114 - 80 horses with a torque of 120 Nm, which is pretty good;
- VAZ 21116 - 87 horses with a torque of 140 Nm. The power and torque have been increased due to the lightening of the torque group;
- VAZ 21126 – 98 horses, 145 Nm;
- VAZ 21127 - 106 horses, 148 Nm.
In terms of volume, all Priora engines did not exceed 1.8 liters and some were installed at 1.6 liters. These cars are considered economical small cars. Fuel consumption did not exceed 10 liters per 100 kilometers in the city.
Similar article VAZ 21126 engine, technical characteristics of the engine
Engines Lada Priora 8 valves
The eight-valve 114 engine in the Priora is installed mainly on sedans. Now it is already difficult to find, since in 2011 the manufacturer changed it to 116.
For your information! Experienced mechanics say that it had some problems that were inherited from other engines, so it did not gain much popularity among car enthusiasts.
The 116 was also an eight-valve engine and was installed from 2007 to 2015 mainly on sedans. Let's take a look at its technical specifications.
| Parameter | Meaning |
| Nutrition | Injection |
| Valves | 8 pieces |
| Location | Row |
| Econorms | Euro 3 |
| Fuel consumption in the city | 9.5 l |
| Life resource | 250 thousand kilometers according to the manufacturer |
| Engine volume | 1.6 l |
The advantages of such engines from Priora are the following positive aspects:
- does not bend the valve;
- can be disassembled and assembled on the knee;
- spare parts are sold at low prices.
However, there were also disadvantages. According to car owners, the main negative aspects of engines are noise and low power.
Lada Priora engines 16 valves
For the Normal and Lux trim levels, the Priora was equipped with an engine of 16 valves. These were improved power units from the manufacturer. Unlike the eight-valve ones, they were equipped with a durable belt from the Gates Rubber Company and a lightweight piston group from the manufacturer Federal Mogul.
Such 16-valve engines had the following characteristics, which I listed in the table below.
| Parameter | Meaning |
| Nutrition | Injection |
| Valves | 16 |
| Location | Transverse |
| Econorms | Euro 3 |
| Fuel consumption in the city | 9,1 |
| Life resource | 300 thousand kilometers |
| Engine volume | 1.8 l |
Small cars with these engines pleased car owners with innovations and increased power. Of course, there were some common problems inherent in all Priora power units. But more on this in a special section below.
Which belt is better to choose for a Priora with 16 valves
Now on sale you can purchase not only a separate belt, but also a whole timing belt kit for replacement. The assortment for Lada is large, which one is better to choose, the original or an analogue, and what to install is up to you. But the ones that have proven themselves best, for engines with any number of valves, are sets or separate original belts from Gates. The original replacement kit is more expensive, but its service life is much higher than its analogue and the possibility of breakage is much lower.