Heating the 220V engine for UAZ 469
I've already racked my brains about how to connect Start-M to warm up the engine more efficiently and quickly.
I have a UAZ 31622 SIMBIR with a ZMZ 409 engine. The cooling system is the same as on a UAZ Hunter with a ZMZ 409 engine. The expansion tank has only one hose at the bottom, which is connected to a thin tube on the radiator filler neck. Here is a photo of my car: https://fotki.yandex.ru/users/ruslan-. a/view/495240/
Option 1: coolant is taken from the lower radiator hose through a tee, coolant is supplied to the engine block through the drain plug through a fitting.
Option 3: make coolant intake from under the temperature indicator sensor (emergency) through an adapter. The heated coolant is supplied to the engine block through the fitting where the drain valve is now located. The heater must be placed as low as possible relative to the drain valve.
Option 4: Collect coolant from the drain plug of the engine block through a fitting, supplying heated liquid to the return of the heater. Make the tee cut into the return flow upward so that the coolant flows towards the pump.
It seems to me that the most ideal option in my case is No. 1. It is simpler and more accessible, and the most important thing is that all installation rules are followed at once: a) The connection of the heater to the cooling system must be carried out in two places remote from each other (heater inlet and heater outlet). b) The heater inlet must be connected to the lowest point of the cooling system; exit from the heater with the top point. c) The inlet to the heater must NOT be located above the point of connection to the engine. (I will try to install it below the lower radiator pipe), as shown in this photo:
But someone wrote on the forum that they installed a heater, as in option No. 1. Heating occurs, but is ineffective, because... The heater often turns off due to the highly heated liquid in itself.
The second option is not very good, because... the stove may start to work worse.
The third option is too complicated, and an adapter is needed so that the emergency sensor can be screwed back in.
Source
UAZ 3962 White Night › Logbook › Electric engine pre-heater.
I’ll start by saying that I went for a can of spray paint, but bought an electric boiler, and paint too.
Well, there’s nothing special to write about, except that I didn’t install it according to the instructions. Why? Firstly
; The instructions are for the UAZ-3151, but it has more space under the hood and everything is a little different. The boiler did not fit into the place suggested by the instructions, so I secured it to the frame by slightly altering the fasteners. There was just some kind of corner on the frame, probably especially for the boiler
PS. Well, that’s it, I’m waiting for praise and criticism, oh yes. The boiler is called START-M, power 1.5 kW.
Addition.
The standard check valve of the electric boiler doesn't hold up at all; you'll still need to install a faucet somewhere in a convenient place.
Description and installation of the Alliance heater on a VAZ car
In search of means to ensure easy starting of the power plant in conditions of reduced temperatures, many car owners opt for antifreeze pre-heaters operating from a 220 V network. In such devices, powerful heating elements ensure fairly quick warm-up of the engine in winter. At the same time, motorists often give preference to such domestically produced devices, including the Alliance pre-heater.
This decision is often due to the fact that domestic devices are cheaper than foreign ones, with decent build quality and acceptable performance of their functions.
This manufacturer has appeared on the market of equipment for heating power plants quite a long time ago, and its products are in demand.
Purpose and main differences
The engine starting heater is designed to maintain the required coolant temperature at a certain level. For example, a temperature of 40°C will provide the necessary conditions in the cylinder for a quick start of the engine, regardless of external conditions.
Structurally, the electric heater is an affordable design compared to independent engine starting devices. A conventional heater with the prefix “electro” is a heating element with power wires located in the engine body. Among the advantages of such a device are:
Before installing an engine heater from a stationary 220V network, get acquainted with the design features. The design is based on a tungsten heating coil located in the cylinder block. Depending on the power, a small volume of antifreeze can be heated relatively quickly.
The main disadvantage is the high energy consumption. In just one night, individual models consume up to 10 kW of electricity. That is why progressive samples are equipped with sensors to periodically disconnect the device from the network.
It is worth noting that the type of engine does not affect the performance of the device. Whether a gasoline or diesel engine is installed on the UAZ, the device is installed in the same way. Here the difference is not as great as matching the tire and wheel sizes for SUVs. With some skill and compliance with safety measures, it is not difficult to assemble an engine pre-heater with your own hands. To avoid unsuccessful experiments, consider the example of an original 220 V car heater.
Video describing the Alliance heater
Related articles:
ATTENTION ! Installation of electric heater Siberia
For UAZ vehicles with a UMZ 414,417,421 carburetor engine, it is recommended that this be carried out by specialists at a service station.
Before installing and operating the Sibir electric heater, carefully read the installation manual.
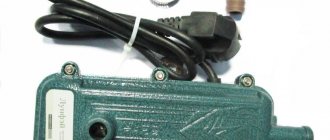
Electric heater delivery set
:
| Name | Quantity, pcs. | Note |
| Electric heater | ||
| Bracket 190 | ||
| Tee 1 | ||
| Spring washer 6 | ||
| Clamp S16-25 | ||
| Fastening strap | L=200 mm | |
| Sleeve (hose) 16 | L=1000mm(400-600) | |
| Installation Guide | ||
| Instructions | ||
| Packaging bag |
Note: if necessary, the company can, according to your order, manufacture and send the parts required for installation
.
Picture 1
Attention!
The electric heater must not touch the engine or other parts of the vehicle.
The electric heater must be installed in a vertical position with the outlet pipe up ( see Fig. 1
), while a slight inclination (not > 15 degrees) is allowed.
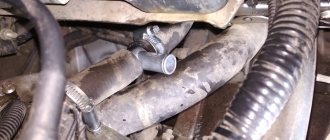
- Drain the coolant by unscrewing the drain plug of the cylinder block and clean the hole.
- Apply sealant to the threads of the K1/4 fitting and screw it in instead of the drain valve ( Fig. 1
). - Secure the bracket to the electric heater with M6*45 bolts using spring washers and nuts.
- Cut the sleeves to length: inlet L=400 mm and outlet L=600 mm.
- Unscrew the bolt securing the right engine support cushion, then secure the bracket with the heater with this bolt ( Fig. 1
). - Place the inlet hose onto fitting K1/4 and connect it to the inlet pipe of the heater. Tighten the clamps ( Fig. 1
). - Cut the sleeve connecting the heater radiator pipe and the valve in the cylinder head at a distance of 60 mm from the point where the sleeve exits the hole in the body. Shorten the piece of sleeve on the tap side by 25mm. Insert a tee into the section of the sleeve and seal the connections by tightening the clamps ( Fig. 1
). - Connect the tee and the outlet pipe of the electric heater with the outlet sleeve, tighten the clamps ( Fig. 1
). - Make sure that the hoses extend at a sufficient distance from the exhaust pipe and exhaust manifold.
- Fill the engine cooling system with coolant.
- Fix the power cord on the car body so that there is no contact with moving and heated parts of the engine.
Preparing for work
- Check connection for leaks.
- Start the car engine and let it run for 5-10 minutes. Then stop the engine and add coolant if necessary.
- Connect the electric heater to the network.
- After 2-5 minutes of operation of the electric heater, check the inlet and outlet hoses. The outlet sleeve must be warmer than the inlet sleeve
ATTENTION
!
The electric heater can be operated only after the engine has warmed up to operating temperature (the thermostat must be open) and the efficiency of the interior heater has been checked.
This must be done to eliminate air pockets in the cooling system. Task:
install a homemade 220V engine preheater on a UAZ 31512
Progress of work on installing a homemade 220V pre-heater for UAZ 31512
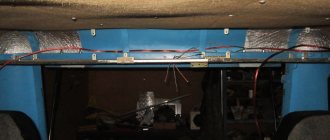
Installed it on the frame below the coolant drain valve from the block. I had some kind of bracket on the frame on purpose. I pulled him towards him with a clamp.
View from the radiator side
Instead of this tap, a fitting with a K1/4 thread was screwed in - this is the cold coolant intake.
At first I planned to route the supply of heated coolant also to the block, there is a plug for the K1/2 fitting above the oil filter...
It should have turned out something like this
...but I couldn’t unscrew it and had to connect it through a tee to the hose that goes from the block head to the heater radiator.
I filled in the drained antifreeze + about another liter. Started it up and cleared the system of air locks. In the morning, after the frost at night, I turned it on for heating. after 2-3 minutes the hose from the heater is already warm. After half an hour the block head got hot. after 40 minutes there is the block itself. Now the engine starts with half a turn, as in the summer, and does not stall for the first 5 seconds, as before.
Heater operation diagram
Heater operation diagram. Stolen from the Internet
Added 02/02/2015
I am posting a short report on the work. The temperature after spending the night is -4.7 degrees. It was possible not to heat it, but the device was at hand and decided to take a measurement.
We turn on the heater and after 20 minutes the block head warms up to +12.2 degrees
Rating 0.00
On all UAZ-3151 vehicles and on individual UAZ-31512, UAZ-31514, UAZ-31519 and UAZ-31513 vehicles, a starting heater was installed, designed to facilitate engine starting at ambient temperatures below minus 15 degrees by heating the coolant and oil in the engine crankcase. The fuel for the starting heater was gasoline used for the engine.
Starting heater UAZ-3151, general device.
The main part of the heater is a boiler of non-dismountable design, the cavities of which are permanently connected to the engine cooling system using inlet and outlet fittings and rubber hoses with clamps. The liquid jackets of the boiler are surrounded by two gas ducts, through which the gas formed during the combustion of the air-fuel mixture passes, heating the coolant.
At the bottom of the boiler there is a drain valve and a drain pipe connected to the combustion chamber of the boiler. In the combustion chamber of the boiler there are two threaded holes, into one of which a glow plug is screwed, and into the other - a fuel line fitting. To fill the coolant, the heater has a funnel with a stopper connected to the boiler liquid jacket with a rubber hose.
Air enters the combustion chamber of the boiler from a fan through a hose. A nozzle with a folding extension is connected to the boiler outlet pipe. Hot gas is removed from the gas ducts through it and, using a tray, is supplied to the engine oil sump.
Diagram of shielded electrical equipment of UAZ-3151 and UAZ-31513 vehicles with inclusion of the electrical circuit of the starting heater.
Fuel is supplied to the starting heater boiler by gravity from the float chamber through a tap with an adjusting needle. In earlier versions of the heater, it was equipped with its own separate fuel tank. To supply air to the heater, a fan with a single-speed electric drive is installed on the radiator trim panel.
Fuel is pumped into the carburetor by an electric fuel pump installed on the left front part of the engine. The electric fuel pump is connected in parallel to the main pump and is designed for short-term operation, so after starting the engine it is necessary to turn it off.
Since the electric fan of the heater has one speed, when initially igniting the boiler, it is recommended to turn it on intermittently with a period of 1-2 seconds, not allowing it to develop a high rotation speed, so as not to overcool the glow plug and extinguish the resulting flame. When a stable combustion occurs, which is determined by noise, the fan must be turned on constantly.
The air-fuel mixture is ignited by a glow plug, which remains turned on until a stable combustion process is achieved in the boiler. Further ignition of the mixture occurs from the heated parts of the combustion chamber.
Hot gases give off part of the heat to the heated liquid, ensuring its thermosiphon circulation in a circle: boiler - outlet pipeline - jacket of the engine cooling system - supply pipeline - boiler. The exhaust gases leaving the boiler heat the oil in the engine crankcase.
The heater is controlled from the control panel. The glow plug on the panel serves to reduce the voltage in the glow plug circuit to 4 Volts and visually monitor its activation.
The procedure for starting the starting heater UAZ-3151.
If water is used as the coolant.
In exceptional cases, water may be used as a coolant for the UAZ-3151 engine. In conditions of low ambient temperatures, after the end of the day's operation of the car, when parking it for a long time, water is drained from the engine cooling system. In this case, before starting the starting heater, you must first prepare 10 liters of clean water in one container and separately another 3 liters in another.
Before starting work with the starting heater, you must unscrew the plug from its filler funnel and remove the radiator cap, then clean the hole in the drain tube to ensure that excess gasoline is drained when the heater starts.
After this, fold the exhaust pipe nozzle extension into the working position and turn on the electric fuel pump using the switch on the control panel, pumping fuel into the carburetor. Turn on the fan electric motor for 10-20 seconds, this will purge the combustion chamber and heater flues with air. Turn off the fan motor and turn on the glow plug.
Hold the switch lever in the on position for 15-20 seconds until the spark plug glows. The glow of the spark plug can be determined by the glow of the control coil on the heater control panel. Open the fuel tap 1-1.5 turns and after 3-5 seconds turn on the fan.
As soon as you hear the first pop-flash in the combustion chamber, turn on the fan constantly. At the same time, a smooth hum of fuel combustion in the boiler should be heard. If the starting heater does not work, then stop the fuel supply, purge the combustion chamber and boiler flues and repeat the start again.
After the starting heater begins to operate stably, turn off the glow plug, adjust the fuel supply so that there is no emission of flame, and immediately pour 3 liters of water through the filler funnel of the heater boiler. When the coolant in the engine warms up, crank the engine crankshaft several times using the starting handle, then start the engine as usual and fill the cooling system with water to normal.
After this, turn off the electric fuel pump, close the fuel supply valve to the boiler and, after the fuel has stopped burning, turn off the fan motor. Failure to comply with the specified procedure for turning off the heater may result in a reverse flame emission and burning of the air supply hose.
Return the extension nozzle of the exhaust pipe to the stowed position and start driving the car after warming up the liquid in the engine cooling system to a temperature of 60-70 degrees according to the temperature on the instrument panel.
If low-freezing liquid is used as coolant.
The procedure for starting the starting heater remains the same, with the exception that it will no longer be necessary to prepare water and fill the engine cooling system with liquid after the heater has started and started stable operation.
Possible malfunctions of the UAZ-3151 starting heater.
If the starting heater does not start at all, then the glow plug or control glow plug may be faulty; its glow is not visible in the slot. Or the battery voltage is insufficient. If during startup and operation of the starting heater the flame fails or the combustion fades, then the opening of the fuel tap should be slightly increased.
Maintenance and care of the UAZ-3151 starting heater.
Maintenance during daily operation consists of monitoring the tightness of pipelines, hoses, taps and their connections, inspecting and tightening the fastenings of the starting heater, and cleaning the glow plug from carbon deposits.
In preparation for the period of operation, it is necessary to clean the boiler of the starting heater from dirt, rinse its liquid jackets, clean the drainage tube, blow out the flues with compressed air, clean the threads of the boiler fill funnel plug, the nozzle with extension and the tray from dirt. When switching to summer operating mode, unscrew the filler cap of the heater boiler and lubricate it.
Types of heaters, features
The company offers a choice of a number of models with different designs and technical characteristics. In most cases, the devices are intended for use on domestic cars and trucks - VAZ, GAZ, UAZ, GAZelle, etc. But at the same time, installation of the Alliance heater is quite possible on foreign cars.
The catalog of preheaters from this company includes the following models:
"Alliance-2-PC"
The only tank-type model on the list, the design of which includes a pump that circulates coolant through the system while the heater is operating. Thanks to this, it ensures more uniform heating of the cylinder block. The equipment has a vertical design. The power of the heating element is 2 kW;
"Alliance"
This model comes in two types - 1.5 and 2.0 kW. Externally, it is identical to the model with a pump, but this version does not have a pump. Liquid circulation – gravity;
Horizontal flow-type model with perpendicular pins. Designed for installation on vehicles that use a shortened cooling system return pipe and an angled antifreeze supply to the thermostat housing (VAZ classic models and some front-wheel drive models). The power of the heating element is only 0.7 kW, so it is more suitable for maintaining temperature rather than heating coolant;
"Alliance-08" and "08 Universal"
Flow model with horizontal position of terminals. The first version is intended for installation on GAZ cars, while the second is universal and can be used on foreign cars. Heater power – 0.8 kW;
see also
Comments 26
Greetings! I want to put it on Shniva for my father, because there are frosts in the village in the forest. There are many different choices: Start, North, Icarus, Longfey, etc. I want 1.5 kW. Tell me which one is better to stop at? there seem to be good reviews for Start, but they are also different: (with and without fanfare). I will be grateful for your answer.
At the service station, I installed them on the Shnivy, but also not according to the instructions, according to the instructions, screws are placed in the sensor and the drain plug, and I, at the sensor location, pulled it to the stove pipe, so the whole side gets warmed up. I prefer the Start company only because it has a thermal fuse; others have them, I just haven’t seen them yet. With fanfare I installed it mainly on diesel engines, but over time they had to be changed. For some reason they tend to burn. In my practice, cats without a pump burn much less often. But it often happens that their check valve does not hold and this will make the stove heat worse, then you have to additionally install a faucet to shut off the boiler itself.
What is it intended for and how is it designed?
When the engine starts after a long stop, in the first seconds its parts come into contact with each other without lubrication. The viscosity of cold engine oil is higher than in the operating temperature range of the engine. Therefore, it takes some time for the lubricating fluid to penetrate through narrow oil lines to engine parts.
This device can heat up the engine in 30 minutes even in severe frost
A modern heater is designed quite simply and is not much different from a boiler. The principle of its operation is to heat the coolant (antifreeze, antifreeze) to operating temperature, from 60 to 70 °C. When heated, the liquid begins to move through the pipes of the cooling system, heating the engine parts. To speed up heat transfer, many models are equipped with pumps that create pressure in the small circuit of the cooling system.
To create pressure due to temperature differences, heaters without a pump are connected to the cooling system at its lowest point. A device with a pump can be connected to the cooling system anywhere. When the temperature reaches the set value, the relay will simply turn off the heating element. If the temperature drops again, the relay will turn on the antifreeze heating again. Thus, you can connect the device in advance without fear of overheating the coolant.
In addition to heating the engine cooling jacket, heaters can parallel:
This way you can connect heaters with or without pumps
The power of the heating elements ranges from 500 Watt to 4 kW. The range of additional features depends on the model and complete set of each device. There are also quite simple heaters on sale that are screwed into plugs or drain plugs of engine cooling systems.
A simple device and low cost are the main advantages of 220 volt preheaters over other varieties. These devices can be independently installed on any car. You just need to decide on how to mount the device in the engine compartment and follow the manufacturer’s installation instructions. The only condition limiting the scope of application is the mandatory presence of an electrical outlet nearby.
There are models with a remote control on which you can set the heating temperature of the liquid and the heating time of the timer
Such heaters are best suited for private homeowners or car owners living on the lower floors of high-rise buildings. Those who have a nearby garage with electricity will also be happy. After all, an electric heater can be controlled remotely, from a distance of up to 1 kilometer (with direct visibility). If there are obstacles in the signal path, the distance will be significantly reduced.
Today, motorists can purchase preheaters of both Russian and foreign production. Chinese Longfei devices, as well as Norwegian DEFA ones, are popular among motorists. German Webasto heaters are not very convenient due to installation difficulties, and they are also expensive. Among Russian-made products, one can note the Severs and Start trademarks, produced with sets of mounting spare parts for domestic and foreign car models. Each model comes with its own set of mounting parts, along with installation instructions.
Depending on the engine size, you can choose models with power from 1 to 3 kW
Installing an electric heater on a 409 engine
Installing an electric heater on a 409 engine
Post by Azat » Wed Oct 26, 2021 13:05
Installing an electric heater on a 409 engine
Post by Alex[BY] » Wed Oct 26, 2021 13:24
Installing an electric heater on a 409 engine
Post by Azat » Wed Oct 26, 2021 13:47
Installing an electric heater on a 409 engine
Posted by Blondi13 » Wed Oct 26, 2021 1:51 pm
Installing an electric heater on a 409 engine
Post by Azat » Wed Oct 26, 2021 14:13
Installing an electric heater on a 409 engine
Post by Alex[BY] » Wed Oct 26, 2021 2:43 pm
Installing an electric heater on a 409 engine
Post by Alex[BY] » Wed Oct 26, 2021 2:44 pm
Installing an electric heater on a 409 engine
Posted by John89 » Wed Oct 26, 2021 3:00 pm
Installing an electric heater on a 409 engine
Post by John89 » Wed Oct 26, 2021 3:07 pm
Installing an electric heater on a 409 engine
Post by Azat » Wed Oct 26, 2021 15:20
Installing an electric heater on a 409 engine
Post by Azat » Wed Oct 26, 2021 15:21
Installing an electric heater on a 409 engine
Post by John89 » Wed Oct 26, 2021 5:04 pm
Installing an electric heater on a 409 engine
Post by John89 » Thu Oct 27, 2021 08:01
Installing an electric heater on a 409 engine
Post by John89 » Thu Oct 27, 2021 08:08
Installing an electric heater on a 409 engine
Post by Azat » Thu Oct 27, 2021 08:44
Installing an electric heater on a 409 engine
Post by John89 » Thu Oct 27, 2021 11:50 am
Installing an electric heater on a 409 engine
Post by Nikolay54 » Thu Oct 27, 2021 12:30
Installing an electric heater on a 409 engine
Post by Azat » Thu Oct 27, 2021 12:46
Installing an electric heater on a 409 engine
Post by John89 » Thu Oct 27, 2021 01:02 pm
Installing an electric heater on a 409 engine
Post by Nikolay54 » Thu Oct 27, 2021 13:06
Installing an electric heater on a 409 engine
Post by John89 » Thu Oct 27, 2021 01:30 pm
Installing an electric heater on a 409 engine
Post by Azat » Thu Oct 27, 2021 14:08
Installing an electric heater on a 409 engine
Post by Grandfather Jurassic » Thu Oct 27, 2021 14:14
Installing an electric heater on a 409 engine
Post by John89 » Thu Oct 27, 2021 2:19 pm
Installing an electric heater on a 409 engine
Post by KARGOnets » Tue Nov 15, 2021 19:11
Installing an electric heater on a 409 engine
Post by Azat » Fri Nov 18, 2021 07:34
Thanks KARGOnets for the details. The other day I already managed to install the heating and now I want to publish my photos and small installation instructions: This is what everything looked like before the work began The kit for the heater itself
Design and operating principle
The design of the Alliance 1.5 device consists of a housing with two terminals - a side supply and a central outlet. This housing plays the role of a reservoir, so a heating element is placed inside it. The leads of the heating element pass through the bottom cover, where it is connected to the power cable. Additionally, the design uses a thermostat that turns the device on/off when a certain temperature is reached (the upper limit is 85 degrees C, and the lower limit is 50 degrees C).
To ensure gravity movement of the coolant, a ball valve is installed in the underwater outlet.
It all works like this: initially the valve is open, so the reservoir is filled with antifreeze from the system. As the coolant is heated by the heating element, it begins to expand, causing the valve to shut off the supply. Further expansion causes the already heated antifreeze to be pushed out through the central (waste) outlet. A pressure drop occurs inside the housing and the valve opens again, releasing the next portion of coolant.
As for flow-through models, they are a regular tube in which a heating element is installed. In such devices, gravity circulation is carried out due to temperature differences.
An example of a homemade heater
The operating principle of the heater is based on the free circulation of coolant in a closed circuit of the cooling system. A device for heating the liquid is built parallel to the radiators. Accelerated fluid circulation will be provided by an additional pump, where the natural speed of fluid movement will not be enough.
In order to make an electric engine heater on your own, you will need:
The assembled structure requires installation at an angle. This will allow the antifreeze to move. Additionally, before installing the heater, ensure its thermal insulation.
Connection diagrams
Each type of model has its own connection diagram, which must be followed, otherwise antifreeze circulation will not be ensured (applies to gravity-fed models).
There may be several options for inserting a heater into the system. For example, some cars use a classic connection scheme, in which the fluid is supplied from the hole for the drain plug (a fitting is installed instead), and the outlet leads to the upper pipe coming from the radiator (the insertion is made using a tee).
But more often a slightly different connection scheme is used. In it, antifreeze is supplied through the same drain plug, but the drain is made into the hole in the temperature sensor of the cylinder block. For such a connection, a tee fitting is included with the device. It is screwed in instead of the temperature sensor. The sensor itself is then screwed into the end of the fitting, and the pipe from the heater is put on the side outlet of the tee.
c0mrade › Blog › Automatic heater Sib-Alliance (Tyumen). Autopsy, review
The quality of the product is top-notch, made in a “Soviet cooperative of the late 80s.” The casting is rough, the gaps are not adjusted, the holes are drilled somehow, not in the center, the metal platform to which the heating element and temperature sensor is attached has a curved shape and therefore does not fit tightly.
Particular attention was drawn to the thermal sensor, which: firstly, does not fit tightly to the plate, the gap is almost 1 mm, and secondly, it is miserably coated with thermal paste of the KPT-8 type, the amount of half a match head, and besides, it was already dry by the time of disassembly.
This is the number one reason why these heaters burn - with this mounting, this temperature sensor will never work. We'll fix it.
Non-drying thermal paste used in computers was generously smeared, and the sensor itself was adjusted so that it fit the entire area. By the way, if the manufacturers of this device themselves suddenly read it (although there are big doubts), the one who figured out how to attach this sensor should be given a “special bonus”. From an installation point of view, it is much easier to weld 2 bolts to the plate using resistance welding and place the platform with the temperature sensor on them, pressing it securely with nuts. With this installation, the sensor will be securely and, most importantly, its entire area pressed against the heated plate. Let's move on. The incoming (cold) antifreeze pipe closes the valve in the form of a plastic ball of a very approximate shape. I cleaned it up with a file, giving it more or less a ball shape. The valve itself is held in place with the stub of a rusty nail.
Not Alliance, but Plyushkin and Co. I replaced it with a piece of copper solder, which I cut from a rod used in soldering by air conditioners.
Moreover, the new limiter was bent with the letter G, so that the stroke of the ball-valve would be greater, i.e., the filling of the heating chamber would occur faster.
Pre-heater Alliance or Start-M
I set the start for myself with a pump, and also crashed into the stove. The work took about 40 minutes, and most of the time was spent figuring out how to secure the heater itself))))))))) in an hour the engine heats up normally.
I installed a Start-turbo 1.5 kW, I’ll be using it for the second year now, I recommend it. This is just from the 220 V network.
At 3.5 there is a two-kilowatt analogue of the severs (Alliance, it seems) - in principle it did not let us down, only when it was very cold, it warmed up worse...
And my Alliance died today. Sever-M worked for almost three years without any complaints, but I installed this one this fall - it won’t turn on, gat (The car is laid up, so...
Start M is of course morally outdated... and dimensions. it is only effective if installed correctly, the lower the better. The rest are better by the way, the same lungfey with a pump and thermal relay. Again, it all depends on the correct installation.
I installed this one on a working V8 eight years ago, it still works, heats up in 40 minutes and the engine starts easily in any weather (a car with an LPG and winter starting is always a problem, but it hasn’t seen a petrol engine for seven years at all), it is placed right behind the saxophone.
It's an alliance company, I've been using it since I was 14, everything works great. No complaints, I took it apart last year - everything is clean inside. But I have a valve at the outlet. Warms up quickly in 1 hour and does 2 cycles. I use it with a timer on the socket, I set the time when it needs to turn on and when it needs to turn off.
In severe frosts I run several cycles every couple of hours.
By the way, the Toyota started on its own with the start/start button after sitting in cold weather below 40. It was the Webast that didn’t start (
While the engine was disassembled, a 2 kW electric heater was installed. I also installed an additional valve for draining the coolant. Tests. At a temperature in the garage of +5, the head became noticeably hot in 10 minutes.
Help others - tell us about your experience using the spare part.
ERMAK head sets have only 6 reviews. Perhaps you will add another one?
Salut-Filter oil filters have only 6 reviews. Perhaps you will add another one?
The TRIALLI cylinder head gasket only has 10 votes! Do you recommend?
Finwhale CV joints have only 2 reviews. Perhaps you will add another one?
There are already 25 manufacturers participating in the auto rating of DVRs for Volkswagen Polo!
There are already 5 manufacturers participating in the auto rating of preheaters for the Nissan X-Trail!
Lemforder stabilizer bushings only have 10 votes! Do you recommend?
TECHNORESSOR springs have only 25 votes! Do you recommend?
There are already 15 manufacturers participating in the auto rating of brake pads for the Honda Accord!
There are already 40 manufacturers participating in the ranking of the best car shampoos!
There are already 25 reviews written on COBRA TUNING.
There are already 30 manufacturers participating in the ranking of the best jacks!
There are already 50 reviews written on Febest engine mounts.
There are already 50 reviews written on Lemforder.
Installation of preheater for UAZ 31512 engine
Task:
install a homemade 220V engine preheater on a UAZ 31512
Progress of work on installing a homemade 220V pre-heater for UAZ 31512
Installed it on the frame below the coolant drain valve from the block. I had some kind of bracket on the frame on purpose. I pulled him towards him with a clamp.
View from the radiator side
Instead of this tap, a fitting with a K1/4 thread was screwed in - this is the cold coolant intake.
At first I planned to route the supply of heated coolant also to the block, there is a plug for the K1/2 fitting above the oil filter...
It should have turned out something like this
...but I couldn’t unscrew it and had to connect it through a tee to the hose that goes from the block head to the heater radiator.
I filled in the drained antifreeze + about another liter. Started it up and cleared the system of air locks. In the morning, after the frost at night, I turned it on for heating. after 2-3 minutes the hose from the heater is already warm. After half an hour the block head got hot. after 40 minutes there is the block itself. Now the engine starts with half a turn, as in the summer, and does not stall for the first 5 seconds, as before.
Heater operation diagram
Heater operation diagram. Stolen from the Internet
I am posting a short report on the work. The temperature after spending the night is -4.7 degrees. It was possible not to heat it, but the device was at hand and decided to take a measurement.
We turn on the heater and after 20 minutes the block head warms up to +12.2 degrees
in another 10 minutes - up to +21.9 degrees
In total, in half an hour the temperature of the block head rises by 26.6 degrees. In severe frost, of course, it takes a little longer to warm up, but it’s enough for easy starting.
Result : work on installing the engine pre-heater for UAZ 31512 has been completed
Replacement and repair of the UAZ 31512 UMZ-421 engine
Assembling a new UAZ 31512 engine Removing the old UAZ 31512 engine Installing a new engine
source
Installation procedure for a 220 V heater
The simplest solution to install a heater is to contact a service station. The cost of work in this case will not exceed 1.5 thousand rubles. However, in practice, self-installation is no more difficult than starting a two-stroke engine.
In general, the work algorithm for installing engine heating for passenger cars looks like this:
At the final stage, it is necessary to check not only the functionality of the device, but also the normal functioning of the cooling system as a whole. After this, rest assured that the car is ready for winter use.
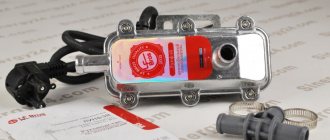
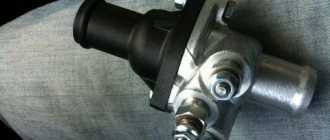
The electric pre-heater AUTO+ SPUTNIK for UAZ models with a UMZ 1.5 kW engine is designed for pre-heating of the coolant of internal combustion engines of vehicles and units in the cold season.
Supply voltage, V 220 Power consumption, W no more than 1500 Thermostat response temperature (shutdown), 95°C Thermostat return temperature (switch on), 65°C Electric shock protection class I Moisture protection degree IP34 Installation and operation:
The electric heater must not touch the engine housing or other parts of the vehicle.
The electric heater must be installed in a vertical position with the outlet pipe facing up, with a slight tilt allowed (no more than 15°).
Cut the hose into lengths: inlet hose 400 mm, outlet 230 mm. Secure the bracket to the heater with studs using washers and nuts. Place the sleeves on the corresponding heater pipes and secure the connections with clamps. Open the drain valve and drain the coolant. Open the drain valve. Unscrew the plug with K1/2 thread from the engine cylinder block on the right side along the direction of the vehicle. Clean the holes. Unscrew the engine foot mounting bolt on the right side along the direction of the car. Apply sealant to the threads of the K1/4 fitting and screw it in instead of the drain valve. Apply sealant to the threads of fitting K1/2 and screw it in instead of the plug. Secure the bracket with the heater with the engine foot bolt. Place the clamp on the outlet sleeve. Place the outlet hose on fitting K1/2 and secure the connection with a clamp. Pour 250 ml of coolant through the inlet hose into the heater. Place the inlet hose onto the fitting with a K1/4 thread and secure the connection with a clamp. Fill the cooling system. The power cable should be laid and secured with straps to ensure its safety from mechanical damage, as well as to prevent possible contact with moving and heated parts of the engine. Check the connections for coolant leaks and repair them if present. Start the engine for 3-5 minutes, and after stopping the engine, add coolant to the required level. Preparing for the first launch:
Fill the cooling system, check connections for leaks. Start the car engine and let it run for 5-10 minutes. Then stop the engine and add coolant if necessary. Connect the electric heater to the network. After 2-5 minutes of operation of the electric heater, check the inlet and outlet hoses. The outlet sleeve must be warmer than the inlet sleeve. Precautionary measures:
The heater can be operated only after the engine has warmed up to operating temperature (the thermostat must be open) and the efficiency of the interior heater has been checked. This must be done to eliminate air locks in the cooling system. It is prohibited to use electrical extension cords without a grounding wire and rated for a current of less than 15 A. It is prohibited to plug in the electric heater with the cover removed. Do not use the heater if there is no coolant in it.
On all UAZ-3151 vehicles and on individual UAZ-31512, UAZ-31514, UAZ-31519 and UAZ-31513 vehicles, a starting heater was installed, designed to facilitate engine starting at ambient temperatures below minus 15 degrees by heating the coolant and oil in the engine crankcase. The fuel for the starting heater was gasoline used for the engine.
Starting heater UAZ-3151, general device.
The main part of the heater is a boiler of non-dismountable design, the cavities of which are permanently connected to the engine cooling system using inlet and outlet fittings and rubber hoses with clamps. The liquid jackets of the boiler are surrounded by two gas ducts, through which the gas formed during the combustion of the air-fuel mixture passes, heating the coolant.
Installation of Severs M on UAZ Patriot with engine 409.10
- 39222 views
- Discuss
Installation of Severs M on a UAZ Patriot with engine 409.10 model since 2011.
The Severs M coolant heater is embedded in the system and connected to 220 V. It works on the principle: The coolant (antifreeze) heats up and, expanding, displaces the colder one, ensuring directed circulation of the liquid through electric heater and engine cooling jacket.
For installation you will need installation kit No. 33
Prepare: tools – wrenches; screwdriver (for tightening clamps); sealant type "Avtosil" (for sealing threaded connections); knife (for cutting hose); coolant (coolant) in the amount of 1 liter; container for draining coolant.
Cut the rubber sleeve into pieces: output sleeve L2=390 mm; inlet sleeve L1=350 mm.
Secure the bracket to the heater with studs through the bushings using washers and nuts
Place the sleeves on the corresponding heater pipes and secure the connections with clamps.
Remove the protection (engine splash guard) on the left side.
Unscrew the drain plug from the engine block (Fig. 3) and drain the coolant.
Unscrew the front steering gear mounting bolt
(Fig. 2 arrow B).
Secure the bracket with the heater with the steering gear bolt through the washer included in the kit.
Cut the hose connecting the expansion tank to the lower radiator hose at the lowest point that allows you to install a tee, see fig. 4.
Having first put on the S20-32 clamps, install the tee in the hose gap, so that the side outlet is directed to the heater.
Place the outlet hose with a clamp on the fitting installed instead of the plug, secure the connection with a clamp (it is possible to trim the outlet hose to avoid kinks).
Pour 250 ml of coolant into the heater through the inlet sleeve.
Place a clamp on the inlet sleeve and put the sleeve on the tee outlet, then secure the connection with the clamp.
Fill the cooling system.
The power cable should be laid and secured with straps to ensure its safety from mechanical damage, as well as to prevent possible contact with moving and heated parts of the engine.
Check connections for coolant leaks and repair if present. Start the engine for 3-5 minutes, and after stopping the engine, add coolant to the required level.
Turn on the heater to a 220 V network (after a few seconds you will hear the noise of the heating coolant), check the heating of the outlet hose. After 3-5 minutes, turn off the heater.