The car's suspension is the first to meet all the unevenness on the car's path, taking on all the blows from holes, potholes and other “pleasant” surprises that our roads are full of.
Each suspension unit has its own specific purpose, but together they are all designed to absorb the shock loads that arise when the vehicle moves, as well as to ensure proper controllability and stability of the vehicle when cornering or making sharp maneuvers.
Parts such as the anti-roll bar bushing often require replacement. You can do the work yourself.
A little about the operation of a car suspension
It is not difficult to guess that the level of safety and comfort on the road for both the driver and passengers almost directly depends on the serviceability of the suspension, as well as how well it copes with its tasks.
Each vehicle suspension component is aimed at a specific function. The levers, together with the axles, hold the wheel in the required plane, while simultaneously allowing it to rotate freely in two different planes (the moment of turning into a turn).
Shock absorbers dampen vibrations that occur during movement, thereby ensuring a smooth ride of the vehicle. At the same time, the springs are designed to ensure the rigidity of the suspension and return its components to their original state.
Main components and components of the car front suspension
Anti-roll bar
But there is one more important detail in the suspension, without which no modern car can do. And this part is a stabilizer. It can be easily seen if the car is driven onto a lift or placed on a viewing hole.
On the front axle, among the springs, shock absorbers and other levers, you will easily notice a curved steel rod, which is attached to the subframe with one arm and to the wheel hub with the other.
The stabilizer mounts are not rigid and allow it to move along the axis in one plane.
The stabilizer appeared in the suspension design at the dawn of the automotive industry, when speeds began to reach 20 km/h and above. The introduction of this element into the suspension design made it possible to ensure that the vehicle remains stable when cornering and maneuvering.
Thus, the main task of the stabilizer during movement is to distribute the weight of the car body over all its wheels in the event of a roll. In particular, this applies to cases of fairly sharp turns or when there is a sudden change in the trajectory of movement.
The principle of operation of the anti-roll bar
On the McFerson type of suspension, which is quite common today, the stabilizer is a torsion bar that acts on torsion. This element is rigidly connected to the car body or subframe.
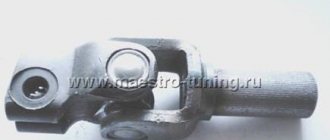
The forces generated in the suspension are transmitted to the stabilizer through additional levers, which communicate with the suspension through hinges.
This simple scheme allows you to prevent even a serious roll of the vehicle, and even more so, its rollover.
The rear axle is most often equipped with a stabilizer of this type if the vehicle has all-wheel drive. If we talk about cars with rear-wheel drive and a solid beam on the rear axle, then the role of the stabilizer is given to the reaction bar, also known as the Panhard rod.
Also, a number of Japanese off-road vehicles at one time, in addition to the Panhard rod, were additionally equipped with another stabilizer, which, in the form of a curved rod, ran along the rear axle beam and communicated with the power components of the body through small levers.
Stabilizer bushings. Signs of malfunction. Consequences
For the best damping of vibration and force impacts on the car body, the vast majority of suspension elements are connected by means of elastic elements. The same applies to the stabilizer.
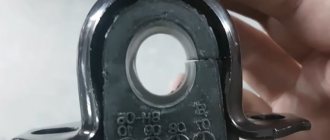
To secure it, special bushings (rubber bands, cushions) made of durable rubber or polyurethane are used. Over time, as the vehicle is used, these bushings may begin to deteriorate and noticeably lose their elasticity. The result of this is unsatisfactory operation of the stabilizer =.
More serious defects may begin to appear, which will only grow faster over time.
Diagram of the stabilizer device and its fastening elements
The first symptom indicating replacement of the bushings will be a slight knocking sound from the suspension. A similar knock can be observed with “tired” shock absorbers.
Only in the case of bushings it will be heard not only on potholes and potholes, but also when entering relatively sharp turns. At the same time, the car often feels excessively rolly and sluggish.
The knocking sound that appears will be a consequence of play that has arisen in the connecting nodes of the stabilizer arms due to worn bushings.
If measures are not taken in time, the knocking will only intensify in the future and will begin to accompany the operation of the suspension everywhere due to increasing deformation and destruction of the bushings. Body roll and excessive play in the steering wheel may occur.
The car may “yaw” not only when turning, but also when braking or changing lanes. Most car manufacturers recommend changing stabilizer bushings every 30–40 thousand mileage. However, in our conditions it is better to focus on bushing wear.
Therefore, a sudden knocking sound and slight rattling in corners will be clear signs of an impending component replacement.
As a popular method of checking the bushings for serviceability, it is proposed to drive the speed bump diagonally in 2nd gear. A dull knock appeared in the area of the pedals - most likely due to the hub bushings.
You can also just crawl under the car and inspect everything yourself. A worn bushing will be pleased with the presence of cracks and abrasions characteristic of worn and cracked rubber.
Auto mechanics sometimes also call these cracks “daisies.”
Stabilizer bushing and bracket for its fastening
Also, the rubber of the bushings can simply harden and lose the necessary elasticity. If you can’t get a good look at the stabilizer bushings, just swing your hand strongly up and down and to the sides on the stabilizer itself. If you feel play, creaks and knocks in the lower part of the suspension, it means that the bushings have become unusable.
But for the best results, it is, of course, better to drive onto an overpass, an inspection hole, or use a lift.
The only tools you will need are a crowbar or a mounting spade, which you simply need to rest against the bottom of the car and slightly “shake” the stabilizer where it connects to the body.
If you feel noticeable play or loss of elasticity, then it’s time to think about replacing the bushings.
The process of replacing the stabilizer bushing
Replacing bushings will not take much time. All you need is the right tool, plus a well-lit and comfortable work area. It is unlikely that the average driver will have access to a professional lift when carrying out work, so it is better to acquire a pair of jacks and a special rigid support in advance
Tool you may need
- An open-end wrench and possibly a socket wrench.
- Ratchet with extension.
- Collar.
- Cap head.
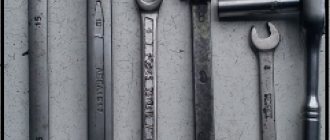
Tools required to replace bushings
Work order
- The car is hung on jacks and securely fixed.
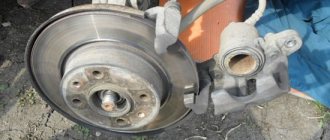
- The wheels are removed. The crankcase protection and fender liners are also dismantled.
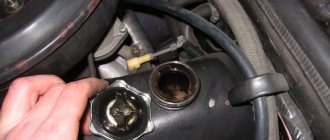
View of the stabilizer cushion before starting work
- The next step is to lift the lower arm using a jack or place a stop under it. If the bushings on both wheels are changed (which is highly recommended), then it is better to put stops under the axle of the front wheels or use a jack. All this is necessary in order to remove the load from the stabilizer beam and facilitate further replacement of the bushings.
The lower arm is jacked up to make it easier to replace rubber bands
- Next, you can loosen the mounts of the anti-roll bar to the car body or subframe on both sides. If difficulties arise with the bolts due to contamination and oxide, treat them with “Vedashka” or another similar solution to make them easier to unscrew.
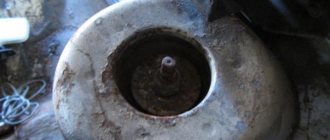
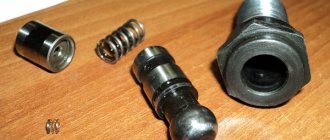
- The bushing mount and the bushing itself are removed. Most of the latter are now cut, which greatly simplifies the process of removing them.
The old bushing is removed from the stabilizer
- A new bushing is taken and placed in place of the old one. Experienced car mechanics recommend thoroughly washing and wiping the seat of the part on the stabilizer. You can also lather the bushing a little to make it easier to move, or use a special lubricant, often included in the repair kit.
Features of the problem for popular models
Statistics show that owners of such car models as Renault Megane, Skoda Rapid, Volkswagen Polo, Lada Vesta (and other representatives of the domestic automobile industry) are faced with problems associated with stabilizer bushings. Let's look at the features of specific car models, as well as recommendations for replacement.
Table. Description of the problem for some models
| Model | Description of the problem |
| Lada Vesta | Often, it is the structure of the suspension of a given car that is the main cause of problems with bushings. Vesta is famous for its large travel of stabilizer struts, which can cause unpleasant sounds when moving. Many car owners lower the seating position of their car to solve this problem. You can also use a special silicone-based lubricant. |
| Volkswagen Polo | There is one proven method for eliminating squeaks - install a small piece of an old timing belt between the stabilizer bushing and the car body. The replacement of bushings itself is no different from that indicated in the instructions above. |
| Skoda Rapid | As practice shows, the best way to get rid of squeaks is to install original VAG rubber bands. Also, many motorists use repair bushings that differ from the usual sizes (repair bushings are 1 mm smaller). As an alternative, you can install rubber bands from other models of this manufacturer, for example, from the Skoda Fabia. |
| Renault Megane | The process of replacing the bushing is no different from other models, but before installing a new rubber band, it and the seat must be treated with a lubricant, which will not harm the parts later. You can use shampoo or soap for this purpose. Depending on the modification, Renault Megane can be equipped with reinforced or conventional suspension, therefore, the dimensions of the bushings and the stabilizer itself may differ. Please keep this in mind when purchasing replacement parts. |
| Mercedes Sprinter | Before purchasing bushings, you must first measure the diameter of the stabilizer, since their dimensions may vary depending on the modification. To do this, use a caliper. Many experts recommend buying special rubber bands for your car, equipped with anthers to protect against dust and water. To treat the surface of parts, it is necessary to use silicone-based products that will not corrode the rubber. Such products include “MOLYKOTE PG-54”, “Litol-24” and others. |
Stabilizer bushings - step-by-step replacement instructions
You can determine whether it is necessary to replace the stabilizer bushings by the knocking or creaking noises that appear in the suspension when braking and driving over potholes.
And given that there are sometimes more potholes on our roads than asphalt pavement, the replacement process must be carried out regularly. The bushings themselves are not very expensive, their timely replacement will save the stabilizer struts from rapid wear, and the car owner from unnecessary expenses associated with their replacement. The replacement process is quite simple and you can easily do it yourself using the instructions provided.
Need for replacement
Stabilizer bushings are among the parts that are subject to the greatest dynamic loads.
They require regular replacement, depending on the maintenance regulations adopted by various car manufacturers and models.
The maximum mileage before replacing the rear and front bushings is usually from 15,000 to 30,000 km. Considering the state of our roads, it is recommended to replace them based on wear and tear.
Untimely replacement can lead to the formation of a roll in the car's stabilizer, and this, in turn, increases the risk of the car tipping over at speed.
The complete set must be replaced, regardless of the difference in external signs of wear.
The cost of such a repair service at a service station is often overpriced, given the ease of replacement for most car models, so it is advisable to replace the front and rear bushings yourself.
Diagnostics
Knocking of the stabilizers is a guaranteed sign of the need to immediately replace the bushings. In addition, squeaks may appear, especially when it gets colder, when the rubber loses its elasticity.
To determine the need for replacement, it may be necessary to remove the crankcase protection. To check the source of vibration, place your hands on the stabilizer link and directly on the mounting bracket.
The partner must press firmly on the hood of the car several times.
If vibrations are felt on the brackets, which are transmitted to the rack, it is necessary to install a new set, even if no play was noticed when inspecting the seats on the stabilizer.
If the hole inside the bushing has taken the shape of an ellipse, cracks are visible on the surface, and the material has hardened, immediate replacement is necessary. Continued operation of the vehicle will significantly reduce the service life of the stabilizer struts.
Tool
To replace the front or rear bushings yourself you will need:
- small ratchet with extension and socket head;
- open-end wrench, it should be thin and small;
- large ratchet, universal joint adapter and socket head;
- You may need an L-shaped extension.
Sequence of work
- The car is securely fixed when jacked up.
- The wheels are unscrewed and removed. There is an engine protection shield in the right wheel arch. Its fastenings are unscrewed and the shield is removed.
- Most of the fasteners under the bottom are pretty acidic, so to speed up the process of replacing stabilizer bushings, they need to be thoroughly treated with a WD 40 solution, which removes corrosion.
- Using an open-end wrench, we fix the finger on the left post. It is slightly hidden from direct access, so you need to find the grooves almost by touch.
- We throw a spanner, preferably a ratchet, onto the nut that secures the shock absorber. Unscrew both fasteners.
- Having freed the stabilizer struts from their fastenings, we disconnect them from the shock absorber strut.
- We install a jack under the left rear part of the subframe. With its help, the subframe is fixed so that when the fasteners are removed, it does not suddenly jump off the studs. A metal plate of considerable size must be placed under the supporting head of the jack so as not to deform the subframe.
- Smoothly lower the jack a few centimeters from the body. Thanks to this, the subframe also lowers slightly, opening access to the bushings.
- A pipe is inserted into the resulting gap, and the subframe is further pressed down. A stopper is inserted into the resulting gap. A 27mm head is suitable; when installing it between the body and the subframe washer, it is better to use pliers. This will save your hand from injury if the pipe slips off the subframe washer.
- We generously water the bracket fastenings with WD-40. We unscrew the bolts gradually, without pressing too much.
- Remove the freed bracket from the bushing, and then remove the bushing itself.
- We install the bushing from the new kit. The cut on the part should be directed strictly back. We position the new part exactly in the place of the old one.
- Install a clamp over the bushing. Lightly tighten the fasteners with your fingers, and then tighten them with a wrench, tightening all the bolts one by one and evenly.
- The stopper, for which the key head was used, is removed. The subframe is lifted by hand and screwed to the body.
- All of these steps are performed in the same way with respect to the second clamp.
- Once the bushings are in place, both posts are screwed into place.
IMPORTANT! Before installation, all threaded parts of fasteners are coated with graphite lubricant to avoid sticking.
When performing the above work, you should be careful and pay attention to safety precautions. In general, such work can be done with your own hands.
Naturally, the design of different car brands differs significantly, so the replacement instructions are rather of a general recommendation nature. For more detailed information, a series of videos on carrying out this type of repair for various brands of cars is presented.
- Video on replacing stabilizer bushings for Ford Explorer:
- Video Chevrolet Aveo 3 - split bushings used in this model make the repair process quick and easy.
- Nissan X-Trail Video:
- Video explaining workflows for Renault Logan:
Source: https://AutoRemont2.ru/podveska-avtomobilya/zamena-vtulok-stabilizatora.html
Tool
To replace the front or rear bushings yourself you will need:
- small ratchet with extension and socket head;
- open-end wrench, it should be thin and small;
- large ratchet, universal joint adapter and socket head;
- You may need an L-shaped extension.
Replacing anti-roll bar bushings
The suspension of any car is always the first to take the blow from road irregularities. Depending on the design and settings, suspension units are designed to most effectively absorb shock loads from uneven road surfaces, as well as to ensure vehicle controllability and stability at high speeds when cornering, as well as during sudden changes in the trajectory of movement (“snake”, avoiding obstacles ). And not only comfort, but also the safety of the driver and passengers depends on how efficient the suspension is. Each of the suspension elements performs its role. Trunnions and levers support the wheel in a given plane, ensuring unhindered rotation in two planes (when turning).
The principle of operation of stabilizers
Springs provide elasticity and return the suspension elements to their original state, and shock absorbers provide smooth ride and damping of elastic vibrations of the body. At the same time, even the perfect operation of the listed elements is not enough to ensure safe movement.
If you hang the car on a lift or drive it into an inspection hole, in addition to the levers, springs and shock absorbers on any modern passenger car, you can see another element - the anti-roll bar.
In the front axle suspension, the stabilizer is a curved lever, attached with one shoulder to the wheel hub assembly, and the other to the subframe. The fastenings are not rigid, with the ability to move along the axis in one plane.
The principle of operation of the stabilizer is to redistribute the weight of the car body over the wheels when it rolls. For example, when taking turns with a small radius or when suddenly changing the trajectory of movement.
Diagnostics
Diagnosis of stabilizer bushings consists of two steps:
- visual assessment;
- providing mechanical impact.
It is necessary to park the car on an overpass or pit to check the rubber bands. Some people use a lift for this purpose, but this can be dangerous. The fact is that diagnosing bushings involves strong tugging of the stabilizer, as a result of which the car sways and may fall. The same applies to jacks, from which the car will come off much faster than from a lift. This can lead to the most dire consequences, since the weight of the car is very large, and this entire metal structure can crush the mechanic.
Diagnostics of stabilizer bushings
The purpose of a visual assessment is to inspect the rubber bands for tears and cracks. If even one crack is found on one part, then the entire set needs to be replaced. Mechanical action requires brute force - grab the stabilizer next to the bushing that connects the part to the body, and pull it hard in all directions. During the process, knocking or squeaking noises may occur. This means the bushings need to be replaced. During the mechanical impact, do not be afraid to damage the stabilizer or the bushings themselves - they are designed for heavy loads, so your attempts to check the serviceability of the parts will not cause them any harm.
Stabilizer bushings and their replacement. When and how to change the bushings of the transverse and stabilizer links
Stabilizers are responsible for the vehicle's stability on the road. To eliminate noise and vibration from the operation of the components of the stabilizers, special bushings are used - elastic elements that give smooth operation.
What is a bushing? An elastic part is created by casting from rubber or polyurethane.
Its shape remains virtually unchanged for different car models, but sometimes has some features depending on the design of the stabilizer. To improve the performance of bushings, they sometimes have bosses and grooves.
They strengthen the structure and allow parts to last longer, and also protect against mechanical stress that can damage them.
When is the transverse stabilizer bushing replaced?
The degree of wear of the bushing can be determined during a routine inspection. Cracks, changes in the properties of rubber, the appearance of abrasions - all this indicates that the part needs to be changed . Typically, bushings are replaced every 30,000 km . Experienced owners advise changing all bushings at once, regardless of their external condition.
During a routine inspection, the bushings may become dirty. They should be cleaned of dirt so as not to provoke accelerated wear of the part.
Unscheduled replacement of bushings is necessary when the following symptoms occur:
- steering wheel play when the car turns;
- noticeable vibration of the steering wheel;
- body roll, accompanied by characteristic unusual sounds (clicks, squeaks);
- vibration in the car suspension, accompanied by extraneous noise;
- when driving in a straight line, the car pulls to the side;
- general instability.
Detection of such problems requires urgent diagnosis. Primary attention should be paid to the bushings. By replacing them, you can check the operation of the car, and if signs of malfunction remain, an additional inspection should be carried out.
Let's sum it up
As you can see, the rear stabilizer bushing or the front stabilizer bushing is a simple element both in terms of design and replacement. At the same time, the bushing of the stabilizer link and the bushing of the stabilizer itself are different, so it is important not to confuse these elements when selecting the necessary spare parts.
The vehicle suspension is one of the most important parts, subject to heavy loads and taking on all the impacts of a rough road. Thanks to its operation, the driver can feel comfortable and not be afraid that while driving the situation may get out of control. However, due to heavy loads, especially when driving on bad roads, which is not uncommon in the Russian Federation, its parts often fail. The most common problem is broken stabilizer bushings. Let's take a closer look at why this happens and how the stabilizer bushings are replaced.