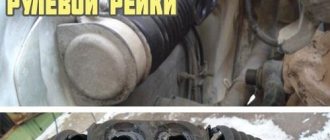
The difference between the gearshift lever and the rocker
The gearshift lever is the only gearbox part with which the driver is in direct contact and which can be seen without disassembling the gearbox itself. At the same time, some car enthusiasts mistakenly identify the lever with the rocker. In fact, the rocker is a separate structure that connects the lever to the box.
At first glance, the lever may seem like a simple and strong part, that is, there is nothing in it to break. However, problems associated with the lever also sometimes arise during the operation of the vehicle, especially on old foreign cars and domestic cars.
Such problems do not pose any particular danger, but comfort is lost, since the entire lever vibrates strongly while driving. This is the main sign when a lever needs to be replaced. The appearance of vibrations occurs due to wear of the plastic bushing, through which this part is connected to other parts of the gearbox.
In addition, sometimes the driver replaces the gearshift lever at his own discretion (the gearshift lever is changed to a longer or shorter one, it is necessary to remove an element to replace it with a new one, it is planned to cover the gearshift lever handle with leather, etc.).
What's the result?
As you can see, replacing the gear shift knob, as well as replacing the cover on the gear lever, is not a complicated procedure and can be done independently. However, you will need certain skills and a minimum set of available tools (nippers, spatula, flat screwdriver, stapler, etc.).
Also, during the work, you should be careful, since the plastic of the interior is quite fragile, the clamps of the base of the gearshift lever cover, etc., break. Finally, we note that although there are different cases on sale, many owners often pay attention to cheap products made from artificial leather or cheap leather.
You can also order a cover separately in special workshops that specialize in reupholstering car interiors. As a rule, these workshops use good quality materials. Also in this case, specialists can independently install the cover on the gearshift lever, and if the cover is ordered from the same workshop, the cost of installation will not be high.
Removing the gearshift lever handle:
- To make this procedure easier, you will need to first follow the shift lever removal instructions above.
- Once the lever is removed, clamp it in a vice.
- We wrap the neck under the handle with tape and install an open-end wrench on the tape at “32”.
- Lightly hit it with a hammer from below in order to knock the handle with the holder away from the lever.
- When the handle comes out a little, remove the tape and remove the handle, first pressing the latches on the holder with a thin screwdriver. Tip: Be careful, as there is a spring under the handle, do not lose it.
- Install in reverse order.
However, you can remove the handle without removing the gearshift lever, following these instructions:
- We disconnect the exhaust pipe fastenings and move the exhaust system to the side, so it will not interfere.
Next, disconnect the gearbox control drive rod from the lower end of the lever and move the rod to the side.
In the VAZ's interior, unfasten the lever cover clasp and remove the cover along with the lower holder.
At the next stage, we lift the plastic lining of the tunnel, thereby removing it through the top of the gear shift knob.
Under the plastic lining is a noise-insulating cover, which can be removed by unscrewing four nuts.
If you carry out this work following these instructions, then you will not spend much time and effort on the entire repair.
Video on how to remove the gear knob on a Renault Logan:
Video about replacing the gearbox cover on a Passat car:
Tuning the gear knob:
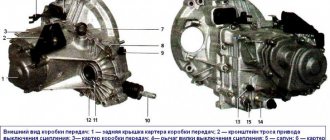
Device location and characteristics
The gearshift lever of the VAZ 2107 is located directly in the car's interior. It is used to be able to change gears while moving. The gear lever fails only in rare cases, and the reason for this is negligence towards the product. If the product fails, it must be replaced. But before replacing, it is necessary to remove the product in question. We’ll find out in more detail how to remove it, as well as replace it on the “seven”.
On the “seven” the gear shift knob has a common problem - rattling and chattering. If you fix such a malfunction using improvised means, then replacing the device will not be necessary. Before you begin replacing the device, you will need to find out the exact causes of the malfunction. After all, sometimes not only the part in question can “fail,” but also the gearbox or clutch.
If you are convinced that it is the gearshift lever that is faulty, then only then should you start replacing it.
Replacement features
Before you begin the replacement, you need to stock up on tools such as wrenches and a screwdriver. We start with the following steps:
- Set the lever to neutral position.
- After this, you need to slide the top cover up. There is no need to completely remove the cover.
- The next step is to move the cover, which is located below, to the top. This cover is also called a thermal protection valve. In the photo below it is shown with a red arrow.
- Now you need to press the device, pushing it to the bottom. After this, you need to insert a screwdriver into the lower part of the product, where the plastic sleeve is located. The bushing is located at the very bottom of the device, as shown in the photo below.
- It is necessary to move the locking sleeve to the lower part, and then remove the product from the box.
- If the device emits strong vibrations, it needs to be replaced with a new one. In this case, you can exchange the part for a product of shorter length, as on foreign cars. A short device is much more comfortable to operate than a standard product.
Many motorists replace the standard gear shift levers with more modern ones, which allows them to uniquely customize the interior of the Seven.
After the standard product is dismantled, we install a new handle in its place. Let's look at what the installation is.
How to change the gear knob on a Priora
In order to remove the gearshift knob on a Priora, as well as to carry out any replacement or modification operations with it, it is necessary to dismantle the control system. So, for example, you can change a part by installing the version developed for Vesta. But the easiest way is to replace it with a standard part: you don’t have to make any modifications.
We remove the Priora gearshift knob, following the standard algorithm:
- Tighten the handbrake so that the Priora is locked in place;
- Remove the cover - just lift it to the top;
- It is better to heat the plastic part with a hairdryer and use a screwdriver to remove the sign with the painted speeds;
- Having rested a piece of a pre-prepared square at the bottom of the lever, use an adjustable wrench to make a stop so that the part goes up.
Watch this video for more details:
Tips and recommendations for replacing the gearshift lever on a VAZ 2107
When choosing parts to replace failed ones, you must purchase only original spare parts from the manufacturer. Despite the simplicity of the design and easy repair of the product, when purchasing counterfeit material, the service life of the parts is low. When using such products, it is quite possible that there will be negative manifestations in motion in the form of crunching, jamming of gear engagement, spontaneous transition to other gears, howling in the lower part of the tunnel, which can subsequently lead to an emergency situation.
Also, during the procedure for reassembling parts, it is imperative to follow the sequence of actions when installing the linkage hinges. It is necessary to use special lubricants when installing the mechanical parts of the product. Special silicone lubricants with a water-repellent composition are best suited. Such material will preserve the integrity of the composition for a long time and protect the main parts of the scenes. Also, at the first appearance of signs of breakdown, it is necessary to carry out a scheduled preventive inspection with dismantling of the entire unit.
How to move the gearshift lever to a VAZ 2107
Moving the unit to another location is extremely rare, as it requires significant intervention in the design of the drawstring itself, as well as the handle. Most often, the lever is shortened and the rocker is moved closer to the driver. Also, when converting a car into a sports car, changes are made to the design: the rocker is replaced with cables, and the lever is replaced with a sports car, which requires a radical redesign of the entire gear shift scheme.
Shift lever squeak and other problems
From all of the above, it is clear that this part is one of the most important in the entire gearbox, and if it fails, then driving such a vehicle becomes life-threatening. The most common reasons why such an emergency can occur are either mechanical damage or the consequences of incorrect operation. Here are a few breakdowns that you can easily detect on your own.
You should know that the gear shift knob should move freely, without jamming . If difficulties arise in performing this action, most likely the spherical washer or ball joint has failed. They need to be replaced urgently. The creaking of the gear shift lever also indicates a malfunction. If spontaneous shutdown occurs, then you should definitely check the spring; it is quite possible that it simply jumped off.
Do you know about the main malfunctions of the manual transmission knob?
The device, together with the gear shift mount, is quite simple. There are several basic faults that can be corrected or simply repaired part of the box drive. Malfunctions of the gear shift knob include the following:
How to repair a gear shift lever?
In any case, no matter what happens, repairing the gear shift lever involves replacing failed parts, and without completely removing it it will be impossible to do this. For this purpose, the plastic protective plate is dismantled and the hinge cage is released. After which it is necessary to move the jet rod to the side and remove the entire lever. But in order to free up access to all the plastic bushings and axles, it is necessary to remove the cover for the gear shift lever.
Check how the axle moves. If it is loose, then you need to change all the bushings, and do not forget to lubricate the new spare parts with special lubricant before installing them.
To replace the spring, it must be pulled out, and for this you need to dismantle the retaining ring and the hinge with the lever. If you cannot do without replacing the ball joint, you should carefully push the spherical washer apart with your fingers and remove the worn part. At the same time, when installing a new one, lubricate it.
The thrusts change as follows. There is a clamp at the bottom of the car; you should loosen it. Next you need to disconnect it from the hinges and, by unscrewing the fastening nut, you can freely pull out the rod. Installation of the new one is carried out in the reverse order. Thus, having replaced all damaged elements with new ones, you can drive safely. At the same time, do not forget that periodically it is necessary to adjust the gear shift lever.
Determining the cause
So, while accelerating, or at idle, your gear lever dangles as if in a fever, making an annoying rattling noise. But no other defects related to the gearbox were found. Installation of an additional gearbox support on a VAZ 2110 16kl. What could be causing this?
- An engineering miscalculation by the creators of the VAZ 2110. They simply forgot to think about the fact that the iron bushing for connecting the lever to the rod during movement “clings” to the edge of the rod, which is why rattling appears;
- You have tuned the lever using a Lada Kalina. This replacement brought several positive moments for you, and one not very pleasing one. When the car is in motion, vibration appears in the driveshaft from Kalina, which transmits rattling through the traction of the entire mechanism. Many who have carried out such tuning say that even if the lever is removed altogether, it still does not eliminate rattling;
- The retaining spring could have broken, or it might not have been there at all. In this case, rattling is inevitable;
- Often the VAZ 2110 gearshift knob rattles due to wear on the engine and gearbox mounts. It may also be that other parts responsible for eliminating chatter (damping vibrations) have worn out.
If the gearshift lever dangles, and difficulties of various kinds arise when shifting gears, then a little tuning will not help here; repair and adjustment is needed not only of the handle, but also of the gearbox itself.
Adjustment
1. Move the gear shift lever to the neutral position. 2. Loosen the tightening of the drive rod clamp of the gear shift mechanism (see above, paragraph 10). 3. Inside the car, an assistant sets the lever almost vertically (moving it slightly back) and holds it in this position. 4. 13 mm
tighten the nut of the coupling bolt of the drive rod mounting clamp, holding the bolt from turning with a wrench of the same size. 5. Check that all gears shift easily. If necessary, repeat the adjustment. Note: When engaging third or fifth gear, your hand should not rest on the instrument panel console. When engaging reverse gear or fifth gear, the gear shift lever should not fall onto the front seat cushions (set to the middle position).
Removing the automatic transmission handle Nissan X-Trail
1. Use a plastic spatula to pry up the lower plastic holder (decorative ring).
2. Lower it down.
3. Pull towards you and pull out the metal retaining clip.
4. Pull up and remove the Nissan X-Trail automatic transmission handle.
5. If necessary, replace the handle with a new one.
6. Reinstall the Nissan X-Trail automatic transmission handle in the reverse order of removal.
Causes and signs of lever failure
A common cause of failure of an automatic transmission and its lever part is non-compliance with operating rules. This problem often arises among drivers who have “switched” from a manual to an automatic transmission, since the use of these two systems has significant differences.
Replacing the automatic transmission lever or consumables is required in several cases:
- vibrations appear;
- the lever begins to scroll;
- the handle wears out;
- the sensor displays information incorrectly.
Malfunctions provoke:
- overheating of the gearbox due to aggressive driving;
- incorrect mode switching, especially in winter;
- engaging reverse until the vehicle comes to a complete stop; switching to Park mode until a complete stop;
- when the car gets into water, the selector sensor is flooded, which leads to failures in the readings and incorrect operation of the lever and the system as a whole;
- natural operational wear of the lever elements or wear resulting from the errors described above.
Malfunctions, as a rule, are eliminated by repairing or completely replacing the entire system, but sometimes you can get by with installing a new lever or consumables.
Arm Removal and Installation Procedures
Features of disassembling and installing the lever depend on the make and model of a particular car. The process is simple - if you know what exactly needs to be done.
Here's how to remove the gear lever and install a new one using a Land Cruiser as an example:
- The lever is switched to neutral mode.
- The panel with the cup holder is dismantled. To do this, you need to gently pull it. Fixation is carried out using clips, so removing the panel is easy.
- The start/power button terminal is disconnected.
- Unscrew the screws that secure the gearbox handle on the windshield side.
- Now the lever is removed, but not completely, since two wires continue to hold it. They need to be cut at a point where it will be more convenient to attach the wires from the new lever.
- Installation of the part is carried out in the reverse order. It is important not to mix up the wires during the connection process. Otherwise, you will have to disassemble everything anew and connect the wiring correctly.
Most of the levers (the so-called classics) are dismantled / mounted according to the following algorithms:
Removing the lever:
- The console is dismantled, the lever is switched to “neutral” mode.
- The decorative cover of the lever is retracted to the upper position, but cannot be removed.
- In the same way, the main cover (the so-called boot) moves to the top point.
- Then you need to move the lever down and use a screwdriver to jam the locking sleeve.
- After this, the locking sleeve is removed from the lever, and the lever rod is removed.
- The bushing should be carefully inspected. If there is damage on it, the part is deformed or has lost elasticity, then it will have to be replaced with a new one. The degree of gearbox vibration directly depends on the condition of the locking sleeve. You can remove the old part using a wire hook or using a screwdriver.
- The same applies to the spacer and elastic bushing. If there are vibrations or scrolling, it is enough to replace the consumables with new ones.
How to remove the gear shift knob of a Galant automatic transmission
For a long time I was tormented by the question of how to remove the gear shift knob of a Galant automatic transmission?
During disassembly they simply unscrew it, but this is not true because... the handle breaks and dangles after reinstallation.
I took one such handle for testing and it became clear that the handle is attached with a nut to the gear selector, but the question is how to remove the button without breaking or scratching it. It turned out just...
We pry the button with a thin, but not springy screwdriver and hold it tight:
There are latches on the left and right, you need to take an even thinner tool and pry the latches “blindly” first on one side, then on the other, while pressing on the first screwdriver:
We are preparing for the fact that the button may fly up :)
Removed automatic transmission handle lock button:
We take out the spring and spring rubber:
Using a long 12mm socket, unscrew the nut inside the handle:
Next, you can remove the chrome trim on the gearshift knob:
Here you will find a useful post on how to remove the center console to remove the plastic around the chrome trim and armrest.
Unscrew the 4 screws that hold the chrome trim.
The screws in the back are easily accessible after removing the center console, but the front ones are located under the dashboard jumper. In our case, this jumper was broken before us.
In order not to remove the entire selector, you can drill two holes in the plastic with a drill
Eliminating rattling
How to remove the gearbox lever of a VAZ 2110
Some people don’t even realize that eliminating the rattling of the gearbox lever in a VAZ 2110 is a completely feasible task, and does not even require special skills. Replacing the VAZ 2110 generator bearing and its. Release the shift knob from the cover in the cabin; Gearbox VAZ 2110. Can be replaced. Of course, you will have to tinker a little, but then being in the car will become much more pleasant. We also remember: what helps one car may not be useful for another car. Therefore, we experiment.
The simplest solution is to install a spring, which is designed to hold the gearbox lever, preventing it from dangling. This type of tuning has a particularly nice feature - you don’t need to disassemble almost anything! Many people wrap the handle with a medical tourniquet before installing the spring to make the fixation tighter.
Installation of washers (plastic or rubber) on the gearbox axle. You will need a plastic lid for a regular glass jar (you can also use other elastic plastic or thick rubber). From it, after a little disassembly of the handle (produced from the salon), several washers are cut out. Replacing the rear struts of a VAZ 2110 in detail -. The first is the size of the sleeve. Here, after lubricating it with lithol, it is fixed. In addition, two more washers are inserted into the slots around the edges of the gear shift mechanism on both sides of the bushing. In this case, you may have to sharpen the bushing a little.
We purchase a repair kit for the scenes. Moreover, it is specifically for the VAZ 2110. It usually includes all those parts that most often need replacement: bushings, washers, a ball joint for the gearbox lever, a lining and a spring that holds the handle in a fixed position and does not allow it to dangle. First, you need to lift the protective and decorative cover in the cabin. After which, using a repair kit, the worn parts are replaced with new ones. Noise from the front bearing of the VAZ 2110 generator on the generator. Replacement of bearings. Gearbox for VAZ 2110 16kl. engine mounts Next Replacing the ball joint race of the gearbox lever 2110. The operation and maintenance manual for the VAZ 2114 states that the gearbox oil should be changed after 75 thousand kilometers. However, sometimes this has only a small effect.
Place the car on an overpass (pit) and unscrew the ball joint of the gearbox lever from the bottom of the car. Sometimes replacing it helps eliminate rattling. This support is included in the repair kit.
The length of the sleeve connecting the rod to the handle is adjusted. This tuning is carried out from the salon and includes the following actions:
- Raise the gearbox handle cover;
- Disconnect the lever together with the rod;
- Remove the indicated bushing;
- Remove the plastic bushings;
- Remove any remaining grease from the metal bushing;
- Measure about 2 mm from the edge on the metal sleeve and mark this place with a line;
- It will be more convenient if you wrap the sleeve with electrical tape (adhesive tape) strictly along this line;
- File off the excess with a grinder, electric sandpaper, or, if you don’t have such devices, with a strong file;
- Remove the electrical tape and put everything back together, not forgetting the lubricant.
This tuning really helped many: the handle does not wobble, there is no metal rattling, since the bushing’s edges no longer touch the rod.
Life hack: how the gearshift knob rattles (oscillates) on a Priora
Rattling occurs due to the fact that there are too large gaps inside. The amplitude of vibrations of the internal parts increases, a knock appears along with vibration - this is how the Priora gearbox knob rattles. The remote bushing of the lever is the source of vibration. You can fix this problem in the following ways:
- Installing the washer - place an additional plastic washer between the rocker and the gear shift knob. Its parameters are an internal radius of 9 mm, an external radius of 13.5 mm. Select the plastic so that it is soft enough. This is necessary so that frosty temperatures do not destroy the bushing;
- Replacing the bushing with a fluoroplastic one. Standard – metal;
- Shortening the bushing means sharpening the gearbox remote bushing by 2 mm on both sides, and then coating the part with lubricant before reinstalling it;
- A short-stroke rocker will eliminate vibrations - the alteration will be quite serious, but switching on the desired speed will be easier, but you will have to make a lot of effort to move the lever.
Often rattling is removed using a repair kit. It will get rid of rattling if there was none before.