Location and Replacement
This part is located on the passenger side in the engine compartment under the cooling system pipes.
In case of large stretching, it must be replaced with a new one; to do this, you need to carry out the following procedure:
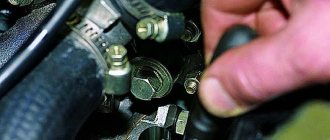
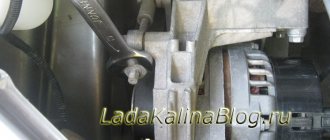
- We take a key for ten and unscrew the tube thanks to which liquid enters the tensioner
- Then use the same key to unscrew a couple of nuts that secure this part to the engine housing
- After this, the device must be pulled out along with the gasket, which must also be replaced with a new one.
The old Niva Chevrolet hydraulic chain tensioner cannot be repaired, so it will have to be replaced with a new one.
Assembly
To perform reassembly we perform the following steps:
- We take a new part and put it in its place
- Take two bolts and screw the device to the engine
- We connect the tube through which the liquid is supplied
Closer to one hundred thousand mileage, even if there is no extraneous noise in the engine area, then in any case the part must be checked for stretching and damage.
Replacing the hydraulic chain tensioner on Niva
The new model Nivki, which is better known to us as the Chevrolet Niva, cutting through domestic roads, inherited the above-mentioned disease from its older brother, the VAZ 21214, which, in turn, is now proudly called Lada 4x4. But the problem is not as scary as its description. In order to keep the power unit in good condition, it is enough to always keep your finger on its pulse: listen to extraneous sounds, regularly carry out maintenance after 60-100 thousand kilometers and not let the problem take its course.
Thanks for subscribing!
If it was not possible to solve the problem of extraneous noise by replacing one hydraulic tensioner with a new one, you can decide to install a mechanical device. Going to car forums for the VAZ 21214, you might be surprised how people almost unanimously give their preference to mechanics. The mechanical tensioner of the “Pilot” series is very popular among the masses. But this does not mean that you should definitely take it; among the mechanics there are a lot of worthy offers, and they are not that expensive. To lengthen the product for the Chevrolet Niva, you just need to weld an additional bushing onto the plunger.
Mechanical chain tensioner
Please note that simply replacing a used VAZ 21214 hydraulic tensioner with a new one is not the right way out of this situation. At a minimum, it is necessary to change the timing chain, which is clearly in critical condition, disposable rubber sealing gaskets in the form of rings and oil seals. And, if replacing such a simple device as a hydraulic tensioner does not present any particular problems on a VAZ 21214, then as for the timing chain, this is already a reason for a separate article.
Valve train chain
If during engine operation there is a ringing sound that resembles the operation of a diesel engine, then most likely the Niva Chevrolet timing chain needs to be replaced.
Replacement
If you do not replace it in time, it may break while driving. To replace, do the following:
- Installing the car in the pit
- The motor protection with boot is dismantled
- We raise the handbrake; it is advisable to place special supports under the wheels
- Drain the antifreeze and remove the radiator and fan
- Carefully disconnect the accelerator cable going to the air filter from the valve covers and pipes
- We remove the crankshaft sensor, loosen the bolts that secure the generator
- Move the generator aside and remove the belt.
- We unscrew several bolts that secure the water pump, and then remove it
- We dismantle the tension and bypass roller of the belt
- Remove all interfering pipes
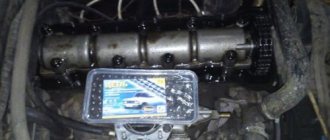
- Cover the cylinder head to prevent debris from getting into it.
- After unscrewing the mounting bolts, remove the camshaft gear
- Remove the oil pipe along with the hydraulic tensioner
- We remove the chain and all gears of the oil pump, crankshaft and camshaft
- We take a new oil seal and install it on the timing cover
Installation
When the Niva Sherole timing chain and all necessary system elements have been removed, you need to correctly install and configure the new parts, for this you need:
- Take the fastening bolt and install it on the shoe
- We check that the shoe is stationary and then tighten the bolt
- We install the new gears in their place so that they coincide with the existing marks
- We install the clamp, if for some reason it does not sit in its place, we file it
Before installing the chain, it must be lubricated with engine oil, after which it can be put in place as follows:
- First on the crankshaft gear
- After that, to the oil pump
- And finally on the camshaft
To ensure better operation and fixation of this mechanism, it contains special Niva Chevrolet timing marks. If they are not taken into account when installing the chain, this can lead to the gas distribution system becoming out of synchronization and increased wear of parts.
Adjustment by marks is carried out in several stages:
- All necessary tools are prepared
- The car is installed on the pit
- The fan is turned off and the radiator mount is unscrewed
- Removing the valve cover
When all the preparatory steps have been completed, the following adjustments are made:
- Rotate the crankshaft until the bearing and camshaft marks match. If the chain is installed correctly, the existing marks on the chain cover and crankshaft will match. If they do not coincide, we adjust the position of the phases
- To make this adjustment, loosen the fastening at the lock washer, then use a 13 key to remove the washer along with the camshaft sprocket
- We set the first gear so that the bolt that secures the crankshaft gear does not turn. Unscrew the fastening bolt and lock washer
- We remove the tensioner.
- Pull the chain towards you and remove it from the sprocket
- To adjust it, move it one tooth
- We begin to turn the crankshaft until the notches coincide
- Install the lock washer. We place the bolt in the place for fastening, but do not tighten it
- Rotate the crankshaft and check if the marks match. If they match, then the work can be considered completed
It is important that the marks match as accurately as possible, since the correctness and stability of the engine will depend on this.
How does the installation proceed?
At the next stage, you should check the degree of chain tension, as well as the coincidence of the marks. You need to pull the pin out of the tensioner. The shaft is rotated several turns to ensure that the marks match. The bolts securing the pump gears and camshaft are tightened, then the stoppers are bent. The front cover is installed. At the same time, the mating surfaces and gasket are lubricated with sealant. The mounting nuts are tightened and the generator bracket is installed. The pulley is installed in place, the cover mounting bolts are tightened, and the valve cover is on top.
How is the timing chain replaced on a Chevrolet Niva? At the next stage, experts recommend checking the condition of the tension rollers and the auxiliary drive belt. If there are defects (noise during rotation in the first case and breaks in the second), the elements are changed.
Next, the pump is mounted with a new gasket. The pulley nut is tightened with a special wrench to 38 millimeters. The belt is put on and all the connectors that were removed earlier are connected. How is the timing chain replaced on a Chevrolet Niva? The radiator is put in place and antifreeze is added. All remaining parts are installed.
After these measures, the engine is started. If the engine starts normally, it needs to be warmed up to operating temperature. Next, you should turn it off and check for coolant leaks. If you have replaced the timing chain tensioner on a Chevrolet Niva with air conditioning, you will additionally need to charge the refrigerant.
Tranquilizer
Another important element in this system is the Niva Chevrolet chain damper, which prevents the resonance effect from occurring. This system consists of the following elements:
The damper is located inside the cylinder head on the front side and is attached to it with two bolts. If it is damaged or worn out, vibrations appear, which can lead to the chain jumping and thereby damaging the motor.
Replacement
To replace, you will need a ten-size socket wrench and a screwdriver. When the tool is ready, we go through the following steps:
- Remove the cover from the cylinder head
- Remove the camshaft drive chain tensioner
- Without disconnecting from the chain, remove the sprocket from the camshaft flange
- Starting from the bottom bolt, unscrew the two fastening bolts
- We fix the chain together with the sprocket and remove the damper. During removal, it is advisable to hold it so that it does not fall into the oil pan.
- We inspect it and if there is damage, we replace it with a new damper.
- We take a new part and install it in reverse order.
It is necessary to purchase a new element exactly the same as the one that was installed previously, since models that were produced earlier may have a damper of a different shape.
What's next?
The car is placed in fifth gear. Use a special 38 mm wrench to remove the nut on the crankshaft pulley.
Unscrew the spark plugs and make marks on the crankshaft, as well as on the camshaft gear. Then dismantle the pulley and unscrew the fastenings of the lower frontal cover. They are located on the engine sump. Unscrew the two damper mounting bolts. The last one is removed too. The oil pump gear clamps are bent. Then the bolt is unscrewed with a 17mm head.
The oil lines are removed from the tensioner using a brake pipe wrench. Afterwards you will need to unscrew the nut of the low oil pressure sensor from the tee. To do this, you will need a 22mm wrench. This procedure is required when using the “Pilot” tensioner.
Using a spark plug wrench, the tee is removed and a pressure sensor is installed instead. Using a 10mm wrench, unscrew the two tensioner nuts. The last one is removed from the place. The top nut is removed. It can be obtained with pliers or a tubular wrench.
The next step is to remove all three gears, as well as the chain. Use a screwdriver to remove the old crankshaft oil seal. It is necessary to thoroughly wipe the oil seal seat from dirt.
You will need a clean rag. It is also advisable to wipe the lid. After these procedures, a new oil seal is pressed in. To make it go in easily, you will need to pre-lubricate the elements with oil. An old oil seal is used as a mandrel (so that the part fits evenly into the hole).
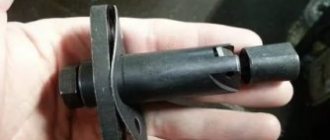
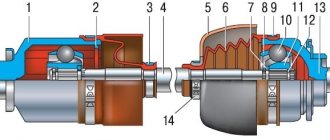
The principle of operation of the tensioner.
The tensioner has the shape of a cylinder, which is screwed on top with a lid, with a hole for oil supply. The hole is closed by a small ball, which is pressed by a spring to ensure oil flows into the housing and prevent it from leaking out. A cylinder with rings moves inside the housing. When the chain is released, the cylinder moves inside the housing under oil pressure. After the chain is loosened, the cylinder is prevented from returning to the initial position of the notch on the body.
conclusions
As you can see, to carry out this work you do not need to have any special knowledge or tools. Therefore, you can handle this kind of work yourself if necessary . If you follow these recommendations, it is impossible to carry out such repairs incorrectly.
The gas distribution system of any engine must work correctly. If problems occur in its operation, this leads to premature wear of the motor and numerous breakdowns. To accurately adjust the timing, special marks are used, according to which the shafts in the engine are aligned. We will tell you about the correct placement of marks on a Chevrolet Niva car in this article.
How is the replacement made?
If chain stretching is detected and the decision is made to replace only the hydraulic tensioner, then this is an incorrect assumption. It is necessary to replace all parts: chain, hydraulic tensioner, seals, gaskets. Replacement is done in the following sequence, using all the necessary tools:
Use a spanner wrench to unscrew the tube fitting, which has a “10” head. The tube is designed to supply oil to the hydraulic tensioner.
Having loosened the fitting, the tube is removed and moved upward so that it does not interfere with further work. The two nuts securing the device itself are also unscrewed using a “10” wrench.
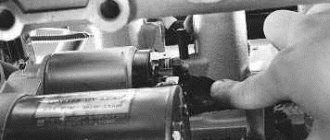
The device is ready to be removed from its mounting location. We grab the protruding part with our hands and pull out the device. There is a gasket on it, which also needs to be removed to replace it with a new one.
A used device cannot be repaired and requires the installation of a new one. Before installation, it is necessary to coat the gasket with a layer of sealant to prevent oil leakage.
Replacing an old device does not require serious mental and especially physical effort. Installation of a new one is carried out in the following steps:
- The device is inserted into the new seat, having first checked that the structure is identical to the old tensioner.
- Screwed in with two fastening nuts.
- The tube is inserted and secured.
It is simply impossible to make a wrong replacement. After installation, the operation of the motor and the tension of the new chain are checked. An important point is to replace the timing chain in order to 100% protect the car and your health from unexpected breakdowns on the road. This article will tell you how to replace the chain.
Now the owners of the Chevrolet Niva can, without doubt and without errors, correct the existing problem with weakening the chain tension. Remember that if your car has traveled more than 100 thousand km, and there are no characteristic sounds from under the hood, then do not neglect the situation, but disassemble and check the looseness of the chain and the functionality of the tensioner. Happy renovation work!