Replacement frequency
Replacing the air filter is necessary every 15-20 thousand km. It is recommended to periodically blow out the filter element with compressed air. However, sometimes it may be necessary to unscheduledly replace the filter. Symptoms of the need to install a new consumable are:
- noticeable loss of power from the power unit;
- the car had to cover a long stretch of dusty dirt road;
- fuel consumption has increased;
- the previous replacement period is unknown, for example, when purchasing a used car;
- There is a lot of oil getting into the air filter;
- The filter element has noticeable mechanical damage, which does not allow quality air purification.
Replacing the air filter - how to change it yourself?
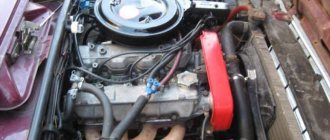
Engine power, fuel consumption and stable engine operation directly depend on the condition of the air filter. If the filter cartridge is clogged, then less air enters the cylinders, which leads to an over-enrichment of the air-fuel mixture, a drop in the power of the power unit and an increase in fuel consumption. Replacing the air filter is a very important procedure in the maintenance of any car, because clean air is the key to proper engine operation. We will try to figure out how often, why and how this element is replaced on carburetor and injection engines, and we will also analyze the consequences of untimely replacement of the air filter.
The process of replacing the air filter on a VAZ 2109 with a carburetor
Replacing the air filter on a carburetor VAZ 2109 is shown below.
- Open the hood lid.
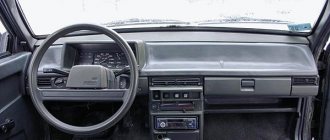
Location of the air filter in the engine compartment of the VAZ 2109
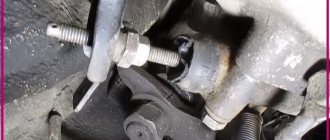
- Unscrew the nut securing the filter cover.
Unscrewing the nut
- Unclip 4 latches.
Unsnapping the latches
- Remove the air filter cover.
Removing the cover
Air filter view
- Install a new filter. For better sealing, many car owners recommend lubricating the rubber ends of the filter element with oil.
Filter installation
Filter element during installation
- Match the marks on the cover and the air filter housing.
Label matching
- Reassemble everything in reverse order.
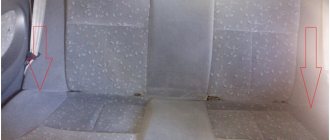
VAZ 2109 owners are often faced with the situation of oil in the air filter. The reason for this is the design of the crankcase gas exhaust. The tube connects the power unit crankcase and the filter housing. This design reduces air pollution and increases engine efficiency.
Oil can flow through the crankcase ventilation tube into the filter. To solve this problem, car owners recommend closing the hole in the filter housing with a champagne cork. The crankcase outlet can be extended with a hose of suitable diameter.
Troubleshooting oil getting into the air filter
Replacing the cabin filter VAZ-2114
Experts recommend replacing the cabin air filter element 7–8 thousand kilometers after each installation of a new one. But if the car is operated under heavy road dust, the filter should be changed more often. This will provide the most comfortable conditions inside the vehicle.
Signs that the air filter element is clogged and needs to be replaced:
- Dust constantly appears on the front panel, despite the fact that it is often wiped off;
- the presence of foreign and unpleasant odors inside the cabin: mold, dust, exhaust gases and others;
- weak air flow from the external air supply ducts when the fan is running at full power;
- intense and frequent fogging of windows;
- insufficient heating of the interior by car heater in winter.
The VAZ-2114 cabin filter is made in the form of a plastic frame on which the filter element is fixed. It is located under the cover of the car heater fan housing, which stands under the hood near the windshield in the center between the wings close to the bulkhead separating the engine compartment from the passenger compartment. It should be noted that the manufacturer did not install cabin filters on the first batches of the VAZ-2114. To determine its presence, simply press on the cover (jabot) of the stove fan housing. If there is no filter element, the plastic of the casing will bend freely. When you feel the elasticity of the lid, it means the salon cleaning element is in place.
Air filter replacement sequence:
- Unscrew the 2 screws securing the cover on both sides of the fan housing.
- Remove the cover.
- We remove the old one and install a new air filter element.
- We perform the reverse steps to disassembly.
Home →
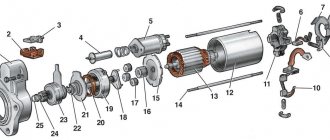
Device → Fuel and exhaust systems → Air filter →
Self-replacement of the air filter on the injection VAZ 2109
Instructions for replacing the air filter on the injection VAZ 2109 are presented below.
- Open the hood.
- Disconnect the sensor located near the air filter.
Disconnecting the sensor
- Unscrew the four filter fasteners. To do this, use a screwdriver.
Unscrewing the filter cover
- Open the lid.
Opening the lid
- Remove the filter element.
Removing the filter
- Clean the seat.
- Install a new filter element.
Installation
- Reassemble everything in the reverse order, avoiding distortions of the air filter cover.
How to change the air filter
The following types of air filters are used in passenger cars, which differ in the way the cartridge is installed in the housing:
- round;
- polygonal;
- cylindrical;
- zero resistance.
Round filters are used on carburetor engines up to 3 liters. Polygonal ones are used on injection and diesel engines with a volume of up to 3 liters. Cylindrical cartridges are used on any engine with a volume over 3 liters. Sometimes there are exceptions, for example, a rectangular filter on a 5 liter diesel engine. Zero resistance filters are installed on racing cars with a short engine life.
Replacing the air filter is easy. To replace the round filter, you need to unscrew 3 nuts or snap off 4 latches and remove the cover. Then remove the dirty cartridge, replace it with a new one, put on and secure the cover. To replace the rectangular filter, you need to unscrew 4 screws or snap off 2–4 latches. Then remove the cover, remove the old cartridge and insert the new one. Then put on and secure the lid. To replace the cylindrical filter, you need to snap off 3-4 latches, then remove and move to the side the cover with the air duct attached to it. Then remove the old cartridge, insert a new one, put on and secure the cover.
Whatever type of filter you change, after removing the cartridge, be sure to wipe the inside of the housing with a damp cloth or vacuum it to remove any trapped dust. Move the rag away from the inlet. This will prevent dust from entering the engine intake manifold. When installing the cartridge, make sure it fits neatly into place. If it is distorted, then some of the air will enter the cylinders without cleaning, which will negatively affect the condition of the valves and cylinder-piston group.
Air filter 2109. Pan. Dimensions. Correspondence.
I made a pyramid out of plasticine, placed it in the air purifier body, buried the lid, and snapped the latches.
Pyramid (approximately).
He pulled out the crumpled pyramid and measured it. Measurements were taken three times.
Measuring a crumpled pyramid 1.
Measurement of crumpled pyramid 2
As they wrote in the magazine Behind the Wheel No. 6 for 2002, “ONE THIRD FILTER” is the nominal height of the air cleaner housing (60 mm). But checking the height of real bodies on different cars showed that “off-scale” heights of up to 63 mm also occur.
Additional measurements:
- The height of my case closed only with “latches” (the nut is not tightened) is 64.5 mm.
- The height of my case, closed with latches and a screwed nut, is 63.65 mm.
- In my case, a tightened nut (I have a wing nut) gives a maximum pressure of 1 mm.
- Not every normal filter will work properly on any car. The fact is that the current OST 37.001.491–90 prescribes a height for filters (59–63) ± 1.5 mm. In other words, everything that falls within the range of 57.5–64.5 (scatter is more than 10% of the filter height) is considered normal.
- In general, it became clear that we either need to take filters from 65 mm. height, either change the pan, or make a rubber gasket under the filter.
- In the same “Behind the Wheel” test, domestic filters did not shine with quality, so I looked at what I could choose with a height of 65 mm. from import.
I didn’t dig particularly deep, but it turned out that there weren’t many options.
Height of different filters
As a result, I bought a MANN C2443/1. Honest 65 mm. with a slight plus. I took it from ISNEXT (formerly EXIST).
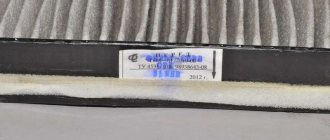
As for the FRAM CA660PL filter, despite the manufacturer’s stated height of 61 mm, my copy has a height of 57-58 mm. The currently installed “Behind the Wheel” filter is 63 mm.
I bought the filter at EMEX. So it’s hard to say whether it’s a defect or a fake.
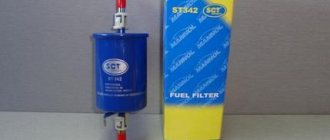
Store labels
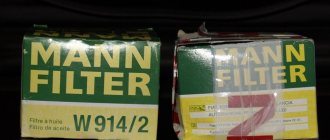
Well, here's a comparison photo between MANN and FRAM. Feel the difference!
FRAM CA660PL MANN-C2443-line
FRAM CA660PL- MANN-C2443
Summary: Before you buy a filter, measure the height of the pan!
pot