The weather was excellent over the weekend, so time was spent replacing the complete timing belt set. The work is being carried out slowly, every step is deliberate and overworked, since I enjoy the work of restoration, there is no task of assembling it quickly in order to ride it.
Now I’ll try to tell you, but as always it won’t be short.
There are a large number of photographs, so I had to combine them so as not to miss every step. Naturally, we first loosen the tension on the generator and remove the belt and pulley, tightening the bolt back. If a lot was washed from the top, then from the bottom there is such a layer of dirt, which is correct, I decided to immediately change the seals. We set the top dead center (TDC). Loosen the roller, rotate it and remove the timing belt. Then the video itself. The roller has a metal clip, I wonder what year it is, since the new VPZ already has a plastic clip. We also see that the cylinder head with the designation 2108 1 has 2 holes for the stud.
This suggests that the cylinder head is designed for 2 different blocks 1.1 and 1.3 with different block heights. On one of the websites this cylinder head was called a rarity in 2010. Let's return to disassembly, unscrew the upper gear with a 17mm wrench, for convenience, insert a 10mm socket into the holes of the gear and put it on the rear timing cover casing nut (as described in the repair book).
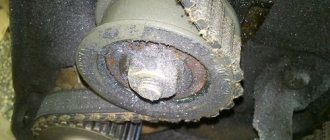
The first thing we see is that the camshaft oil seal is coated with sealant.
The second and more terrible moment is that the gear in the place where the key is installed has a broken groove, the key has clogged edges. The result is definitely a replacement. With the next movement I wanted to remove the lower gear, the book says, take it from both sides and pry it off with a screwdriver, but that was not the case. The gear just doesn't move. Access is only possible from one side; the rear cover casing is in the way on the other. Therefore, we drain the antifreeze from the block and unscrew the casing and, accordingly, the pump. Since the car is 91 years old and has an old-style spar (many people know). Therefore, to remove the pump and casing, I had to unscrew the front engine mount and lift the engine on a jack with a wooden spacer, providing additional space.
After this, remove the timing case and pump at the same time. Having removed the pump I saw a halogram and a TZA mark, the pump was a good original. But it already has a slight bite in the bearing.
Only after this did access to the lower gear appear on both sides. After some time it gave in and will naturally be replaced with a new one.
The entire system has been disassembled, everything is covered in oil, now it all needs to be washed thoroughly. How nice it is to look at the cleanliness, it took some time. Using a mirror, I noticed that the camshaft, due to the fact that the gear was broken in the place where the key was installed, had nicks.
That was the end of Saturday.
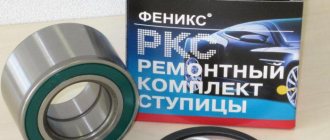
In the morning I visited my favorite car store where the following spare parts were purchased: 1. Timing gear 2108-1006020 large “DAAZ” - 140 rubles 2. Timing gear 2108-1005030 small “DAAZ” - 85 rubles 3. Key 2108-1005017 2 pcs - 32 rubles 4 Timing gear pin 2108-1005031 - 10r 5. PVC wire braid D9 5 meters -100r 6. 4-pin relay - 58r 7. Relay block - 10r 8. Washer valve bracket 2108-5208558 - 15r 9. Paper pump gasket - 3p 10. Cork pump gasket – 16 RUR 11. Sealant gasket – 84 RUR Total amount: 553 RUR
Let's start assembling. I used a tap and a die to thread the threads in the block and bolts for installing the pump.
I started replacing the camshaft and crankshaft seals. The upper oil seal has the material designation NBR - nitrile rubber and seems to have a 99 year stamp.
The oil seal became stiff, cracked, very carefully I broke off a piece of the oil seal in order to displace it from the camshaft, at some point it went and was pulled out.
In its place was a new BRT oil seal - fluorine rubber FRM.
But the crankshaft oil seal was already installed from Elring and as soon as I brought the screwdriver it just jumped out of its place, it was so soft that it just dangled in its seat. A new BRT oil seal was also installed - fluorine rubber FRM.
Now let's look at the Kroner pump. The kit includes a paranit gasket. From the beginning I began to measure the distance from the impeller to the place where the block was installed, I even took plasticine. But the distance turned out to be very decent. I went to get my original TZA pump, comparing them with each other, it turned out that the Kroner pump - the impeller is positioned lower by as much as 3-4mm. Therefore, from the available gaskets, I chose the thinnest one, which was paranitic.
The best thing to do was to cut the gasket out of A4 sheet and install it. But this measure will not save with this pomp. Therefore, buy only good pumps, which I include TZA. We install back the already washed timing case and pump.
The next step is installing the gears. The lower one stood up easily, as it should be removed. But the top one did not want to get dressed at all, due to the fact that there are burrs that I wrote about above. Only after processing with a file did the gear fall into place.
We assemble the tension roller, not forgetting about the ring.
The last step is installing a new timing belt and tensioning it. At the end, we turn the crankshaft 2 turns and check that the marks match; if it doesn’t work, we repeat the installation procedure.
With this Sunday came to an end. I spent the weekend profitably.
To make driving a car enjoyable, you need to constantly monitor its technical condition and regularly change all consumables. The timing belt is one such material. The article provides instructions on how to replace the timing belt on a VAZ 2108 with a carburetor and includes a demonstration video that will turn the replacement process for any driver from a burdensome duty into a pleasure.
What is a timing belt for?
Modern cars with a carburetor are equipped with a gas distribution mechanism. When the timing belt is operating, the valves must open and close in a strict order. Their movements must be performed synchronously with the movements of the pistons. The transmission of motion from the crankshaft to the camshaft is carried out using a timing belt. If it breaks, the valve timing is disrupted, which can lead to serious damage. Depending on the design of the engine, the valves may bend when they meet the pistons.
Example of bent valves
Replacement Guide
Manufacturers recommend replacing the timing belt on a VAZ 2108 with a carburetor after 60-75 thousand kilometers. Considering that the car is operated in different conditions, it is recommended to do a visual inspection of the components every 15 thousand kilometers.
Replacement should be done if the following defects are found:
- unevenness, wear, cracks on the surface;
- oil stains;
- frayed end sides;
- tear, wear, missing teeth;
- a stretched belt that can no longer be tightened.
When inspecting the unit, you should pay attention to other elements.
New consumables
The tension roller usually comes with the strap.
If oil leaks are detected, the seals most likely need to be replaced. If there are scratches, chips, or play on the surface of the pump, it should be replaced. How long the parts will last depends on their quality and operating conditions.
Required Tools
To carry out the replacement procedure on a VAZ 2108, you need to prepare the usual tools:
- sets of sockets and spanners;
- screwdriver;
- a special key for turning the tension roller;
- jack;
- new consumables;
- clean rags.
If you do not have a special key to turn the tension roller, you can use pliers and two nails.
Stages of work
To make it convenient to work with the car, it should be driven onto a flat surface or a lifting device.
The replacement itself consists of the following steps:
- To access the crankshaft pulley, you first need to remove the right wheel from the front.
- After unscrewing the three bolts, it is necessary to remove the protective timing cover.
Removing the protective cover
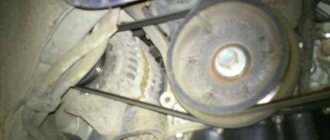
- Loosen the generator belt and remove it from all the rollers.
- Next you need to set the tags. To do this, you need to turn the crankshaft in a clockwise direction until the marks on the camshaft and the rear cover of the timing mechanism match.
- In the upper part of the clutch housing, you need to remove the plug and make sure that the groove on the flywheel and the slot on the clutch housing match.
- Next, remove the sensor indicating the crankshaft position.
- The crankshaft must be secured. To do this, you need to insert a screwdriver or a metal pin between the teeth of the flywheel.
- Next, unscrew the fastening bolt and remove the generator drive pulley.
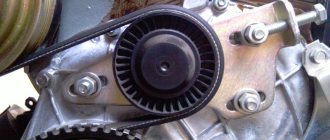
- Using a “17” wrench, you need to loosen the fastening nut on the tension roller.
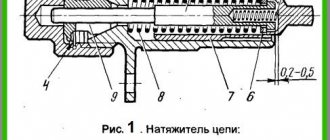
When the strap is as loose as possible, it can be removed. Dismantling a rubber product - To replace the tensioner, you need to unscrew the fastening nut and remove it from the pin. When replacing the roller, you should inspect the spacer washer, which also needs to be replaced if necessary.
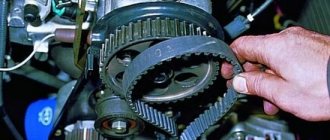
- The new belt is first put on the teeth of the crankshaft pulley, then on the teeth of the pump pulley, then wound behind the roller and pulled over the teeth of the camshaft gear.
- Using a special wrench or using nails and pliers, you need to turn the tensioner and tighten the rubber product.
- Next, you need to tighten the tension roller nut.
- Then you need to return the attachment drive pulley to its place and screw in the fastening bolt all the way. Next, turn the crankshaft clockwise just a couple of turns and again set all the alignment marks on the camshaft and crankshaft. Setting marks on the pulley Checking the timing belt tension
If the marks do not match, the belt installation should be repeated.Checking the tension of the timing belt
After installing the strap, you need to check its tension. To do this, you need to turn the belt in the space between the camshaft and crankshaft pulleys 90 degrees. If it turns more than 90 degrees with a little effort, it needs to be tightened more.
- Next, install the remaining components in reverse order.
At the last stage, be sure to check the alignment of the installation marks.
This completes the replacement of the timing belt on the VAZ 2108 carburetor.
Why does the timing belt break on a VAZ 2109?
Many people wonder why the timing belt breaks only after it has happened. You will be lucky if such a breakdown occurs, for example, somewhere in the yards while the engine is warming up, and not on the highway between cities. Therefore, so that you do not find yourself in such situations, you need to know why this happens. There are several reasons for belt breaks:
- Natural wear of the part.
- Buying a defective belt.
- Contact with technical fluids on the belt.
- Malfunction of timing drive parts.
Let's discuss each point in more detail.
Natural wear of the part.
During operation, the belt not only wears out, but also bends, resulting in microcracks that subsequently grow and lead to belt breakage.
Each node has its own service life. The timing belt of the eight-valve VAZ engine operates for 60 thousand kilometers.
Buying a defective belt.
Don't skimp on critical spare parts. By saving 100-200 rubles you can be stuck on the road for a long time.
Contact with technical fluids on the belt.
Oil or coolant can easily get on the timing belt. Oil gets in due to wear on the camshaft and crankshaft seals, and antifreeze can leak out when the pump wears out.
Malfunction of timing drive parts.
Timing drive parts include:
Over many thousands of kilometers, the timing gears wear out and the possibility of the belt jumping over a gear tooth increases.
Due to a poor-quality belt tension roller or due to its long use, it may jam. Also, do not overtighten the belt. A belt that is too tight begins to whistle and can break very quickly.
During operation, the pump bearings wear out and play appears at the pump shaft, as a result of which the pump drive gear is crooked and the timing belt begins to slip and rub against the protective casing or the block.
The procedure for replacing the timing belt VAZ 2109 1.5 liters 8 valves
Old VAZ 2109 with a 1.5 8 valve engine, timing belt replacement. In general, it could be a VAZ 2114 or 2110, there is no difference in operation, the eight-valve engine is the same everywhere. Together with the belt, we will change the pump, the tension roller and two pulleys, the camshaft and the crankshaft. If the timing belt breaks, the valves on this engine do not bend, but it is better not to let it get to that point. Changing the pump and roller is a prerequisite so that after a thousand kilometers you don’t have to disassemble everything again. But it’s up to you to decide for the pulley, the price is 150 rubles per pair. There were cars where a slightly bent pulley caused the belt to slip and gradually wear out, reducing its service life. On this car the belt was worn down in half.
We recommend that you periodically check the condition of the belt to avoid annoying consequences and not have to look for someone to take it to a repair shop. Replace every 40,000 kilometers.
And here is the patient himself.
To replace it, we need a key for the tension roller, the price is half a hundred rubles. You can buy it at any auto store. As well as a set of keys and sockets and two hours of free time.
How to remove the timing belt on a VAZ 2109.
First of all, we engage fifth gear (this is done to make it easier to crank the engine when we align the marks), loosen the nuts on the front left wheel and jack it up. Open the hood, remove the protective cover and look at the position of the mark on the gear.
If you change the belt on a VAZ before it breaks.
Rotate the wheel until the marks on the gear and on the plate match.
After the marks coincide in this place, open the inspection hole plug in the clutch housing and check whether the slot on the housing coincides with the mark on the flywheel.
If there are no marks on the flywheel, then rotate the wheel so that the camshaft gear makes one more revolution. If this time no risk appears near the mark in the clutch housing, read how to change the timing belt on a VAZ 2109 if the belt breaks. If the mark coincides with the mark, unscrew the crankshaft bolt and go to the section “Lower timing mark of VAZ 2109”
If the timing belt on the VAZ 2109 is broken and you are planning to change it.
We remove the wheel, remove the plastic fender liner, if you have one. Unscrew the crankshaft pulley bolt.
If you don’t know how to unscrew the VAZ crankshaft bolt, then I’ll tell you a little trick.
If you have someone to help you, then ask the assistant, without removing the car from fifth gear, to press the brake as hard as possible. Meanwhile, we take the head and the larger lever and twist it counterclockwise with all our might.
If you are alone in this difficult situation, then the steps are as follows: check that the car is in gear and screw in 2 bolts that screw the wheels into the hub and between them insert a crowbar, reinforcement, a strong stick (whatever you find, as long as it doesn’t break) and press it into the ground. Next, take the head, extension and larger lever and unscrew the bolt, making sure that the car does not fall off the jack.
Lower timing mark of VAZ 2109.
After unscrewing the bolt securing the generator drive pulley, look at the alignment of the marks on the crankshaft gear and on the oil pump housing, they should match.
When the marks on the upper and lower gears are set, you can unscrew the tension roller and remove the roller and timing belt.
Where are the timing marks on a VAZ?
The 8-valve VAZ engine has one camshaft, and it is much easier to set marks on it than on a twin-shaft engine. Let's look at all the possible ways to find the extreme position of the camshaft and crankshaft.
Photo of VAZ 2108 timing marks
On the camshaft, as a rule, there is a mark on the pulley, such a small mark, and on the cylinder head there is an ebb with which this mark should coincide, or rather not even an ebb, but a protrusion on the shield, on the left side, when looking at the engine and camshaft from the front. Sometimes these marks are not observed; what to do in this case is described below.
The crankshaft is aligned according to the mark on the flywheel, on the gearbox, near the engine on top there is a hatch covered with a rubber plug. If you remove the plug, you will see marks on the flywheel and a protruding rod from the engine, which should coincide. But there may be a problem: the fact is that if the engine was disassembled and the flywheel was removed, then the flywheel can be placed on either side, that is, the mark will be God knows where, but not at TDC. There is no guide or eccentric on the flywheel; whichever side you put it on, that’s what it will become, even if you turn it 180 degrees.
In this case, you can look for the mark on the front of the engine - on the pulley and the return flow on the oil pump on the engine. But this is not the case on all engines; often this mark is missing. What to do in situations where no tags are found? Now the fun begins, in fact, marks are not needed on this engine, you can do without them.
Installing a timing belt on a VAZ 2109 injector.
Before installing the belt, check all marks again. When installing the belt, there should be no slack in the belt between the camshaft and crankshaft gears, otherwise the marks will go away. It is best for the belt to be slightly tensioned in this place. It is allowed that the marks differ by approximately half a gear tooth. We install the tension roller. Before him, a washer is put on the bolt, and only then the roller itself.
How to properly tension the timing belt on a VAZ 2109.
The belt can be tensioned either with or without a special key. A special key can replace a screwdriver and 2 nails or self-tapping screws. We insert the nails into the holes of the roller, insert a screwdriver between them and twist counterclockwise. A good tension is considered to be the moment when the belt between the camshaft and crankshaft gears can be twisted 90 degrees with little effort. With the engine running, in this place the belt should run straight like a string, without beating. It should also make noises such as creaks and whistles.
After tensioning the belt, turn the crankshaft 2 turns and see if the marks on the gears match. If everything matches, then we collect the rest in reverse order.
I hope in the article “How to change the timing belt on a VAZ 2109” you found answers to all your questions. If something is unclear, leave your question in the comments.
The timing belt on VAZ 2109-2108 vehicles must be changed regularly, namely at least after 60,000 km. Of course, from time to time you need to look at its condition, and if chips or tears are visible to the naked eye, then it must be changed urgently.
This procedure is not simple, but it cannot be called complicated either, since if you have the necessary tools, you can do everything yourself without any problems. From the tool we need:
- Open-end wrenches or spanners for 17 and 19
- 10mm head with ratchet handle
- Flat screwdriver
- Special key for tensioning the roller
Removing and installing the timing belt
So, before proceeding with this maintenance, it is necessary to align the timing belt to the marks, and also remove the alternator belt. After this, we need to unscrew the generator drive pulley, since in the future it will interfere with us. To prevent it from turning, hold it through the hole with a large flat-head screwdriver, as clearly shown in the picture:
Observe carefully, if during unscrewing the camshaft gear has moved relative to the mark on the cover body, then even with the crankshaft pulley fastening nut loosened, it is necessary to set the sprocket in its place. Then unscrew the bolt completely by hand and remove the pulley:
Next, loosen the tension roller nut and use a special wrench to loosen it (usually rollers with two holes at the edges are used), although in most cases it loosens spontaneously:
Then you can remove the timing belt from the camshaft gear, as is clearly demonstrated in the photo below:
It is also better to change the tension roller together with the belt, since it is its jamming that can cause a break. In order to replace it, you need to completely unscrew the fastening nut and remove it from the stud:
Pay attention to the photo above, you can see that there is a spacer ring behind the roller. It needs to be removed and when installing, first insert it into the back of the roller, and then put it all in place.
Now you can replace the belt on a VAZ 2109-2108. To do this, we first put it on the crankshaft gear, and then immediately along the large branch onto the camshaft sprocket.
This is necessary so that during further installation the marks do not get lost. Next, we put the water pump drive gear and tension roller on it. After everything, we look at the alignment of the marks, and if everything is fine, then we stretch it using a roller.
The belt tension should be such that when the engine is running, the large branch does not wave at low and high speeds. But at the same time, you should not overtighten, as this can lead to premature wear. Listen with the engine running to see if there is any extraneous noise from the tension roller, and if there is one, then slightly loosen the belt. Next, install all the removed parts in reverse order.
During the operation and repair of VAZ 2109, 2108 and 21099 cars, sometimes it is necessary to adjust the tension or replace the entire timing belt. Initially, to carry out this procedure, it is necessary to remove the protective cover on the timing drive, while unscrewing 3 bolts. Then you need to turn the crankshaft by a special bolt so that the mark on the camshaft pulley is opposite the mark that is on the timing cover. Then you need to disconnect the bolt on the crankshaft pulley.
In order to prevent the shaft from turning, it must be fixed with a screwdriver. Then you need to disconnect the crankshaft pulley, loosen the nut on the tension roller in order to ease the tension of the timing belt. Then you can remove the timing belt itself. The belt must be installed on the crankshaft pulley, then on the camshaft pulley, until all the marks on the cover and also on the pulley match.
Next, you should put the timing belt directly on the water pump pulley and on the tension roller. After this, you need to put on the crankshaft pulley and tighten the mounting bolt using torque. The timing belt should be tensioned using a tension roller, and then the fastening nut on the roller should be tightened. After this, you need to check the timing belt tension.
At the end, you should install the timing cover of the drive, then the generator belt itself and adjust the tension. For greater clarity and understanding of exactly how this procedure should be carried out, you should definitely watch the video below.
EvgenyTigrus › Blog › Testing timing belts for VAZ-2108
Everyone knows that the timing belt needs to be replaced from time to time.
Otherwise, sooner or later it will break. And then, at best, the engine will simply stall, and at worst... Unfortunately, the 1300 cc VAZ-2108 engine is a vivid example of the “worst case”: a broken timing belt inevitably means expensive head repairs with replacement of valves. To avoid this, you need to change the belt on time - factory standards require this to be done every 60,000 km. But what kind of belt should I buy to replace my old one? Dmitry SHEVTSOV Photo by the author
For the test, we were able to buy belts from seven different brands. All of them are designed to work in the gas distribution mechanism of the VAZ-2108 engine. The “reference point” is a domestic belt from Balakovo, which is used to equip the engines of VAZ front-wheel drive vehicles on the assembly line in Tolyatti. The remaining six products are imported. Dayco belts are Italian, Lemforder are German, Roulunds are from Denmark. But finding out the pedigrees of the belts of the other three brands turned out to be more difficult. Let's take Bosch, for example. The box says that the belt is from Germany, and the first digits of the barcode indicate France. The same leapfrog with belts from the famous Gates company: the barcode indicates Belgium, and on the belts themselves there are the inscriptions Made in Poland. And on the packaging of Contitech belts there is only a German barcode - and not a single inscription about the place of manufacture. We bought belts of all brands in six pieces, as required by the test program compiled on the basis of TU 38.1051912 “Toothed belts for VAZ engines.” The exception was Gates belts - we bought as many as 12 pieces, six belts each with teeth of two different profiles. The fact is that timing belts for VAZ front-wheel drive engines come with two types of teeth. The first is with a so-called involute profile: such a tooth resembles a rounded trapezoid. Involute teeth are available on Russian belts, as well as Bosch and Contitech belts. The second type of teeth, which appeared after the involute one, is round: Dayco, Lemforder and Roulunds belts ended up with such teeth. But we found the “eight” Gates on sale with both a traditional involute tooth and a more modern round tooth. Interestingly, in a laboratory accredited by Gosstandart in the field of testing rubber products, they immediately found out that two different Gates belts differ not only in the profile of the teeth, but also in the hardness of the rubber. Belts with an involute tooth profile are made of rubber with a hardness of 65 units on the Shore scale, and the rubber hardness of round toothed belts is 2 units higher. By the way, all imported belts are made of moderately hard rubber (63-67 Shore units), and the material of Russian belts is harder - 73 Shore units. What does this mean? Nothing. In VAZ's technical specifications, the hardness of the rubber of toothed belts is not specified at all. And theoretically, softer rubber will be more flexible in the cold. We decided to check this - especially since according to VAZ standards, a belt, after being kept in a freezer for a day at a temperature of minus 45 degrees, should bend without cracks on a round mandrel with a diameter of 10 cm. The belts were frozen, bent... All samples passed the cold test, including more “solid” Russian.
After this came the turn of strength tests. First, tests on tensile testing machines, which all samples passed. Moreover, at one stand the belts were checked for delamination, tearing off the toothed part from the base,
Experts explained the increase in strength by the properties of heat-resistant rubbers from which the belts are made. With long, stable heating, their internal connections become stronger, and the toothed part is baked more strongly to the base tape. Approximately the same thing happens when the belt is running on the engine - after all, the temperature inside the belt casing, especially in the summer heat, is no less than 90 degrees... We checked the hardness of the rubber on the “toasted” belts. The Gates belts "dried out" the least - their hardness increased by only 6 units. But the Dayco belts, which were the most elastic at first, hardened the most - the hardness of the rubber increased by 14 units.
Simulating harsh operating conditions in a worn engine with leaking seals, testers exposed the rubber surfaces of the belts to hot engine oil for two days. Again, all belts passed the test. The next test was to determine the specific force that a belt tooth can transmit. This test is carried out as follows: the belt, pressed against a stationary gear with a force of 133 Newtons, begins to pull at a speed of 50 mm/min until the teeth are cut off or disengaged.
Source: www.drive2.com
Replacing the timing belt on a VAZ 2108/2109/21099
Replacing the timing belt (timing belt) is a simple operation. car models, this process can take a large number of hours. Replacing is an important job when servicing any car.
This is due to the fact that in cars, a rupture of the timing belt leads to consequences, which usually results in the opening of the engine gas distribution mechanism group.
On average, the life of a timing belt fluctuates about kilometers, but it is recommended that the timing belt be repaired prematurely in case of any visible damage, in order to avoid the problems described above. It is recommended to change the belt after purchasing a car if it is not known how long the previous owner of the car drove without replacing it.
On many cars, the timing belt can only be replaced by specialists; after replacement, an electronic check of the engine is necessary, however, due to the design of the cars, this operation can be carried out yourself. Let's consider replacing the domestic VAZ car VAZ 2108/2109/21099).
Remove the generator drive belt. Using a 10mm wrench, unscrew the bolts of the front timing cover:
Remove the right wheel mudguard from the engine compartment.
Remove the crankshaft position sensor (see “Removing the crankshaft position sensor”).
Unscrew the bolt securing the generator drive pulley.
Turn the tension roller to the position at which the belt will be loosened as much as possible.
Install the timing belt sequence. We put on the crankshaft belt. Then we put on the rear branch of the coolant pump roller. Putting on the belt
Tighten the tension roller mounting nut. We tighten the bolt securing the generator drive pulley “19” and turn the crankshaft clockwise. We check the alignment marks of the crankshaft
If there are marks, repeat the operation to install the belt. To adjust the belt tension, turn the crankshaft counterclockwise so that the camshaft mark moves down the rear cover
Excessive belt tension reduces the service life of the belt and coolant pump roller bearings.
It is best to check the condition of the timing belt as often as possible - approximately once every 15-20 thousand kilometers. It should be replaced at 50-60 thousand. It’s better not to delay and install a new kit in time.
This is especially true for VAZ-2109 cars with 1.3 liter engines. They are equipped with pistons that do not have scraping for valves.
If the timing belt breaks, the crankshaft continues to rotate. The camshaft stops, and all valves occupy the lower position (open).
The pistons hit the valves, and the force is enough to cause the valves to become deformed. Therefore, a broken timing belt can cause very sad consequences.
In what cases is replacement necessary?
The timing belt is a rubber rim with a toothed inner side. It serves to synchronize the operation of the crankshaft and distribution shaft, and also drives the water and oil pumps. It belongs to consumables that need to be changed regularly. The replacement should be carried out according to the recommendations of the VAZ 21099 manufacturer, who recommends replacing the part after 50-60 thousand kilometers. But this is not the main criterion.
A belt break while driving can cause a major engine overhaul. If the belt breaks, the synchronization of the crankshaft and camshaft disappears. Then the valves begin to hit the pistons and bend, thereby damaging the pistons and cylinder walls. Therefore, the condition of the timing belt should be checked every 15 thousand km. If cracks are found during inspection, it must be replaced.
Preparation for repair
Place chocks under the left rear wheel and slightly lift the front right side with a jack.
Loosen the disc to the hub.
Now lift the side of the car so that the wheel is lifted off the ground. Without this procedure, replacing the timing belt is impossible.
After this, unscrew the bolts and remove the wheel from the car.
Now you can begin to dismantle the remaining units. You will need to loosen the nut on the generator and remove the belt from it, as it interferes with repairs.
Using a 10 mm spanner, unscrew the three bolts that secure the protective cover to the VAZ-2109 engine block. Here under it there is a timing belt with a tension roller.
But before removing the drive, you need to install the shafts according to the marks. To do this, use a 19 mm wrench to turn the crankshaft clockwise.
There is a rubber plug in the clutch block (under the distributor). If you remove it, you can see the flywheel. There is a mark on it that should line up with a notch on the bar attached to the engine.
There is also a mark on the camshaft that should align with the bar.