CHAIN DRIVE VAZ 2107
The chain drive on VAZ cars is designed to transmit movement from the crankshaft to the camshaft. The rotating camshaft opens and closes the valves with cams, through which the cylinders are filled with the fuel mixture, and the working cycle occurs in them. Malfunctions in the gas distribution system lead to malfunctions or to a complete stop of the internal combustion engine. Therefore, the chain drive must be maintained in good condition and adjusted if necessary.
DEVICE
The timing device of the VAZ 2107 is quite simple; there is nothing superfluous in the mechanism. The gas distribution mechanism of VAZ classic engines with a chain drive contains the following parts:
- Intake and exhaust valves on the cylinder head;
- Rocker;
- Camshaft;
- Intermediate shaft gear (sprocket);
- Intermediate shaft;
- Metal gear (sprocket) of the camshaft;
- Valve train chain;
- Tensioner;
- Tranquilizer;
- Tensioner “shoe” (lower damper);
- Crankshaft gear.
The crankshaft and camshaft are installed relative to each other in a certain position. For precise installation, there are special marks on the crankshaft pulley and camshaft sprocket. Incorrect installation, at best, leads to unstable operation of the internal combustion engine, in the worst case, the valves in the cylinder head bend, and serious repairs are already inevitable.
TENSIONER
The chain tensioner plays a very important role in the gas distribution mechanism - it keeps the chain taut. On classic VAZ models there are three types of tensioners:
- Standard mechanical;
- Auto;
- Hydraulic tensioner.
The hydraulic tensioner is standardly installed on the Chevrolet Niva and Niva VAZ 21214. But in order to install it on the VAZ 2107, it is necessary to convert the timing belt to “hydraulics”, especially since such a device is quite capricious on the “Classic”.
A standard tensioner consists of the following elements:
- Cylindrical body;
- Two springs;
- Plunger;
- Rod;
- Rusk;
- Cap fixing nut.
Standard tensioners can be from different manufacturers; the price of parts ranges from 250 to 450 rubles; the most expensive and reliable parts are those produced by AvtoVAZ and TZA. But in general, the reliability of these tensioners is quite low - they often fail.
The VAZ 2107 automatic chain tensioner is installed instead of the standard one. It is more reliable, since its design does not contain a mechanical plunger mechanism with a clamp, which causes a lot of trouble for owners of classic VAZs. In an automatic device, the chain is tensioned by a rack plunger. The retractable chain tensioner is securely fixed and does not compress under the shock load of the chain. This type of tensioner appeared on the market relatively recently, but has already proven itself on the positive side.
What is the cost of a new VAZ 2107 tensioner?
In order to change an automatic tensioner, on average you need 600-700 rubles. TZA (Togliatti Automotive Units Plant) produces the best, “native” tensioners for “classics”. The package (blue) has the packer's number as well as an authentication sticker with a protective layer. Under the layer there is a code, when entered, you will receive an SMS confirmation. Inside there must be an insert - a form with the name of the product, the date of manufacture, and the blue original seals of the quality control department.
ADJUSTMENT (TENSION)
It is unacceptable to drive a car with a chain drive with a noisy gas distribution mechanism, as a skipped chain can cause many problems. Therefore, the VAZ 2107 chain is tensioned immediately after the noise appears.
In general, adjustment of the VAZ 2107 chain is carried out in the following cases:
- When noise appears in the timing belt;
- After carrying out any repairs related to the removal of timing parts;
- After installing a new chain after 1000 km.
To adjust, you will need a minimal amount of tools, and in general you can only get by with a 38-mm ratchet wrench and a 13-mm socket wrench. We proceed as follows:
- We turn off the engine;
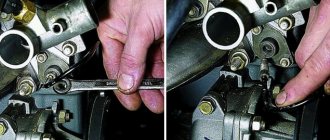
- Using a 13mm wrench, loosen the tensioner cap nut;
- Using a ratchet wrench of 38, we turn the crankshaft in the direction of its movement (clockwise) until it begins to rotate somewhat tighter;
- Tighten the cap nut and start the engine. The chain noise should disappear.
But since it is not always possible to tighten the chain on a VAZ 2107 using this method, it is easier to remove the valve cover for adjustment. The fact is that it is difficult to catch the moment when cranking the crankshaft when the tensioner starts to open. And when the cover is removed, the tension of the chain mechanism is clearly visible.
Chain tension on VAZ 2107 (injector)? is done in exactly the same way as on a carburetor engine. But the automatic tensioner does not need to be recharged, but if the chain becomes noisy with it, then the timing parts need to be replaced.
It is not always possible to tighten the timing chain on a VAZ 2107 due to the fact that it stretches over time, and the length of the tensioner plunger is not enough for adjustment. If you don’t plan to change the chain yet, but you need to drive, then you can temporarily increase the tensioner rod - car owners often attach a bushing from the air filter housing to the end of its rod. But it will still be impossible to operate the engine like this for a long time; worn timing parts must be replaced.
What is the sequence of actions when replacing?
First, remove the cylinder head cover. This will be required in order to correctly determine the chain tension at the very end.
- Remove the air filter housing from the carburetor. Then we disconnect the throttle linkage from the roller.
- Then you need to remove the lever with rods.
- And finally, we disconnect the fuel hose from the bracket that goes from the fuel pump to the carburetor.
- Using a 10 mm tubular wrench, remove the cylinder head cover. This must be done so that you can check the chain tension by hand.
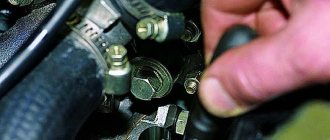
- The VAZ 2107 timing chain tensioner is located on the right front side of the engine. First, using a 10mm wrench, unscrew the tensioner mounting nuts.
- We take it out of the engine. There should be a gasket between the engine housing and the tensioner. Try not to damage or lose it, since a new gasket is almost always sold only complete with the tensioner. Sometimes it can start to “etch”, and in order not to purchase a kit to replace it, save the old gasket.
- We fix the new automatic tensioner vertically in a bench vice. Then use a 13 mm wrench to loosen the cap nut. After this, the plunger became movable and moves freely in the tensioner body.
- Now we “charge” the tensioner plunger. To do this, we place it vertically (the place where we place it is shown by a blue triangle). Then press vertically downwards with force (pressure points are shown in red). The plunger is “recessed” into the body.
- Now you need to continue pressing on the body and holding the plunger “cocked” and tighten the nut back with a 13 mm open-end wrench.
- Now we install the “cocked tensioner” together with the gasket into the engine housing. Using an open-end wrench 36-38 (the VAZ 2107 may have either a nut or a ratchet, so the sizes are different), turn the crankshaft clockwise by an average of one and a half to two turns. When the greatest resistance to movement arises, then the chain will be stretched to its maximum. The main thing is to ensure that the crankshaft does not turn back due to compression and that the chain tension does not weaken. If you don’t have a key for 38, you can turn on the ignition and turn the crankshaft with the starter.
- We tighten the nut back, holding the crankshaft from “shock absorption” back. Then we check the tension result by pressing the chain with our hand again. There should be no deflection. Now we install the block head cover in place.
- Only after the chain is tensioned should you loosen the tensioner cap nut. The plunger will release and "shoot", causing the shoe to seal tightly against the chain. At this time, a click will be heard. Only after a click does the tensioner cap nut need to be tightened tightly.
REPLACEMENT
When it is not possible to tighten the timing chain on a VAZ 2107, it is replaced. Along the way, you will need to change the tensioner shoe and damper. Often a set of all gears (sprockets) must be replaced, but they do not wear out as quickly as other timing parts. Before carrying out work, you will need to buy all the necessary spare parts and prepare the tools. The chain is sold at any auto store that sells VAZ spare parts. The cost of a timing chain is approximately 500-800 rubles, depending on the manufacturer. Suspiciously cheap parts are not worth buying. And you need to remember that the number of links may vary depending on the type of engine (for motor 2106 there should be 116 links). If you need to change a set of sprockets, it will cost about 600 rubles. A shoe and a damper cost approximately 100 rubles each. every.
Tools you will need:
- Set of car keys;
- Screwdrivers;
- Hammer;
- Ratchet wrench VAZ.
Why is the device replaced?
With prolonged use, the VAZ 2107 chain tensioner weakens (the spring loses its elasticity), which leads to improper operation of the device. This has a negative impact on the operation of the engine, since the valve timing gradually shifts, which contributes to increased heating and wear of the cylinder-piston group parts.
If it is no longer possible to tension the chain, then it may be time to replace the chain itself or one or both shoes, but perhaps only the VAZ 2107 chain tensioner has become unusable and you can only get by by replacing it, without expensive repairs. In the material we will consider the question of how to replace the chain tensioner on a VAZ 2107 car without affecting the tensioner shoe.
What is required for the work
To replace the tensioner on a VAZ 2107, you will need to use simple tools:
- Open-end wrenches for “10” and “13”.
- Key for turning the crankshaft.
After making sure that the above tools are available, you can begin work.
How much does a new product cost?
For the VAZ 2107, a tensioner from classic VAZ models is suitable, so you can choose any one that is available on the market. The average cost of this device is 600-700 rubles. Experienced drivers recommend giving preference to devices from the Tolyatti Automobile Plant, which are supplied in blue packaging. The package contains the packer's number, as well as a special sticker with a code underneath. If you send this code to the number, you will receive an SMS message with confirmation.
It is important to know! Purchase products only from certified stores to avoid purchasing counterfeits.
The Pilot brand device is also receiving positive reviews. It has its advantages compared to the standard one, and at the same time it is considered maintenance-free and more reliable. Below is the packaging of the ANC “Pilot”.
Once the Pilot or standard chain tensioner has been purchased, you can proceed to the replacement procedure. The advantage of the “Pilot” is the fact that it is an automatic chain tensioner for the VAZ 2107, which independently regulates and maintains the degree of chain tension on the seven.
Product replacement principle
To replace a worn chain tensioner on a VAZ 2107 with a new one, you will need to perform the following steps:
Replacing the timing chain on a VAZ 2107
The gas distribution mechanism in an internal combustion engine is an important part, without which driving is impossible. It is the timing belt that is responsible for supplying the fuel-air mixture to the cylinders and removing exhaust gases, that is, this is the basis for the operation of the internal combustion engine in any car. The movement of the valves responsible for the intake and exhaust of the mixture is controlled by the camshaft. There is one in 8-valve power units and two in 16-valve ones. The camshafts are driven by a belt or chain drive. The oil pump and other engine mechanisms operate from the same drive.
If the drive means fails or is completely destroyed, there is a risk of significant engine damage. Many engines, after a broken chain or timing belt, require a major overhaul and replacement of many parts, which is not cheap. Therefore, the technical condition of the timing drive must be monitored very closely, and in case of malfunctions, it must be replaced. Replacing the timing chain on a VAZ-2107 with your own hands is quite possible due to the relative simplicity and maintainability of the design.
What car enthusiasts say about replacing the chain tensioner in Nissan
- How to determine that a Nissan chain tensioner needs to be replaced because it is defective? “You can understand that a replacement is needed on a Nissan in the following way: you need to find a small hole on the tensioner; lubricant comes out of it in a thin stream if the mechanism is functioning properly. Have you found such a hole? This means the part is defective, and lubricant will come from under the piston.”
- How to restore the chain tensioner in a Nissan without replacing it?
“If a mechanism breaks down, there is a way to bring it back to life without having to replace it. What needs to be done: there will be a bar on the body; it limits the stroke of the tension piston. It needs to be removed, as well as the aluminum rivets. You will see a hole, it needs to be drilled, for this you will need a drill of 5, the thread must be cut to 6. Now we assemble the mechanism, install it in the motor, turn the knee one turn, so the chain will loosen as much as possible on the tensioner side.All that remains is to screw the bolt into the resulting hole, apply sufficient force, but the thread should not be stripped! After such manipulations, the motor will work perfectly.”
- Do I need to replace the Nissan chain tensioner?
“How to get to the main chain GN? We dismantle the window on the gas distribution mechanism cover. To make it easy for you, study its design. Most likely, you will need to flush the Nissan engine, as well as fill in high-quality lubricant. You will ride 5,000–10,000 km, and there will be no extraneous sounds, and you won’t even need replacement. However, if the chain is noisy all the time, you will have to remove the GN here.” - We remove extraneous sound on Nissan quickly and without replacement.
“Does the chain ring after the engine warms up? Then bend the upper damper upwards from it. There will be no extraneous sounds after this. I guarantee it 100%."
Possible faults
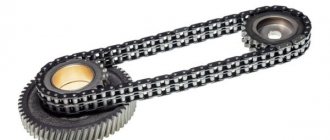
In the family of cars of the Volzhsky Automobile Plant, which are called “classics”, the timing drive is made in a chain version. The service life of a good double-row chain is longer than any belt, and the chain is better protected from any external influences while being inside the engine block. Instant stretching of the chain is excluded; moreover, the chain, unlike the belt, will not slip when the engine is suddenly revved up. The downside: noise and some cumbersomeness are not so noticeable when operating the VAZ-2107.
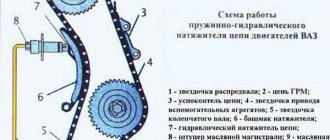
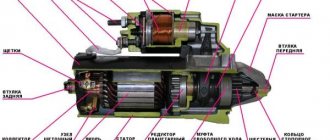
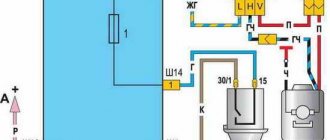
Tensioner diagram: 1 — camshaft sprocket; 2 - timing chain; 3 — chain damper; 4 — auxiliary drive sprocket; 5 — crankshaft sprocket; 6 — tensioner shoe; 7 — hydraulic chain tensioner; 8 - oil line fitting
Unfortunately, the chain also does not last forever. It also stretches - only not immediately, but gradually, as a result of the metal fingers working against the gear teeth.
Signs that the chain has stretched and you need to diagnose the degree of its serviceability are the following:
- extraneous knocking and clanking when the engine is running;
- severe stretching and metal wear can lead to irregular valve timing, increased fuel consumption and other malfunctions.
If the chain has only slightly stretched, you can compensate for the sag by increasing the pressure with the tensioner shoe. When the limit of adjustments has been exhausted, only replacing the chain can help.
Chain stretch even of a few millimeters is noticeable to the eye
In order to better understand when you can get by with little blood and when to change the chain, the manufacturer has established the approximate resource for normal operation of the timing drive, which on the “seven” is 60 thousand kilometers. When used beyond the specified period, there is a risk of not just stretching, but the teeth jumping during operation, or the unit breaking.
Jumping the chain by one or two gear teeth leads to a violation of the valve timing, which will affect malfunctions even at idle speed, not to mention operation under load.
An open circuit leads to the disappearance of synchronization between the revolutions of the crankshaft and camshaft. As a result, the pistons, by inertia, hit the valves open inside the cylinder, deform themselves and deform them. The pistons of the “seven” engine have special grooves that protect the valves from bending. But if the engine has undergone a major overhaul with the replacement of the cylinder-piston group, the pistons may well not have recesses, then the risk of serious damage increases. Monitor the drive chain and change it on time.
Functions and design of the chain tensioner
The hydraulic timing chain tensioner is a unit that performs an auxiliary function. It is made in the form of a hydraulic cylinder with a special design, which ensures constant tension of the chain with a certain force, and the tension does not depend on the ambient temperature, loads, and the condition of the parts.
The camshaft chain drive on Nissan is used quite often, because its replacement is rarely required, it is reliable and can withstand heavy loads. Unfortunately, metal chain expands when exposed to high temperatures. Over time, it wears heavily and becomes stretched. As a result, the tension becomes less, strong vibrations and extraneous sounds occur. As a result, the sprockets begin to slip over the teeth, the phases change, and individual parts of the assembly may become unusable. The solution to these problems lies in a special mechanism - a hydraulic tensioner.
A hydraulic tensioner is necessary in order to:
- maintain chain tension if it wears out and stretches;
- dampen vibrations of the chain branch when the engine is started.
If a tensioner is installed, there is no need to manually adjust the tension. In addition, even if the drive parts wear out, there will be no negative consequences.
The special design of the hydraulic tensioner allows vibrations and vibrations to be damped. This reduces the load on the elements of the mechanism and makes it work less noisily.
However, if you do not replace the Nissan chain tensioner in time, malfunctions may occur. Every car owner should know how this mechanism works and how it works. This is the only way you won’t go wrong when choosing a hydraulic tensioner suitable for replacing on a Nissan.
All hydraulic tensioners produced today have a single design and work the same. The differences are only in some elements, as well as additional functions.
The Nissan hydraulic tensioner includes a cylinder-shaped metal body with a plunger in front of it and a valve assembly at the back. A working cavity is formed between them, which is closed. The plunger is a hollow spring-loaded cylinder that can move along the body; in front there is a surface for resting on the shoe or a lever with a tensioner sprocket.
To prevent the plunger from slipping out of the body, a pin or locking mechanism is installed.
The valve assembly contains a check valve; it is located on the plunger side. It is made of a spring-loaded ball that closes the channel through which lubricant is supplied. The ball is able to move exclusively towards the working cavity.
The mounting flange is located on the hydraulic tensioner housing. In addition, there is a threaded hole so that you can attach a tube or hose from the engine lubrication system. The device is located directly next to the chain, where the plunger rests on the shoe or sprocket lever. As a result, the force is transferred to the timing chain.
To replace a Nissan chain tensioner, you need to understand how it functions. When the driver starts the car, lubricant flows under high pressure to the check valve. It overcomes the spring force and penetrates the working cavity.
Pressure acts on the plunger, it comes out of the body, then rests against the shoe or sprocket lever. When the plunger moves, a force is created, resulting in tension in the chain. Then the tension becomes greatest, and the oil pressure in the working cavity is small so that the plunger can move further.
We recommend
“Winter tires for Nissan: review of models and selection criteria” Read more
Now the chain begins to put pressure on the plunger. Then the oil pressure in the working cavity becomes exactly the same as the oil pressure that comes from the engine lubrication system. As a result, the check valve closes. Thanks to this, the lubricant is locked in the working cavity, and the plunger does not move. The chain is tensioned and secured. If the engine stops, the hydraulic tensioner will remain in the operating position and the tension will not decrease.
Replacing the timing chain
The owners of the VAZ-2107 became the heirs of the Soviet school of automotive engineering. It was believed that a significant part of the repair work should be within the capabilities of the vehicle owner. The Zhiguli engine of the 7th model has almost no components and assemblies that require adjustment using special equipment, for example, computer diagnostic systems. A driver who has the skills to use hand tools can easily replace the timing belt on his own. There are two ways to perform this operation.
It is important! The fuel injection system on the VAZ 2107 can be injection or carburetor. It does not affect the process of replacing the timing belt assembly. The new chain is installed in the same way on both the injector and the carburetor.
Fast way
It is worth mentioning right away that this method does not guarantee long-term proper operation of the engine. Use it at your own risk! Sometimes a quick timing chain replacement is justified if you have a new part with you and you discover a critical chain failure. It's dangerous to go any further. In this case, quickly replacing the chain will lead to less risk than continuing to drive with the old one. This is done only in order to reach the house or the nearest service station, where more time can be spent on correctly installing the transmission mechanism. The sequence of actions for quick dismantling is as follows:
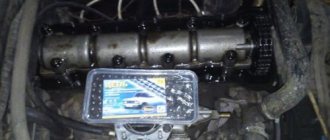
- After opening the hood, you need to remove the cylinder head cover. A view of the camshaft with driven gear will open.
- Remove the connecting pin and disconnect the prepared new chain. The same operation must be done with the old chain.
- Connect the new chain to one end of the old one.
- Holding and tightening the free end of the old chain, use a special wrench to turn the crankshaft until the new chain takes the place of the old one.
- After this, it is enough to connect and rivet the new chain. This will not be easy to do, since it will be pulled by the unrestricted tensioner shoe, which cannot be reached without removing the engine cover.
Video “Chain Knocking on a Classic”
This video examines the cause of engine knocking and demonstrates chain drive tension.
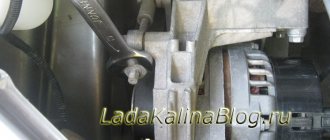
A VAZ 2107 timing chain tensioner is installed on the front right side of the car engine. The main purpose of such a mechanism is to tension the chain, which in turn is extended during operation.
Replacement work is not difficult and is completed within a short period of time. To replace the tensioner you must:
- Open the hood of the car and in the engine compartment, use a ten-point socket wrench to unscrew the two bolts securing the tensioner to the cylinder block and carefully remove it. A sealing gasket will be installed between the tensioner and the block. Check its condition and, if necessary, replace it with a new one.
- Having removed the tensioner body, we clamp it in a vice and use a thirteen key to unscrew the central cap nut, thereby checking the serviceability of the collet lock. If a crack is detected, it is necessary to replace the cap or the tensioner itself.
After checking the tensioner and if it needed to be replaced, you can begin installation. Before installing it, the tensioner must be charged; to do this, push the plunger all the way in and, holding it in this state, tighten the cap nut.
I tighten the cap nut, install the tensioner in its place and tighten the bolts that secure it. Then we turn the crankshaft one turn, thereby tightening the camshaft drive chain, after which we release the cap nut, releasing the tensioner, and tighten it again. At this point, the repair work to replace the timing chain tensioner of the VAZ 2107 is completed.
Sometimes a car enthusiast encounters extraneous sounds that come from the area of the front engine cover and resemble a kind of tapping. This may be a sign that the chain guide needs to be replaced. The damper on the VAZ 2107 model is necessary to soften the vibrations of the chain during its rotation. If you can clearly hear a clattering or metallic tapping sound, this means that the damper is very worn and needs to be urgently replaced. Another possible cause of the problem is that the chain tension is too loose. In this car model, the damper is located on the left, in front of the cylinder block. Use the diagram supplied with the machine to determine the exact location of the part to be replaced.
Replacing a chain guide on a VAZ 2107 is not a complicated procedure. Each driver will be able to carry out such an operation independently if he takes into account several important points. When replacing a part yourself, you need to proceed like this.
The long fastening bolt is installed at the top, and the short one at the bottom. If the bolts have a significant degree of wear, they need to be replaced, otherwise even after replacing the damper, the characteristic tapping sound may remain.
If the damper simply breaks into pieces while moving, you need to remove all its components. Sometimes this is quite difficult to do and you have to invent various devices to get the debris out. In such a situation, a magnet attached to the end of a long wire can help out. Place all the removed parts together to determine if there is anything left inside.
Do not buy the parts needed for replacement at a service station - there they will cost 1.5-2 times more than at the car market or in a specialized store.
Useful notes
If you have a “seven” with a carburetor, then after replacing the timing chain you need to adjust the ignition, because the drive sprocket of the ignition distributor-distributor (in common parlance, distributor) was also removed from its seat. Injection models do not require such adjustment.
The carburetor in VAZ 2106-2107 cars is characterized by stable operation and rarely fails. However, even this unit may need repairs. Details of the procedure are outlined here: https://vazweb.ru/desyatka/dvigatel/remont-karbyuratora-vaz-2107.html
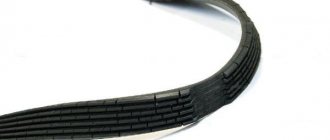
Soviet and early Russian cars of the classic family were traditionally equipped with double-row timing chains. This provided increased reliability due to the fact that the break of one link did not provoke an instant collision of the piston with the valve in the open position. The disadvantage was the increased weight. In order to save money and simplify the design, the chain began to be made single-row. The resource of a double chain reaches 100 - 120 thousand kilometers, while a single chain is half as much. Some car owners are returning a double-row chain to their power units. True, for this you will also have to replace all the gears that mesh with the chain. Today, a set of such parts is quite difficult to find, so get ready for search work if you want to increase the reliability of the timing mechanism.
A double-row timing chain has a much longer life, but choosing a set of parts for its installation is much more difficult
The timing chain is a transmission mechanism, the condition of which the car owner must monitor especially carefully. It is not without reason that experienced drivers advise listening to their car. Extraneous noise with jingling notes is a sure sign that it’s time to open at least the cylinder head cover, crank the crankshaft and inspect the chain, at least externally. If there are alarming signs, the chain will need to be removed and replaced. Confidence, accuracy and these instructions will help you save a considerable amount of money, because replacing a chain or belt on a “classic” costs about 2,000 rubles in the country.
Consequences of malfunctions
Problems in the timing chain drive lead to the following problems:
Note. Chain drives of the timing unit can be single- or double-row. The former are not as reliable and durable as the latter, and often break down after a run of 50-80 thousand km. Double-row drives break extremely rarely, even when the owner of the car does not pay due attention to it.
Double-row chains also break, but very rarely
Replacing the chain tensioner shoe VAZ 2107
Replacing the chain tensioner on a VAZ 2107 does not present any difficulties; it can be removed and installed in literally a matter of minutes.
Replacement
How to replace the timing chain tensioner
Removal: 1) First, remove the two nuts that secure the chain tensioner to the engine.
Unscrewing the chain tensioner fastening nut
2) Then remove the chain tensioner from the car engine.
Note! There is a sealing gasket between the chain tensioner and the engine, remove it carefully, do not damage it! (For information on what a sealing gasket looks like, see the very bottom of the article, in the “For Beginners!” section)
Installation: 1) First, charge the new chain tensioner. (For information on how to charge the chain tensioner, see the article “How to charge the chain tensioner on a VAZ?”)
2) Then reinstall it in the reverse order of removal.
3) Now turn the crankshaft clockwise in order to tension the timing chain. (For information on how to turn the crankshaft, see the article “Installing the piston of the fourth cylinder to the TDC position”, in paragraphs “1-2”)
Note! In the article to which the link is given in paragraph “3”, by clicking on it you will also need to set marks, but if you are replacing only the chain tensioner, then you do not need to set any marks, just turn the crankshaft “1-1.5” turns and that’s it !
4) After you have completed cranking the crankshaft, loosen the cap nut slightly to allow the tensioner to discharge.
Note! When the chain tensioner is discharged, you will hear a click and only then tighten the chain tensioner nut back!
How to change a shoe
You will need: “10”, “13”, “17” wrenches, a special wrench for the crankshaft pulley nut (or a “36” socket), a flat-blade screwdriver, a mounting blade, a hammer, and a bit.
1. Remove the engine splash guard.
2. Remove the generator drive belt (see “Checking and adjusting the tension of the generator and water pump drive belt and replacing it”).
3. Remove the engine cooling fan with the electric motor and casing assembly.
4. Unscrew the three bolts 2 securing the oil sump to the camshaft drive cover and loosen (by unscrewing 2-3 turns) the two bolts 1 securing the oil sump to the engine crankcase.
5. Remove six bolts 1 and three nuts 2 securing the camshaft drive cover.
6. Unscrew the crankshaft pulley securing nut and remove it.
7. Use a mounting blade to pry the pulley and remove it from the crankshaft.
8. Using a screwdriver, carefully pry off the camshaft drive cover and its gasket.
9. This is where tensioner shoe 1 and tensioner bolt 2 are located.
10. Remove the bolt securing the tensioner shoe and remove the shoe.
11. Install the new tensioner shoe and the removed parts in the reverse order of removal. When purchasing a new shoe, pay attention to the markings (shown by the arrow); purchase a shoe with exactly the same markings.
12. After final assembly, adjust the chain tension.
13. Install the removed parts in the reverse order of removal. Adjust the tension of the generator drive belt (see “Checking and adjusting the tension of the generator and water pump drive belt and replacing it”).
How to charge
How to charge a mechanical chain tensioner on a VAZ?
1. This is all done very simply, first remove it from your car (For information on how to remove the tensioner, read the article: “Replacing the chain tensioner on a car”), during removal, by the way, the central nut may be removed (If you have not used the tensioner for quite some time) removed) you have rusted and with the tensioner removed, you may not even be able to unscrew it, so with the tensioner installed, namely when you remove it, remove the central nut with a wrench (there will be a small click, you should hear it) and only after that unscrew the two nuts that secure it and then remove the chain tensioner itself.
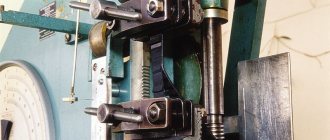
2. Now, when you have the tensioner in your hands, either loosen its central nut as shown in the photo below (This is if you did not loosen it when removing the tensioner), or immediately proceed to loading the tensioner, the tensioner is charged only after the plunger is loaded will come out completely (the plunger is indicated by the arrow, and it comes out after loosening that same central nut), if it has already come out, then you need to insert it back with force, to do this, press the tensioner with both hands as shown in the small photo, the plunger into this While you press on the tensioner, it will not sink much and when you feel that it is no longer drowned and has reached its limit, hold the tensioner in this position and tighten its central nut until it stops, thereby the plunger will lock and the tensioner will be charged.
Step-by-step instructions for replacing the tensioner
The tensioner does not often cause problems with the gas distribution mechanism. However, like any part, sometimes it requires replacement. For this type of repair you will need a little time, a new automatic tensioner and a gasket under it. The work is carried out using a set of keys. Here are the instructions for engines with carburetors:
- Remove the air filter housing from the carburetor. Disconnect the throttle from the roller.
- Completely remove the linkage arm.
- Move aside the fuel hose connecting the fuel pump and carburetor.
- Remove the cover from the cylinder head. You can then check the timing chain tension.
- On the right side of the front side of the engine is the tensioner. First you need to unscrew the two nuts that hold it in place and then remove it. If you did not buy a repair kit for this unit, then remove the tensioner carefully so as not to damage the existing one. Now, in most cases, new parts are sold complete with gaskets, but they can begin to leak.
- Next, you have two options - install a new part and carry out reverse assembly, or try to repair the tensioner. To do this, you will need to secure it in a bench vise and unscrew the cap nut.
- You can notice how the plunger has become movable and began to move freely along the tensioner body.
- If wear is not visible on the body of the automatic tensioner, then you can try to replace the plunger and reassemble the part. To do this, place the plunger against the long end of the tensioner (on the other side of the cap nut) and press firmly onto the housing fasteners. Carefully assemble the part.
- Install the repaired unit into the power plant. Using a 36 or 38 open-end wrench, turn the crankshaft 1.5-2 turns. You need to make sure that the chain is as tight as possible. The most difficult thing in this work is to make sure that the shaft does not turn back. If this happens, the chain will sag. If you do not have such a large key, you can turn the shaft using the starter. To do this, simply start the engine.
- Secure the tensioner in place while keeping the crankshaft from turning back. During operation, check the chain tension. There should be no deflections on it. Next, replace the cover covering the cylinder head.
- Now you need to turn on the automatic tension mechanism - to do this, unscrew the cap nut. You should hear a click, then tighten the nut back.
If you want to automatically replace the tensioner completely, then it is best to purchase it manufactured by TZA. They can be distinguished by their bright blue packaging, with a protective layer to verify the authenticity of the part.