The generator belt has an important purpose - it transmits torque from the engine through the crankshaft to the generator. The latter charges the battery and maintains the functionality of all electrical equipment of the car. On an engine with air conditioning, it rotates the compressor clutch and other accessory drives.
Chevrolet Niva Hobby 2.0 › Logbook › Replacing the auxiliary drive belt.
Even when buying a car, I noticed that the belt on the generator and other units were in a sad state.
I bought a new belt made by Balakovorezinotekhnika, the salesman at the auto store convinced me that this was the best option, the price was 860 rubles.
Since I have a car with air conditioning, to replace the drive belt, you first need to remove the drive belt on the air conditioning compressor. Access to the tension roller to loosen the belt tension is possible only from the bottom. First of all, we remove the main engine protection, then the protection on the right side that covers the air conditioner compressor.
Due to the fact that the Chevrolet Niva has high ground clearance, I did everything without a pit or a lift, I simply laid a camping mat on the floor in the garage and calmly unscrewed everything that was required.
To loosen the tension of the air conditioner belt, you need to unscrew the two bolts securing the platform on which the roller is installed. Then loosen the air conditioning belt tension bolt! Removing the main drive belt for auxiliary units is also not a complicated process; we loosen the three bolts holding the platform with the tension roller, then loosen the tension with a special bolt.
We throw off the old belt, before doing this, be sure to remember its location, or it’s better to take a photo so that you can install the new belt correctly! Assembly is carried out in the reverse order described above.
Source
Tools:
I dismantled the roller and air conditioner belt, and then the belt with the rollers of the auxiliary units. Imagine my surprise when I discovered that the rollers installed at the factory turned out to be from INA!
It should not have cracks, cuts or delaminate. If it has defects, it must be replaced.
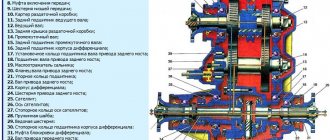
Sequence of work, 1 - removal of faulty parts. The first step is to prepare the generator for the repair and replacement process.
To do this, old parts are removed. To do this, you will need wrenches with a diameter of 10 and First of all, you need to loosen the belt and remove it, otherwise you will not have access to the bearings themselves.
Checking the condition and replacing the Chevrolet Niva air conditioning compressor drive belt
Tools:
- Socket wrench
- Head for socket wrench 13
- Key for 13
Parts and consumables:
- Air conditioning compressor drive belt
Note: In accordance with the maintenance regulations, we check the condition of the air conditioning compressor drive belt every 15 thousand kilometers.
We carry out the work by placing the car on an overpass or inspection ditch.
Checking and tensioning the air conditioning compressor drive belt
1. Remove the engine compartment mudguards as described here.
2. To check the belt tension, press the belt with your finger, in the middle between the compressor and crankshaft pulleys.
3. With a pressing force of about 10 kgf, the belt deflection should be about 8.0 mm.
4. To adjust the belt tension, use a “13” head to loosen the two bolts securing the tension roller bracket.
5. Using the “13” socket, rotate the adjusting bolt clockwise, tensioning the belt.
6. After tensioning the belt, tighten the bolts securing the tension roller bracket.
Replacing the air conditioning compressor drive belt
Note: We replace the air conditioning compressor drive belt when cracks, tears, and detachments of rubber from the fabric base are detected.
1. To replace the belt, loosen the bolts securing the tension roller bracket and release the belt tension by rotating the adjusting bolt counterclockwise.
2. Remove the belt from the tension roller and compressor pulleys and crankshaft.
Marking of the air conditioning compressor drive belt (four-strand, 810 mm long).
3. Install the new belt in reverse order. We put the belt on the compressor pulley so that it is located closer to the inner edge of the pulley.
4. After installation, adjust the belt tension (see above).
The article is missing:
- High-quality photos of repairs
Source: Chevrolet niva device, operation, maintenance and repair. Publishing house "Behind the wheel"
Source
We check and install the air conditioner belt and alternator belt Niva Chevrolet
From the moment of its appearance and at the time of writing, all Chevrolet Niva cars were equipped with a single engine model - 2123. This engine is easy to maintain; almost all elements on it can be changed independently with a minimum set of tools. Belt drives are especially easy to adjust. They are installed on the generator and other engine auxiliaries such as air conditioning. Most of them can be changed independently of each other, so the Niva Chevrolet alternator belt with air conditioning can be changed as easily as on a simpler version.
Where is the air conditioner located on a Chevrolet Niva?
The principle of operation of the air conditioner is almost the same as in a home refrigerator.
When you turn on the air conditioner, the air conditioning compressor starts working.
The compressor continuously compresses and circulates the refrigerant
During compression, the gaseous refrigerant turns into a liquid state, condensing in a heat exchanger-condenser and releasing heat.
Further, during the reverse transition to the gaseous state, heat is absorbed in the evaporator heat exchanger.
Evaporator 5, which is located inside the car, constantly reduces the air temperature
The refrigerant transfers heat to condenser 2, which is located outside the cabin, and is released from it. This cycle is repeated, and heat is constantly removed from the cabin.
With the help of control, actuators maintain the required microclimate.
The refrigerant in the Chevrolet Niva is R134a.
The compressor is mounted on the engine bracket on the right side.
The compressor is driven by a poly-V-belt from the car engine through an electromagnetic clutch.
When voltage is applied to its winding, the driven disk and pulley rotate synchronously, driving the compressor shaft.
The compressor is lubricated with a special compressor oil that circulates throughout the system along with the refrigerant.
The air conditioning system uses compressor oil AT41244 (ISO 150).
The volume of refrigerant for refilling the air conditioning system is 0.4 kg.
Compressor oil volume – 0.22 l.
Aluminum air conditioner condenser 6 It condenses (transitions into a liquid state) the refrigerant pumped by the compressor with the release of heat into the atmosphere. For better airflow, the condenser is installed in front of the radiator of the cooling system.
Evaporator 4 – aluminum heat exchanger. The transition of the refrigerant from liquid to gaseous state (evaporation) occurs in it with the absorption of heat.
The evaporator is installed in the instrument panel in the path of the incoming air flow, which reduces its temperature.
Receiver-dryer 7 is installed on the outlet pipeline of the condenser in front of the evaporator and serves as a reservoir for liquid refrigerant, cleans it of foreign impurities and water.
The receiver-dryer can be equipped with an inspection window to monitor the amount of refrigerant.
The expansion valve is installed on the evaporator and regulates the amount of refrigerant entering the evaporator.
The expansion valve is a device that provides changes in system performance depending on conditions and operating modes.
The pressure sensor provides a signal to the ECM to turn the air conditioner on/off depending on the pressure in the high-pressure line
The air conditioning system is controlled manually by turning on the (A/C) button 1, Fig. 3, the air conditioner control, the temperature control knob 5 with blue and red zones, the heating system fan motor speed switch 2, the air flow distribution switch 4 in the cabin ( up, down, center)
Drive tension
The ignition must be turned off. After this, open the hood and remove the plastic trim. Then loosen the air duct clamp. You can use a regular screwdriver for this.
Then use a 10 mm socket wrench to unscrew the screw holding the air filter. After this, remove the air duct from the filter housing. At this point the preparation stage can be considered complete.
Chevrolet Niva
In order to replace the air conditioning belt on a Chevrolet Niva, you need to use only one 12 key. There are no difficulties in carrying out repairs; it is enough to install the car on an inspection hole or overpass. This makes it much easier to make repairs, because the belt is located at the bottom. To remove it, you will need to loosen the roller mount.
After installing the new belt, simply tighten it using a bolt installed on the roller
Please note that when replacing all belts in a comprehensive manner, this should be installed last. First replace the timing belt, then the generator, and lastly the air conditioner. https://www.youtube.com/embed/S6-ccVQyf40
It is recommended to buy belts from well-known brands, the quality of which has been tested by time. The layout of the drive mechanisms is shown in the photo.
To work you will need a tool:
- screwdriver;
- jack;
- set of socket wrenches;
- mounting blade.
Signs that the drive belt needs to be replaced:
- Visual wear: abrasions, unevenness, tears and cracks;
- Rubber peeling;
- Presence of oil stains.
Signs of a belt failure:
- Extraneous characteristic whistle. Appears at maximum load on the electrical system;
- The battery light is on on the dashboard. Talks about its accelerated discharge;
- Disabling some electrical appliances that require power from the generator.
Before carrying out the procedure, you need to prepare for it. You will need to collect the necessary tools, materials and study safety precautions.
Safety precautions
Basic safety rules:
- When replacing the drive, disconnect the negative terminal of the battery;
- Wait until the engine cools down (20-30 minutes);
- Carry out the replacement procedure with gloves. This will reduce the likelihood of burns.
List of tools and materials:
- Set of wrenches;
- Set of heads;
- Two screwdrivers (slotted and Phillips);
- Mount;
- Jack;
- New part.
Attention! Do not overtighten the belt! Excessive belt tension leads to premature failure of the alternator belt and bearings, coolant pump and power steering pump.
We replace the drive belt for auxiliary units when cracks, ruptures and detachments of rubber from the fabric base are detected on it. On a car with air conditioning, remove the air conditioning compressor drive belt.
Loosen the nuts securing the tension roller bracket (see above) and rotate the adjusting bolt counterclockwise, loosening the belt tension.
The ignition must be turned off. After this, open the hood and remove the plastic trim. Then loosen the air duct clamp. You can use a regular screwdriver for this.
Then use a 10 mm socket wrench to unscrew the screw holding the air filter. After this, remove the air duct from the filter housing. At this point the preparation stage can be considered complete.
According to the manufacturer’s recommendations, the belt drive on the Chevrolet Niva generator should be changed after 50 thousand kilometers. But this is not the main criterion. The belt can last longer; if it is an original product, it will last 65-75 thousand kilometers. Belts made in China have to be changed after 15-20 thousand kilometers. Therefore, it should be visually inspected regularly.
Replacement is carried out if the following defects are detected:
- traces of surface wear: abrasions, cracks, bulges, unevenness;
- peeling of material from the base;
- oil stains on the surface;
- frayed ends. Installed new consumables
A sign of a malfunction is:
- the appearance of extraneous whistles at maximum load on the electrical system;
- the battery discharge light is on;
- turning off devices that require power to operate.
Adjustment
To start adjusting the Niva Chevrolet alternator belt, you need to loosen 3 nuts. They don't unscrew completely. 1-2 turns are enough to begin further work.
The adjustment assembly fastener is indicated in the image above and marked with an arrow. To carry out this procedure you will need a key number 13.
The adjustment is made with the same key set to 13. By rotating the screw in the direction of unscrewing, loosening occurs; if you rotate it in the other direction, tightening, then tension occurs.
Tension adjustment
In order to check the belt tension, you just need to press your finger on it approximately in the middle - between the gears of the coolant pump (pump) and the generator itself. If the force is 8 kgf, then the maximum deflection value should be no more than 12 mm. But you don’t need to tighten it too much, as this will reduce the life of the bearings and belt.
Read news about the new Niva
- UAZ or Niva - which is better, car characteristics and features ::
- FROST car air conditioners // Online store // Prices // Air conditioners for cars Lada VAZ, VolksWagen Polo, Daewoo Matiz
- Pump for Chevrolet Niva - Auto workshop online
- Niva Chevrolet installation of air conditioning - Auto magazine MyDucato
- Niva Chevrolet installation of air conditioning - Auto magazine MyDucato
- Why the Chevrolet Niva air conditioner does not turn on: reasons and installation (diagram), belt replacement
- Niva Chevrolet installation of air conditioning - Auto magazine MyDucato
- Niva Chevrolet air conditioning installation - Online auto workshop
Examination.
The correctly tensioned alternator belt on a Chevrolet Niva can be checked by pressing on it at point P indicated in the figure. With a force of 75N, the permissible deflection should be 1-1.2 centimeters.
It is possible to more accurately measure the tension level only in a service station that has the necessary equipment for this. The same applies to tightening the nuts. The manufacturer recommends tightening with a force of 20-25 N*m. A special torque wrench is used for this.
The need for periodic inspection.
The main feature of the Chevrolet Niva engine is that in addition to the generator, this belt also drives the cooling system pump. If it is weakened, then over time it may slip and, in addition to insufficient voltage supplied by the generator, there is a risk of engine overheating as a result of the pump stopping. The risk of higher wear and tear on the pulleys it drives also increases due to increased vibration.
An overtightened belt also leads to severe wear of the bearings. In addition, you may notice a whistling sound when the engine is running, which indicates that it is experiencing strong friction and as a result is overheating.
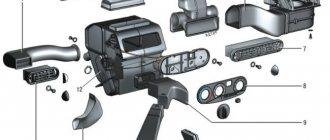
Niva heating system
Niva heating consists of many elements. The key elements are: heater, wiring, control valve, fan and control panel. The heater resembles a small radiator. It is located next to the dashboard and has an inlet and outlet through which the coolant flows. The valve is responsible for controlling the amount of refrigerant entering it. Finally, the warm air created by the heater is delivered into the vehicle interior using a blower. Control is carried out using the control panel.
Replacing the air conditioner belt.
To change the Niva Chevrolet air conditioning belt, you need to place the car on an overpass or inspection hole. After this, you need to remove the engine protection.
To do this, using a 13mm wrench, unscrew the 4 bolts around the perimeter.
After which you can remove the oil pan protection.
Using a 8mm head, unscrew the screws holding the protection.
Unscrew the front mudguard.
In order to check the tension, you need to press it with your hand between the compressor and crankshaft pulleys. The permissible deviation should be no more than 0.8 centimeters.
If it is worn out, then we proceed to replace it. To do this, use a socket wrench to loosen the bolts securing the tension roller.
If the air conditioning belt is in good condition, but is loose, you need to turn the bolt, tightening it clockwise, this will lead to tension.
Replacement is carried out if there are cracks, signs of delamination and breaks on the belt. To change, you need to loosen the bolt, to do this you need to rotate it counterclockwise.
After which it can be easily removed from the pulley. On Niva, a four-strand compressor with a length of 810 millimeters is used to drive the compressor.
The belt is put on so that it is closer to the inner edge of the pulley. Then you immediately need to check its tension.
After installing the part, reassemble the components in the reverse order.
Source
When to replace
During the operation of the Chevrolet Niva, a problem often arises associated with the flow of lubricant through the crankshaft. The reason for this may be various malfunctions, including wear of the element itself that performs the gasket function. If during the diagnostic process it is determined that it will no longer be able to perform its functions, then it needs to be replaced. After the dismantling process, a new product is installed.
This operation will make it possible to eliminate the lubricant leak. There are some peculiarities in replacing the front and rear oil seals, so motorists who want to do these operations themselves should study all the nuances.
How to tighten the Niva Chevrolet alternator belt: photos and videos
There will be 2 wires on the back of the gene - one is plug-in, and the second is screwed with a nut and washer to the bolt.
To do this, we drive the car into a pit or overpass and remove the engine protection.
Check that the ignition is turned off. Having opened the hood, you need to remove the plastic trim, overcoming the resistance of the clamps (4 pcs.). Then, taking a screwdriver, loosen the clamp on the main air duct (photo 2).
A set of preliminary steps
Use a 10mm wrench to unscrew the fastening screw (photo 3). The screw is removed, and then the air duct must be removed from the filter housing. Preparations are complete.
Reasons for failure
- Entry of a foreign body. This is most likely evidenced by traces of impacts on the body and marks on the flat side of the belt.
- Incorrect belt tension adjustment - too strong or too weak. In this case, the tension indicator, tensioner cover or tensioner limiter breaks. This can be caused by incorrect tightening of bolts or incorrect sizing.
- Work in high temperature.
- Part misalignment. Because of this, belt marks can be seen on its surface.
- Mechanical damage from tools during installation.
Checking and replacing drive belts for Niva Chevrolet auxiliary units
Depending on the vehicle configuration, various schemes and drive options for auxiliary units may be used.
Belts may vary in size, since auxiliary units such as a power steering pump, generator, and air conditioning compressor may be from different manufacturers.
Therefore, before checking and replacing belts, you need to decide which option is right for you.
The size of the belts is indicated on the outside of the belts. You need to buy belts according to their size.
When replacing belts, be sure to check the condition of the tension and auxiliary rollers.
You should definitely carry spare belts with you, especially on a long trip. Let's look at some options and technology for replacing belts.
Insufficient belt tension impairs fluid circulation in the cooling system, which leads to engine overheating. In addition, recharging the battery worsens and the belt itself wears out more. If the tension is too strong, the bearings of the water pump and generator may fail.
Check the tension of the drive belt of the water pump and generator from above in the engine compartment.
Tension is characterized by the amount of belt deflection between the pump and crankshaft pulleys (deflection “B”) (Fig. 1) or the generator and pump pulleys (deflection A) when a force of 98.1 N (10 kgf) is applied in the middle of the distance between the pulleys.
Deflection A should be 10 - 15 mm, deflection B - 12 - 17 mm.
It is more convenient to check the deflection “A”.
To check the tension, you can use a spring balance scale by hooking a belt branch with its hook and pulling it up.
Adjust the belt tension with the car mounted on a lift or inspection ditch.
The adjustment is carried out by moving the generator relative to the engine.
You will need: a 13" wrench, a mounting blade.
1. Remove the oil sump protection and engine splash guard.
2. Loosen the nut securing the generator to the tension bar by about one turn
3. Loosen the nut of the lower mounting of the generator.
4. To increase belt tension, move the generator away from the engine.
When moving the generator to increase belt tension, apply force only to the generator housing. placing the mounting blade between the housing and the engine.
5. To reduce belt tension, move the generator towards the engine by hand.
6. Without changing the position of the generator, tighten the nut securing the generator to the tension bar and the nut of the lower mounting of the generator.
nuts securing the generator to the tension bar 28.08-45.3 N m (2.9-4.6 kgcm);
nuts for the lower mounting of the generator 57.3-72 N m (5.95-7.35 kgcm).
7. Install the oil pan protection and engine splash guard in the reverse order of removal.
8. To replace the belt, unscrew the crankshaft position sensor screw and remove the sensor from the bracket socket without disconnecting the wires.
9. Remove the power steering pump drive belt.
10. Perform steps 2 and 3 for adjusting the belt tension and push the generator towards the engine until it stops.
11. Remove the belt first from the pump pulley, then from the generator and crankshaft pulleys.
12. Place the new belt first on the crankshaft pulley, then on the generator pulley, and then on the pump pulley.
If the new belt is tight on the pump pulley, and the generator is pushed all the way towards the engine, carefully turn the pump pulley by hand or slowly turn the crankshaft until the belt is completely seated on the pulley. Have an assistant turn the crankshaft.
13. Perform steps 2-6 for adjusting belt tension.
Adjusting the tension of the Chevrolet Niva cooling system pump drive belt
Then check the belt tension and tighten the fastening nut. Lastly, replace the crankshaft sensor and connect the connector.
NIVA CHEVROLET install a non-adjustable front wheel bearing
Installed new consumables The replacement procedure for a car without air conditioning is described above. On cars with air conditioning, a compressor pulley is added to the device, onto which the belt drive is also tensioned.
It is important to correctly adjust the belt tension. If it is not tensioned enough, the generator will not be able to operate at full capacity, thereby reducing the battery charge level
This will lead to rapid wear of the battery. I know that many people don’t bother and judge the correct tension purely by how their fingers feel. But I went a different way.
For this I needed an electronic steelyard and a regular ruler. For convenience, the air supply pipe was unscrewed and removed.
The meaning of the actions is clear from the photo. I rest a block against the belt, with an electronic steelyard attached to the other end. I place a ruler on the block, aligning the zero division with the edge of the air socket. I pull the steelyard with my hand until reading 7.
But this was wrong, the strap began to slide off the rollers and whistle wildly, because it did not fit into the grooves: Therefore, it is better to take a native one with the same width of the roller and with the correct number of streams of grooves. That’s why the belt is called a ripple belt, because the grooves must match, it turns out something like rails. I wanted to buy an Ampere Pramo, but I couldn’t find it anywhere in the city; the original genes cost rubles.
So I decided to try the Chinese How to remove a generator from a Chevrolet Niva First you need to loosen the belt, which if it’s tight, you can’t easily reset it.
So, our task is to loosen the tension roller; it is held in place by a platform with three nuts. You will need a 10mm wrench, it is very advisable to have a ratchet with the same head, preferably an elongated one, because the third nut is located directly under the belt and it is better to approach it from the side.
Loosen the nut securing the generator to the tension bar 3 by approximately one turn.
Loosen the generator lower mounting nut. To increase belt tension, move the alternator away from the engine. When moving the generator to increase belt tension, apply force only to the generator housing.
To reduce belt tension, move the generator towards the engine by hand. Without changing the position of the generator, tighten the nut securing the generator to the tension bar and the nut of the lower mounting of the generator. Install the oil sump guard and engine splash guard in the reverse order of removal.
To replace the belt, unscrew the crankshaft position sensor screw and remove the sensor from the bracket socket without disconnecting the wires. Remove the power steering pump drive belt, see.
Installed a new Chinese generator on Shevik
When replacing the timing belt on a Chevrolet Niva, follow these steps.
- Remove the air conditioning and cooling radiators completely. Before this, of course, you will have to drain the liquid from the cooling system and bleed off the freon. There is no need to remove the fans from them.
- Remove the air purification filter housing.
- Remove the A/C compressor and alternator drive belts. Be sure to remove the tension mechanisms as well.
- Remove the upper part of the timing housing.
- Place marks on the shaft gears. They must definitely match. There is a notch on the engine crankcase that should match the mark on the pulley.
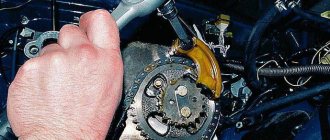
The first step is to prepare the generator for the repair and replacement process. To do this, old parts are removed. To do this, you will need wrenches of diameter 10 and 17.
1. First of all, you need to loosen the belt and remove it, otherwise you will not have access to the bearings themselves. To do this, you need to loosen the roller, which is held by a platform with nuts. There are three nuts, they require a 10mm wrench. Once they are all unscrewed, you need to unscrew the adjusting screw so that it moves up from the platform.
- Place the car in first gear to prevent the crankshaft from turning;
- Unscrew the nut that secures the part
- Remove the spring washer and remove the part.
The process of removing generator rollers on a Niva Chevrolet is identical to any other car.
5. The new ring is installed in its place;6. A new roller is installed in place of the old bearing. Before doing this, you should check the diameters of both parts to avoid the mechanism not working;7. Next, the bearing is fixed using a washer with a spring mechanism and a nut;
8. After this, the belt is put on the new roller.
1. You can put the car in 4th gear, put the belt on the roller and push in the direction of rotation of the crankshaft. When it starts to turn, you need to pull the belt onto the generator pulley, and it will fall into place on its own.
2. In the same way, you can not push the car, but lift the wheel and spin it, or spin the generator itself.
This makes it easy and quick to replace the Chevrolet Niva generator belt rollers. You should regularly diagnose the moving parts of the car in order to prevent possible breakdowns in time and replace faulty parts.
We recommend replacing the bearings and belt every 40 thousand kilometers.
As it turned out, the generator jammed and because of it the belt broke. Why did this happen? Most likely (my version) - when replacing the pump, the service center tightened the belt too much, because we couldn’t tighten the same one at all. As a result, during the hellish “tightening”, the old gene grunted; the bearings could not withstand such abuse. Therefore, it is better to do everything yourself or in a trusted service. Well, tighten it correctly, you could press the samples with your finger by 1 cm.
How did they even manage to tighten the 1885 belt? I can't imagine))
First I'll tell you about the generator
I took the old one, they completely disassembled it, looked at it and said that it had come to an end. The bearings were torn, and the rotor was worn out to such an extent that repairs would cost 2,500 rubles. And a new one costs 3100. It’s Chinese, but the warranty is 3 months, we checked it at the stand - everything works.
Therefore, it is better to take a native gene with the same width of the roller and with the correct number of rivulets (grooves). That’s why the belt is called a ripple belt, because the grooves must match, it turns out something like rails.
I wanted to buy a 100 Amp Pramo, but I couldn’t find it anywhere in the city; the original genes cost 4,000 rubles. So I decided to try Chinese))
How to remove a generator from a Chevrolet Niva
First you need to loosen the belt, which if tense, cannot be easily reset. So, our task is to loosen the tension roller; it is held in place by a platform with three nuts. You will need a 10mm wrench, it is very advisable to have a ratchet with the same head, preferably an elongated one, because the third nut is located directly under the belt and it is better to approach it from the side.
Chevrolet Niva Home #2 › Logbook › Installing a Frost air conditioner in a Chevrolet Niva
I want to talk about the process of installing an air conditioner in a Chevrolet Niva. The car is 04 years old, Bosch 7.0 brains. So, let's start - installing a Frost air conditioning kit in an old Chevy.
The current kits are for restyling, as the manufacturer explained to me, but there were no special problems. First of all, we remove the engine protection and boot to replace the crankshaft pulley.
Then we screw the mount of the air conditioner compressor to the cylinder block (we must insert the bolt that secures the compressor itself in advance before screwing the mount to the block, then it won’t fit) In order for the compressor to stand up, we throw away the heat-reflecting shield of the upper arm (I also threw out the starter one at the same time ) We take the compressor in our hands and, turning it a little, we find the position in which it crawls into its rightful place.
The compressor belt from the kit fit, but I put it on like a chain on a bicycle - we put the belt on the compressor completely and half on the crankshaft pulley. We turn the crankshaft with the key and the belt falls into place. We tighten the belt with the compressor and we can say that the hood is finished.
Let's move on to the salon. We remove the glove compartment, unscrew the ECU and everything attached, remove the pipe from the heater fan to the heater body.
Now the fun part is taking the evaporator in our hands and figuring out where to make holes in the engine shield. We drill a shield and a hole in the floor tunnel for condensation. It's all up to your skills and eye. The evaporator housing does not really fit very well, but I have a desire to drive cool and a hair dryer))) after trying on the evaporator several times, I brought the evaporator housing to the ideal and was installed in the evaporator.
The last part left is the wiring. The diagram is in the instructions, but I’ll duplicate it:
We connect the wire to the stove speed switch, drill a hole for the cold regulator and pull the button plug through.
All that remains is to fill the system with freon (compressor oil is already in the compressor and according to the instructions there is no need to add it). I've already driven about 4 thousand with it (we drove it to the Caucasus, which I'll tell you about later) everything works fine, but there is one BUT - the car doesn't know about the air conditioner. It all works like this - when the air conditioner is turned on, it turns on the fan and compressor of the air conditioner. If we start the car with the A/C turned off for some time, we need to let it run at idle so that the car catches idle with a load in the form of the A/C compressor and works normally. If we drive without turning off the A/C button, then there are no problems. In short, for XX to normalize, you need to wait a little. No further problems were identified. I hope I explained the installation of the air conditioner clearly. Cold weather everyone!
How to remove the generator.
To remove the generator you need to use a ten key, loosening the nut that holds the base with the tension roller, removing all the nuts from their seats. Then unscrew the adjusting screw, having first found it. After making sure that the screw moves freely, unscrew it to the top of the platform. In the photo you can see where all these bolts are located.
We fold the belt off the pulley and unscrew the bolts that hold the device, this can be done with a thirteen key, and on the other hand with a seventeen key. We disconnect the two wires that are connected to the back of the generator, one is connected to the head of the bolt, the other is plugged in, and we disconnect them. Then we remove it from the seat.
What are the signs to recognize a malfunction?
A number of signs indicate the need to replace old rollers with new ones. They appear both directly while driving, in the form of extraneous noise, and during visual inspection.
- Mechanical damage on the surface of the rollers;
- Noticeable play;
- Grinding noises when turning. This is a clear sign that the car needs repairs;
- Damaged bracket or bearing;
- Leaking oil;
- High temperature during operation;
- Strong vibration during operation;
- Difficulty in turning the shaft.
Air conditioning Niva Chevrolet and its repair
Loss of refrigerant
If the exhaust air does not come out for a long time, the refrigerant may need to be replenished. This may also indicate a leak in the system. Refrigerant problems are the leading cause of inefficient air conditioning. The refrigerant in the air conditioning system must be replaced from time to time. It is worth taking into account that its quantity decreases by about 15% per year.
Damaged compressor
The compressor does an extremely hard job and gets hot due to the high pressure it must generate. Loud banging or "squealing" noises coupled with a lack of cooling usually indicate problems with the compressor. The compressor must be repaired as soon as possible to prevent further damage to the system, which will increase the cost of repair.
Presence of refrigerant leak
If there is a refrigerant leak in the cabin, there may also be no cooling. The leak should be repaired as soon as possible, as a “dry” air conditioning system can quickly fail.
Faulty capacitor
If your air conditioning system stops working, a faulty condenser may be to blame. Generally, there are two reasons why a capacitor does not work. The first is leakage, which can occur in many channels in the capacitor. This leakage may be a normal result of wear and tear. Unfortunately, this capacitor needs to be replaced. The second reason for capacitor failure may be its clogging. Metal particles from the compressor can enter the condenser, clogging it. In this case, the capacitor must be replaced with a new one.
Condenser Fan Failure
The Niva condenser fan cools the heated condenser. If this fails, the system will not be able to cool the air. Insufficient cooling of the interior or its complete disappearance may be caused by a malfunction of the fan.
Low pressure valve
It is responsible for preventing the compressor from turning on if the system pressure is too low. This malfunction will prevent the use of the Niva air conditioner.
Damaged blower or blower resistor
The “blower” is responsible for supplying air inside the cabin. If the system makes unusual noise during operation or air does not exit the vents, the blower or blower resistor may be damaged. It may also turn out that the fan is only running at maximum speed. In this case, it is worth checking the fuses.
Damaged switch
If the Chevrolet Niva air conditioner works intermittently or you need to “combine” various buttons to set the desired temperature, this may indicate a malfunction of the control panel or switch.
Dehumidifier
If your air conditioner is not blowing cool air and moisture is building up on the glass, your dehumidifier may need to be replaced. It should be replaced as soon as possible before other components of the Niva's air conditioning system are damaged.
Blown fuse
The Chevrolet Niva air conditioner is equipped with many fuses. If at least one of them burns out, the entire system will stop working.