To replace or tighten the alternator belt on a Matiz, you will have to do a fairly large amount of work. This is due to the design features of the Daewoo hatchback. It is easier to tighten the alternator belt on a Matiz by placing the car in a viewing hole. However, this procedure can also be performed outdoors. But in this case, you will have to remove several parts located in the engine compartment and hiding access to the Matiz generator belt.
When to change
The Daewoo company recommends changing the belt drive located in the engine compartment every 40 thousand kilometers. This frequency is established based on the results of test measurements. That is, in real conditions it is necessary to replace more often.
You will also have to install a new belt on your Daewoo Matiz if you are concerned about the following “symptoms”:
- a strong whistle that occurs after starting the engine;
- on-board electronics shows low battery charge when the battery is fully charged;
- During inspection, sagging and cracks were revealed.
If elasticity decreases, you can tighten the belt. This procedure gives a temporary effect. After several tens or hundreds of kilometers, the part will have to be replaced. To tighten the belt on a Daewoo Matiz you will need:
- Open the hood and remove the coolant reservoir.
- Using a 12mm wrench, loosen the top bolt that secures the generator.
- Place the ratchet wrench on the bolt and tighten the belt using a screwdriver.
- Tighten the loose bolt.
At the end of the manipulations, you need to start the engine and check if there is a whistle from the engine compartment.
This is interesting: How to remove the low beam bulb of a Renault Duster
Daewoo Matiz rotten maklay › Logbook › Replacing the timing belt, alternator belt,
And so, no one knows whether the previous owner changed the timing belt, so it was purchased: -GMBGT-30010 Timing belt tension roller for 424 rubles. -ContitechCT 910 Timing belt for 557 rubles -General Motors96565821 0.7 V-belt alternator for free, got it with the former owner. But according to existential costs 224 rubles.
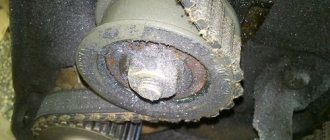
I haven’t changed the pump until it plays and drives the coolant into the reservoir well. Next, many unscrew the crankshaft pulley with the help of a partner, a huge wrench, use their wives, come up with devices, generally do complete crap) It’s the 21st century, there’s a wrench for that, well or, as a last resort, use a starter, and since I made the replacement in the garage, the bolt was unscrewed using the starter. Not the first time, but the swing in the Matiz allows you to hit the key properly.
Self-replacement
Changing the Daewoo Matiz alternator belt is quite difficult. To do this you will need to do the following:
- Open the hood and drain the coolant from the reservoir. Therefore, before starting the procedure, it is recommended to prepare an appropriate container (a soda bottle will do).
- Holding the clamp with pliers, disconnect the pipe going from the reservoir to the throttle valve.
- Connect the disconnected pipe to the prepared container, start the engine and wait until the liquid has completely drained. There is no pressure in this system. Therefore, after dismantling, the liquid will not immediately begin to flow.
- Remove the terminals from the battery. This must be done to avoid electric shocks.
- Remove the remaining pipe and lift the power steering reservoir.
- Move the expansion tank aside and, by sliding the clamping clamp, remove the lower pipe.
- Remove the tank, thereby opening direct access to the generator.
- Loosen the top and bottom bolts.
- Remove the old belt drive and install the new one.
After completing the above manipulations, you need to perform all the steps in reverse order. In a similar way, you can adjust the belt on the Daewoo Matiz.
The instructions described above are suitable for those cases when it is impossible to tighten or replace a part in a pit or using a jack. If the car can be placed on an overpass, then the procedure becomes much easier.
On the overpass
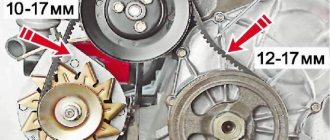
To tighten the part, you will need to remove the right front wheel, behind which the generator is hidden. After this, you need to check the tension level. To do this, you need to press on the belt in the area between the generator and crankshaft pulleys. If, as measured by a ruler, the deflection exceeds 10 mm, then the part should be tightened by performing the steps described below:
- Using a 12mm wrench, loosen the bottom nut. At this moment, you need to use the same tool to hold the left bolt securing the generator from turning.
- Loosen the top bolt.
- Loosen the bolt that secures the generator to the adjustment bar.
- Using a mounting spatula inserted between the part to be disassembled and the bracket, press out the generator.
- Tension the belt, and then tighten the fastening bolt that secures the parts to the bracket.
- Recheck the tension force.
If the belt on a Daewoo Matiz is overtightened, this may lead to early wear of the generator bearings. If defects are found on this consumable part, you must:
- Dismantle and remove the mudguard from the wheel arch.
- Remove the drive belt for the power steering pump.
- Loosen the bracket and use the mounting spatula to move the generator to the side.
- Replace the failed part.
It is important to note that a four-lane belt drive must be installed on the Daewoo Matiz.
The three-band component wears out faster, which can cause damage to the generator itself.
On the way to the generator
Next, disconnect the fuel line from the fuel rail. To do this, press two clamps on both sides of the fuel line. Raise the clamps up until they click and lower them back. So, we disconnected the fuel line from the rail.
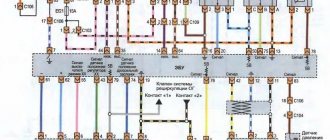
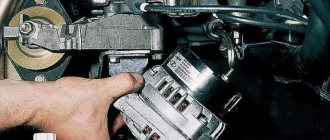
The generator has one electrical connector that goes to the battery charge indicator light. We will need to disconnect it. A wire (plus) is attached to the nearby nose terminal, which can be disconnected by unscrewing the nut using a 10mm wrench. We need to unscrew the generator tension bolt and two bolts securing the generator bar.
We remove the top bar and monitor the fuel rail, the tube of which can bend if not handled carefully. The generator itself has a bolt and a bracket fastening. To dismantle them, you need to use a 12mm wrench. Next, remove the boot under the generator, which is held on by two nuts with a 10mm head and one bolt.
Now we get directly to the generator itself.
On one side there is a bolt, and on the other there is a bolt and nut. To dismantle the generator, we will need to unscrew the bolt from the rear bracket of the engine mount. Don't worry, this won't damage the engine. You will also need to remove the alternator belt.
If necessary, you can replace it if it is damaged.
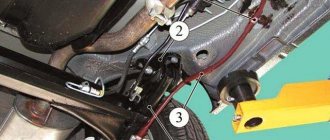
Now we need to unscrew the two support mounting bolts that go under head 12. If they don’t unscrew very well, you can use WD-40. On the bolt, which is located closer to the center of the engine, there is a ground wire. Don't forget to connect it back later when you reassemble.
Having previously removed the support mounting bolt (however, you don’t have to completely unscrew it, but only loosen it a little until there is noticeable play), we remove the generator through the hole between the pan and the right side of the spar. When disconnecting the rear engine mount, there must be enough space to remove the generator.
Once we have managed to remove the generator, we can begin repairing or replacing it.
The steps to reinstall the generator are exactly the opposite of those already performed. Of course, this method of accessing the generator is not as convenient as when working with a lift, but it allows you to quickly repair it while being away from a car service center.
Despite the fact that the Daewoo Matiz alternator belt and other elements are quite reliable, failures still occur. The car owner should know how to carry out basic repairs on his own. All about this in our article.
[Hide]
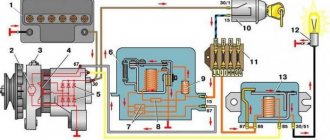
Typical generator problems
The vast majority of cars produced by Daewoo have two main types of generating devices. This is a generator Matiz, Nexia CS130 and CS121. A similar model is in Gentra's car. There are no fundamental differences other than the size of the stator. They are even interchangeable.
Unification allows basic repairs to be carried out according to the same scheme, regardless of which model is installed on the Daewoo Matiz. As practice shows, the stator and rotor are both reliable models. In most cases, failure of their operation is caused by mechanical damage.
The most common troubles include:
- destruction on the back cover;
- burnout of the diode bridge due to improper washing, contact with oils and technical liquids on the housing.
- scorching of the working surface;
- generation of generator brushes.
These problems can lead to others. Thus, the destruction of the bearing leads to strong shock loads on the rotor and stator. Also, because of this, a short circuit of the “plus” of the brushes to ground may occur - and as a result, the relay-regulator will burn out.
Which alternator belt to choose for Daewoo Matiz
The belt under article number 96568068 is suitable for Daewoo Matiz.
Hatchbacks with automatic and manual transmissions are equipped with the same components.
Due to the fact that it is difficult to find consumable parts for Daewoo Matiz, you can purchase an analogue of the Lynx brand for this car. Moreover, original components are more expensive, when the service life of both belts is almost the same.
2297-4-14-10
In this case, the protrusion on the tensioner body should fit into the recess in the socket.
Next, reinstall the power steering pump drive belt.
Checking and replacing Daewoo Gentra accessory drive belts
( 1 rating, average 4 out of 5 )
This is interesting: How to learn how to operate the clutch correctly
Let's start work
Opening the hood, we find an expansion tank with coolant. We will need to drain it so that during further dismantling we don’t spill it on the floor. First prepare a small container to collect the coolant. A sparkling water bottle will suffice.
Remove the connector from the generator and the boot near the right wheel
So, we disconnect the pipe that leads from the expansion tank to the throttle valve. To do this, we compress the clamp with pliers, pulling it back a little. This will allow us to remove the already mentioned upper pipe. We move the clamp closer to the engine shield for convenient removal and drainage of liquid from the pipe into a bottle or canister that we previously prepared. Since there is practically no pressure in the pipe, you don’t have to worry about it jumping out of the container. To drain the liquid more efficiently, start the engine and wait until all the antifreeze is drained.
Now we can remove the expansion tank. We remove the terminals from the battery to avoid a possible short circuit. Now you can remove the second upper pipe, as well as lift the power steering reservoir. This will allow you to move the expansion tank slightly towards you and dismantle the lower pipe by moving the clamp clamp with pliers. Now you can completely remove the tank, which is what we do. We remove all the pipes to the side to gain free access to the generator.
How to remove a Daewoo Matiz generator
I would like to present you this video about removing the generator
from a Daewoo Matiz
. Video exclusively for...
Daewoo Matiz Best - Removing and installing the generator
Daewoo Matiz - Removal
Replacement instructions for valve cars
It is better to carry out all disassembly/assembly work on an inspection pit or overpass. If such conditions cannot be created, then you can use a jack to lift the front of the car.
Required Tools
- The key is "19".
- Socket head on "8".
- Special device for mounting the strap.
- Knife.
- New consumable.
- Clean rags.
For Daewoo Nexia you need to purchase a Conder belt with catalog code 96486813, 96182007, size 13x825 mm.
Stages
- We begin work by unscrewing the bolts on the crankcase protection. You don’t have to completely remove the protection; just unscrew the bolts from the front. This opening is enough to carry out the replacement.
- After unscrewing the fastening bolts on the right side of the engine protection, you need to move the protection closer to the wheel.
- The air conditioner strap is not reused, so it can be cut with a knife instead of being removed.
- Next, we disassemble the tensioner mechanism, checking the parts for defects.
- All defective parts must be replaced.
- Next, we mount the tension roller and put on the Belleville washer. We only tighten the nut without tightening it completely.
- Before installation, wipe all surfaces with a clean cloth to prevent the product being installed from slipping.
- For ease of installation, a special device should be installed on the crankshaft pulley, thanks to which the product is put on the crankshaft pulley. First, the part is put on the Conder compressor pulley. It is then passed under the crankshaft pulley and installed on the mounting fixture.
- In this case, the gearbox must be set to neutral.
- By turning the crankshaft pulley by the mounting bolt in a clockwise direction, the belt must be guided into the pulley groove until it is completely put on. As soon as this happens, the strap tension will weaken.
- When the new consumable is put on and the mounting device is no longer clamped, it is removed.
- Next, you need to turn the crankshaft one turn and check that the belt lies correctly in the pulley grooves.
- Having put on the Conder drive belt, use the adjusting bolt to set the required tension. You can check the tension by pressing the upper part of the belt between the air conditioning compressor and the crankshaft. The correct tension will be if, with a force of 10 kg, the belt bends by 5-8 mm.
- Now you can finally tighten the tensioner nut.
- Next, the removed parts are installed in reverse order.
- This concludes the procedure.
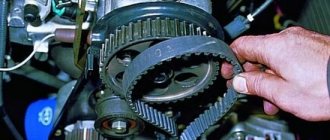
We begin installing a new timing belt
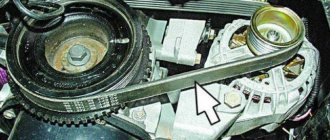
Let's check all the marks again. We put the tension roller in place together with the spring, put the guide pin into the hole, and do not install the bolt yet, this will give us the opportunity to pull the roller further when installing a new belt. We first put the new timing belt on the camshaft sprocket and secure it with a plastic clamp so that it does not slip off in the future. Don't forget about the direction of rotation on the belt.
Next, we put it on the crankshaft sprocket and make sure that the right branch of the belt is tensioned, then on the tension roller and pump. We install the tension roller bolt, do not tighten it. A few degrees, without much effort, we turn the camshaft counterclockwise, thereby slightly tensioning the right branch of the belt. We check with our hands whether the spring has tensioned the tension roller, try to move it towards the belt, and then tighten the roller. Remove the clamp and turn the crankshaft two turns. We check the marks and tension of the belt, try to turn it ninety degrees with two fingers, if it turns more, then it is necessary to tighten the timing belt. If everything matches and the tension is normal, install all the parts in the reverse order of removal. Well, if not, we repeat everything from the beginning.
Price:
| Service | Price |
| Replacing the alternator belt | from 800 rub. |
| + rollers | from 1200 rub. |
| + mounted | from 1800 rub. |
Car services in St. Petersburg:
Kupchino
– 245-34-84 Citizen
– 603-55-05
Bolsheviks
–
WhatAapp/Viber: 8-911-766-42-33
When is it time to change:
– a whistle that occurs when there is a load on the electrical equipment of the car; – cracks on the belt; – loss of elasticity; – alarm about a decrease in battery charge when it is fully charged.
Work guarantee
– 180 days.
Which to choose:
1. Contitech (Germany) 2. Dayco (Italy) 3. SKF (Sweden) 4. Gates (USA) 5. Flennor (European Union) When purchasing spare parts from us, we will provide a discount on replacement.
Addresses in St. Petersburg: Service station on Bolshevikov: st. Voroshilova, house 7, from 10 to 18, t., Sat, Sun – closed. Service station on Grazhdansky: st. Uchitelskaya, building 23, from 9.30 to 21.00, t., seven days a week. Service station on Kupchino: st. Dimitrova, building 1, from 10 to 20.00, t., seven days a week.