The gas distribution mechanism (GRM) of an internal combustion engine coordinates the operation of valves and pistons and is driven by a special belt or chain. Replacing the VAZ 2109 and VAZ 21099 timing belt is done every 30-40 thousand km, which will minimize the likelihood of it breaking during operation. Many owners turn to specialized service stations, but due to the maintainability and simplicity of the design of these models, the replacement can be done independently.
Preparatory work
Replacing the timing belt requires some prep work to get to it. To do this, lift the hood and remove the air filter pipe by unscrewing the fastenings of the retaining clamp with a wrench. Next, the belt protective cover is removed, for which you need to unscrew the three bolts that hold it in place. This is done with a regular open-end wrench. In the opened space, the timing belt will be visible, which needs to be replaced.
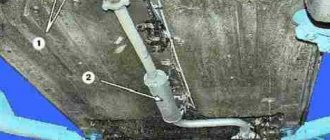
The front right wheel and the protection under it are first removed to get to the crankshaft pulley, which drives the gas distribution mechanism via a belt. In the cab, put the lever in the fourth gear position and ask the assistant to press the brake pedal. We install the head 19 on a long wrench so that it is convenient to get to the crankshaft pulley, which we unscrew, which will require some effort. After the bolt is broken, you can put the gear in neutral and not hold the brake pedal.
Important feature! To replace the timing belt on a VAZ 2109 8-valve injection engine or a similar VAZ 21099 model, when removing the crankshaft pulley, you need to hold the flywheel, which is best done with a screwdriver. Otherwise, it will rotate along with the pulley. In carburetor engines this problem does not exist; the pulley is held independently.
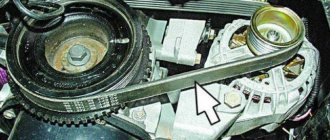
From the top of the open hood, the nut that holds the tension of the generator belt is loosened; this is best done using a special cardan on which to place the head of the key. The generator pulley is moved so that the belt can be removed without interference. After this, remove the crankshaft pulley so that the gear is visible.
Dismantling
To correctly replace the timing belt, you first need to dismantle the element. The process can take quite a lot of time, although the work itself is not very difficult.
- Remove the casing covering the belt, pulleys, dismantle the tension roller and other elements related to the gas distribution mechanism.
- The cover is held in place by three mounting bolts, so removal should not be a problem.
- Remove the alternator belt. This will give you access to the desired object - the timing belt. To do this, lower the retaining bolt down a little and move the generator towards the engine. This will loosen the belt, making it easy to remove.
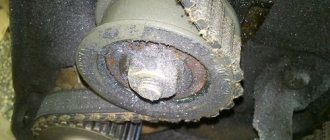
- Align the gas distribution mechanism to the marks. First you need to install the crankshaft in the required position. This is done by turning it and looking through the hatch on the clutch housing.
- Stop rotating as soon as the mark on the crankshaft flywheel aligns with the marks on the housing. This indicates that the piston of the first cylinder is at TDC - top dead center.
- Make sure that the mark on the camshaft gear is aligned with the mark on the metal housing.
- Having set the marks, you can begin the procedure of dismantling the old worn timing belt.
- Release and move the tension roller to the side. This will release the tension on the strap. As a result, it can be removed from its position.
- Next you need to remove the belt from the crankshaft gear. To do this, the pulley is first removed.
- There should be no problems with dismantling the pulley, since it is removed this way. First remove the right wheel, turn the steering wheel to the right and you will gain access to the side shield. The shield is removed, and behind it is the crankshaft pulley. Relevant for carburetors and injectors.
- If your VAZ 2109 has an injection engine, you will need to fix the crankshaft to remove the pulley. It is not difficult to do such a procedure. Insert a long screwdriver into the special hatch where the flywheel mark is located. This will lock the crankshaft in the required position, so you can easily unscrew your pulley.
- On a carburetor VAZ 2109, fixation should be performed directly on the pulley.
- Before you begin removing the timing belt, examine the condition of the water pump and tension pulley. You should also check whether the axis of the tension roller and timing gear are in good condition.
- If there is damage, defective elements must be replaced.
- Check the current condition of the camshaft and crankshaft seals.
Crack on the strap
Experts agree that when replacing the timing belt, the rollers and pump should also be replaced. But this is a recommendation, not a requirement.
Aligning marks
In order for the engine to work after replacement, it is necessary to set the timing marks. If the belt tensioner roller is noisy, it is better to replace it. Although it is better to do this in any case, so that no problems arise during the life of the belt. But if this is not possible, use a 17 wrench to loosen the nut holding it in order to loosen the tension for subsequent removal of the belt. We find a mark on the main camshaft sprocket and align it with the mark on the cover. To align the marks, unscrew the bolt holding the camshaft sprocket, align the timing belt marks, and then tighten it again.
After this, we align the marks on the crankshaft. To do this, we find a groove on the housing in the area of the oil pump and a point on the crankshaft gear. We put the pulley on the gear and turn it by hand until the marks match. This is easy to do; just hand strength is enough to turn the pulley.
Sometimes the marks on the crankshaft are not visible, then after aligning the marks on the camshaft, you need to make sure that the mark on the flywheel and the notch on the casing match. To do this, you first need to remove a special plug, after which these marks will be visible. If they do not match, after replacing the timing belt the engine will not start, and if it starts, it will run unstably and intermittently. Therefore, this stage is important for successful repair and subsequent operation of the car.
When replacement is required
The timing belt is responsible for the operation of the gas distribution mechanism.
Try in every possible way to avoid breaking the belt while driving, otherwise this may negatively affect the condition of the engine and the cost of its repair.
The most dangerous is the contact, the “meeting” between two main elements - the piston and the valve. In this case, the unit becomes deformed, requiring expensive restoration of the car.
There are several main criteria that indicate the need to replace the unit.
| Sign of wear | Peculiarities |
| Natural wear and tear | Each element has a certain resource, a margin of safety, above which it can “jump” only in rare exceptions. For timing belts on nines it is 50-60 thousand kilometers |
| Visual signs of wear | If you examine the condition of the strap, if there are any malfunctions, this will manifest itself in the form of defects, cracks, and peeling along the edges. All this suggests that you cannot continue to operate the car with such a strap; replacement is required. |
| Oil or coolant on the surface | Another sign that the strap is outdated and needs to be replaced. At the same time, do not forget to check for leaks in their cooling system and oil channels |
| Retighten the strap | When the service life has not yet come to an end, the strap may still become loose. To eliminate this, it is tensioned. But over time, the tension reaches its limit, the strap becomes overtightened and is no longer able to return to the desired position. For replacement and only |
| Tooth wear | If there are problems with the teeth, when moving, the belt simply begins to slip while the crankshaft rotates. Here you will have to change the gears and the belt itself |
Belt installation
If the marks on the camshaft and crankshaft coincide, you need to install a new timing belt. If there are markings or inscriptions on the belt, they must be oriented clockwise, and the arrows must also be oriented if they are on the belt. Before this, the old belt is removed; if it is intact, by examining it, you can make sure that it is cracked and its operation is dangerous.
First, the belt is installed on the crankshaft gear, and then, with light force, on the camshaft sprocket. When installed, it should go around the drive sprocket and tension roller, making a zigzag.
Checking the timing belt tension is done by adjusting the tension roller, which is best replaced when installing a new belt. This is done with a special key; if you don’t have one, bolts or pins 40-50 mm long that fit the diameter are inserted into the holes. A screwdriver is inserted between them and, turning the roller, the belt is tightened. It should be quite tight, but with the average effort of the hand to turn 90°, if it is overtightened, it will quickly wear out. After this, the tension roller nut is securely tightened.
Replacing the timing belt on a VAZ 2109
As mentioned above, the timing belt has a limited service life. On some machines the declared service life of the original product may be longer, on others less. In the case of a VAZ, the belt runs, on average, about 50-60 thousand km. or 4-5 years.
It is important to remember that it may become unusable earlier for a number of reasons (ingress of oil or technical fluids, stretching, delamination, cracking, etc.). One way or another, you need to change the VAZ 2109 timing belt both in terms of mileage or time, and in case of defects.
The belt itself is actually a rubber rim with a toothed inner side and is necessary to synchronize the operation of the crankshaft and camshaft. Also, the specified belt on a VAZ and many other cars acts as a drive for a water pump, oil pump, etc.
At the same time, it is a mistake to believe that the part has a long service life. Simply put, this is a consumable that needs to be changed regularly. Let's look at how the replacement is performed and what to pay attention to.
Reassembly
Then everything is assembled in reverse order. First, install the crankshaft pulley. To tighten the bolt, set the fourth speed again and depress the brake pedal, after which the bolt is tightened with a head with great force using a collar. The generator belt is installed in place, the pulleys are moved apart using a pipe, a collar or a small pry bar. This is necessary for good tension of the generator belt, after which the nut is tightened using a wrench with a universal joint. The pulling procedure is repeated several times. This belt should be stretched very tightly and practically not bend under the force of your hand.
Video: Replacing the timing belt VAZ 21099, 2109
After this, the timing belt protection is put in place, for which you will need to install it in the seat and tighten the three bolts again. The air intake is put in place and secured with a clamp. The metal and plastic protection is installed in place and the removed wheel is secured, the car is removed from the jack. After this, you can start the engine. It will start without problems, its operation should be stable, without fluctuations or extraneous sounds. This will only be possible when all the marks match and the belt is tensioned with sufficient force.
Experience shows that replacing the timing belt on VAZ 21099 and 2109 can be done independently, without turning to professionals at a service station, especially if it is a planned replacement and the belt remained intact before replacement. You don’t need any special tools for this, just a set of socket heads and open-end wrenches and a regular flat-head screwdriver are enough to do it yourself.
If, due to an oversight or due to a defect, the timing belt breaks, then after replacing it the engine may still not start, since it will require repairs and cannot be done without professionals.
Seal
Installing a new timing belt
We check that all marks match.
We first place the belt on the crankshaft and pump. Then we tighten the right descending branch of the belt and put it on the camshaft pulley and tension roller. We check all the marks again and tighten the belt with a roller. The tension is considered sufficient if, with the force of two fingers, you can twist the longest branch of the belt by a maximum of 90 degrees. It’s easier to take the right branch of the belt with two fingers and twist it, if more than 90 is not very bad, but less is very bad. An overtightened belt will wear out quickly and will also reduce the life of the pump.
We place the bottom protective plastic cover. And on the crankshaft pulley we mark the twentieth tooth after skipping two teeth. We count counterclockwise.
This mark corresponds to the top dead center of the first cylinder. We put the pulley in place and the mark should be against the crankshaft position sensor. More precisely, against the small iron core of the sensor. Sometimes it gets into the gap between the teeth, this is considered acceptable. We tighten the pulley in the same way as we unscrewed it, with the help of a partner.
We turn the crankshaft two turns and check the marks; this is where our mark on the pulley comes in handy.
If everything is in trouble, we collect everything that we took apart. As they say in smart books, install the parts in the reverse order of removal. Don't forget to add antifreeze.
We start the car, accept congratulations from family and friends and head off to adventure.
How to properly check the rollers for serviceability?
Experienced car owners advise checking the serviceability of the rollers as follows:
- The first step is to remove the cover from the timing belt;
- Then start the engine;
- Observe the movement of the belt;
- You also need to listen, if you hear a whistle, grinding, squeaking, then most likely the rollers are faulty;
- Inspect the bearing bracket with the engine turned off;
- Check the belt for play; if there is any, this is a consequence of a malfunction of the roller or its incorrect setting;
- Check the roller for abrasion;
- Check to see if there is a grinding noise when the roller rotates (to do this, remove the belt and turn the roller several times).
- You can check the operation of the rollers by inspecting the belt itself. If bites are found on it, this indicates a malfunction of the tension rollers. In this case, they must be urgently replaced.
Experienced car owners advise resorting to the following trick:
If you hear a creaking sound when the belt is operating, do not immediately replace the rollers! You can apply WD-40 lubricant to the inside of the belt. If the creaking fails, then the problem was belt wear. As a result, only it can be replaced.
You should also do some preparatory work:
- prepare the necessary tools;
- purchase consumables.
To carry out technical work on replacing timing rollers, you will need the following tools and consumables:
- Set of car spanners;
- A set with a ratchet wrench, a set of replacement heads for it (needed when a modified timing system shield is installed);
- Automotive screwdriver set;
- New consumables;
- Lubricant mixture;
- Rags.
To ensure that the car owner does not receive any injuries, he must also comply with the necessary safety precautions. It's pretty simple! But following it will allow you to protect yourself from unwanted injuries.
Safety precautions when carrying out technical work on the timing system:
- It is necessary to wear double-layer gloves;
- Replace consumables only with the engine turned off;
- When removing the timing rollers, they should be held with your hand, otherwise they may jump off their seat and hit the car owner in the face;
- Carry out all work in a well-lit place;
- When changing timing system consumables, you should strictly follow the step-by-step instructions.
Compliance with all the points described above will allow all technical work to be completed within 1 - 1.5 hours.
How to install the rollers correctly in place?
Not only the operation of the timing belt, but the operation of the entire engine as a whole will depend on how correctly the rollers are installed.
In order to correctly install the timing rollers, you must follow the following instructions:
- The first step is to position the tension roller so that the technical holes for a special key are on the outside of the roller.
- The second step is to use a special key to adjust the position of the roller.
- Then install the timing belt on it.
- Then perform a couple of revolutions of the belt to make sure that the roller rotates smoothly on the bushing. During its operation, it should not make creaks, rattles, or metal friction should be felt.
- When tightening this part, it will be useful for inexperienced motorists to use the level from the repair kit. When tightening the bolts, place a level against the roller and, if necessary, adjust its position. It should be installed at 90 degrees. Otherwise, when the engine is running, it may damage its seat, which will require expensive repairs.
If you follow the instructions described above, you should take into account: for adjusting the tension rollers, there are special technical marks on the modified timing system plate. They should be used to adjust their position. The car comes with a standard panel from the factory, which does not have any technical data printed on it.