Most modern passenger cars are equipped with a timing belt drive. Despite a lot of positive aspects such as quiet operation, simplicity of the device and reliability, there is one significant drawback - the belt can break right on the move. And this scares potential buyers. Naturally, questions arise about what to do if the timing belt breaks and what consequences this may have. We’ll talk about this today, pay attention to every nuance, and figure out how to replace the timing belt using the example of the Lada Priora and cars with a similar engine.
Broken timing belt on Priora: consequences
Owners of a Lada Priora car have already experienced from their own experience what can happen to the engine of this car in the event of a timing belt break. This also applies to Kalina owners who have Priorov engines installed.
If your VAZ 21126 car is equipped with a 1.6-liter sixteen-valve flame engine, then you should be extremely careful and watch the belt from time to time. And even if the timing belt does not break on the Priora, and it simply jumps one tooth, then damage to the pistons and valves cannot be avoided.
The best predictions are that only the valves will be bent, and the worst outcome is broken pistons, a warped cylinder head and cylinder block.
The fact is that the current pistons are far from the same ones that were produced on VAZ 2112 models with a 1.5-liter engine. Designers, in pursuit of power, made the piston so thin that if the stroke is broken, it meets the valve and crumbles into several small pieces. This is followed by pouring the remaining piston into the pan.
In this case, not only the pistons suffer, but also the cylinder liners, which, most likely, will also have to be changed.
Replacement is carried out due to many burrs on the liner mirror. Plus, pistons with rings, a timing belt with rollers, and gaskets for the entire engine must be replaced. It is not difficult to calculate what such a repair could cost.
Many people think that in a Priora timing belt, a broken belt will not affect it personally, but as practice shows, no one is immune from such situations, even if you monitor the condition of the timing belt every day. But in order to understand why the timing belt breaks in Priora, you need to find out why such an element is even needed in the system?
Are the valves bending or not?
Of course, for many experienced car owners, the question such as “whether the valves on a Priora are bent” has long been studied.
But there are many new drivers who do not have information on this matter. It is for such car enthusiasts that this post will be written.
It is worth noting that several engine modifications were installed on Lada Priora cars. And of course, the answer to the question about bent valves will depend on what power unit is installed on your car.
- VAZ 21126 is a classic Priorov engine, which was the first on these cars. Thanks to changes in the design, namely the lightening of the connecting rod and piston group, there was no room left for valve recesses in the pistons. As a result, when the timing belt breaks, which sometimes happens on Priora, the valves are bent, and sometimes even the pistons are damaged.
- The VAZ 21116 engine is a simpler 8-valve engine that Priora inherited from Granta. In appearance, it is practically no different from a conventional 8-valve injection engine, but inside, again, there are lightweight pistons, which leads to the already familiar consequences in the event of a timing belt break - valve bending. But it is worth noting that the load on the timing belt of 8-valve engines is slightly lower than that of 16-valve engines, and such problems are less common with such power units.
- VAZ 21127 is an improved 126 engine that no longer develops 98, but as much as 106 hp. Of course, here, too, the valves bend when they meet the pistons, because by increasing the power, it was impossible to increase the pistons in order to make the necessary recesses. In fact, the piston remained the same, and the changes affected only the intake receiver.
Why do you need a timing belt?
On all more or less modern cars that are equipped with an internal combustion engine, a special gas distribution system has long been used. Such a system may include:
— Rods transmitting reciprocating movements to the valves from the GDV;
— Valves (they are inlet and outlet, and on each cylinder);
— Timing belt, chain, group of sixes.
The operating principle of a four-stroke engine is designed in such a way that during its operation, the valves inside each cylinder must open and close alternately and in strict sequence. So, for this process to occur successfully, the gas camshaft must rotate.
Torque is transmitted to the camshaft directly from the crankshaft, and the same timing belt, a special chain, or a set of gears can serve as a transmission device. New cars, including Priora, are often equipped with belts (the reason is that they are lightweight and do not create noise when the engine is running).
Broken timing belt
Now let’s talk about the troubles that can befall the owner of a Priora (the timing belt of the engine of this car can be compared to a “needle in an egg”, breaking which can kill Koshchei the Immortal).
When the timing belt breaks on a Priora, the consequences can be the most dire, since the entire gas distribution system stops - the valves literally freeze in different positions and it’s great if these same valves do not reach the piston when it rises up.
Often the most dangerous thing happens - a strong impact of the piston on the valve. At the same time, valve curvature is not the whole problem. Often the piston is broken, and along with it the entire gas distribution mechanism. When the timing belt breaks in Priora, almost the entire engine may fail and good investments will be spent on its restoration in the future.
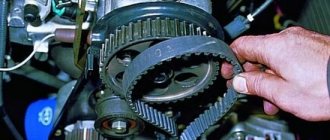
Checking the performance of the belt
Following the factory documentation, we can say that checking the 16-valve engine on a Priora is required every 20 thousand mileage of the car (take into account the quality of spare parts and the large number of fakes). This should be done in the same way as on the old nines:
- The front end is raised on jacks above the ground to a distance sufficient to get under the car.
- Engage 5th gear.
- Open the protective cover or remove it so that the inspection does not damage it.
- Now you need one person to rotate the wheel while you inspect the drive for damage.
Broken timing belt on Priora: physics of the process
So, in order to imagine what happens when the timing belt breaks, it is necessary to understand at least a little into the essence of the process itself.
If the timing belt breaks, the camshafts are locked in the same position and at the point at which they were performing a stroke at the moment the belt broke, and the crankshaft, according to the law of inertia, continues to rotate (the flywheel rotates it - and it is no longer so important whether this happened in gear or not, the car gained high speeds or was moving at low speeds) and the pistons hit the valves with enormous force - and not all of them, of course, but precisely those that were open at that moment.
Further, the physics of the process is extremely simple - the valves simply bend. There are cases when they also pierce the piston, but, fortunately, this phenomenon does not happen so often.
Belt tension after replacement
A special feature of the VAZ-2170 engine is the timing belt tensioner. Therefore, constant checks or installation by “eye” are no longer required here. For correct drive tension, there are marks on the roller itself. On the external disk and the base of the video. This is a protrusion and a slot. They must match. Then the tension will be normal. The mechanism is rotated using a conventional puller for various retaining rings. Once the marks match, secure the bolt.
After replacing the Priora timing drive, you need to make sure that the work was done correctly. To do this, without starting the engine, engage 4th gear and turn the engine a couple of revolutions, rotating the wheel drum. If it rotates normally, reassemble everything in reverse order. Housing covers, pulley with damper and generator belt. Installation of the generator drive belt is described in a separate article.
Replace the wheel and connect the battery. Now you can start the engine and check the Priora on the road.
A small but very useful video on the topic of replacing the Priora timing belt:
Causes of timing belt breakage
A belt break, like a connecting rod break on a Priora, is preceded by some reasons. They can be very different, but usually come down to the following root causes:
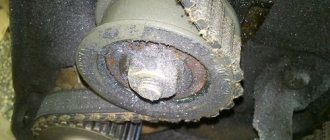
1. A break can simply occur due to the dilapidation of the belt itself or its extremely poor quality (oil leaks from under the seals or sharp edges of the shaft gears).
2. The pump jams (very common);
3. The rollers jam or the tension roller unscrews;
4. One or more camshafts also jam (for example, due to the breakdown of one of the camshafts - but here the consequences are significantly different);
5. The crankshaft is completely jammed (the openwork is complete, but no one can guarantee that the belt will break).
Reasons for the breakup
The main flaw of the belt on the Priora (we chose it as an example, but there is no fundamental difference with cars that use a similar type of distribution mechanism) is that it is made of rubber.
Accordingly, if the belt is not replaced by the end of its life, the rupture will occur spontaneously and it is impossible to predict this moment. For modern cars, the only problem with a broken belt is the fact that it breaks. On older cars, a torn belt also means that your valves are bent. In new cars, special grooves are made in the pistons for the valves, due to which such an annoying nuisance does not happen. The 16-valve engines on the Priora are exactly like this. On old VAZ 2109 and 99, if your valves are bent, then you will have to spend a lot of money on repairs.
The belt will break due to the following reasons:
- End of service life.
- Oil leaking from under the block head.
- Broken rollers or tensioner.
Wearing the belt before the deadline is the most common mistake of people who operate a 16-valve engine in a Priora. Therefore, in this case, you need to focus on the recommended mileage indicated by the manufacturer, closer to which it is recommended to replace the belt. At the same time, if you do not want the valves to bend, then replace the belt a little before the expected date.
Another problem for engines that have been running for more than a hundred thousand kilometers is oil leakage. According to the regulations, it is recommended to rebuild a 16-valve engine after the first 150 thousand mileage and replace all rubber elements. If the gasket was not replaced on time and oil from under the valve cover or cylinder head flows onto the drive surface, then you are guaranteed to bend the valves soon (if on your engine, in the event of a break, the valves bend. You can find out more information in the documentation for maintenance of your vehicle). When oil gets on the belt, it causes fatigue aging; the rubber becomes unusable and thins out under the influence of an aggressive environment. The consequences will not be long in coming, so oil leaks should also be considered as signs of a rupture.
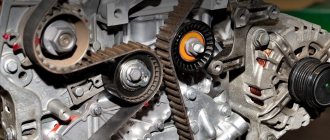
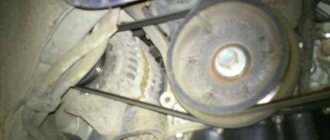
Another factor that influences the condition of the timing belt is the auxiliary components that ensure the movement of the belt. On a Priora with a 16-valve engine, idler rollers and tensioners are involved in the movement of the belt.
The condition and normal operation of these mechanisms should also be considered as signs of rupture, since if some auxiliary mechanism jams while driving, the belt will burst. To prevent this from happening and to prevent the valves from bending, you only need to pay attention to the condition of the auxiliary components of the gas distribution mechanism when performing maintenance. If you notice that something is wrong, then refrain from traveling until the corresponding unit is replaced.
Belt care
To avoid any reasons that could lead to a broken timing belt in the Priora, the designers advise taking care of this unit, because you can only avoid a belt break and all further troubles if you constantly care for and monitor your car. The most important thing you need to know is the mileage of the Priora.
The manufacturer guarantees that the timing belt service life is approximately 200 thousand km, and only after reaching this mileage does it need to be changed. But experience shows that trouble can occur much earlier, and this can be explained by the fact that each individual engine can be equipped with belts from a different manufacturer. In one case there may be a belt made in China, and in another, for example, a Polish one.
For this reason, you need to listen to the sound of the engine literally when you reach a mileage of 100 thousand kilometers. If you suddenly hear extraneous sounds: a suspicious “rustling” sound, you must immediately contact the service for diagnostics. If service workers offer to replace the timing belt, then you should not be greedy, since a malfunction can lead to extremely undesirable consequences.
I would like to note the fact that timing belt breaks on a 16-valve Priora occur more often than on an eight-valve engine. This is explained by the fact that in the head of a 16-valve engine, the valves extend a little further than in an 8-valve engine, and at the same time the risk of the piston meeting the valve increases. Of course, you can replace the 16-valve head with an 8-valve one and forget about the trouble, but then the car owner will lose about 20 “horses”.
Replacement timing
The Priora timing mechanism is a complex structure, which has two camshafts, 16 valves, tension and idler rollers. And the toothed belt also rotates the coolant pump blades. Recommendations from the Lada Priora manufacturer indicate that the timing belt needs to be changed after a mileage of 200 thousand km. It is difficult to say whether there are cars with such mileage without rotation of rubber products in the timing drive.
The duration of such rotation depends on many factors:
- Quality of material and workmanship of the part.
- Operating conditions of the machine.
- Technical condition of the engine.
- Grease or other technical fluid gets into the belt rotation zone.
Taking these factors into account, experts recommend stopping at a mileage of approximately 50–60 thousand km, in some cases even less. If we talk about such a reduction in the recommended period of operation of rubber goods on Priora, then the following circumstances can be noted. The movement of a car in urban conditions is accompanied by frequent stops and then starting. The belt teeth experience jerking, which weakens them. The smooth operation of the engine on the highway has a minimum of such jerks, so the drive will work longer.
The ingress of engine lubricant, coolant or other foreign particles will also greatly reduce service life. If you notice a lubricant leak in the area of the camshaft or crankshaft seals, the leak is immediately repaired. It is imperative to change rubber goods when purchasing a used car, since the mileage on this car is unknown. And the condition of the pulleys on the crankshaft and camshafts also reduces the service life of timing drive rubber parts.
Priora timing belt broke, how long to repair
that when the timing belt breaks, it bends not only the valves, but also breaks the pistons and bends the connecting rods
On a state-owned Prior with a mileage of 120 thousand. The pump fell apart, the rollers and belt were replaced. There were no signs of wear on the belt and the rollers were loose.
Chet didn't understand. Before 120k km, neither the belt nor the rollers were changed? 120,000 km without replacing the timing belt, in my opinion, is even very good. I think if I get a Priora I will change the timing kit assembly every 60-70t.km.
yes, it’s not just good - it’s just stupefying
Before 120k km, neither the belt nor the rollers were changed?
Before 120k km, neither the belt nor the rollers were changed?
I myself drive 21113 1.5 16V - everything is OK
Yesterday I changed the timing belt, in the garage I saw pistons from a Priora. On one of them there was actually a piece missing! The mechanic said that the valves were bent and the piston was screwed in.. A piston costs from 12,000. A belt costs 1000-1500, etc. But if “I myself drive 21113 1.5 16V - everything is OK,” then decide for yourself. For example, this is my third year going. bye ugh*3 times!
People, you are probably exaggerating with the belt breaks on Priors. At one time there was the same garbage with 1.5 16V. But if you check everything on time...listen to the videos at least once a week. watch the belt everything will be ok.
Even the shit magazine Zarublem is silent on this matter. They have priors in their fleet, in the new issue 01 2010 I read everything OK! And if their belt had broken, there would have been a stink all over the country.
More specific please. Where do you hear from? I don't hear anything. Friends drive only rejoice. But those who don’t have a prior in sight all suffer - there are no priors, and the belt breaks. Everyone’s excuse is YouTube! Specifically, someone was eager to find out on the forum?
Source
Selection of instruments and start of the operation
So, if your timing belt has already broken, or you decide to change it yourself, then you need to start with preparation. If it has come to this, then you need to know that the belt on 16-valve engines on the Priora is changed along with the idler rollers and tensioners - their service life is designed so that they fail approximately at the same time. If you change one drive, it is possible that the belt will burst while driving and this will lead to breakdown of all drive components. Some car enthusiasts noted that at the end of their service life, the idler pulley was bent and because of this, even the new belt was torn.
You will need the following tools for your work:
- Screwdriver Set.
- Mount.
- Jack.
- Open-end wrenches.
- Pliers.
Priora timing belt broke, how long to repair
that when the timing belt breaks, it bends not only the valves, but also breaks the pistons and bends the connecting rods
On a state-owned Prior with a mileage of 120 thousand. The pump fell apart, the rollers and belt were replaced. There were no signs of wear on the belt and the rollers were loose.
Chet didn't understand. Before 120k km, neither the belt nor the rollers were changed? 120,000 km without replacing the timing belt, in my opinion, is even very good. I think if I get a Priora I will change the timing kit assembly every 60-70t.km.
On a state-owned Prior with a mileage of 120 thousand. The pump fell apart, the rollers and belt were replaced. There were no signs of wear on the belt and the rollers were loose.
Chet didn't understand. Before 120k km, neither the belt nor the rollers were changed? 120,000 km without replacing the timing belt, in my opinion, is even very good. I think if I get a Priora I will change the timing kit assembly every 60-70t.km.
yes, it’s not just good - it’s just stupefying
Before 120k km, neither the belt nor the rollers were changed?
Before 120k km, neither the belt nor the rollers were changed?
I myself drive 21113 1.5 16V - everything is OK
Yesterday I changed the timing belt, in the garage I saw pistons from a Priora. On one of them there was actually a piece missing! The mechanic said that the valves were bent and the piston was screwed in.. A piston costs from 12,000. A belt costs 1000-1500, etc. But if “I myself drive 21113 1.5 16V - everything is OK,” then decide for yourself. For example, this is my third year going. bye ugh*3 times!
Repairing engine 21126 VAZ 2170 Priora after timing belt break
Today we brought one of the old clients to the Priora, as it turned out, the jammed pump broke the belt and, as a result, the valves were bent.
But progress at AvtoVAZ does not stand still, and if on the engines of the tenth family the valves were simply bent, then on the Priora 126s the connecting rods also lose alignment and, if they are not changed, there is a high probability that the engine will begin to eat oil and, accordingly, your money. Glory to the designers of AvtoVAZ!
But every cloud has a silver lining, there are sets of pistons for 126 engines with grooves that do not bend the valves. In this article we will describe the procedure for repairing the cylinder head after a broken timing belt, as well as replacing the piston. Removing and installing the timing belt is described in this article, so we will not dwell on it in detail.
To perform this procedure, torque wrenches are required!
I use two keys: 28-210 Nm with a 1/2 square and 5-25 Nm with a 1/4 square.
Which belt to buy
The main supplier of rubber products for VAZ is the RTI plant in Balakovo. In addition to this plant, components from imported manufacturers can be used. High-quality repair kits are supplied by the Belgian company Gates. It has proven itself to be a reliable product that is used by many well-known car manufacturers. The products of Bosch, which supplies almost all car factories with components, receive good reviews.
They are also used to replace products from companies such as ContTech, Lemforder, and Dayco. The middle price segment includes products from Balakovo, Bosch, and Lemforder. Products from Gates, Contitech, and Dayco are classified as premium class. The price range ranges from 700 to 1500 rubles per piece. When choosing spare parts, you should beware of buying fakes, of which there are many on the automotive market. A high-quality part cannot have a low cost. You can read more about which kit you should choose in this article.
Let's start to disassemble
First, drain the oil and antifreeze. We remove the protective cover, the air filter with pipes, disconnect the ignition coil connectors, the throttle cable and the throttle assembly.
We remove the thermostat housing and simultaneously disconnect all the available connectors and pipes. We remove all the wiring that was in our way towards the battery.
We remove the generator. We unscrew the eight thirteen nuts holding the intake manifold and remove it. We unscrew all the bolts securing the valve cover, as well as the side engine support.
Unscrew the eight nuts and remove the exhaust manifold.
Remove the timing belt, camshaft pulleys and pump.
In three passes, so as not to deform the part, we first loosen and then unscrew twenty bolts of the camshaft bearing housing, the head is eight.
Be sure to follow the sequence shown in the photo.
Remove the bearing housing. We remove the camshafts; there is a distinctive lip on the intake camshaft.
Also, in several passes, we first loosen and then unscrew the ten cylinder head mounting bolts.
Be sure to follow the sequence shown in the photo.
Remove the cylinder head. All sixteen valves are replaced.
Cylinder head repair
We mark all hydraulic compensators with numbers using an ordinary clerical touch and put them away. An ordinary magnet will help you pull them out. We dry out the valves and remove the oil seals (valve seals), the valves into scrap metal, the oil seals into the trash. We clean all channels. We take the head for grinding, just in case. After washing it again with kerosene after sanding and blowing it with air, we begin to assemble it.
We arrange the recently purchased valves in the sequence in which they will be located in the cylinder head and begin to grind in one by one. Lubricate the valve stem with clean oil and apply lapping paste to the edge.
We insert the valve into place and put a valve grinding tool on the valve stem. The stores sell a device for manual lapping, but since this is the twenty-first century, we are mechanizing the process. We take the old valve and cut off the rod from it, select a rubber tube for it of such a diameter that it fits tightly. The rod is in a reversible drill, one end of the tube is on it, the other is on the valve being ground in. At low speeds we begin to grind the valve, constantly change the direction of rotation and periodically press it to the seat or weaken the force. On average, the valve takes about twenty seconds. We take it out and wipe it.
The valve is considered ground in if a uniform gray strip of at least 1.5 mm wide appears on the chamfer.
The same stripe should appear on the valve seat.
Video of manually grinding valves
For a sixteen valve head, everything is the same, only there are twice as many valves.
After lapping, all valves and seats are thoroughly wiped and washed with kerosene to remove any remaining lapping paste. We check for leaks. We tighten the old spark plugs and put all the valves in place. Pour kerosene and wait three minutes, if the kerosene does not run away all is well, otherwise we grind the valves on this cylinder.
Let's move on to the cylinder block
We remove the pallet. Rotating the crankshaft as it is convenient for us, unscrew two bolts on each connecting rod cap. We use a TORX E10 head for this.
We take out the pistons along with the connecting rods. To do this, use the wooden handle of a hammer to press the connecting rod from below and lightly tap it to knock it up. We remove the old liners and buy new ones of the same size according to the markings on them. Here is another stone in AvtoVAZ’s garden, the owner has never climbed into the car from the interior or into the engine, but three pistons were of group “B” and one was “C”. It turns out that at the factory they re-sharpened one cylinder a little and simply put an enlarged piston there, no words. There are no options, we take group “C”, don’t sharpen the engine because of this. We will not touch the main liners either.
We buy a new piston group that does not bend the valves, connecting rods and connecting rod bearings.
Eliminating longitudinal play of the crankshaft
It was noticed on this motor. To eliminate it, replace the thrust half-rings. Standard and repair sizes are available. We take the first repair size, if they are too tight we sand them down a little. We unscrew the middle main bearing and gently push it with a screwdriver and move the half rings. The mark on it is in the form of three serifs, shown below.
When the half ring comes out a little, turn the crankshaft, it will push it out. There are two types of half rings: white at the front and yellow at the rear; the grooves on them should point towards the crankshaft cheeks.
We install them as we removed the new half rings; if they go in with great effort, you can grind them a little on a small abrasive stone, but not from the side of the grooves. Checking the play.
We tighten the main bearing with a torque of 8 kgf*m.
Assembling the piston
There is an arrow stamped on the top of the piston; it should be directed towards the front of the engine. And there are marks on the connecting rod that should look the same way.
We insert one retaining ring into the groove on the piston. We insert the connecting rod into the piston and, having lubricated the connecting rod and the piston pin with oil, insert it into place. Insert the second retaining ring. Although this operation seems simple, it will take some pains. We inspect the assembled structure; all retaining rings must be clearly in their grooves, otherwise a ring that has jumped out while the engine is running can cause a lot of trouble.
After assembly, you need to break off the connecting rod bearing cap, since the connecting rod is made in one piece. It's like that on our cars. First, unscrew the bolts. We insert the connecting rod into the cleats at the level of the mark shown in the figure with the black arrow and lightly clamp it, then break it off with a slight movement of the hand. The first time is very scary. We put the cover in place and tighten the bolts so as not to mix it up in the future.
Checking the thermal gap in the piston rings
We lay out each set of rings for each cylinder.
In the future we will not change their places.
In turn, we insert each ring into its own cylinder and push it a little with the piston approximately to the middle.
We measure the gap with feeler gauges.
Nominal clearance: 0.25 - 0.45 mm.
The maximum clearance for all is 1 mm. But this already smacks of waste.
Installing new rings
First, install the oil scraper ring expansion spring, then the ring itself. The oil scraper ring lock should face the opposite direction of the spring lock. Then we install the lower compression ring and finally the upper compression ring.
The inscription “TOP” must be stamped on the rings; it must face up.
The rings in the piston grooves must rotate easily.