Main types of faults
The fan is necessary to cool the radiator at times when there is no oncoming air flow, that is, during slow movement or parking. With its help, a warm air flow from the radiator flows to the engine, which is important during winter warm-up.
There are several options for incorrect operation of the VAZ-2107 electric fan:
- The device does not start under any conditions. In this case, the engine overheats. With this malfunction, it is important to look at the arrow indicating the temperature. If it reaches the red zone and the fan motor does not turn on, then the fault must be found in the power circuit or in the device itself. Most often the fan does not turn on due to:
- wear of brushes, commutator or armature winding of the electric motor;
- electrical circuit break;
- sensor malfunction;
- fuse blown;
- relay failure.
- Full time job. With this failure, the fan does not stop and spins up at any temperature. The following may cause a malfunction:
- sensor failure;
- stuck relay;
- short circuit of the power supply.
- Untimely switching on. This problem occurs when the temperature sensor readings are faulty. It transmits incorrect information to the relay, so it does not activate the device in time.
- Extraneous noise during operation. In the interior of the VAZ-2107, the moment the fan turns on is clearly audible. If this noise is accompanied by a creaking, hum or whistle, then you need to check the bearing or support sleeve of the cover. The appearance of a crackling or knocking sound is characteristic of contact of the impeller with the inner edge of the electric motor frame; this happens when the blades are deformed or misaligned.
If the fan is said to be not working, then most likely it does not start or does not work in a timely manner. Let's look at how to check the devices responsible for running it.
How to check a fuse
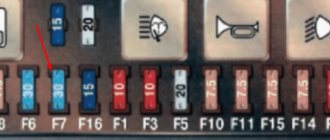
In the mounting block of the engine compartment there is a fuse responsible for the operation of the fan. Its designation on the power supply diagram is F-7, nominal value is 16A. Checking and replacing the fuse is carried out according to the instructions:
- Remove the negative terminal from the battery. Remove the mounting block cover.
- Pull the F-7 fuse out of its seat. Using a multitester, check it by connecting the probes to the contacts.
- If the device is blown, buy a new fuse and replace it with a new one.
This is the simplest repair option, which is carried out when the cooling fan does not work.
Fuel temperature sensor
A malfunction is usually indicated by a warning lamp on the dashboard with the inscription “Check engine”. Temperature sensor:
Note: The information coming from the thermistor is used by the PCM for diagnostic purposes. Failure of the sensor leads to the recording of a corresponding malfunction code in the OBD system memory. Performing the procedure described below will result in a fault code being stored in the OBD permanent memory, which will be illuminated by the “Check Engine” warning lamp on the instrument panel. Once you have completed the check and related repairs, clear the system memory.
Checking and replacing the electric motor
A more complex option is to check and replace the electric motor. It is performed according to the instructions:
- Disconnect the fan power plug. Connect two wires to the fan connector, of such length that they can be brought to the battery terminals. After connecting to the plug, connect the wires to the battery and watch the fan react. No response means it needs to be replaced.
- If it works, then you need to check whether voltage is supplied. To do this, you need to place the voltmeter probes on the contacts of the second half of the plug. After this, start the engine. If you have a carburetor engine, then you need to additionally close the contacts of the temperature sensor using a screwdriver. Look at the voltmeter readings, the voltage should be from 11.7 to 14.5 V. If you have an injector, then you need to wait until the temperature reaches +85...+95 °C. After this, the on-board computer will send a signal to the relay to turn on the fan. As soon as this happens, look at the readings on the device, they should be within the same limits. Insufficient voltage or its absence indicates problems in the power circuit.
- After checking, when you realize that the fan does not start due to the motor, it is necessary to replace it. To do this, use socket wrenches to remove the two fasteners of the fan casing to the generator.
- Pull the casing towards you and release the wires from the retainer. To do this, use pliers to squeeze the fastening petals and then push them out.
- Remove the fan. While holding the impeller, unscrew the central nut securing it with a 13mm wrench.
- Remove the impeller from the shaft. Unscrew the electric motor mountings with a 10mm wrench.
- Remove the electric motor and replace it with a new one. After this, you need to reassemble the structure.
Temperature sensors rarely fail, so we will not dwell in detail on checking and replacing them. Most often the problem lies in the electric motor or power circuit.
Source
Everything about the cooling radiator fan on the VAZ 2107
The design of the VAZ 2107 car provides a cooling system, which is based on such an important element as a fan. The main purpose of the VAZ 2107 radiator fan is to provide cooling of the radiator with coolant due to airflow. The element in question plays an important role on which the efficiency of a car engine depends. If the device malfunctions, the operation of the car cannot continue, since the result of such a breakdown is overheating and jamming of the engine.
Designs and principles of operation of sensors
Over the years, various models of fan switching sensors were installed on VAZ 2107 cars. At first these were electromechanical sensors, then they were replaced by electronics. Let's take a closer look at each device.
Electromechanical sensor VAZ 2107
Inside the electromechanical sensor there is a small container with ceresite mixed with copper powder. Above this substance there is a flexible membrane with a pusher attached to it. And the pusher, in turn, is connected to the moving contact. This entire structure is housed in a steel case with thick walls (which are necessary to ensure more uniform heating of the sensor). On the outside of the housing there are threads and a pair of electrical contacts.
The operation of the VAZ 2107 electromechanical sensor is based on the expansion of ceresite under the influence of high temperature
The sensor operates on a simple principle: the volume of ceresite changes with increasing temperature. Ceresite, heating up under the influence of almost boiling antifreeze, expands and raises the membrane, which sets the pusher in motion. It reaches the moving contact and closes it, which causes the fan to turn on. When the temperature of the antifreeze drops due to additional airflow, the ceresite cools down, the membrane goes down, the contact opens and the fan turns off.
Mechanical forced radiator cooling
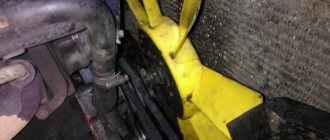
Owners of some of the first sevens know how the mechanical cooling fan system works. The impeller of the device is driven by the rotating crankshaft rotor. The elements are connected using a belt drive, and the operation of the radiator cooling fan begins immediately after the engine starts.
This method of fan operation is called mechanical, and its main advantage is reliability. When the engine starts, the impeller of the device begins to rotate, thereby providing airflow to the radiator. Such a system is simple and therefore practically does not require repairs. The main disadvantage of this mechanism is that the rotation speed of the impeller directly depends on the engine speed. At idle, the impeller rotates at a lower speed than when moving at high speed.
If in the summer, when starting a VAZ 2107 with such an engine, the rotation of the fan does not negatively affect the warming up of the engine, then in winter it is the opposite. When starting the engine in winter, it is necessary to quickly warm up the engine, and the constant rotation of the fan complicates this task, even despite the cooling system, which consists of two fluid circulation circles - small and large.
The disadvantage of prolonged warm-up of the engine is eliminated by using a thermostat, which controls the circulation of coolant in a large and small circle. When the operating temperature is reached, when the engine warms up, the thermostat opens the valve and the liquid circulates in a large circle, that is, through the cooling radiator.
In winter, when the car is moving at high speed, the fan cools the liquid too quickly, so you will notice that on such sevens the temperature gauge needle often does not reach the operating value. This is why many car owners place cardboard or cloth on the radiator grille to prevent the flow of cold air.
Electric cooling fan operation
The design of the “classic” cooling system does not provide for constant fan operation. It should turn on only after reaching a certain coolant temperature, we discussed this in more detail in this article. VAZ fan switch sensor 2107
the injector is installed in the radiator. Therefore, the fan turns on after the radiator itself can no longer cope with the cooling task. This is implemented as follows:
- After heating the antifreeze in the “small circle” of cooling, the thermostat opens.
- The coolant circulates in a “large circle” through the radiator, which ensures effective heat exchange with the environment.
- If the radiator does not “cope” with cooling, the contacts of the fan sensor close and it begins to intensively drive air flow through the radiator, increasing heat transfer.
If the sensor fails, the fan turns on when it overheats and the coolant may boil.
Method one - forced mechanical cooling
Perhaps you can call it that. Remember the first VAZ 2101-2107 cars, which did not use electric fans. In them, the radiator was blown through an impeller screwed to the pump rotor. The exact same fan can be installed on a VAZ 2107 injector. The design of the cooling system is not much different.
But we must immediately mention some of the features of this design. The fact is that even in winter the radiator will be blown by air flow. This reduces the engine temperature, so the cabin can be quite cool. It’s good in the summer - the engine is always cooled, the fan is constantly running, the antifreeze does not boil.
But make two more small improvements and summer operation will be just a fairy tale:
- Place a plastic diffuser that will direct the air beam into the radiator honeycombs.
- The upper part of the radiator needs to be installed a little closer to the impeller blades. Fasteners should be made using small strips of hard metal. Try to ensure that the distance from the surface of the radiator to the impeller is in the range of 2-4 cm.
These are the little tricks that will help you improve the cooling of the VAZ 2107 engine. The price of the issue is literally meager - no more than 80 rubles (that’s how much the impeller costs).
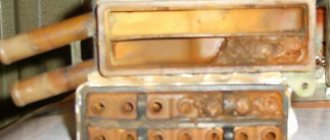
Fuse box in the passenger compartment
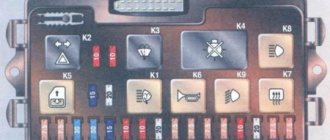
Despite the lack of differences between the mounting blocks of the “sevens” with carburetor and injection engines, the latter are equipped with an additional block, which is installed in the cabin under the glove compartment. The block consists of blocks with relays and fuses:
Fuses are designed to protect:
How to remove the power supply
To replace the switching devices and fuses of the power unit control system, it is necessary to remove the bracket on which they are mounted. To do this, perform the following steps:
Since the additional block does not have any printed circuit board, there is nothing to restore in it, except for replacing the elements installed in it.
Having familiarized yourself with the purpose of the fuse box on the VAZ 2107 and step-by-step instructions for its dismantling and repair, finding and fixing the fault will not pose any particular problems even for novice car owners. It is important to monitor the condition of the fuses and promptly replace failed elements with parts of the same rating, which will eliminate the need for more serious repairs.
Source
Cooling fan VAZ 2107
In the power plants of the first "sevens" the radiator fan was installed directly on the water pump shaft. Like the pump, it was driven by a belt drive from the crankshaft pulley. This design was also used on other cars at that time. It almost never failed, and it was impossible to overheat the engine with it. However, she had one drawback. The constantly cooled power unit warmed up very slowly. That is why AvtoVAZ designers changed the principle of forced airflow, replacing the mechanical fan with an electric one, and with automatic activation.
Early modifications of the VAZ 2107 had a mechanically driven fan
Why do you need an electric fan?
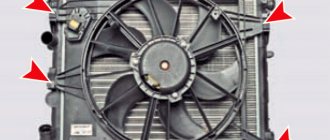
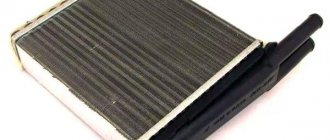
The fan is designed for forced airflow of the cooling radiator. During operation of the power plant, liquid coolant enters the radiator through the opened thermostat. Passing through its tubes equipped with thin plates (lamellas), the refrigerant cools due to the heat exchange process.
Later modifications of the Sevens were equipped with electric cooling fans
When a car moves at speed, heat transfer is facilitated by the oncoming air flow, but if the car sits for a long time or drives slowly, the coolant does not have time to cool. At such moments, it is the electric fan that saves the engine from overheating.
Device design
The radiator fan consists of three main elements:
- DC motor;
- impellers;
- framework. The fan consists of an electric motor, impeller and frame
The electric motor rotor is equipped with a plastic impeller. It is she who, rotating, creates a directed air flow. The engine of the device is installed in a metal frame, with which it is attached to the radiator housing.
Where is the fan switch located?
For all outdated modifications of the “classic”, the sensor is located on the cooling radiator housing. Bottom right to be precise. From the outside, it looks like a brass nut “30” with two contacts out. Raise the hood and look at the back of the radiator. you will definitely see him. The principle of operation of the sensor is very simple. The thermocouple reacts to an increase in temperature, closes the contact, and voltage is supplied to the fan. For vehicles with controlled fuel injection, the fan is turned on by a command from the electronic unit based on data received from the sensor. In other words, the ECU itself controls all processes. But where is the fan switching sensor located on injection-powered “sevens”?
READ G-Class 4x4 squared 2022 looks like an elephant on roller skates at the Nurburgring
Method two - electric
If you have a new car, an injector and an electric fan are installed, is it worth spoiling it with a forced impeller? It would be somewhat more reasonable to leave the electric fan, but make a backup way to turn it on using a button. Purchase several items and materials from the store:
- New sensor (if the old one has become unusable).
- Electromagnetic relay with normally open contacts.
- Red wire with a cross section of 0.75 square meters. mm.
- A button for installation in the dashboard of a VAZ 2107 (preferably backlit).
- Heat shrink insulation.
- Female connectors and relay socket.
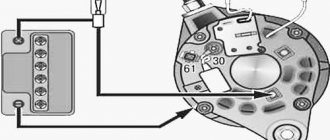
The connection diagram is shown in the photo. First of all, turn off the fan and change the sensor for turning it on. Then you assemble the circuit.
Please note that newer vehicles use sensors that can handle very high currents. But despite this, they still burn out. Sudden loads still quickly damage it. What to do? There is only one way out - to reduce the current at the sensor terminals. To do this, introduce an electromagnetic relay into the circuit. Now the chance of sensor failure is reduced. But the chance of relay failure becomes higher. True, it will be easier to change it.
Install a button to force the fan on in the dashboard and stretch two wires from it - one can be connected directly to ground, and the second to the sensor output. It turns out that your button and sensor contacts are connected in parallel. Therefore, if the sensor fails, you can turn on the electromagnetic relay with a button.
Diagnostics and repair
It is recommended to check the fan and elements of its electrical circuit in the following order:
- Fuse.
- Relay.
- Electric motor.
- Temperature sensor.
Checking the functionality of the fuse
The fuse is usually checked first, as this process is the simplest and does not take much time. To carry it out, you only need an autotester or a test lamp. The essence of the diagnosis is to determine whether it passes electric current.
The fan circuit fuse is installed in the vehicle's mounting block, which is located in the engine compartment. In the diagram it is designated as F-7 with a rating of 16 A. To check and replace it, you must perform the following work:
Relay diagnostics
As we have already said, in the injection “sevens” a relay is provided to unload the electrical circuit of the radiator fan. It is installed in an additional mounting block located under the glove box in the car interior, and is designated R-3.
Checking the relay yourself is quite problematic. It is much easier to take a new device and install it in place of the one being diagnosed. If the electric fan turns on when the refrigerant is heated to the desired temperature, then that was the problem.
Checking and replacing the electric motor
- voltmeter or multifunction autotester;
- two pieces of wire;
- socket wrenches “8”, “10” and “13”;
- pliers.
The work order is as follows:
- Disconnect the fan power connector.
- To the contacts of the half of the connector that comes from the electric motor, we connect two wires, the length of which should be enough to connect them to the battery terminals.
- We connect the ends of the wires to the battery terminals. If the fan does not turn on, you can prepare to replace it.
- If it works properly, it is worth checking whether voltage is supplied to it.
- We connect the voltmeter probes to the contacts of the other half of the connector (to which voltage is supplied).
- We start the engine, use a screwdriver to close the sensor contacts (for carburetor cars) and look at the device readings. The voltage at the contacts should be equal to what the generator produces (11.7–14.5 V). For injection machines, there is no need to short-circuit anything. It is necessary to wait until the engine temperature reaches the value at which the electronic control unit sends a signal to the relay (85–95 OS), and read the instrument readings. If there is no voltage or it does not correspond to the set values (for both types of engines), the cause should be sought in the device circuit.
- If a malfunction of the electric motor is detected, use an “8” socket wrench to unscrew the 2 bolts securing the fan casing to the radiator (left and right).
- Carefully pull the casing towards you, while simultaneously releasing the sensor wires from the retainer.
- Using pliers, we compress the tabs that secure the wire sheath. We push the clamps out of the casing.
- We dismantle the fan assembly.
- Holding the impeller blades with your hand, unscrew the nut securing it using a socket wrench set to “13”.
- Disconnect the impeller from the shaft.
- Using a “10” wrench, unscrew all three nuts that secure the electric motor housing to the frame.
- We remove the faulty electric motor.
- We install a new device in its place. We reassemble in reverse order.
Diagnostics and replacement of temperature sensor
Temperature sensors for carburetor and injection "sevens" differ not only in design, but also in their operating principle. For the former, the sensor simply closes and opens the contacts, while for the latter, it changes the value of its electrical resistance. Let's consider both options.
Carburetor engine
Tools and tools you will need:
- open-end wrench at “30”;
- socket wrench or socket to “13”;
- ohmmeter or autotester;
- liquid thermometer with a measuring range of up to 100 °C;
- a clean container for collecting refrigerant;
- container with water;
- gas (electric) stove or household boiler;
- dry clean rag.
The check and replacement algorithm is as follows:
- We place the container under the plug on the cylinder block of the power plant.
- Unscrew the plug and drain the refrigerant.
- Disconnect the connector from the sensor contacts.
- Using a key set to “30”, unscrew the sensor.
- We connect the ohmmeter probes to the sensor contacts. The resistance between them in a working device should tend to infinity. This means that the contacts are open.
- Place the sensor with its threaded part in a container of water. We do not turn off the probes of the device. Heat the water in the container using a stove or boiler.
- We observe the thermometer readings. When the water reaches a temperature of 85–95 °C, the sensor contacts should close and the ohmmeter should show zero resistance. If this does not happen, we change the sensor by screwing a new device in place of the old one.
Video: how to prevent engine overheating with a faulty sensor
Injection engine
The injection “seven” has two temperature sensors. One of them works in tandem with a device that shows the coolant temperature to the driver, the other with the ECU. We need exactly the second sensor. As already mentioned, it is installed on the pipe next to the thermostat. To check and replace it we will need:
- autotester or multimeter with the ability to measure voltage and resistance;
- open-end or ring wrench set to “19”;
- liquid thermometer with temperature measurement amplitude up to 100 °C;
- heat-resistant container with water;
- boiler or stove (for heating a container of water);
- clean dry cloth.
The process of replacing a sensor on a carburetor engine
This is where the process may seem more complicated. After all, considering that the sensor
located at the bottom, you will have to drain the coolant. And to do this you need to look for an inspection hole, remove the engine protection, etc. But you don’t have to do this. You just need to quickly screw the new sensor in place of the old one. Naturally, some coolant will spill out, but its amount will be limited to 20-30 ml. In addition, you can always place a properly cut plastic bottle under the connection point.
So, prepare a new sensor and a “30” wrench. Disconnect the wires from the device. Carefully unscrew the sensor using the key. Continue unscrewing it by hand, pressing it against the radiator body. When the sensor comes off the thread, you can pinch the hole with your finger and start screwing in the new element with your other hand. Do not manage to lose the O-ring that is placed on the threaded part of the device. That, in fact, is the whole process. All that remains is to connect the wires to it, start the power unit and check if everything works.
Method three - perfect fans
To improve the cooling of the VAZ 2107, you can use more modern ones instead of a standard electric fan. Those that are installed on cars of the Kalina and Priora models are perfect. An electric fan with eight blades will work especially well. The air flow from it will be much stronger, therefore, the radiator honeycombs will cool down faster.
Today we’ll talk about the reasons why the VAZ 2107 fan (injector and carburetor) does not turn on. A little earlier, we figured out how to improve the engine cooling system. The whole procedure is simple and does not require much knowledge. But an equally pressing problem is that the fan refuses to turn on in a timely manner. Let's try to find out why this happens.
Carburetor sevens
In these cars, the control system for turning on the electric fan is very simple. It can even be called analog. The entire circuit consists of the simplest form of the following elements:
- Electric fan motor.
- Power sensor.
- Wiring.
That's it, there is nothing else, you need to look for breakdowns only in these parts of the structure. In 70% of cases the sensor fails, in 5% the electric fan fails, in 20% the electrical wiring is to blame.
To diagnose a car, I recommend using a fairly cheap solution: install it once and use it always.
But some cars use a slightly more advanced circuit, which includes an electromagnetic relay. With its help, it is possible to remove high currents from the sensor. This increases the resource of the device.
Some drivers who are not used to trusting automation install a regular button parallel to the sensor (and sometimes instead of it). Such a scheme has a right to exist, but the driver himself must be extremely careful in order to notice the temperature rise in time and turn on the electric fan.
Injection engines
Here everything is somewhat more complicated, since the following devices are responsible for the operation of the radiator electric motor:
- Electronic control unit.
- Coolant temperature sensor.
- Electromagnetic relay.
The reason why the electric fan may not work (or often turn on too much) lies in one of these components. Of course, the engine starts too often if the radiator honeycombs, either inside or outside, are very dirty, or if there are air pockets. But it does not turn on due to a breakdown in the control system.
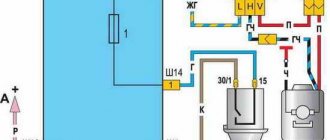
So, you need to find a temperature sensor for diagnostics. It is located in one of the pipes of the VAZ 2107 engine cooling system. If you look at the engine from above, you will find it under the pipe that connects the fuel rail to the throttle valve. To check it, you need to disconnect the terminal and measure the resistance between the central terminal and ground. At a temperature of 20 degrees, the resistance should be about 3.5 kOhm. If the temperature is close to 90 degrees, then the resistance will be about 0.25 kOhm.
If there is no resistance, or it differs significantly from the values given above, then there is clearly a malfunction of the sensor and it cannot be repaired. The price of a new one will be approximately 100-200 rubles (depending on the seller’s appetite). But if the sensor is working, but the electric fan does not work, then you need to check its electric motor and switching relay. If no problems are found, diagnose the electrical wiring.
Replacing fog lamp fuses
The VAZ 2107 has another fuse, which is responsible for the operation of the fog lights. Many “Seven” car owners often cannot find this device. It is located directly under the console central panel. There is a button for turning on the fog lights, next to which the fuse is located. To replace it, you will need to remove the panel. This unit is located in a round oblong contact box. To replace it, you need to remove it and replace it with a new one.
In order to check or replace fusible safety lights, it is necessary to perform the following sequence of operations:
Troubleshooting algorithm
If the electric cooling fan does not work on your VAZ 2107 (carburetor), you need to do the following:
- Turn off the engine and turn on the ignition.
- Use a flat-head screwdriver to short-circuit the terminals of the fan switch sensor. Please note that all control is based on mass. If the fan turns on, the sensor is faulty. If it doesn’t work, then the reason lies deeper.
- Disconnect the block from the electric fan and supply power from the battery directly. A rotating rotor indicates that the engine is running. If the electric fan does not work even this way, you will have to think about replacing it.
- If the fan and sensor are working properly, you need to check the electromagnetic relay (if present in the circuit).
- The wires are checked last. Oxidation very often occurs at the joints with the car body. And sometimes a banal break even happens.
The same algorithm can partly be applied to cars on which an injector is installed.
But in order to compare and appreciate the difference, it is worth considering such machines.