ADJUSTING THERMAL CLEARANCES IN THE VALVE MECHANISM OF THE LADA KALINA ENGINE
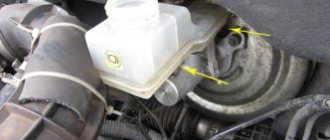
We measure and adjust the gaps on a cold engine. Remove the engine screen. Disconnect the throttle drive cable from the throttle assembly sector (see “Replacing the throttle drive cable,” page 99). Having unscrewed the three fastening nuts, remove the throttle valve drive cable bracket and move the bracket with the cable to the side (see “Removing the receiver”, p. 93).
Remove the cylinder head cover.
Remove the front timing belt cover (see “Checking the condition and replacing the timing belt,” p. 29).
The procedure for checking and adjusting the clearances in the valve drive mechanism is as follows.
We turn the crankshaft by the bolt securing the generator drive pulley clockwise until the installation marks on the camshaft pulley and the rear timing belt cover are aligned (see “Checking the condition and replacing the timing belt,” page 29).
Then turn the crankshaft clockwise another 40-50° (2.5-3 teeth on the camshaft pulley).
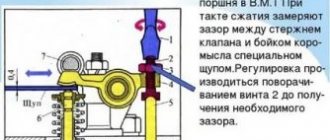
In this position of the shafts, we check the gaps at the first one with a set of feeler gauges.
. and install a clamp between the edge of the pusher and the camshaft that holds the pusher in the lower position.
Fixing valve tappets when replacing the adjusting washer: 1 - phycoetor; 2 — adjusting sheibe
Move the lever of the device to the upper position.
Use tweezers to pry the adjusting washer through the slot and remove it.
If you do not have a device for adjusting the valves, you can use two screwdrivers. Using a powerful screwdriver, leaning on the cam, press the pusher down. By inserting the edge of another screwdriver (with a blade width of at least 10 mm) between the edge of the pusher and the camshaft, fix the pusher and remove the adjusting washer with tweezers.
We adjust the gap by selecting an adjusting washer with the required thickness.
To do this, use a micrometer to measure the thickness of the removed washer.
The thickness of the new adjusting washer is determined by the formula:
where “A” is the measured gap;
“B” is the thickness of the removed washer; “C” - nominal gap;
“H” is the thickness of the new washer. The thickness of the new washer is marked on its surface with an electrograph. We install the new washer in the pusher with the marking down and remove the lock.
Check the gap again. When adjusted correctly, a 0.20 or 0.35 mm feeler gauge should fit into the gap with slight pinching.
Consistently turning the crankshaft half a turn, we check and, if necessary, adjust the clearances of other valves in the sequence indicated in the table. We assemble the engine in the reverse order. Before installing the cylinder head cover.
. We replace its sealing gasket with a new one.
Video on the topic “Lada Kalina. ADJUSTING THERMAL CLEARANCES IN THE ENGINE VALVE MECHANISM”
Valve adjustment on VAZ 2110, 2114, Kalina, Granta, 2109, 2108 Valve adjustment on 8 valve VAZ engines
Source
Gap adjustment
Work is carried out only on a cold engine.
Remove the valve cover by unscrewing the bolts securing it. Remove the timing belt cover. Remove the spark plugs to make it easier to turn the engine.
Remove oil from the head. It is better to do this with a syringe so that no debris gets on the head.
We inspect the camshaft cams. They should not be heavily worn out or damaged in any way.
Install the pusher tool onto the valve cover studs, tightening it with the nuts from the cover.
Using a wrench, turn the crankshaft clockwise until the marks located on the pulley and the timing belt cover match. After the marks match, turn the shaft approximately 3 more teeth of the camshaft pulley. At this moment, the piston in the first cylinder should be at TDC (top dead center).
Using feeler gauges 0.2 and 0.35, check the clearances of the first and third shaft cams. If the probes pass freely, then it is necessary to replace the washers (In order to remove the washers from the pushers, grooves are provided on the upper edges). To do this, turn the pushers with the groove towards you. Using the tool, press the valve down, holding the pusher with a screwdriver inserted into the groove so that it does not rotate.
Fix the pusher in the lower position. Using tweezers, pull out the washer. We select and insert a new one of the appropriate size, with the markings facing the pusher. The dimensions are written on the washer itself. We remove the latch. Check the gaps again.
We adjust valves on Lada Kalina 8 valves with our own hands
The issue with adjusting thermal clearances is a classic one: everyone should be able to change the washers on the pushrods of an 8-valve valve. But there is “bad advice” that applies to the VAZ-21116 engine: they say that for exhaust valves it is better to make the gap equal to 0.40, and let the tolerance be 0.05 mm. In fact, the requirements have not changed since the 11183 engine: the average numbers should be 0.20 and 0.35. Following “bad advice”, you get one thing - the engine “knocks” when cold. And this is for a value of 0.40! You still need to be able to set it, but it may turn out to be 0.45... And then our adjustment will kill 4 of the 8 valves on the Lada Kalina. We are talking about the Kalina 2 family, where the only 8-valve engine was the 21116 engine.
The following is a video where valve knocking is recorded.
Adjusting valves VAZ 2109, 2114 8 valves: clearances, order
Many myths and legends have developed around such a necessary procedure as adjusting the valves on the VAZ 2109, 2114 and 2108. At first, carburetor ones then became injection ones, but the design of the gas distribution mechanism did not change. Until the 2011 release, even the thermal gaps remained the same. Only with the advent of the light ShPG did the gaps become a little larger. The seats are metal-ceramic, and the pistons are light. The frequency of valve adjustment remains the same at 30,000 km.
On a new car, it is necessary to adjust the valves in the first 3,000 km, then at 15,000 and every 30,000 km. If you do not adhere to periodicity, the valves may burn out and the seats in the head may sag. In addition, traction is lost and fuel consumption increases. Thermal clearances on vases 2108, 21083, 2109, 21099, 2110, 21102, 2111, 21114, 2112, 2113, 2114, 2115, 1113, 11113, 2170, 2190, Priora, Granta (with engine 1118 3), should be like this:
- Graduation 0.35;
- Inlet 0.20 mm.
All steps for adjusting valves inside and out
First, taking a Phillips screwdriver, loosen the clamps on the three supply hoses. These hoses are connected to the cylinder head cover. Each clamp is clamped with a Phillips screw (see photo).
We remove everything unnecessary
After disconnecting all the hoses, you can remove the receiver mounting bracket. You will need a 10mm socket wrench to unscrew the three nuts.
The second extra part is the bracket
If even the studs are turned out, it doesn’t matter, they can be screwed back in. Use the same “10” wrench to unscrew the nuts on the cover.
The pushers are already visible!
There are washers under the nuts, which are important not to lose.
On any car, including the Lada Kalina, valve adjustment is carried out as follows: rotate the crankshaft pulley, moving the camshaft to the desired position. The camshaft pulley needs to be opened - to do this, the casing is removed.
Preparing for the test
Use a 6mm hex key to unscrew the fasteners of the top cover. The number of screws here is four.
Upper casing covering the timing belt
When the cover is removed, perform the main action:
Camshaft pulley, marks
Check the gaps, replace the washers
Now on the Lada Kalina we regulate not 8 valves, but two. The gap between the washer and the pusher is measured with feeler gauges (photo 1). For the intake valve the numbers should be 0.20 mm, for the exhaust valve - 0.35 mm. The tolerance is 0.05 mm.
Measuring and preparing for replacement
If the gap does not meet the required one, a special device is screwed to the studs (photo 2). Then do this:
Adjusting the valve clearances of the Lada Kalina car engine
Applies to engines without hydraulic compensators.
To compensate for thermal expansion of the valve stem, clearance is required between the camshaft cam and the valve tappet.
For intake valves, the clearance should be 0.15-0.25 mm, and for exhaust valves - 0.30-0.40 mm.
The gap is set by selecting the thickness of the adjusting washers. The washers are installed in a niche located on the top of the pushers.
To make it more convenient to remove the washers, grooves are made on the upper edges of the pushers.
We measure and adjust the gaps on a cold engine.
Remove the engine screen.
Disconnect the throttle drive cable from the throttle assembly sector (see “Replacing the throttle drive cable”).
Having unscrewed the three fastening nuts, remove the throttle valve drive cable bracket and move the bracket with the cable to the side.
Use a Phillips screwdriver to loosen the clamp on the lower crankcase ventilation hose and remove the hose from the cylinder head cover pipe.
Use a Phillips screwdriver to loosen the clamp on the crankcase ventilation hose (main circuit), and remove the hose from the cylinder head cover pipe.
Using a Phillips screwdriver, loosen the clamp on the crankcase ventilation hose (idle circuit) and disconnect the hose from the cylinder head cover pipe.
Using a 10mm wrench, unscrew the two nuts securing the cylinder head cover and remove the washers
Remove two rubber bushings
Removing the cylinder head cover
Counting from the camshaft drive, the first, fourth, fifth and eighth valves are exhaust valves; the second, third, sixth and seventh are inlet.
The procedure for checking and adjusting the clearances in the valve drive mechanism is as follows.
Source
Adjusting valves on VAZ 2108, VAZ 2109, VAZ 21099
Welcome! There must be a valve clearance, but it must be minimal, otherwise, if there is no clearance, the valves will not be able to close reliably. In this case, depressurization will occur in the cylinders and the power will noticeably drop, and the exhaust valves will begin to burn out.
On the other hand, the gap is increased - the valves will not be able to open completely while the engine is running, thereby the power will again drop, because the engine will not be able to supply the fuel-air mixture, because the valves do not open completely.
Moreover, the valves can rattle when there is a large gap, and after adjusting them, when you start the engine, you will immediately feel how it will run quieter and in the future you will understand when it is time to adjust the valves on the car.
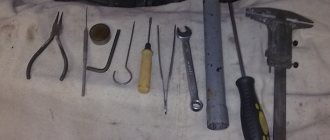
Note! You will need the following tools: tweezers, a screwdriver, a set of all kinds of wrenches (spanners, sockets, etc.), a set of probes (purchased at a car dealership or car market) and a micrometer.
Valves location
You won’t be able to see them that easily, you’ll have to remove the cylinder head from the car, after removal the camshaft and its cams will appear in front of you, under the camshaft cams there are eight valves (or rather their shims, and under them there are pushers, and under the pushers the valves themselves ), which you need to adjust. The shaft cams and valve washers, through which the clearance is adjusted, are indicated by arrows. Under each arrow there is a number indicating the valve number; you will use these numbers to adjust them, so do not forget about this photo as you read the article.
When to adjust valves?
Their gap increases as you drive the car, for example, a hard driving style will require adjustment after 30 thousand, a quiet ride - after 40 thousand you will need to think about adjustment. It is imperative to make adjustments if you buy a used car (few people adjust the valves before selling), especially if you hear the loud sound of the engine running (the valves are knocking). In general, the easiest way to understand whether valves need to be adjusted is to check their clearance: just remove the cylinder head cover from the car engine and use a set of feeler gauges to check the clearance of all valves on the car.
We adjust valves on VAZ 2108-VAZ 21099
Note! The adjustment is made on a warm car engine (+20 °C and above), in winter during cold weather, be sure to warm up the engine first and quickly, before it has completely cooled down, adjust the valves. There is a caveat, you will have to initially stock up on shims, because you don’t know what sizes of washers exactly are needed.
The washers are first removed and looked at in size and new ones are selected. You will need a second car (for example, a taxi, a friend) to get to the auto shop and buy new washers. Accordingly, we do not recommend this method of adjustment; it is better to find a warm place, the car will stand, heat up, and at the same time the engine will become room temperature, acceptable for adjustment.
1) Remove the cylinder head cover from the car engine, first stock up on the cover gasket: the old one always shrinks and deteriorates (cracks, deforms) over time. For a detailed description of the process, read the article: “Replacing the cylinder head cover gasket on a car.”
2) Now remove two side bolts and 1 central bolt using wrenches or a socket wrench (shown in the photo below). Remove the plastic cover and set it aside. Align the two marks with each other, namely the camshaft pulley mark (indicated by a blue arrow) and the mark on the rear cover (indicated by a green arrow). There are many ways to connect tags, we recommend using the following:
- hang out the front wheel (any);
- engage fourth gear;
- Turn the wheel forward in the direction of travel of the car until the marks connect.
Alternative method:
- engage 4th gear;
- Using your own efforts, slowly move the car until the marks align.
Third option: take a hefty wrench in your hands (a wrench with a large socket head is most convenient) and turn the crankshaft pulley mounting bolt clockwise. This bolt is located quite low and in the second photo after the bottom one it is indicated by a yellow arrow.
Note! It is possible to turn the crankshaft only by turning the crankshaft pulley (number 3) and the generator pulley (number 2). It is forbidden to turn the crankshaft by rotating the camshaft pulley (number 1). Turning out the four spark plugs will help make rotation easier; for more details, see the article: “Replacing spark plugs on a car”!
3) Then use a clean cloth to wipe the cylinder head, especially the location of the valve tappets, to remove any remaining oil. Now turn the crankshaft another 40-50° (not to be confused with the camshaft) - the same gap will appear at the camshaft cams and pushers. We check the gap at the first, second, third and fifth valves (diagram with numbers above), for exhaust valves it should be equal to (0.35+0.05) mm.
Graduation - first, fourth, fifth and eighth, be sure to remember. For intake (0.2+0.05) mm - second, third, sixth and seventh. The gaps are checked using special probes. Insert one at a time of varying thicknesses between the camshaft lobe indicated by the red arrow and the shim indicated by the blue arrow).
Rotate the crankshaft exactly 360° (full rotation) and check and, if necessary, adjust the clearances of the fourth, sixth, seventh and eighth valves in the same way.
Note! The bottom photo shows the adjustment washer. Take a closer look at the place indicated by the arrow and you will see an inscription with information about the thickness of this washer (3.82 on the presented example). The thickness is measured with a micrometer (the values are not always written correctly on the washers, and sometimes they are completely erased). Having measured, you got a value, for example, 3.90. Remember the valve clearance from which you removed this washer (0.50 for example) and add it to the thickness (3.9+0.5 = 4.4). From the obtained value we subtract the permissible gap, the standards were described above). Using the intake valve as an example: 4.4 – 0.2 = 4.2 (mm) – the value of the new washer.
How often do valves on a viburnum be adjusted?
For a long time now, readers have been asking for a detailed article on adjusting valves on Kalina with an 8-valve engine. Yesterday I decided to do this procedure on my car, although there was no reason for this, the engine ran quietly and there were no knocks in the valve cover area.
Below I will give a detailed list of the necessary tools and devices for carrying out this maintenance of the Lada Kalina.
Below we will discuss the detailed procedure of work, with a description and photographs.
The procedure for adjusting valves on a Lada Kalina engine with eight valves
The required gap between the shims and the camshaft should be 0.15-0.25mm for the intake group and 0.30-0.40mm for the exhaust group. Valve counting starts from the camshaft pulley.
First we adjust the pair: the first exhaust – the third inlet.
Then the fifth graduation - the second intake.
Then the eighth graduation - the sixth intake.
Latest: fourth graduation – seventh induction.
After adjustment, pour oil into the cylinder head and install a new gasket, replace the valve cover and timing belt cover.
Required tool:
- tweezers;
- set of probes;
- device for adjusting gaps;
- oil syringe;
As can be seen from the above, adjusting the valves of the Kalina Lada does not seem to be a difficult task. Following these instructions, any unprepared car enthusiast can perform it.
If the work is carried out correctly and the adjustment procedure is followed, the gas distribution mechanism of the car will work properly without causing any trouble.
Adjusting the thermal valve clearances on Kalina 1.6 8-cl.
Video instruction
I recently updated the article because I made a special video instruction for adjusting valves for all front-wheel drive VAZs, including Kalina. So see everything clearly below.
Well, below you can see everything in the usual format, like most of the articles on this site.
Photo report of the work
The first step is to remove the valve cover, and also align the camshaft and crankshaft of the engine according to the marks. This is written in detail in this article: Setting the timing belt by marks. When aligned, the piston of the 1st or 4th cylinder is at top dead center (TDC).
I will show the adjustment procedure in two stages, and not in four, as is written in many manuals. This method is described in the magazine “Behind the Wheel” and is also described in the official manual from the publishing house “Third Rome”. The essence of this method is not to turn the crankshaft 3 times, adjusting two valves at a time, but by turning it just once, adjusting 4 valves at once. I'll describe it in more detail as we go along.
So, we look at the camshaft cams, and those 4 of them that are currently raised up from the valve, we measure the gaps there. These will be 1,2,3 and 5 valves.
Now in more detail about the process of removing the Kalina adjusting washers. We put the bar on the valve cover studs and secure it with nuts:
After this, use the lever of the mechanism to push the desired valve down to the very end, and at this time insert the thrust lever under the camshaft so that it holds the pusher pressed:
Please note that the slot on the pusher should be in front so that it is convenient for you to pry on and remove the washer. The ideal tool for this are long-nose pliers:
Then, when you have a new washer of suitable thickness, immediately insert it into its original place:
Then use a lever to press it down so that it sits in place. And of course, before this we remove the pusher stop clamp.
Now that we have dealt with 4 valves and achieved nominal values, we proceed to adjusting the rest: 4, 6, 7 and 8 valves. To do this, turn the engine crankshaft 1 revolution (look at the mark on the flywheel), or half a revolution of the camshaft. We repeat a similar procedure at the second appointment.
I want to say that with a mileage of 50,000 km on my Kalina, nothing needed to be adjusted, since the gaps were nominal. So, once again it is better not to go there if they do not knock or are not clamped. If I missed something, I’ll add it, write! If you have any questions, ask in the comments!
How to adjust the 8 valve mechanism in the Lada Kalina model? Most owners of these practical Russian cars sooner or later ask themselves a similar question. Carrying out this procedure yourself will not only be interesting, but also useful in terms of gaining experience.
Now let's move on to a more detailed consideration of the issue outlined here: valve adjustment.
Preparing for work
Lada Kalina Station Wagon Logbook Replacing the rear wheel bearing
You will need a set of tools and accessories:
- a set of socket heads with a wrench and a ratchet;
- syringe for removing engine oil;
- figured and flat screwdrivers;
- special tool for recessing valves;
- a series of special probes;
- tweezers;
- long-nose pliers;
- adjusting washers.
The procedure is actually simple and can be done independently, without the participation of specialists. To save time or if the process seems too complicated, it is better to use the services of a car service. Such work does not cost that much: the standard figure does not exceed 800–1000 rubles, depending on the region.
Instructions for adjusting gaps
Before starting this operation, it is necessary to cool the engine. Afterwards, the bolts securing the cylinder head are unscrewed and the latter is dismantled. Further work looks like this.
- Remove the casing that covers the timing gear drive.
- Unscrew the spark plugs (this will make it easier to rotate the engine crankshaft).
- The surface under the head is cleared of oil using a syringe.
- If the camshaft has severe wear on the pusher cams, damaged and worn elements must be replaced.
- In place of the block head, a special device should be installed on the mounting studs, which will help to push the valves down.
- The pistons are set at dead center. To do this, the crankshaft is turned with a knob until the mark on the rear timing cover coincides with the mark on the pulley.
- After the marks match, the crankshaft rotates a few more teeth, and the first piston will be installed at top dead center.
- Using a feeler gauge, the gaps are measured first on the first cam, and then on the third. To do this, take a probe whose size is no more than 0.35 mm. If the dipstick passes without resistance, you should select another washer.
- Through a special groove in the upper edge, the washer is picked up and removed. In order to see the groove you need to move the pusher a little.
- Using a special device, the valve is recessed downwards; in this case, you should hold the pusher with a flat-end screwdriver, inserting it not into the groove, thus preventing its arbitrary rotation.
- After fixing the pusher with tweezers, the washer is removed and another one of suitable thickness is installed in its place. On one side of each washer there is a special marking indicating the size. The washer change is completed, the screwdriver is removed, the valve is returned to its place, and the gap is measured using a feeler gauge.
Ideal valve adjustment on Kalina involves inserting the dipstick into the gaps with little force (within reason). After this, you need to turn the engine again by one revolution of the crankshaft pulley and carry out a control measurement of the gap. Thus, all clearances are checked and adjusted, with the obligatory rotation of the crankshaft before each measurement. After the operation, you need to fill the engine oil to the required level, you will also need to replace the Kalina valve cover gasket, and then secure the valve cover and timing drive with fasteners.
The operation, if you look at it, is simple. You must strictly follow the step-by-step instructions, and even a beginner can handle this procedure.
Correct adjustment is immediately noticeable: the gas distribution mechanism works smoothly, the engine does not make noise, which means the car’s “heart health” is in order. At least for the next 50–60,000 kilometers, thermal gaps will not have a negative impact and no additional work will be required. And they will certainly be the result of incorrect or untimely adjustment.
Why is adjustment necessary?
The correct procedure depends on:
Valve adjustment in a Lada Kalina car should be carried out with a periodic mileage of 20 thousand km or a little more.
It is not recommended to neglect this procedure, since the regulatory value of the gaps at the valves of the intake and exhaust circuits changes. This circumstance provokes a loose fit of the valve discs to the seat seats, which inevitably leads to the formation of carbon deposits, incomplete combustion of fuel, damage to the discs with subsequent burnout and other troubles in the timing belt in the LADA Kalina model. As you can see, in the absence of the required clearances, there is a violation of the correct functioning of the engine as a whole, and the only harmless point here is the owner’s acoustic discomfort due to the increased noise of the timing belt.
Note that adjustment of the valve mechanism requires 8 valve engines of Lada Kalina cars.
Why adjustment is needed
A properly performed operation depends on:
- excellent operation of the gas distribution system;
- finding the gaps within normal limits;
- engine operation (it is much quieter and much easier to start, and the camshaft sensor, which controls the entire operation of the car, will show the good condition of the mechanisms);
- reduction of fuel consumption;
- better performance of the pusher and camshaft;
- no carbon deposits (the combustion chamber will remain virtually clean).
Lada Kalina valve adjustment is usually carried out after the car has traveled more than 20 thousand km. There is no point in delaying this, because when gaps appear in the valves, the settings made at the factory are violated, the cylinders are left without a sufficient amount of fuel, and if the gas is incompletely burned, it is released prematurely.
We can safely say that if the valve malfunctions, the entire operation of the car is disrupted. And if the valves burn out, the cylinder head will suffer.
Those who purchased a car like the Lada Kalina 2 know that valve adjustment after a certain mileage is necessary.
This type of machine comes with several types of engines. The first model is 8-valve, with a displacement of 1.6 liters. Valves need to be adjusted periodically. Time passed, and a car appeared with a smaller volume - 1.4 liters, but with 16 valves. Virtually no valve adjustment is required.
But the designers did not think to rest on this; as a result of their creativity, a new Kalina car engine appeared with 8 valves and a volume of 1.6 liters, but with a lightweight piston system. The most prestigious Lada Kalina 2 is a 16-valve model with a volume of 1.6 liters. Adjustment is very rarely needed, but the valves can become bent if the belt breaks.
How to adjust the valves?
The main question is how to adjust the valves. To perform this procedure, the owner will need to acquire the following set of tools, accessories and consumables:
Before the valve adjustment begins, let the engine cool down (temperature no more than 20 degrees).
The manipulation algorithm for the two remaining pairs of valves, depending on the angle of rotation of the crankshaft in the Lada Kalina car, is as follows:
To be sure that the adjustment is correct, you can re-perform the entire shaft rotation cycle with a control measurement of the gap values. Note that their value for the exhaust group of valves is 0.3 mm, and for the intake valves – 0.2 mm.
Let's sum it up
Now you know how to adjust the valves. When the mechanism in the LADA Kalina model is adjusted, we reinstall all previously dismantled parts, add oil to the engine and start it. We are pleased with the clear and quiet operation of the engine, as well as its improved throttle response.
Because You are not logged in. To come in.
Because The topic is archived.
If the top ten has the same timing system as the chisels: RV, washer, valve pusher, then the frequency of valve adjustment is determined only by mileage. During operation, the valves “press” the seats (especially the exhaust seats, which have a larger gap) and the gap between the camshaft cam and the washer decreases, so the “clamped” valves operate quieter. However, as a result, the valves either do not close tightly or do not close completely at all, and since heat from the valve is removed mainly from its head through the seat, then. Without having physical contact with it, the valve “fries” quite quickly.
Easy to do yourself. You need: 1) a device for 200-300 rubles. – I bought it near Nitel, 2) a set of probes for 50-100 rubles, a wrench for 10, 3) an ordinary medical syringe (for removing oil from oil baths - you can do without it, but it’s hard to see and you can get dirty) 4) and tweezers or long nose pliers (for picking out washers).
. Well, according to the manual, we measure the gaps, if they are gone, then we pick out and “measure” the washers, and then we go to the nearest auto store (assemble and put on the cover - 10 minutes) and buy thinner washers, install them. Business for an hour at most - longer to look for a car service.
If instead of washers there are hydraulic compensators, then you can only change them and diagnose their malfunction by sound - the faulty one typically knocks. 
Source
Valve adjustment value
If we talk about an internal combustion engine, we can briefly describe the cycles of its operation. This is intake, then compression, after which fuel combustion occurs, and stroke 4 is the release of exhaust gases. On the standard Kalina 2 engine and other VAZ cars, 4 valves are used for each cylinder. Two are responsible for exhaust and two for intake. The principle of their operation is simple: when the camshaft rotates, both intake ports open simultaneously, and after a certain time, two exhaust ports open.
Valve mechanism design
The intake stroke involves the downward movement of the piston. At the same time, the intake valves open, supplying a dose of a mixture of air and gasoline into the cylinder. At the next stage, the piston begins to rise up and the intake valves close. Thus, the compression stroke occurs. Having reached the top point of the cylinder, the piston is sharply thrown back by igniting the mixture with a spark plug. Once the piston reaches extreme bottom dead center, the exhaust valves open. When it begins to rise upward, exhaust gases are pushed out at the same time.
Accordingly, without valves, the operation of an internal combustion engine is virtually impossible. Their function directly depends on the correct rotation of the camshaft. And to be precise, the appendages on it, called pushers.
As for valves, the most important parameter of their operation is the thermal gap and the correctness of its adjustment. After all, every little detail is important for the stable functioning of the gas distribution mechanism.
Purpose of thermal gap
When this gap is properly adjusted, the tappet and camshaft lobe are pressed against each other as hard as possible to ensure perfect contact between the surfaces. It is necessary to take into account that all internal combustion engine parts are mainly made of different alloys and metals (aluminum, copper, cast iron compounds). The pushers, camshaft and valve group itself are also metal. As you know, any metal tends to increase in size when heated strongly. As a result, the gap that exists on a cold power unit differs significantly from that on a warm one. Simply put, the valves are either too tight or the surfaces are not in close contact.
Adjusting the gaps is the installation of special gaps between the valve and the piston, taking into account the expansion of metals when heated. These values are so small that microns are used to measure them. However, different values are used for exhaust and intake.
Each automaker, including AvtoVAZ, has regulations according to which the required indicators are set. This is what people call valve adjustment. The manufacturer clearly regulates the frequency of such a procedure: at least once every 50,000 km. Typically, special adjusting washers are used for these purposes, which are changed at the top of the pushers.
An increased or insufficient thermal gap has an extremely negative effect on the operation of the gas distribution mechanism. In general, the operation of the entire engine is disrupted.
Differences in load on exhaust and intake valves
Almost all elements of an internal combustion engine are subject to severe thermal loads, the valve group is no exception. The diameter of their rod does not exceed 5 mm. And when fuel burns, thermal energy is released, and the temperature in a short period of time can reach 2,000 degrees. A larger gap is established on the exhaust parts due to stronger heating from the release of hot exhaust gases. This means that the metal expands at such temperatures more than at the inlet.
Consequences of untimely adjustment
If thermal gaps are not adjusted, two main problems can arise. The first involves excessive clamping. The second, on the contrary, consists of too large gap values.
Pros and cons of various engine modifications
8 valves; volume 1.6 liters
The engine is well known to car enthusiasts. Its quality and reliability are beyond doubt. Positive aspects of the engine:
The negative aspects include:
16 valves; volume 1.4 liters
Positive aspects of the engine:
The negative side can be called:
16 valves; volume 1.6 liters
Positive aspects of the engine:
The negative side includes:
Engine types
The first Lada Kalina cars received a 1.6-liter power unit and a timing belt with 8 valves. On these models, periodic adjustment of valve clearances is necessary. Later, the manufacturer offered a car with a 1.4-liter engine capacity and 16 valves, the clearances of which practically do not need to be adjusted. The next design option is a car with a 1.6 liter engine and a timing belt with 8 valves, which need to be adjusted periodically. And the “hit” model is the Lada Kalina with 16 valves and a 1.6 liter power plant. Here, adjustment is required very rarely: but if the timing belt breaks, the valves will bend.
Causes of pinched valves
The first factor is most often observed on those cars whose owners have equipped their cars with LPG equipment (gas equipment).
Gap too small
As you know, the valve has a plate - its widest part, which is located directly in the combustion chambers. On the reverse side it is attached to the cylinder head. As the car's mileage increases, the chamfer on the surface of the plate and the mounting location begin to wear out. As a result, when the rod is raised, the pusher is pressed too tightly against the camshaft cam. This is how compression occurs.
Such a phenomenon does not bring anything good to the motor.
| Processes | Consequences |
| The valve will begin to heat up. | Thermal expansion is not compensated by the gap, and the plate will begin to fly out of the mounting location. |
| There is a decrease in compression. | The answer is a reduction in power. |
| Heat removal is not carried out in normal mode. | There is a negative impact on the operation of the catalyst. |
| During combustion of the air-fuel mixture, part of the burning composition goes into the exhaust manifold. | Thus, the plate and chamfer are destroyed faster. |
The intake elements, unlike the exhaust elements, have the opportunity to be cooled by a new portion of the fuel mixture. There is virtually no exhaust heat removal.
Increased clearances
Another situation is when the gaps between the valve and the piston are too large. With use, natural metal wear occurs on the camshaft journals and on the surface of the cams. Accordingly, an increase in gap values appears. If adjustment is not carried out according to the regulations, for obvious reasons the gap will increase even more, including from shock wave loads. You can find out about this by the characteristic clatter of the engine even after reaching the optimal operating temperature.
Gradually, the valve timing begins to be disrupted, and the power of the power plant decreases. This happens due to the delayed opening of the intake and exhaust elements. The air-fuel mixture arrives late, and the exhaust gases cannot escape completely, as a result the engine begins to operate unstably, noise increases, etc.
It is important to carry out adjustments in a timely manner and not neglect this procedure. The last resort in the most advanced cases is a major overhaul of the cylinder head.
Signs of a burnt valve - review article
Valve burnout is a problem that owners of domestic cars most often encounter. But it would be unfair to blame exclusively the products of the Russian automobile industry, since they are also found in foreign cars, even if they are far from new. But any valve malfunction, including burnout, can lead to very serious consequences, so every car owner simply needs to be able to recognize the signs of a burnt-out valve in a timely manner in order to be able to promptly correct what can still be fixed without unpleasant surprises.
Causes of the malfunction.
The symptoms of a burnt valve are to some extent similar to malfunctions that are completely unrelated to the car’s engine. That is why insufficiently experienced car owners can spend a lot of time and effort to repair and fix something that, in principle, was not broken. As a rule, they are the last to realize that the valve has failed.
But despite all their apparent insignificance, the valves perform a very important function - they allow fuel to enter the combustion chamber and release burnt gases. That is, they are constantly in an aggressive environment - under the influence of gases and high temperatures.
It is natural that the metal from which the valve is made gradually deteriorates - the valve burns out.
Most often, the valve “flies” in very old cars, as well as in budget cars, when producing which the automaker chose price over quality. However, car owners themselves, without even realizing it, often provoke/accelerate the process of valve burnout, for example, by filling their car with fuel that is not suitable for it. But this, as they say, is a topic for a completely different article.
Symptoms of a burnt valve.
As noted earlier, the symptoms of a burnt valve are very similar to the symptoms of a malfunctioning ignition system, so many people begin to repair it first. But the engine, despite all the repair work, continues to act up and malfunction. That’s when a frantic search begins for other possible causes in the engine and other systems, although it’s all about a banal valve.
The most important symptom of the indicated problem is engine tripping, when one or more cylinders stop functioning. This happens because a burnt-out valve, when fuel burns, begins to let gases through, which do not push the piston down, but directly exit into the manifold.
You can diagnose this malfunction without disassembling the engine by following a certain algorithm of actions:
- we check the ignition - the integrity of the wires, the functionality of the distributor, the ignition timing;
- we determine the problem cylinder - we pull off the high-voltage caps from the spark plugs, the engine will start to stall if the cylinder is working, or if the cylinder is faulty, the engine operation will remain unchanged;
- Let's measure the compression: it will most likely be slightly lower than the required 11 points, by the way, this may be an indicator of not only a valve malfunction, but also a piston group malfunction.
Now a few words about how, without disassembling the engine, you can determine what exactly you are dealing with - a malfunction of the valve or piston group.
- Turn on the ignition and remove the breather hose. Warm air should come out of it, or at least a little smoke. The smoke is dense, gray, smelling of exhaust - a sign of a malfunction of the piston group.
- Remove the spark plug from the problem cylinder. If the piston is damaged, the spark plug will be in oil, and if the valve is burnt out, it will be in normal condition.
- Remove the cylinder head and replace the damaged element. If the valve is changed, then it must be ground in, and all valve stem seals must be replaced along with it.
https://youtube.com/watch?v=7EEiCJcTPfM
Process Features
Lada Kalina of the first and second generations differ not only in appearance, but also in the engine. The adjustment is also, albeit slightly, different. It is only needed on an engine with 8 valves, the design of which has not changed, so there is no difference in the procedure for installing thermal clearances on the first and second generations. On engines with 16 valves, this process does not make sense, since from the factory the design includes hydraulic compensators that maintain the optimal clearance without additional intervention.
The procedure is to change the values of the intervals. Work is carried out with the engine stopped by rotating the crankshaft manually clockwise. This process will require special washers, which are installed in the niches of the pushers. All you need to do is select the right size washer.
We adjust valves on Lada Kalina 8 valves with our own hands
The issue with adjusting thermal clearances is a classic one: everyone should be able to change the washers on the pushrods of an 8-valve valve. But there is “bad advice” that applies to the VAZ-21116 engine: they say that for exhaust valves it is better to make the gap equal to 0.40, and let the tolerance be 0.05 mm. In fact, the requirements have not changed since the 11183 engine: the average numbers should be 0.20 and 0.35. Following “bad advice”, you get one thing - the engine “knocks” when cold. And this is for a value of 0.40! You still need to be able to set it, but it may turn out to be 0.45... And then our adjustment will kill 4 of the 8 valves on the Lada Kalina. We are talking about the Kalina 2 family, where the only 8-valve engine was the 21116 engine.
The following is a video where valve knocking is recorded.