Why do they remove the LADA Kalina bumper?
- While driving, and even in an open parking lot, parts of the car are exposed to constant physical and chemical attack. Therefore, the decorative paintwork of the bumper loses its attractive appearance and requires restoration, which is carried out by removing the bumper.
- The tough and brittle carbon fiber of the bumper can crack even during a minor accident and require repairs. This is especially true in winter, when at low temperatures carbon fiber becomes especially fragile and can burst even with relatively light contact with a snowdrift. Restoring the paintwork and soldering the bumper material requires dismantling this part from the car.
- If the LADA “Kalina” bumper is severely damaged, it needs to be replaced with a new one, which also requires dismantling the old part.
- You have to remove the bumper to replace the Kalina headlight units.
- Tuning a car's front body kit usually requires dismantling the bumper in order to modify it, paint it, or replace it with a finished tuned product.
Owner reviews, recommendations
The part designated by number 21900-2803131-00 may have the following names from different sellers: bumper beam, channel, etc. This “beam” is usually sold unpainted. Therefore, we take putty and prime it. And then we take the part to a paint shop and let them apply a polymer coating. It is not recommended to install an unpainted metal part. It will quickly begin to rust.
Various amplifier installation options
It is advisable to place washers under the nuts, then the paint will not be scratched. The “beam” itself, unpainted, weighs about 1 kg and is easy to transport. A labor-intensive process, as you can understand, is the installation of a standard bumper. This operation is best performed by two people.
There is no point in trying to apply the polymer coating yourself. The baking temperature of the paint is +70 C. C. There is no need to try to solve this problem using a household oven - the bracket simply will not fit in the oven.
It is easy to notice that the bumpers of the Lada Kalina 2 and Grants differ in design and shape. As the owners of the “second Kalina” themselves say, the installed bumper amplifier does not change the appearance of the car. But coming closer to the radiator and looking from top to bottom, everyone notices the iron bracket. Therefore, it is better to paint it with black matte enamel. There are no other options.
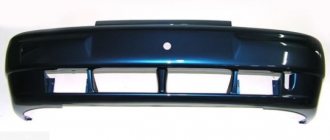
How to choose a front bumper for LADA “Kalina”
If you do not take into account tuning parts, there are two types of standard front bumpers for Kalina on sale: painted and unpainted. The first ones must be carefully selected by color so that they do not differ from neighboring body elements. The paintwork changes color slightly as a result of exposure to the sun, so selection by catalog number is not always effective and it is better to choose the appropriate color “on the spot.” Unpainted bumpers are suitable when painting adjacent parts of the car (fenders, hood) is required, for example, after an accident. When purchasing a new bumper, you should pay attention to the following points:
- the paintwork of the part should not have chips or cracks (they especially often appear near the fasteners);
- the plastic of the bumper must be elastic, because excessive rigidity causes cracks even with mild impacts, for example, on snow or sand;
- when purchasing a tuned bumper, you should make sure that it has holes for fog lights;
- There must be stiffening ribs inside the bumper, otherwise it may “lead” and lose its original shape.
What is needed to remove the front bumper of LADA “Kalina”
It is better to carry out work on dismantling the bumper in the inspection hole, because part of the fastenings for this part are located at the bottom of the car. If there is no hole or lift, the job will not be impossible, but you will have to unscrew some nuts by feel or lie on the ground to see the attachment points. It is better to remove and install the bumper with an assistant who can hold one side while you unscrew the fastenings of the other. If you perform the operation yourself, you may not be able to hold the part, which as a result will fall and be damaged. To remove the front bumper of LADA “Kalina” you need:
- crosshead screwdriver;
- socket or socket wrench 10;
- extension;
- wrench (preferably with a ratchet, which will make the work much easier).
Currently, two generations of Kalina have been produced, differing in the way the bumper is mounted. Accordingly, the procedure for removing this part is slightly different.
Advice: before removing the bumper from the Kalina (regardless of the modification), you should remove the ground from the battery to avoid a short circuit when disconnecting electrical appliances.
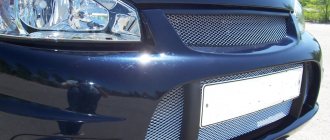
How to choose fog lights?
This is how this headlight shines
Installation of fog lights is preceded by purchasing them at the store. In this case, you must first look at the integrity of the glass of each light bulb, the matching of the headlights and mounting systems.
Compliance with the UNECE is confirmed by the presence of the “E” stamp on the diffuser; it is also desirable to have a GOST terminal, TU, date of manufacture and manufacturer. When we choose fog lights, Priora as a model allows us to purchase articles of predominantly round shape, while the latest fashion is considered to be slit headlights, which have small vertical angles (about 30-50 degrees) and are very well suited as fog equipment.
Fog lights can be produced in:
The first options almost always do not have certification data and have a lot of power, which only causes harm on the road (blinds oncoming drivers). Japanese and European models have moderate power, but are quite expensive. Therefore, when purchasing, it is better to focus on domestic models that comply with GOST standards and are relatively inexpensive.
The installation of fog lights begins for Priora owners by disconnecting the ground wire from the battery (needed to prevent a short circuit). Then the protection is removed from the engine crankcase. To do this, you need to take a key for “10” and two keys for “19”. The usual front crankcase protection has 5 “studs”, but the reinforced one can be attached to the front beam with two half-clamps. Removing the protection is a sequence of simple steps - first, use keys “19” to unscrew the nuts attaching the levers. (The second key is used to keep it from turning). Then use a 10mm wrench to unscrew the five nuts. Installation of protection is carried out in the reverse order.
How to remove the front bumper of LADA “Kalina”-1
To remove the bumper from the first generation Kalina, you should perform the following steps:
- open the hood;
- unscrew the three screws securing the plastic radiator grille;
- remove the radiator grill;
- unscrew the two screws of the lower grille and remove it;
- disconnect the PTF connectors;
- unscrew the two screws securing the bumper located behind the grille;
- move into the inspection hole and from it unscrew the three central lower bolts securing the front bumper;
- Unscrew two pairs of lower screws located on the sides of the front bumper (attachments to the body kit and fender liners);
- unscrew two pairs of screws that are located in the front parts of the wheel arches;
- carefully pry and unclip the plastic latches holding the bumper to the body;
- carefully move the front bumper forward, releasing the latches from the clutch with the body, and remove it from the car (this operation is best done together with an assistant).
Installing the front bumper is done in the reverse order.
Removing and installing the front body kit
Since the bumper of the Lada Kalina car is attached in many places, including from below, it is most convenient to carry out work in the inspection hole. If necessary, you can do it without it, but then you will have to look for the lower screws by touch or lie under the car to see them.
The list of tools for disassembly is quite short:
- Phillips-head screwdrivers of different lengths;
- 10 mm socket wrench or socket;
- extension cord and ratchet wrench.
Article on the topic: What is a catalyst in a car
At the moment, there are 2 generations of VAZ 1118 cars, and they are disassembled in different ways. Therefore, the order of work must be considered separately for each modification.
Kalina 1
If you have fog lights installed, then before starting work, disconnect the battery and follow this algorithm:
- Open the hood lid and unscrew the 3 screws holding the plastic radiator grille and carefully remove it.
- Do the same with the bottom grille, removing the 2 screws that secure it.
- Behind the grille there are 2 screws securing the bumper itself, unscrew them.
- Move into the inspection hole and unscrew the 3 lower bolts located in the center.
- Remove 2 pairs of lower screws located on the sides. They attach the body kit to the fender liner from below.
- There are 2 more pairs of screws located in the front of the wheel arches; unscrew them last.
- When all the fasteners are unscrewed, the bumper continues to be held on by plastic latches. To remove it and not break off the latches, pry the side edge of the element (near the wheel) with your hands and gently pull it to the side, disengaging the latches.
- Move the body kit forward a little and remove it from the car. At this time, the assistant must support the other end of the part, preventing it from falling.
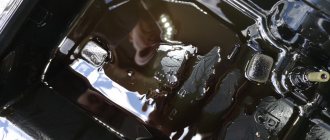
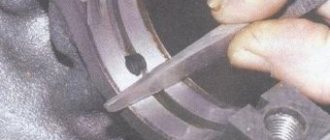
Corrosion of body parts is often found under the removed element. To see the whole picture, remove the plastic amplifier (you need to unscrew 3 bolts) and remove the rust, then touch up these areas.
In case of corrosion of body parts, remove the plastic reinforcement and remove the rust
An important point when installing a new bumper is that you need to put it in place correctly and secure the latches.
- Put on one side of the element immediately, and pull the other side together with an assistant. He should press on the corner of the part from the front, and you - from the side, until a characteristic click is heard.
- Then screw all the screws into place.
- Connect the connectors.
- Install gratings.
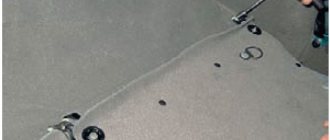
Photo of the attachment points of the part
3 bolts press the bumper to the body from below 2 pairs of self-tapping screws secure the body kit along the edges 2 self-tapping screws connect the element to the fender liner Top fastening points To remove the grille, you need to unscrew the countersunk screws Access to these bolts opens after removing the grille
Front bumper on Kalina 2
On the new Lada Kalina model, the front body kit is attached differently: the lower screws are located far from the plumb line of the element, so it is very inconvenient to unscrew them without an inspection ditch. But you don’t need to dismantle the radiator grilles to get to the hidden fasteners. The removal operation is performed as follows:
- Open the hood and remove the negative battery terminal.
- From the inspection hole, unscrew the 3 bolts screwed to the bottom of the car. Two of them are in the center, the third is to the side (to the right in the direction of travel).
- Unscrew 2 pairs of lower screws located at the edges of the bumper.
- As in Kalina 1, unscrew 2 pairs of screws connecting the part to the fender liner and located in front of the wheel arches.
- Unscrew the 6 bolts of the upper mounting of the body kit; they are located on the horizontal panel above the radiator.
The procedure for dismantling and replacing the front body kit is carried out together with an assistant, as described above. Immediately after removing the element, disconnect the power supply connectors for the fog lights, and when installing, do not forget to connect them back.
Where is the fastener located - photo
The bolts on Kalina 2 are located quite deep A pair of self-tapping screws connect the fender liner to the bumper 6 bolts of the upper fastening Article on the topic: Malfunctions of the car air conditioner - what can leave us without coolness?
How to remove the front bumper of LADA “Kalina”-2
The procedure for dismantling the bumper of the newer Kalina variation is slightly different. To remove it from the car, you should do the following:
- unscrew the three lower mounting bolts (two in the center and the third on the left in the direction of travel);
- unscrew two pairs of screws located at the edges of the bumper;
- unscrew two pairs of screws securing the fender liners to the front bumper;
- unscrew the six upper bolts, the bumper to the horizontal panel near the radiator;
- carefully pry and unclip the plastic latches holding the bumper to the body;
- carefully move the front bumper forward, releasing the latches from the clutch with the body, and remove it from the car (this operation is best done together with an assistant).
To install the front bumper on the Kalina, you need to do the operations in the reverse order.
Replacing the rear bumper
Hatchback, sedan, and station wagon bodies are equipped with bumpers of different configurations, which have their own characteristic mounting features. As a result, when installing them, it is necessary to perform some additional operations that differ from the standard algorithm of actions.
As for the step-by-step instructions for performing this operation, they are as follows:
- The first step is to remove the standard mudguard. To do this, unscrew three screws in the wheel arch of the rear wheel with a Phillips screwdriver and remove the mudguard.
- From the bottom of the car, use a screwdriver to unscrew the screw of the lower fastening of the mudguard and dismantle the mudguard itself. The mudguard located on the left wheel is also removed in the same way.
- Use the “tenth” head to unscrew the lower fastening bolts.
- open the trunk lid and use the same head to remove the four upper mounting bolts.
- With the application of force with both hands, remove the top of the body bracket from the side of the bumper. We repeat this operation on the other side of the machine.
- dismantle the shock absorber, unscrew the three nuts on the “10” energy-absorbing beam of the rear damper and also dismantle it.