Self-cleaning of VAZ 2110 injectors. How to wash the injectors with your own hands
Author: ides · Published 07/12/2016 · Updated 07/12/2016
Cleaning injectors
refers to those types of work that need to be done only in case of emergency, that is, according to the principle “don’t touch it while it’s quiet.” This is not surprising, given the fact that the ramp in which the injectors are located and, in principle, the injectors themselves can be called the heart of a car engine. Therefore, it is recommended to clean injectors only as a last resort, for example, when problems occur with starting the engine, increased fuel consumption, tripping or a sharp drop in power.
There are plenty of various additives on the automotive chemicals market that are added to fuel to clean the injector, but they are not always able to cope with the task assigned to them or do not perform it very well. Often, cleaning additives in fuel can cause irreparable harm to the engine, due to the fact that acidified dirt and other deposits can create a blockage that prevents the normal passage of the fuel-air mixture or completely block the access of fuel. In this article I will talk about how to clean injectors with your own hands using the example of a VAZ 2110.
Relevant: Do-it-yourself adjustment of VAZ 2101 valves
Cleaning VAZ 2110 injectors - removing the ramp
Attention is important! In order to remove the ramp on a VAZ 2110, you must wait until the engine cools down.
1. First of all, you need to turn off the power to the fuel pump; to do this, disconnect the wires from it.
2. After this, start the engine and let it run until it stalls. This should be done until the engine stops starting; in other words, your task is to remove pressure from the fuel supply system.
3. Now you can remove the ramp.
4. First of all, de-energize the ramp; to do this, turn off its power - the general wiring is located on the passenger compartment side.
5. Unscrew the fuel hoses, as well as all electrical components connected to the fuel rail: idle air control (IAC), throttle position sensor, pressure regulator.
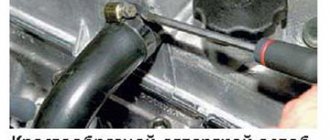
6. Use a hexagon to unscrew the two bolts that secure the fuel rail.
7. Now you can actually remove the fuel rail itself. This is done in the upward direction, but without available tools this is sometimes quite difficult to do, since the fuel rail fits quite tightly. Remove the ramp strictly parallel to the ground, as any misalignment will only complicate your task.
How to wash an injector with your own hands
Injector cleaning products effectively remove deposits from the system. To carry out the procedure, a special pneumatic station is required. Such equipment can be freely purchased in Russia. Today there are pneumatic stations of domestic or Chinese production. If there is no need to constantly use such equipment, washing the injector can be carried out at car services that offer such a service. The price will range from 1,500 to 4,000 rubles, depending on the car and region of residence.
You can try to assemble the station yourself. At the same time, you should know that washing injectors with homemade stations is dangerous.
Flushing fluids are more flammable than fuel, so avoid fluid leakage
Once on the exhaust manifold of a warm engine, the liquid will instantly ignite - such a procedure can cost you not only your car, but your life and health.
Required injector flushing kit:
When the station is connected, the system looks like a hospital IV. Flushing injectors does not require much experience; the main thing is to strictly follow the instructions for connecting and flushing. Here is a list of steps on how to mount the station for operation.
Installation of a washing station
It is not necessary to change the oil and spark plugs after using LAVR injector flushing fluid, so immediately start the engine and do a test drive. In the very first kilometers of the journey, improvements in engine performance will be felt.
Injectors - what are they?
Let's figure out what injectors are and what they are needed for. Injectors are an electromagnetic mechanism designed to spray fuel into the cylinder. Their number depends on the number of cylinders in the car. The VAZ car has 4 cylinders, therefore there are also 4 injectors.
A serviceable and clean injector sprays fuel evenly without any delays or jerks.
A clogged injector may not spray fuel at all or, on the contrary, pour it in drops. As a result, the engine cannot operate normally and correctly.
Symptoms of clogged injectors
Loss of dynamics is one of the main signs of clogged injectors. If they are contaminated, the car simply will not accelerate properly.
- Unstable idling, the engine at idle will operate unstably and intermittently.
- Starting difficulties can occur when there is contamination or when the injectors stop holding pressure. Fuel begins to drip into the cylinder, which can cause popping sounds in the exhaust pipe.
- Ringing fingers are inevitable when the spray nozzle is clogged; this is due to the fact that the fuel entering the cylinder is mixed with air and the concentration of fuel in this mixture is quite small, so the engine experiences detonation.
Driving with dirty injectors will not provide any driving pleasure. And driving with such a problem is highly not recommended.
When to clean injectors
Cleaning of injectors on Lada cars is carried out according to the condition of the car. If there are no problems with your car, then there is no need to clean them. Also, to find out for sure whether the injectors need to be cleaned, you first need to diagnose the fuel system. You can learn more about how to diagnose the fuel system in our article.
The manufacturer recommends cleaning the injectors every 50,000 km. Since the fuel at our gas stations leaves much to be desired, just before this mileage they begin to become clogged and flushing them will be useful. You can wash it at a service station, or you can do it yourself. Next, we will look in detail at how to wash the injectors on a VAZ car at home.
Injector cleaning steps
General view of the injectors
In order to clean the injectors, you must first remove them and check for fuel atomization. To do this effectively, it is best to go to a car service center where there is a special testing and diagnostic stand. But, for extreme sports enthusiasts, you can do this procedure at home with your own hands.
Removing injectors
In order to remove the injectors, you will have to disassemble part of the fuel system. Let's start with the receiver.
So, first you need to disconnect the fuel pipes. Then, you need to disconnect the fuel rail from the on-board network. Next, we dismantle the ramp.
Dismantled fuel rail with injectors
The next step is to dismantle the injectors themselves.
They must be removed very carefully so as not to damage them. The main thing is to preserve the rubber seals.
Although, as practice shows, they usually change because they are subject to wear. Now that everything is removed, you can proceed directly to the cleaning process. There are two ways to clean injectors: in a car service center at a special stand or at home. Let's consider both methods in more detail.
Cleaning injectors on a stand
Nozzles in a stand for testing and cleaning
Usually, a car service center asks to bring dismantled injectors. So, first, the power supply and operability of this element are checked, and only after that you can proceed directly to the cleaning process. Let's look at the whole process step by step:
- The injectors are installed in special mounting locations and connected to the stand. It is worth noting that, depending on the design of the cleaning apparatus, the procedure can be carried out simultaneously on 4 to 8 elements.
- Next, the cleaning program is installed.
- The first step is to clean the injectors by drip.
- Then, cleaning liquid is supplied under pressure to wash away any remaining scale and burnt residue.
- The next step is to check the spray pattern.
- The last step is to diagnose clean injectors in different operating modes. The stand simulates the supply of fuel, which will check how well the elements have been cleaned.
If at the inspection stage the changes are insignificant, then it is recommended to replace the injectors with new ones, since their clogged and worn-out conditions have reached a critical level, and operation is no longer possible.
Different nozzle cleaning modes
Cleaning at home
To clean injectors at home, you will need some tools and materials. Namely: liquid for cleaning injectors, a compressor capable of delivering an output flow of special liquid of 3-3.3 atmospheres (bar), a tube of the appropriate diameter, a container (bottle) for the liquid.
A can of cleaning liquid is connected to the nozzle through a syringe.
So, we connect the tube to the inlet of the nozzle, and the other end to the container with liquid. Now, you need to connect the bottle to the compressor. Now, it is gradually necessary to introduce air into the container with the liquid so that from it the mixture goes into the nozzle. The pressure must be gradually increased. Thus, cleaning and checking the injector for suitability.
One way to clean injectors
Important! Usually, as practice shows, such experiments end in failure and the injectors are still sent to a car service center on a special stand. Therefore, fuel system repair technicians do not recommend experimenting with injectors at home.
Signs of injector failure
Now you need to consider the signs of malfunction and contamination of the injector:
- The engine starts poorly or does not start the first time.
- Unstable operation in any mode.
- When switching from high or medium speeds to idle, the engine stalls.
- Unstable idle speed.
- Increased crankshaft speed at idle.
- Decrease in power of the main power unit.
- There were jerks and dips when moving.
- The fuel consumption has increased.
- When checking the exhaust gases, an increased amount of CH and CO was detected.
- Glow ignition due to loss of injector tightness.
Methods for cleaning injectors
Injector flushing additives
There are a huge number of different additives for flushing the injector. Such additives are poured into the car tank and mixed with fuel. The mixture of fuel and additives enters the main elements of the fuel system and flushes them, including the injectors. But, as a rule, such washings do not bring much results, since all the dirt that was washed away to the injectors gets and settles on them, which can only aggravate the situation. Using this method is not recommended.
Ultrasonic cleaning
This washing is considered as effective as washing the injectors during dismantling. We will not dwell on this method, since this method of washing can only be carried out at a service station. And the price of this method is not small, from 2000 rubles to 5000 rubles.
Washing without removal
What you will need:
- Set of wrenches;
- Screwdrivers “+” and “-“;
- Flushing fluid;
- Fuel hose;
- Fitting for tubeless wheel – 2 pcs;
- Bottle;
- Clamps;
- Drill 10 mm;
- Compressor with pressure gauge (can be used for a car);
Making a device for washing injectors without removing them from the car
- In a 1.5 liter bottle, drill a hole in the bottom with a diameter of 10 mm.
- Insert the wheel fitting into the drilled hole.
- Similarly, drill a 10 mm hole in the bottle cap.
- Insert the wheel fitting into the bottle cap and screw it on.
- Unscrew the spool valve from the fitting in the bottle cap.
- We attach a fuel hose to the fitting installed on the cover and secure it with a clamp.
This is what should happen
Relieving pressure in the fuel rail
- In order to relieve pressure in the fuel rail, you need to remove fuse F3 (15A) it is located under the central panel where the foot air ducts are.
- After that, you need to start the car at the residual pressure and let it run until the car engine stops.
- After which you can start working
Connecting the device to the fuel line
- Under the hood we find a fuel line pipe (if the engine has a return line, there will be two pipes, one of them goes to the fuel rail, so you need to connect to it).
- We take two Keys on “17” and unscrew the fitting connection, carefully without damaging the tube.
- You need to unscrew it like this: position the keys like scissors and squeeze them; you must follow the correct direction so that the fitting and nut are unscrewed and not tightened.
- After the fitting connection is unscrewed on the tube, you will see a rubber ring; it must be removed; if it is in poor condition, it is better to replace it.
- Next, we connect the hose from our device to the tube and tighten it with a clamp.
- Pour washing liquid into the bottle and tighten the cap.
- We pump a pressure of 3 atm into the bottle with a compressor.
- We hang the bottle with the cork down and start the car.
Washing process
- We start the car on the flushing fluid and let it use up half of the flushing fluid.
- Next, we stop the car engine and let it sit for 20 minutes. This is necessary so that all the dirt in the injectors becomes sour and dissolves.
- We start the engine again and press the accelerator pedal and keep the speed around 3000 rpm. This must be done until the flushing liquid runs out.
- Next, remove the flushing device and screw the fuel line hose into place.
Attention
Don't forget to install the rubber O-ring when connecting the tube and the fuel line fitting.
Flushing engine injectors VAZ 2110, 2111, 2112
The procedure for washing injectors is quite complex and time-consuming and takes more than one hour. So it is better to devote enough free time to this event. Due to the presence of a large number of small parts and the inaccessibility of the elements, it is advisable to perform all the operations below in good lighting, preferably during the day.
- insulating tape
- a can of carburetor cleaner (in the example, ABRO mold cleaner was used)
- two wires with a female connector and exposed on the opposite side by approximately 50 mm, so that the battery terminals (or the injector terminal) are tightly wrapped
- hose that matches the inner diameter of the nozzle body
- thread sealant
You need to start by removing the air filter and adsorber. It is also necessary to remove the intake pipe hose to gain access to the fuel rail. After this, we proceed to remove the fuel rail with the wiring harness. Disconnect the electrical connector of the injector wiring harness.
Using the wheel valve cap, unscrew the spool valve from the fuel rail fitting, gradually releasing the fuel pressure. Or release the pressure with a thin screwdriver by pressing on the valve:
Next, use a Phillips screwdriver to unscrew the bracket of the fuel pipe holder bracket:
Remove the hose from the pressure regulator connecting it to the receiver. Using a 24mm wrench, unscrew the nut of the outlet pipe fitting.
Using the same wrench, unscrew the nut of the inlet pipe fitting, holding the nut at the fuel rail with a 27 wrench.
Use a 5mm hex to unscrew the two ramp mounting screws:
By gently rocking the ramp, remove all four injectors from their seats and remove the ramp towards the left side of the car.
Next we proceed to removing the injectors. Compress the spring clip and remove the electrical connectors.
Then we move the latch along the ramp:
And remove it through the grooves on the ramp:
Using gentle rocking to avoid breaking the sealing ring, remove the injector from the ramp socket:
Next, you need to carefully remove the O-rings from the nozzle and the nozzle body itself.
We proceed directly to washing the injectors. Shorten the carburetor cleaner tube by approximately half. We wrap electrical tape around one end so that it fits tightly into the hose and tighten it with a clamp or wire. We attach the terminal to the nozzle, insert it into the free end of the hose and also tighten it with a clamp.
We connect the hose with the nozzle to a can of carburetor cleaning fluid and place one bare end of the wire on the battery terminal:
We press on the cylinder with one hand and tap the battery terminal with the other. IMPORTANT: CURRENT TO THE INJECTOR WINDING MUST BE SUPPLIED PULSELY, NOT LINEAR, TO AVOID OVERHEATING OF THE SOLENOID VALVE WINDING AND ITS CLOSURE! If the nozzles were dirty, then first you will see streams from the nozzles, then a cloud.
After washing the injectors from the inside, you need to inspect them from the outside and remove any remaining varnish deposits and dirt with the same cleaner.
Let's put everything back together in reverse order. The O-RINGS OF THE INJECTORS, before installing the injectors themselves into the mounting sockets of the ramp and intake manifold, MUST BE LUBRICATED WITH ENGINE OIL! Also, when installing the fuel rail, pre-lubricate the set screws with thread sealant.
After installation, start the engine. Unstable operation may occur during the first seconds of operation or difficult start-up due to cleaner residues in the injectors - this is normal.
Washing with removal of injectors
What you need:
- Set of wrenches;
- O-rings for injectors 16 pcs;
- Carburetor cleaner;
- Syringe;
- Injector plug 1 pc. or mother chips 2 pcs;
- Two-core wire up to 1 m long;
- Intake receiver O-rings;
Injector removal process
- First, we relieve the pressure in the fuel rail; how to do this is written above.
- In order to dismantle the fuel rail, it is necessary to remove the intake manifold.
- We remove the intake manifold corrugation by unscrewing the clamp from the DZ and unscrewing the clamp from the low crankcase ventilation, and remove the chip from the mass air flow sensor.
- Unscrew the dipstick with a screwdriver and pull it up.
- Unscrew the breather clamp, remove the hose and bend it down.
- We remove individual ignition coils except for the 4th cylinder (it does not interfere).
- Unscrew the two nuts securing the intake manifold from above.
- Unscrew the 2 bolts and 3 nuts securing the intake manifold.
- We move the intake manifold towards the radiator and lift it to the top.
- Under the hood we find a fuel line pipe (if the engine has a return line, there will be two pipes, one of them goes to the fuel rail, so you need to connect to it).
- We take two Keys on “17” and unscrew the fitting connection, carefully without damaging the tube.
- You need to unscrew it like this: position the keys like scissors and squeeze them; you must follow the correct direction so that the fitting and nut are unscrewed and not tightened.
- After the fitting connection is unscrewed on the tube, you will see a rubber ring; it must be removed; if it is in poor condition, it is better to replace it.
- Disconnect the injector wiring harness.
- Using a screwdriver, unscrew the bolt securing the fuel rail tube to the cylinder head.
- Unscrew the two hex bolts to “6”.
- Pull the fuel rail towards you; with a little force, the ramp should come off.
Removing injectors from the fuel rail
- We remove the chip from each injector and dismantle the wiring harness.
- Remove the retaining rings from the injectors
- Pull out the nozzles in a circular motion
Preparing to wash the injectors
In order to wash the removed injectors, it is necessary to prepare a washing device. The injectors are flushed under pressure. To do this, we assemble the injector power supply circuit. The injector receives power from 9 to 12 V. The power source for opening the injector can be a crown battery or a car battery. We will use a rechargeable battery.
So, let's start assembling a device for washing injectors on a Lada car
For convenience, it is better to carry out the procedure together.
- You need to prepare a syringe. Pull the piston out of it; the syringe cylinder should fit tightly onto the nozzle with the ring. You can also use a hose of a suitable diameter instead of a syringe and tighten it with a clamp. We will use a hose.
- Next, we twist the wires with the injector plug or with the “mother” terminals.
- We connect the nozzle to the power source, observing the polarity. "+" and "-"
- The injector should click, which means the injector is opening.
- We hold the nozzle and spray carburetor cleaner into the hose and hold it, creating pressure in the hose between the nozzle and the cleaner bottle.
- Then you need to open the injector by connecting the wires to the battery
- The injector will spray carburetor cleaner and clear itself.
- You can complete the procedure as soon as a uniform spray of fuel begins to emerge from the injector.
- Next, you should do the same procedure with all the injectors.
- Assembly should be carried out in the reverse order of disassembly.
Advice
For easier installation of the fuel rail with injectors into the cylinder head, it is recommended to lubricate the O-rings with engine oil.
Now you know in what ways and how you can wash the injectors. We hope our article helped you and you chose a method of washing injectors that is convenient for you.
Removing and washing injectors
In this article I will describe the process of removing injectors on a VAZ-2107 car. The owner complained about tripping and rough operation of the engine when running on gasoline. After diagnostics, it was discovered that the injectors were clogged. The car is additionally equipped with 2nd generation gas equipment, the so-called “cracker”. In this regard, the view in the photographs may differ slightly from yours (presence of a firecracker, injector emulator, etc.). In Fig. Figure 1 shows the appearance of the engine compartment of the vehicle being serviced.
Let's get started. We unscrew the clamps securing the air pipe using a Phillips screwdriver or a 7 mm socket.
Remove the throttle cable clamp using a “flat” screwdriver, carefully prying it up.
Open the throttle valve and remove the throttle cable.
We unscrew the fastening of the throttle cable using a 10 mm “head”.
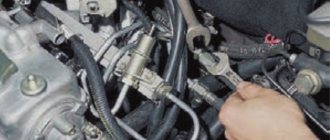
We unscrew the fuel lines with two 17 mm open-end wrenches. We unscrew the fastening of the tubes with a Phillips screwdriver.
Remove the vacuum hose from the fuel pressure regulator.
Remove the brake booster hose by unscrewing the clamp with a flat-head screwdriver.
We unscrew the two nuts securing the throttle assembly using a 13 mm “head”. We remove it, holding the washers on the studs, and move it to the side.
When is injector cleaning necessary?
In order to understand the condition of the injectors, you need to clearly listen to the “whispering” of your engine:
These symptoms should alert you and make you think about the stable operation of the system as a whole.
Frequency of cleaning injectors
There is no specific point in time that would indicate the frequency of their cleaning. Remember that if nothing bothers you about the operation of the engine, then there is definitely nothing that needs to be repaired. However, if symptoms appear, it is best to first carry out an analysis and determine the exact cause of the problem.
What will cleaning do?
When the injectors are cleaned, you will immediately feel changes in the operation of the engine. However, note that this depends on the amount of carbon deposits and instability before the cleaning process. Therefore, the more contaminants there are, the better the cleaning is done, the greater the chance of getting serviceable injectors.
When is injector flushing necessary?
How do contaminants appear? First, resins settle on the engine parts; this is not burnt fuel with impurities. Then the sediment oxidizes, becomes hard, and settles in a layer on the parts. If you refuse to clean the injection, then problems in the operation of the engine will only increase: high wear of mechanisms will appear, increased formation of coke and soot, the catalyst will experience excessive load, fail, etc.
Even a thin 0.005 mm varnish layer reduces the efficiency of injectors by more than 20%
The nature of the spray torch changes: its shape and size. The nozzles lose their tightness, causing the injection control to malfunction. As a result, we observe dips at idle and increased fuel consumption.
The quality of fuel, extreme weather conditions, and long periods of sitting in traffic jams make the process of pollution formation lightning fast. You should know that there are other possible places of contamination: fuel filter, pump, fuel intake screen. These dirty parts interfere with the normal operation of the engine. Prevention must be carried out every 20-30 thousand km.
Cleaning on removed injectors
In order to clean the injectors, the first step is to remove them. How to quickly replace them is written in this article.
When the injectors are removed, you can proceed to cleaning them.
Connection diagram!
Since the nozzle opens at a power of 12V and 10W, it is necessary to make wire connections, the circuit of which will include a light bulb. It will thus act as a damper. You can make such a circuit using this diagram:
Detailed connection diagram.
- Next, when everything is connected according to the diagram, we connect power to the injector, but leave the other end unpowered.
- Since cleaning will be done under pressure, take care to ensure that all connections are properly secured. It is best to use hot melt glue.
The pipe to the sprayer is fixed with hot-melt adhesive.
Injector cleaning technology
- First of all, remove the O-ring from the injector.
- We put a pre-prepared rubber tube on its shank.
The entire structure is assembled.
The nozzle is cleaned and the lamp lights up.
In total, you will need about 3 hours to complete such work.
The difference before and after cleaning.
Cleaning engine injectors
This method is not the actual cleaning of the injectors, but it fully allows you to get rid of deposits on them without resorting to dismantling them.
First of all, this is much faster, but on the other hand, the result is not always effective. However, as VAZ-2112 car owners say, in some cases, this really helps.
Work process
- A compressor is connected to the system, similar to that described earlier, which is capable of increasing the pressure in the ramp to 3.2 atmospheres. In parallel, we connect a purifier in a container of at least 1 liter. (Most often, special injector cleaners are used in metal containers - approx.).
- Next, we start the engine and let it run for 10 minutes, after which we stop and let it rest for the same amount of time.
- Then we start it again and, by re-gassing, pass the entire liter of liquid through the injectors.
- When the engine stalls, change the spark plugs, which will become covered with soot.
The entire process of work in this way should not exceed one hour.
By the way, such work can render spark plugs unusable, so clean the injectors on the engine using old or spare spark plugs. Or guess the moment when you will change the spark plugs. We have already talked about the choice of spark plugs for 16-valve engines.
Injector cleaning in Kyiv, the best price for cleaning (rinsing) fuel injectors at the OILER service station
An injector (injector) is a valve that is designed to properly inject fuel. Its clogging leads to increased fuel consumption, decreased dynamics, deterioration in power performance and problems with starting the engine. Professional cleaning of injector nozzles
will help you avoid all these problems. Its high-quality implementation on modern equipment is offered by the OILER car service. The price for cleaning injectors is affordable to every car owner.
If your car needs injector cleaning in Kyiv, you can make an appointment online, fill out the feedback form, or contact the manager at the specified phone number.
How do you know if the injectors need cleaning?
The quality of fuel in Ukraine is far from ideal, and a large number of impurities leads to their deposits on the injectors. Over time, such accumulations form a dense, stable layer that interferes with the operation of the injectors. Subsequently, the owner of such a car will need to clean the gasoline injectors. As a result of injector contamination, the following occurs:
- fuel consumption increases;
- power indicators decrease;
- The stability of the motor is lost when idling or in transient modes;
- jerking when accelerating;
- The toxicity of exhaust gases increases and popping noises appear;
- It is difficult to start the engine, especially in cold weather.
Degree of injector contamination
As a result of using poor quality fuel, three main stages of injector contamination can be observed:
- Reduced performance up to 7 percent. This is considered minor contamination, which obviously does not affect operation, but leads to a slight excess fuel consumption.
- Up to 15 percent + fluctuations in engine idle and exhaust gases. Acceleration dynamics are clearly reduced, detonation and a sharp unpleasant smell of exhaust gases occur. In this case, even more fuel is consumed.
- Up to 50 percent. The engine runs very poorly; when idling, one or more cylinders may fail. When you press the gas sharply, specific pops appear. There are also other symptoms from the previous stages.
Why and how often do you need to clean injector nozzles?
The injector holes and the frequency of their opening/closing are responsible for the speed and uniformity of fuel injection. Cleaning the injector nozzles
is needed to maintain their performance, as well as maintain engine power and fuel consumption.
According to European standards, scheduled cleaning of injectors should be carried out every 30,000 km, but Ukrainian fuel is of lower quality and therefore the frequency approximately doubles. We recommend cleaning the injectors at least once every 20,000 km.
The ratio of air and fuel after cleaning returns to normal, which leads to complete combustion of fuel, stabilization of its consumption and reduction of smoke. This also reduces the load on the fuel system and increases the service life of its components.
It is better to wash the injectors at a car service center.
To flush the injectors, motorists add various additives approximately every 5,000 km, but the effect of these actions is noticeable only in cars with a mileage of up to 20,000 km. Build-ups that have formed during longer use cannot be cleaned off in this way.
You can completely get rid of contaminants only by contacting a car service center, where professionals using special equipment will do this. Initially, diagnostics are carried out to determine the degree of contamination and functionality of the injectors, and only then the required cleaning and restoration work is assigned.
Methods for cleaning injectors:
- Cleaning injectors without removing them. A special unit containing a liquid, a solvent, is attached to the fuel system, with which the injectors are washed. To protect the fuel filters and fuel pump, the car system is completely turned off during flushing. Cleaning injectors with removal is beneficial for the entire engine system, as it simultaneously cleans the valves and combustion chamber. If you clean the injectors without removing them from the engine, you can do it poorly.
- Cleaning injectors on a stand. This method gives a more reliable result, since it completely controls the condition of each part. To clean, the injectors are removed from the engine and moved to an ultrasonic bath. Cyclic washing is carried out using the cavitation method with a gradual increase in intensity. After each stage, they are diagnosed at the stand.
Benefits of Professional Cleaning
The price for cleaning injectors at the OILER car service center is affordable, but this is not the main thing - with us you are guaranteed to receive efficient injectors that will not fail for a long time. You can ask our manager by phone or through the feedback form about how much it costs to clean injectors.
Cleaning injectors with ultrasound
And another method that can be easily used to clean them is ultrasound.
Pros and cons of using ultrasound
There is still debate about how useful this method is, and there is no consensus on this. Some say that this method harms the injectors due to the destruction of the mesh, and that such work should only be combined with washing and dismantling. Others say that such work has a very good effect on the condition of the injectors and does not harm them in any way; moreover, the condition of ultrasonic cleaned injectors is comparable to new parts.
In any case, it is up to you to decide whether to use this method. The cost of such work at a car service is 2,000 rubles and takes about 4 hours.
Prices for cleaning injectors
- In order to clean the injectors that have been removed and fixed on the ramp, you will need a total cost of about 500 rubles .
- And to clean them in the service, you will pay about 2000 rubles , and this is the same as when cleaning with ultrasound.
Since such work does not pose any difficulty, it is much easier to do everything yourself.
Injector prices
If, after the cleaning and diagnostic procedure, you come to the conclusion that it is completely faulty and needs to be replaced, then it is worth noting that you should buy a strictly analog nozzle, with the part number indicated on its body. The average price for them is in the range of 1000-1500 rubles.
In any case, it is up to you to decide whether to replace or clean the injectors. Because in some cases it is much easier to replace a part than to bother with cleaning it.
Symptoms of a problem
With proper care, the injectors on the VAZ 2110 can last quite a long time. But when the first signs of malfunction appear, it is recommended to immediately clean the elements. What are the symptoms?
- The engine starts with certain difficulties;
- Fuel consumption increases;
- Power and thrust drop;
- In winter, the car sometimes jerks;
- The engine starts to stall, etc.
If you notice at least one of the symptoms, be sure to check the injectors and decide whether to clean or replace.
Cleaning methods
There are three main ways that will allow you to clean your injectors. Decide for yourself which one to use.
Way
Peculiarities
Quite effective, but financially expensive. Plus, working with chemicals is risky because it is very dangerous to your health. Cleaning is carried out only in full compliance with safety regulations
Car services will now do everything for your money. But you'll have to pay a lot. Don’t forget that finding a really good, responsible and inexpensive service station is something out of the realm of fantasy. Therefore, either questionable quality of work, or impressive money for effective cleaning
The most economically profitable way to save money and complete the task efficiently. You should choose this option only if you have an idea about the design of the motor, the location and functions of the injectors
Do not carry out cleaning yourself if you have never climbed into the engine compartment yourself to replace or repair engine components. Trust trusted specialists, do not take risks.
Before and after cleaning
Before replacing or cleaning the injectors, they will need to be removed from the fuel rail. To achieve this, the following activities are carried out:
- Make sure the engine has cooled down properly. It is not safe to work on a hot engine;
- Disconnect the power wires from the fuel pump to de-energize the device;
- Try to reduce the pressure in the engine power system as much as possible. To do this, the engine starts, and then you need to wait until it stalls at idle speed;
- Repeat this procedure several times until the car simply stops responding to turns of the ignition key;
- That's it, now our goal is the fuel rail. To remove it, you must first remove the terminals from the battery, turn off the power to the ramp itself, disconnect the fuel supply hoses, and also disconnect all electrical appliances going to it. These are pressure, idle, throttle position sensors;
- If you have an 8-valve engine, then you do not need to remove the receiver. This step is relevant for engines with 16 valves;
- Experts do not recommend removing the intake manifold without dismantling the throttle valve and the hose going to it. It is better to unscrew and disconnect everything at once, which will allow you to continue working more conveniently;
- Cover the exhaust manifold openings with something to protect them from foreign objects;
- Using a hex wrench, you can unscrew a couple of bolts and remove the fuel rail along with the injectors;
- Make sure that there are no distortions when removing the ramp, otherwise problems may arise with the dismantling processes;
- We remove the injectors. To do this, remove the mounting brackets that hold the electrical connector. You also need to remove the bracket that holds the injector in its seat.
Do-it-yourself injector cleaning - fuel injector prevention: photo
It will not be news to anyone that gasoline at gas stations is not getting any better. Frankly, he's bad. Without going into details, the quality of the fuel greatly affects the performance of the power system, in particular the injectors. On Lada Granta and relatively new Lada Vesta with 16-valve engines, cleaning the injectors is one of the mandatory measures.
When to flush the injectors on a Lada Granta
The difficulty in diagnosing injectors on modern engines is that it is almost impossible to visually assess their condition without removing them. Signals about loss of injector performance can also come from the on-board computer.
In addition, the driver may notice a number of changes in the behavior of the car:
- Increased fuel consumption.
- Deterioration in dynamics.
- Power drop.
- Difficult cold or hot starting.
- Dips, unstable operation in transient conditions.
- Unstable idle speed.
Of course, there is diagnostic equipment, there are scanners and special programs for a computer or smartphone, which will also show that it is time to clean the injectors. Another thing is that not everyone can use all this, and not everyone needs it. And preventive maintenance will never hurt the injectors if the cleaning is done correctly and efficiently.
The optimal mileage between injector cleanings, as practice shows, is a maximum of 20,000 km, and preferably 12-15 thousand.
At the same time, experienced grant managers recommend cleaning the injector on both 8-valve and 16-valve engines, immediately before every second oil change .
Methods for cleaning Lada Granta injectors. Why clean
Injectors are cleaned in different ways. There are several methods, and the most effective is bench cleaning followed by checking the performance and shape of the torch. It looks something like this.
Bench testing of injectors. The results of flare formation are immediately visible
If for some reason we do not have the opportunity to perform bench cleaning, we will clean it ourselves and there are at least three simple ways to do this:
- Injector cleaner . This method is perfect for the laziest - just pour injector cleaner into the tank, it mixes with fuel and restores order in the power system. Not long ago, we looked into the merits of the best fuel system cleaners for 2021. But this technology has a significant disadvantage. It cannot be used in cases where the car’s mileage has exceeded 30-50 thousand km. Everything is very simple. During this time, a huge amount of rust and debris accumulates in the tank, fuel filters, fuel module and line. All this will be dissolved by the cleaner, mixed and supplied directly to the nozzles. In addition, no one knows how rubber seals and rings will react to a chemically aggressive agent. Therefore, there may be more harm than good.
- Cleaning injectors without removing them from the engine . Nice and simple method. The advantage is that in this way we also clean the intake manifold, intake valves, and combustion chamber from carbon deposits. Sometimes this technique even helps to decarbonize the rings. The downside is that after washing without removing it you have to change the oil and spark plugs. Although, as we said, cleaning can be timed to coincide with changing the oil and filters.
- Washing injectors with removal . Everything is clear here. This is the best way to get your injectors looking their best. The method works if we know for sure that the fuel system is in order, there are no problems with the electronics and there are no frogs croaking in the tank. You can literally rinse on your knees and without any stands.