Lada Kalina has been mass-produced by AvtoVAZ for more than 10 years and even managed to undergo a good restyling several years ago. No matter how unflattering people say about this car, sales volumes indicate the popularity of the model. Maybe its appearance, especially the first generation, cannot be called a reference, but compared to all previous VAZ models, it is the most reliable and safe car.
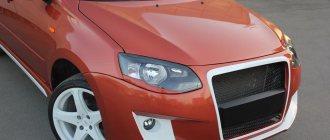
To correct the situation with the unfortunate appearance of their iron horse, some car enthusiasts use various methods of modification. There are many options for modernization, but one of the most popular methods of external tuning is body kits. For the most part, these are alternative bumpers front and rear.
Advantages and disadvantages of tuning
Car owners install body kits and, in particular, a different color bumper on Kalina not so much to improve aerodynamic characteristics, but to change the appearance. In general, not everyone thinks that the body kit primarily improves the streamlined silhouette of Kalina, correcting the shortcomings of the engineers who created the standard bumpers. In addition, other bumpers add individuality to the appearance, especially if they are made to order.
Alternative elements can be installed on any body variant of the Lada Kalina - it doesn’t matter whether it’s a hatchback, sedan or station wagon.
A well-chosen rear and front bumper can visually change the appearance of Kalina beyond recognition. It is quite possible that at a quick glance the car will look like a foreign car.
Purpose of a car bumper
The front bumper, like the rear bumper in the Lada Kalina car, serves to protect body components and assemblies of various systems from external mechanical influence, for example, during an accident. The device is not a protective element for the driver or his companions, because airbags and other power components of the body are used for this. The body element is capable of absorbing part of the energy from a collision, thereby reducing the level of destructive impact exerted by inertia on the body components located behind it. This is true for high speeds. When driving at minimum speeds, the plastic element is able to completely absorb the impact energy of a collision, preventing destruction of the car body and systems.
Characteristics of Kalina bumpers of the first and second generation
If this is a standard option, it is made of the most inexpensive material. Typically, ABS plastic is ideal for such purposes. This is a modern and practical type of plastic. Its main feature is flexibility. The material provides resistance to minor impacts and immunity to aggressive chemicals. For example, a bumper made of ABS plastic is not harmed by gasoline. It is not afraid of the destructive ultraviolet rays of the sun, and the surface has excellent adhesion to various paints and varnishes, such as car enamel or primer.
The material is universal in use, but has one significant drawback. At low temperatures it loses its flexibility and cracks easily. Therefore, in cold weather you need to be especially careful when dealing with various kinds of obstacles, as the material becomes brittle and easily damaged.
On the second generation Lada Kalina, a different material was used to make bumpers, namely fiberglass. Of course, we are talking about a modification of the Lada Kalina Sport. In fact, this is an analogue of ABS plastic, but its main disadvantages are excluded. Of course, its strength is not enough to withstand a serious collision with an obstacle, but it is still less fragile. But it also turns out to have a drawback.
Painting a fiberglass product is problematic, so it is better to entrust the painting of such an element to professionals.
Selection of bumpers for Lada Kalina
There are several options, depending on the body style, including standard models. When purchasing such products, you should take into account the features of the body, since, for example, a sedan has structural differences when compared with a hatchback and station wagon, and vice versa. Selecting bumpers and other body kit elements for Kalina is not difficult. The model is popular, and a large number of external tuning options have been created for it to suit every taste.
For example, the most popular option among car owners is ABR Samurai bumpers and moldings. With this body kit you can create the appearance of a Subaru Impresa. The elements improve the aerodynamic characteristics of Kalina no worse than the bumpers on Kalina Sport. Similar body kits can be selected for hatchback, station wagon and sedan, as well as for the Kalina Cross version.
As for the station wagon, it is quite difficult to find good bumpers to replace the standard ones. The fact is that this body type was created as a family car and tuning it is not entirely appropriate. A station wagon will look ridiculous with an aggressive sports body kit. You can install bumpers from a sedan or hatchback, but this will not give the required effect. To select a front or rear bumper for a Kalina station wagon, it is better to turn to the experts in their field. There are few truly professional showrooms, but this is where they will install and manufacture bumpers that will ideally harmonize with the features of any body.
For other bodies, it is also worth approaching the choice of body kit in general wisely, so that the result of the work does not cause ridicule from others. It is generally not recommended to engage in amateur activities in such a matter, otherwise the most harmless thing that will result is an absurd appearance.
Incorrect selection of body kit will lead to the car being unstable when driving at high speed, which can cause an accident.
Removing the rear element
To remove the rear bumper you will need the following tools:
- key to “10”;
- Phillips screwdriver.
We proceed according to the algorithm below.
- We provide easy access to the lower fastening components. To do this, we hang the sides of the car one by one with jacks and remove the wheels. Don't forget about safety elements.
- We dismantle the mudguards located above the wheels on both sides of the car. To do this, unscrew three screws.
- Next, access to two screws opens. They “capitulate” under the “onslaught” of a Phillips screwdriver.
- Using a socket wrench, we unscrew a pair of screws at the bottom and two fastening components at the top of the product.
- We remove the rear bumper from the hooks and carefully remove it from the car.
- We dismantle the amplifier. It is held in place by three mounting points.
Removing bumpers on Kalina 1st and 2nd generation
Regardless of the modifications, an overpass or inspection hole will be required, since these body elements are attached in several places, including the lower part. If you wish, you can do without a hole, but in this case you will have to lie under the car or look for fastening bolts by touch, which, for obvious reasons, is not entirely convenient.
It is recommended to carry out all manipulations on the Lada Kalina with an assistant so that you can hold both sides at the same time. Otherwise, the free part may fall while the other is being freed, thereby damaging the paint. A partner’s help will also be useful during installation.
To work you will need a minimum set of tools:
- figured and flat screwdrivers;
- socket head or socket wrench 10;
- ratchet or crank.
Depending on the generation of Kalina, the algorithm for installing and dismantling bumpers is slightly different. Therefore, it is worth taking a closer look at the procedure for different modifications.
Removing bumpers on Kalina 1
If there are fog lights in front, you need to disconnect the terminals from the battery, thereby cutting off the power to the on-board network. The further algorithm of actions is as follows.
- Open the hood and use a screwdriver to unscrew the screws that secure the plastic radiator grille, then remove it.
- Next, remove the lower grille, first unscrewing the two fastening screws.
- Behind the radiator grille you can see two more screws, which should be unscrewed, as they secure the bumper.
- Under the car, in the place where the lip is located, you need to unscrew the 10 bolts located in the middle.
- On the left and right there will be two more self-tapping screws for fastening the bumper; they also need to be unscrewed.
- There are two more mounting bolts in the wheel arches at the front; if fender liners are installed, they will have to be removed to get to the screws.
- After unscrewing all the fastening screws and bolts, the front bumper remains secured with latches. To avoid breaking them off when removing them (they are plastic), you need to grab the lower edge of the bumper and pull to the side, thus disengaging the latches. Next you need to pull the bumper forward and remove it.
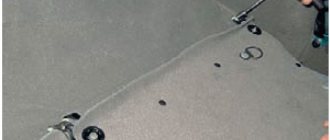
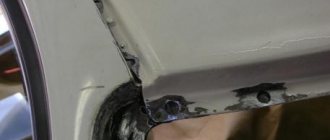
There are often pockets of corrosion under the bumper (especially if the car is older than 5 years). It is recommended to clean and treat these areas, then prime and paint.
When installing a new bumper, you must follow some rules, namely, you must correctly install the latches in the latches. One side is put on immediately, after which the second, with the participation of an assistant, is pulled onto the latches. Next, all that remains is to screw all the screws into place and secure the radiator grilles.
Removing and installing the front bumper Kalina 2
The second generation of the machine uses a different mounting method. The screws on the bottom are located far back from the overhang, so it will be difficult to unscrew them without a lift or inspection hole. On the other hand, there are also advantages. To get to some fasteners, you do not have to remove the radiator grille.
The procedure for removing the front bumper on Kalina 2 is as follows.
- Open the hood and turn off the power to the on-board network by disconnecting the terminals from the battery.
- Remove the three central mounting bolts under the car's bottom.
- Unscrew the two screws from the bottom, they are on the right and left.
- Now the bolts located in the front wheel arches.
- There are six mounting bolts on the top of the radiator panel; they should be unscrewed. (On Kalina 2, identical bumpers are installed in the hatchback and station wagon, so there is no difference in dismantling).
The further operation is carried out in exactly the same way as for the first generation Kalina. It is better to carry out all actions with the participation of an assistant.
After removal, you need to disconnect the terminal blocks of the fog lights (if any), and be sure to connect them during reassembly.
Detaching the rear bumpers
To remove the rear element on Kalina 1, you need to use, in addition to the above tools, a short shaped screwdriver, as well as Torx keys or simply an “asterisk”, since self-tapping screws with such heads are attached to the fender liners. Since the back of the car always contains more dirt under the bumper than the front, it is recommended to first wash and dry the rear bumper, including the inside.
Bumpers on Kalina 2 in a hatchback body are much more difficult to disassemble. And all because you will have to additionally remove the rear lights. Here, too, there are latches that can be removed in the same way as in the front.
Removing the rear bumper on Kalina 1
This can be done without an inspection hole or a lift: the bolts of the lower fastenings are located close. The dismantling procedure includes the following steps.
- Unscrew the three fastening screws in the wheel arches, two screws secure the mudguards.
- Behind each mudguard there is a 10mm bolt that needs to be unscrewed.
- The bottom 10 bolts are also unscrewed.
- Next, you need to open the trunk and unscrew the 4 screws on the top.
The further algorithm of actions is similar to the procedure for removing the front bumper. You need to pull one side until the latches come out of the latches, and then remove the element from the car. If necessary, you can also remove the plastic amplifier, which is attached to the body with three bolts.
Removing the rear bumper on Kalina 2
To remove the rear bumper of the second-generation Kalina, you must first get to the hidden bolts under the side lamps; the easiest way to do this is by removing the latter. The lights are attached to bolts; they should be unscrewed with a size 8 wrench and then removed, disconnecting all the wires.
On a hatchback, removal from the rear is carried out in the following order:
- The element is attached to the body from below with two bolts in the center and two self-tapping screws on the right and left; they need to be unscrewed.
- Using Torx keys, unscrew the screws in the wheel arches, after which you can remove the mudguard retainer.
- Unscrew the 8 fasteners from the top. 6 bolts are located at the threshold of the luggage compartment, and two more in the seats where the lights were previously located.
- All that remains is to unlock the latches and remove the bumper from the car.
Dismantling the element on Kalina in a station wagon differs in that the fastening from below is now only three bolts, there are no fastening elements on the right and left. Even a beginner can remove and install the bumper on a Lada Kalina; the main thing in this matter is accuracy, as careless actions can lead to damage to the paintwork. Caution is also needed when unlocking latches, which are easy to break; it is not for nothing that it is recommended to carry out this procedure with an assistant.
Problems with removing and installing Lada Kalina bumpers
Many car enthusiasts encounter some difficulties during installation, especially when we are not talking about standard models. In order not to accidentally break a part, it is better to perform all actions with an assistant. As a last resort, you can address this issue to a car service center, where they will do it quickly and inexpensively. If the installation takes place at sub-zero temperatures, it is necessary to carry out dismantling and installation in a warm heated box: plastic is fragile in the cold and can be damaged.
Minor problems await those who are planning to replace the original part with a sports tuned version.
The fact is that in most cases it requires adjusting the part to the body. Therefore, it is better to seek help from specialists so that you do not have to buy a new bumper. You will also have to remove this part when replacing the headlights. Without this, you shouldn’t even try to replace it, otherwise you may lose both the bumper and headlights.
When searching for information about replacement on the Internet, you should keep in mind that in the huge amount of information, not every piece of advice is given by professionals. And no one will be held accountable for wrong actions. So this issue should be approached more responsibly.
Replacing the rear bumper
Replacing the rear bumper of a Lada Kalina has its own characteristics that are worth studying before removing the rear bumper from this car.
Hatchback, sedan, and station wagon bodies are equipped with bumpers of different configurations, which have their own characteristic mounting features. As a result, when installing them, it is necessary to perform some additional operations that differ from the standard algorithm of actions.
As for the step-by-step instructions for performing this operation, they are as follows:
- The first step is to remove the standard mudguard. To do this, unscrew three screws in the wheel arch of the rear wheel with a Phillips screwdriver and remove the mudguard.
- From the bottom of the car, use a screwdriver to unscrew the screw of the lower fastening of the mudguard and dismantle the mudguard itself. The mudguard located on the left wheel is also removed in the same way.
- Use the “tenth” head to unscrew the lower fastening bolts.
- open the trunk lid and use the same head to remove the four upper mounting bolts.
- With the application of force with both hands, remove the top of the body bracket from the side of the bumper. We repeat this operation on the other side of the machine.
- dismantle the shock absorber, unscrew the three nuts on the “10” energy-absorbing beam of the rear damper and also dismantle it.
Kalina bumper trim
It serves not so much as protection, but rather to give the appearance of the car new characteristic features. There are a lot of such elements. And you can choose the one you like the most.
Overlays
| Name | Properties and Functions | Peculiarities |
| For example, the Courage overlay | Creates a more aggressive and expressive appearance, the front part is lowered by 2 cm. The trim is fixed on the bumper and looks like a single unit with it, creating a sporty style of the usual Kalina modification. The use of this pad improves aerodynamic performance due to the protrusions at the front and sides. | For fastening, you can use a special sealant or ordinary self-tapping screws. |
| Overlay Cameo-Sport | It also affects aerodynamics, increasing downforce, which is important when driving at high speeds. The design of this element improves the vehicle's handling and increases steering sensitivity. The design features of the lining make it possible to redirect oncoming air flows, thereby reducing resistance. | For installation, you can use two methods: either with plastic sealant or with bolts. In the first case, speed is attractive, and in the second, reliability, although installation with bolts will take much more time. |
| Runi pad | Chrome plated. Gives the car solidity. made of high quality stainless steel. | The rear bumper option complements the existing body kit. |
Another one is Totti's rubber. Like all others, it was created to decorate Kalina and improve aerodynamic properties. In addition, it provides protection against dirt and creates a unique style of appearance. This series of pads is characterized by durable material that ensures reliability and durability.
Removing the rear element
To remove the rear bumper you will need the following tools:
- key to “10”;
- Phillips screwdriver.
We proceed according to the algorithm below.
- We provide easy access to the lower fastening components. To do this, we hang the sides of the car one by one with jacks and remove the wheels. Don't forget about safety elements.
- We dismantle the mudguards located above the wheels on both sides of the car. To do this, unscrew three screws.
- Next, access to two screws opens. They “capitulate” under the “onslaught” of a Phillips screwdriver.
- Using a socket wrench, we unscrew a pair of screws at the bottom and two fastening components at the top of the product.
- We remove the rear bumper from the hooks and carefully remove it from the car.
- We dismantle the amplifier. It is held in place by three mounting points.
Now the owner has scope for further actions, for example, to install a tuning version of the product.
Installation of the element is carried out according to the reverse procedure. It is also recommended to collect the fastening components in separate boxes. If for some reason the structure “refuses” to be dismantled, then increased efforts should not be made so as not to break the fragile plastic structure. Here it is better to check whether all fastening components have been removed?