How to properly replace valves on Lada Kalina
Many owners of the domestic Lada Kalina car are faced with the need to replace valves or pumps. There are many reasons to do this, for example, the cylinder head gaskets have partially or completely burned out, or a breakdown has occurred due to the timing belt. In addition, the valve stem may become unusable or the plate may crack. It is also necessary to monitor the operation of the fuel filter. On machines with eight valves, replacement can be done without the help of a specialist, if, of course, you have some mechanical skills. So, in order to make the replacement, you will need the following tools:
- a very important device called a desiccant. With its help, crackers are removed;
- remover for caps, thanks to which oil is removed;
- key to “13” and knob.
After all the tools are prepared, we proceed directly to the task.
- The main cover is removed. After this you can see the camshaft.
- The gas distribution shaft is removed from the head.
- The pushers are dismantled.
- The desiccant device is fixed. Let us remind you that with its help “crackers” are removed from the valves.
All work must be carried out carefully and carefully, because if done incorrectly, the device can shoot out a “cracker”. In this case, it will be impossible to find it. After removal, you can begin to remove the spring with the plates. Note that they are dismantled very easily. Next you need to remove the valve. We recommend marking their location so that when assembling you do not make a mistake and put everything in its place. Use the points made with a punch as marks.
How to troubleshoot injector problems?
To identify the causes of an injector malfunction, you need to go through half of the car. It takes a lot of time and effort. Special diagnostic equipment is required.
Advanced cases occur among drivers who do not monitor the condition of the car. Requires time and material costs to fix the problem.
Many drivers have an indecently dirty injection system. Lack of competent maintenance and low-quality fuel take their toll.
Computer diagnostics.
The beginning of any renovation. Clarifies the causes of malfunctions. Special equipment is used.
Fuel injection system.
Represented by nozzles prone to contamination. It has a complex design, which makes it difficult to perform maintenance on your own without outside help.
Failure to promptly replace the fuel filter results in small dirt particles entering the injector nozzles. Normal supply of gasoline is difficult. Ultrasound is used to remove dirt and the filter is replaced.
Result after replacing the fuel pump
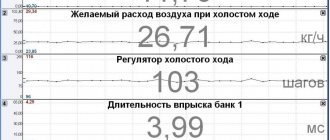
So, after replacing the fuel pump, a pressure gauge was immediately connected and when starting the engine, excellent readings of 4 kg/cm² could be observed, and when the speed was set to almost maximum, the pressure did not decrease.
Here you can see information on replacing the fuel pump, which was done in this case. As for the result specifically in terms of the operation of the motor and its power characteristics, everything is excellent here too. Now the car drives very quickly, there are no dips or slowdowns when pressing the gas pedal. As surprising as it may sound, fuel consumption also returned to normal both at idle and when driving.
News
Reviews about Autocompas.ru and the work of the staff
A review section has been introduced on the site, using the latest technologies, now each client can write a review from their personal account.
Read completely
Automation of Returns
A completely new and intuitive returns system.
Read completely
Delivery across Russia
Global update of the “Delivery” section! Track numbers in your personal account and convenient cargo tracking.
Read completely
Updated VIN form
An updated form for creating an application for an expert to select spare parts using the vehicle’s VIN code.
Read completely
Video review of a dying fuel pump on Kalina
If you don’t want to read everything written above, then you can watch this video, in which everything was clearly demonstrated.
If you have any questions, ask them below in the comments or discuss them on the channel under the video.
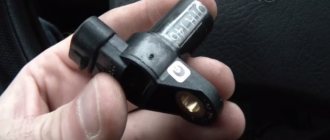
The fuel pressure regulator is a diaphragm valve. Fuel presses against it at one end, and the intake manifold spring presses against it at the other. At lower speeds, the valve opens, accompanied by the draining of residual fuel from the engine into the tank. The next time fuel is supplied, the pump starts, drawing the liquid through the filter. There is a special stabilizer on the fuel rail, whose task is to maintain optimal pressure in the system.
If this component breaks down, the engine power of the machine drops and uneven operation of the engine is felt. To protect yourself from this, you need to systematically check the regulator and promptly respond to symptoms of damage to the device.
Checking the pressure in the engine power supply system
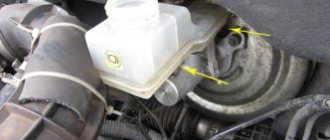
The pressure in the engine power supply system can be checked with a conventional pressure gauge (for example, from a tire pump). We carry out the work on a cold engine. Relieve the pressure in the power system (see “Replacing the fuel filter”). We put an oil and petrol resistant reinforced hose (with an internal diameter of 12 mm) onto the threaded fitting of the pressure gauge and secure it with a clamp on the right side of the engine (in the direction of travel of the car).
. unscrew the plastic cap of the fitting on the fuel rail (for clarity, the plastic engine screen has been removed).
Using the wheel valve cap, unscrew the spool valve from the fuel rail fitting.
We remove the spool from the fuel rail.
We put the pressure gauge hose on the ramp fitting and secure it with a clamp. With the ignition off, for 3-5 minutes, using a wire, we supply “+” 12 V power from the battery to pin “11” of the diagnostic connector. The electric fuel pump should turn on. Its operation can be monitored by ear. Within 10 seconds we measure the fuel pressure, which should be 3.6-4.0 bar. After turning off the pump, the pressure may decrease slightly and then stabilize for a while. If the pressure in the system is more than 4.0 bar, the fuel pressure regulator is faulty. Low pressure (below 3.6 bar) in the power system can be caused by a clogged fuel filter or fuel module strainer, as well as a malfunction of the electric fuel pump and fuel pressure regulator. To check the fuel filter for contamination, you need to remove it (see “Replacing the fuel filter”), drain the remaining fuel from it and blow it through a piece of hose (you can use your mouth). The resistance to air passage during purging should be insignificant. Otherwise, we replace the fuel filter with a new one, which we recommend always keeping in stock. We check the condition of the fuel module strainer after dismantling the module (see “Removing and disassembling the fuel module”). If the mesh filter is very dirty, clean and rinse it. To check the serviceability of the fuel pressure regulator (at low pressure), you should connect a hose with a pressure gauge directly to the output fitting of the fuel module. We supply power to the electric fuel pump as indicated above. If the fuel pressure is 3.6 bar or higher, the regulator is releasing fuel pressure too much. This regulator is faulty and must be replaced (see “Removing and disassembling the fuel module”). If the fuel pressure in the engine power supply system is low and continues to drop after the electric fuel pump is turned off, then this may be due to leaky connections of the fuel module, a malfunction of the pump, or leaking injectors. To find the cause of the malfunction, turn on the electric fuel pump again for 10 seconds (supplying power to contact “11” of the diagnostic connector) and after turning it off, completely pinch the rubber hose supplying fuel to the fuel rail. If the pressure stabilizes, then either the fuel module or the electric fuel pump is faulty. If the pressure continues to drop, one or more injectors are leaking. A leaking injector can usually be identified by the dark color of its nozzle, which contains coked droplets of fuel. Checking the tightness of the injectors is described in section. “Checking the injectors, removing the fuel rail and injectors.”
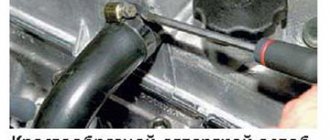
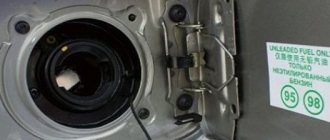
On Sunday I was surprised to learn that Kaliny has a fuel system. Or the engine power system. Or what else to call her. I used to think that I filled the tank with AI-95 gasoline and drove myself when I needed it. But no. It turned out that gasoline somehow needed to be delivered from the gas tank to the internal combustion engine. Because the tank is at the back and the engine is at the front. Okay, let's leave the lyrics. How it all happened. I was returning from dancing at night, the girls suddenly started howling: “It smells like gasoline!” What am I, my nose is clogged, runny nose, drooling, snot. I got to the parking lot and opened the hood. I looked into it. Closed. It's dark outside, you can't see anything. I took out a flashlight. Still not visible. Well, let's go home. In the afternoon, on Sunday, I got ready to go buy radio parts. I got to the parking lot, sat down, started it, and turned on the interior air vent. And then I clearly sensed the pungent smell of AI-95 gasoline. Opened the hood. I looked. And in normal daylight I saw a fountain of gasoline. It turned out that the canister valve tube (or supply tube, it’s hard to disassemble, they are nearby) had rubbed against some other tube. And the tube is plastic, curved in a filigree way, not like the shapeless fuel hoses on all sorts of nines and other classics. And plus to everything, you won’t find her anywhere with fire in the daytime. Well, I had to take a piece of fuel hose from 2109 (the same one that is shapeless), cut the original tube, and insert a 10-centimeter piece of fuel hose into the cut of the tube onto the clamps.
How does the Lada Kalina gasoline vapor recovery system work?
The EVAP system in question was created to prevent the release of harmful gasoline vapors into the surrounding atmosphere resulting from fuel evaporation; it includes:
- fuel shut-off valve;
- adsorber;
- solenoid valve for purging the absorbent element;
- connecting pipelines.
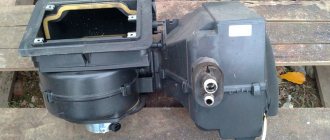
The most important component in the system is the adsorber (also called a carbon filter), the basis of which is activated non-edible carbon, enclosed in a plastic housing. The resulting gasoline vapors are absorbed by the carbon of the absorbent element, gradually accumulating in it. When the engine starts, the canister purge valve (KPA) is turned on, and due to the vacuum, all accumulated vapors enter the intake manifold and then burn out.
On the Lada Kalina, the adsorber is located in the gas tank area, and getting to it is very difficult. To dismantle this EVAP element, it is necessary to remove the fuel tank, but the control unit is located in an accessible place - the valve is located in the engine compartment, in close proximity to the battery, on the rear wall of the air filter housing. It should be noted that for turbocharged engines, a vacuum is not created in the intake manifold, and in order to force the vapors in the desired direction, an additional two-way valve is included in the circuit.
Symptoms of the need for replacement
- Reduced sensitivity when pressing the gas pedal . There is a feeling that the car is holding something. Dynamics may appear, but this happens periodically.
- Floating engine speed at idle.
- If the filter is heavily clogged, the car may stall in neutral gear.
- The occurrence of periodic failures .
- Increased fuel consumption.
The Lada Kalina inherited the principle of fuel filtration from the “ tenth ” family. This principle allows you to carry out the work of replacing elements yourself.
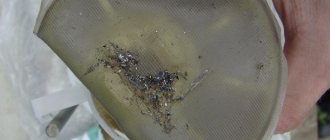
The photo shows how dirty the fuel pump mesh can be.
The following two tabs change content below.
- About the author:
- Latest articles:
I am the editor-in-chief of the site. In our editorial office: Hyundai Accent, Hyundai Solaris, Hyundai Santa FE (turbo-diesel 2015). I now have a Lada Kalina LUX (98 horses). A car fanatic, he has owned both left and right hand drive cars. Robots, CVTs, mechanics. The only thing missing was DSG. But it will be soon.
Similar materials
Tags: Lada Kalina
Replacing the electric window
If the window lift cable on a Lada Kalina car has become unusable or the motor has burned out, the ESP must be changed. We carry out the replacement operation in the following order:
- dismantle the power window control unit;
- remove the door trim;
- to disconnect the window regulator from the glass, the latter must be raised all the way up;
- unscrew the four bolts that secure the glass to the ESP (two in the front and two in the back). The glass is held on by seals, but it can also be secured so that it does not fall down;
- unscrew the black metal strip (three screws);
- unscrew the eleven window regulator fasteners (10 bolts), disconnect the power plug from the electric motor;
- We begin to remove the power window from the rear, first removing one half of it;
- then we take out the front part along with the motor from the door cavity;
A burnt-out electric motor on a lift can be easily replaced. For this:
- unscrew the three studs on the mechanism body, then four more screws;
- dismantle the motor, holding the cable spool with your hand, install a new part;
- We install the window regulator in the door, connect it to the glass guides, and put the trim in place.
Removing the Kalina fuel tank
Tool:
- Medium Phillips screwdriver
- Open-end wrench 10 mm
- Driver for socket attachment
- Knob attachment 10 mm
- Knob attachment 13 mm
- Adjustable stop
Parts and consumables:
Note:
We carry out the work on an inspection ditch or overpass with an empty fuel tank.
1. To remove fuel from the tank, remove the fuel module. To do this, use a Phillips screwdriver to unscrew the four self-tapping screws securing the hatch cover in the floor of the body under the rear seat, disconnect the fuel pipes and wire blocks. Then, use a screwdriver to turn the pressure ring and remove the fuel module. After this, we pump out the fuel through the hole in the tank.
2. Using a wrench or a 10mm socket, loosen the clamp securing the filler pipe hose and remove the hose from the fuel tank pipe.
Lada Kalina engine repair, valve grinding, cylinder head repair, pistons replacement
The mileage of the Lada Kalina car is 100 thousand km. in eight years. The car has an HBO. The viburnum engine has become less dynamic, the response is not the same.
And one more thing - I didn’t like the clattering noise in the viburnum engine.
Missing the third cylinder, trimming, Brains of HBO Alpha-S.
I decided to disassemble and evaluate the condition of the crank mechanism. We removed the cylinder head and pumped the pistons. It turns out they are very worn, but the rings are in good condition. So you need to repair the Lada Kalina engine
cylinder block 8 valve engine Lada Kalina 1118
Condition of the cylinder block between the first and second, as well as between the second and third cylinders
I immediately noticed a slight burnout (carbon deposits) on the cylinder head of the viburnum fret between the second and third combustion chambers of the cylinders. Most likely the cylinder head gasket is loose
cylinder head of 8 valve engine 1118
Piston sizes are different! .On one piston the inscription G-B2
. As far as we know, this means a group
IN
, and the “finger” marking is 2.
The connecting rods, bearings and valve guides were within normal limits. We bought a piston 2110 D=82mm E3 with rings and pins assembled. Group D was not found, so we took E. The fitting showed that everything fits perfectly.
What surprised me was the condition of the insides after using Lukoil oil 5w40 in winter and 10w40 in summer. I thought there would be a lot of soot and deposits, I expected to see a terrible picture. Alas, and for the better, my expectations were not met)))
Components of the fuel system of the Lada Kalina car
Fig.5.
Throttle assembly of the fuel system Lada Kalina 1 - throttle valve drive sector; 2, 4 — fittings for connection to the engine cooling system; 3 — crankcase gas supply fitting; 5 — throttle position sensor; b idle speed regulator; 7 — fitting for connecting to the adsorber; 8 — throttle valve; 9 — throttle body pipe
The Lada Kalina power system consists of a fuel tank, a fuel module, a fuel filter, a fuel rail with injectors, an air filter, fuel lines, air ducts, a throttle assembly, an intake module, and a gasoline vapor recovery system.
The air entering the engine cylinders is cleaned of dust by an air filter. The air filter is installed in the engine compartment on three rubber supports. The filter element is replaceable and made of special paper.
To prevent contaminated air from leaking into the intake tract, there is a sealing edging at the top of the element. To replace the filter element, the filter cover is removable. The purified air passes through the mass air flow sensor through the air duct to the throttle valve.
The throttle valve regulates the amount of air entering the cylinders of the Lada Kalina engine. The damper drive from the gas pedal is a cable drive. The damper rotates on an axis in the housing (pipe).
The throttle body is secured to the intake module flange with studs. The housing has a channel for coolant. The channel is connected to the cooling system by rubber hoses.
Circulating coolant through the throttle body prevents the body's internal air cavities from freezing in the winter. The housing contains fittings for connection to the adsorber and the crankcase ventilation system of the Lada Kalina engine.
The throttle body with the throttle position sensor and idle speed control installed on it form the throttle assembly.
The fuel supply is stored in a tank with a capacity of 50 liters. The fuel tank is steel, welded from two stamped parts. The tank is suspended from the bottom of the car on two steel clamps.
The filler neck of the fuel tank is located on the right side of the Lada Kalina car and is closed with a plug. Fuel is supplied from the tank by an electric fuel pump (gasoline pump) of a submersible type.
The fuel pump is installed in the fuel tank. To access the pump, there is a hatch with a cover in the bottom of the car under the rear seat cushions.
A mesh filter is installed on the inlet pipe of the Lada Kalina fuel pump, which traps small solid particles of debris that have entered the fuel tank along with gasoline.
The fuel pump is supplied with voltage at the command of the ECU when the ignition is turned on. If no attempt is made to start the engine, then after 2-3 seconds the ECU will turn off the fuel pump.
From the pump, gasoline flows through the corrugated tube of the fuel module into the fuel line and then into the fuel filter, where the fuel undergoes more thorough cleaning.
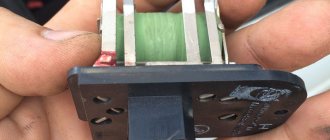
Fig.6. Gasoline pump Lada Kalina
1 — protrusion for fastening the mesh filter; 2 – fuel intake pipe for connecting a strainer; 3 - body; 4 — electrical connector block; 5 - outlet (discharge) pipe for connection to the fuel module cover with a corrugated tube
Replacing the fuel pump Lada Kalina
The operation of replacing the fuel pump requires experience and accuracy (elements of the fuel module can be damaged), therefore, if the fuel pump is faulty, it is recommended to replace the entire fuel module.
Work to replace the fuel pump Lada Kalina:
– Remove the fuel module
– Remove the pump from the intake chamber of the fuel module.
– The strainer is held in place by a locking spring washer on the cylindrical boss of the fuel pump.
– Remove the strainer from the electric fuel pump pipe. At the same time, we help with a slotted screwdriver with a thin blade, carefully moving the lock washer along the pump boss.
– Having released the latch, remove the fuel pump from the holder.
– Using a screwdriver, remove the clamp securing the tube on the pipe of the Lada Kalina electric fuel pump.
– We heat the end of the corrugated tube placed on the nozzle of the electric fuel pump.
– Monitor the temperature of the heated parts; do not overheat the pump and tube.
– Remove the corrugated tube from the pump nozzle.
– Install the fuel module in reverse order.
– At the same time, putting on the strainer, use a slotted screwdriver with a wide blade to press the filter spring washer onto the protrusion of the pump.
Fig.7. Fuel filter Lada Kalina
1 — inlet pipe; 2 - body; 3 — fuel flow direction arrow (painted on the filter housing); 4 - outlet pipe
The fuel filter is made of paper, installed in a non-separable metal housing. The purified fuel flows through the fuel line into the fuel rail.
The Lada Kalina fuel rail holds four injectors and supplies fuel to them. The connection between the ramp and the injectors is sealed with rubber rings. The ramp is secured to the cylinder head with bolts.
The fuel pressure regulator is a bypass valve that maintains a working pressure of 378-390 kPa in the system (fuel line), necessary for the proper operation of the injection system.
In accordance with current environmental requirements, the car is equipped with a fuel vapor recovery system; the above-fuel space of the tank is connected to the atmosphere not directly, but through the elements of this system.
The system consists of a separator, an adsorber, an adsorber purge valve, connecting tubes and hoses. The separator is mounted under the left rear fender of the car. In the separator, gasoline vapors are partially condensed and returned back to the fuel tank through the filler pipe.
From the separator, non-condensed gasoline vapors flow through tubes and connecting hoses into the adsorber, which prevents the vapors from entering the atmosphere.
The Lada Kalina adsorber is a container where gasoline vapors are absorbed by activated carbon. When the engine operates at a high crankshaft speed, the ECU sends a signal to open the canister purge valve, and gasoline vapors are sucked into the intake module receiver.
The adsorber is mounted on the fuel tank on the left and covered with a protective screen.
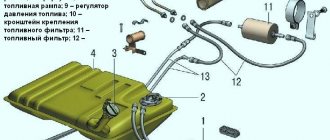
Fig.8. Lada Kalina engine fuel supply system diagram
1 — throttle assembly; 2 — adsorber purge valve; 3 - fuel filter; 4 - separator; 5 - filler pipe; b - adsorber; 7 — nozzles; 8 — diagnostic fitting of the fuel rail; 9 — fuel rail; 10 — fuel tank; 11 - fuel module
Air is supplied to the intake valves of the engine cylinders through the intake module. The engine intake module is made of special plastic and is a non-separable element.
Fig.9. Lada Kalina engine fuel module
1 – inlet pipe (for supplying fuel to the pressure regulator); 2 – outlet (discharge) pipe; 3 – module cover; 4 – fuel level indicator sensor; 5 – intake chamber; 6 – module cover guide
Replacing the adsorber purge valve on Kalina
If the check shows that the Evap-Solenoid is faulty, the part must be replaced (catalog number - 11181164200). There is no point in repairing the device:
- the price of the valve is in the range of 400-800 rubles;
- You can buy the device in almost any store that sells VAZ spare parts;
- changing the KPA is very easy and simple.
But before making a replacement, it would be a good idea to check the control circuit; quite often the valve does not work due to a break in the wires going to it. To complete the work, you will not need a pit or a lift, and the procedure itself will take no more than one to two hours, even if the operation is performed by an inexperienced worker without metalworking skills.
We change the valve as follows:
- turn off the ignition, raise the hood;
- find Evap-Soleno />
- We dismantle the valve together with the tube, and the disassembly is almost complete.
Replacing the purge valve could be considered a very simple task, if not for one “but” - it is very difficult to remove the plastic tube from the CPA without damaging it, and it does not come with the new valve. There are two options here:
- try to carefully heat the connection with a hairdryer and pull off the pipe;
- cut the tube at the connections, and instead buy an ordinary fuel hose with a diameter of 8 mm and two clamps.
Having measured the required length of the hose, cut it, connect it to the valve and connector, we get approximately the same design as in the figure below.
We install everything in place, start the engine, and test the car on the move.
Causes of gasoline pump malfunction
If Kalina’s fuel pump does not pump, then the reasons will be in the equipment itself or in other parts of the system. First, you should make sure that there is fuel in the tank, a spark in the spark plugs, the battery is charged, and the starter is working. If everything is in order, then you need to continue checking. If the cause of the malfunction is identified, for questions regarding the purchase of auto parts to eliminate it, you can contact the specialized online store automechanika38.rf.
Electromechanical equipment may not function correctly or stop working due to a malfunction in either the mechanical or electrical components of the system.
- The fuel pump fuse has blown - you should remove the element from the fuse box (located in the engine compartment). If the contact has visible damage, the part needs to be replaced.
- The equipment relay is faulty - check the electrical wiring, contacts between the unit and the diagnostic block, as well as the relay. Using a test lamp or multimeter, check the presence of voltage at the pump chip. A correctly operating relay makes clicks when the ignition is turned on, after the required pressure has been reached in the fuel line.
- There is no contact of the equipment with “ground” - it is necessary to apply ground to the part chip. The wire is located under the instrument panel and runs through the interior of the car. It is worth checking it, cleaning the contacts, and fixing them securely on the pump.
- The electronic control unit is faulty - the ECU needs to be repaired or replaced.
- A breakdown in the car alarm, poor installation of the security system - electrical wires may be mixed up, errors may have been made when connecting the alarm.
- Insufficient pressure in the fuel line may be the result of contamination of the gasoline filter or the filter mesh of the pump itself.
Many car owners prefer to drive with a half-empty fuel tank. However, the fuel pump in this case often overheats, which will ultimately lead to equipment malfunction. The reasons why the fuel pump on Kalina does not turn on may be the breakdown of individual parts of the unit. To determine the problem, it is necessary to remove the equipment and diagnose it.
Selecting new filter elements
To purchase fuel purification system parts for VAZ 1117-19 models, you need to know what they look like:
- The coarse filter is a flat mesh bag made of chemically resistant plastic that captures large particles of 80-100 microns. In the center of the element there is a plastic fitting that fits onto the counterpart of the gasoline pump.
The mesh element is equipped with a pipe that fits onto the fuel pump fitting - The fine filter is made in the form of a cylinder with two fittings at the ends. The body is made of metal or special plastic - polyamide, and there is filter paper inside it. It traps particles measuring 15-50 microns. The pipes are equipped with clamps for fastening fuel hoses.
The element is equipped with clamps for fastening fuel line connections
All modifications of the Lada Kalina, including the second generation, are equipped with absolutely identical filter elements - a “barrel” and a mesh catcher. The dimensions of the spare parts are also identical.
There are no tricks in choosing a coarse mesh - the parts are made according to a single sample and cost from 30 to 45 rubles. The only caution: in order not to purchase a low-quality product or a fake, contact well-established stores. Although the fuel pump mesh costs a penny, it plays an important role in the fuel system: it catches large debris that can quickly clog the filter paper of the next cleaning element.
In operation, the plastic case is not inferior to the metal one in terms of reliability.
How often is replacement done?
There are clear regulations for replacing consumables, which include fuel filters. According to the requirements of the machine's operating instructions, they must be changed every 30 thousand kilometers. But given the different quality of fuel at gas stations and the operating conditions of the car, experienced auto mechanics recommend reducing the maximum interval to the following values:
- for a fine filter - 20 thousand km;
- for coarse mesh - 70 thousand km;
- when operating in northern regions, the service life is reduced by half from the regulations, that is, it is 15 and 35 thousand km, respectively.
Some motorists who carefully care for their Kalina offer their own replacement intervals. The principle is as follows: all consumables are updated simultaneously, along with the addition of fresh oil. With such a scheme, the interval is reduced to 7-15 thousand km, depending on the quality of the engine lubrication.
Compared to its predecessors, the Lada Kalina has a more modern and complex design. But the gasoline filtration scheme, inherited from the “tenth” VAZ family, remained unchanged. Thanks to this, it remains possible to change the cleaning elements yourself and not pay money for car service services.
- Author: ratico19
Rate this article: (20 votes, average: 4.5 out of 5)
Malfunction of injector nozzles symptoms
Fuel injection has undeniable advantages over the carburetor principle of mixture formation. First of all, this means more accurate dosing of fuel, and therefore greater efficiency and acceleration of the car and less toxicity of exhaust gases. However, the main executive part of the injection system - the nozzle - operates under difficult conditions and is therefore very demanding on maintenance.
Nozzle (injector)
– a controlled solenoid valve that ensures a dosed supply of fuel to the engine cylinders. There are injectors for central (single-point, mono) and distributed (multi-point) injection.
Control block
– an electronic unit that controls the injection system, in particular the operation of the injectors.
Nozzle device:
a – single-point injection nozzle, b – distributed injection nozzle 1 – filter, 2 – electrical connector, 3 – electromagnet winding, 4 – nozzle body, 5 – core, 6 – valve body, 7 – valve (b – valve needle), 8 – sealing ring, 9 – spray hole.
Fuel is supplied to the injector under a certain pressure (depending on the engine operating mode). Electrical impulses supplied to the injector solenoid from the control unit actuate the needle valve, which opens and closes the injector channel. The amount of fuel sprayed is proportional to the pulse duration specified by the control unit. The shape and direction of the spray torch play a significant role in the process of mixture formation and are determined by the number and location of the spray holes. Central injection.
Fuel is injected into the common intake manifold by one nozzle (for all engine cylinders), which is installed in front of the throttle valve, in the place where the carburetor should be, and is characterized by low resistance of the electromagnet winding (up to 4-5 Ohms).
Single-point injection - as an intermediate stage in the transition from a carburetor to distributed injection systems and was installed on cars mainly in the 80s of the 20th century. In the 90s, single-point injection was almost universally replaced by multi-point or distributed distributed injection.
Separate injectors inject fuel into the intake manifolds of each cylinder. They are located at the base of the intake pipes (at the cylinder head housing) and are characterized by a relatively high resistance of the electromagnet windings (up to 12-16 Ohms). The exception is the injectors of turbocharged engines, which have a winding resistance of up to 4-5 Ohms. On some latest generation vehicles, fuel is supplied directly into the combustion chamber (direct injection). The injectors of such engines are characterized by a high operating voltage of the electromagnet (up to 100 V).
Main signs and causes of injector malfunction.
The condition of the injectors significantly affects engine performance. The main signs of their malfunction are: jerks and dips when the load on the engine increases; insufficient power developed by the engine; unstable operation at low speeds; increased toxicity of exhaust gases. You can check the functionality of the injector electromagnet yourself by touch or using a stethoscope. Valve activation is accompanied by characteristic clicks. Valve immobility may be the result of damage to the electrical circuit, poor contact of electrical connections, lack of electrical impulse, or a break in the injector solenoid winding.
The most common malfunction of injectors is their contamination. They are located in an area exposed to high temperatures. The consequence of this is coking by the resins contained in the fuel (especially low-quality fuel), the formation of solid deposits on the injector, blocking (partially or completely) the spray holes and violating the tightness of the needle valve. In addition, general contamination of the fuel system elements (tank, pipeline, filter, etc.) leads to clogging of the injector channels and filter with sludge particles. The main way to restore normal operation of injectors is to wash them.
Cleaning the injectors
This operation involves removing (washing out) accumulated contaminants from the system. The main methods of cleaning injectors include:
Removing old deposits using this method can lead to the exact opposite result: a large amount of sludge, washed away by the detergent additive from the walls of the fuel system, clogs the pipeline, the fuel filter, and sometimes the injectors themselves, completely rendering them inoperable.
Flushing injectors using a special installation without dismantling them involves running the engine using a special flushing fuel (solvent). To do this, the standard fuel pump of the car and the fuel drain line into the tank (“return”) are turned off, and the fuel line of the injection system is connected to an installation (stand) that has a reservoir with a solvent, which is supplied under pressure to the injectors.
The process is divided into several stages. First, the engine runs for 15-20 minutes at idle speed. Then it is stopped for 15-20 minutes to soften particularly stubborn deposits. Then the engine starts again and runs for 15-20 minutes in the mode of periodically increasing the speed to its maximum number. The effectiveness of flushing can be indirectly determined by the duration of opening and closing of the needle valve (using a multitester), by the smoothness of the increase in speed and the concentration of CH in the exhaust gases. The approximate solvent consumption is approximately 0.7 liters for flushing an engine with a working volume of 1.2-1.4 liters. The final stage of flushing is to restore the connections of the standard fuel lines and run the engine on gasoline for 30 minutes. It is recommended to carry out such washing every 15-20 thousand kilometers.
Washing on an ultrasonic stand with dismantling the nozzles is used as a last resort to remove large hardened deposits when the first two methods do not lead to the desired results. The principle of operation of such stands is based on the destruction of deposits of a nozzle immersed in a special detergent composition using ultrasound. In addition, benches, as a rule, allow you to accurately evaluate the performance and spray quality of an injector.
General recommendations: Try to avoid refueling at questionable gas stations. Using high-quality gasoline will extend the life of the injector. Follow the recommended timing for replacing the fuel filter. When carrying out repair work, do not allow the fuel system to become clogged. Failure to seal the injector sealing rings may result in a fire. When installing injectors on the engine, it is recommended to replace the O-rings with new ones. To facilitate installation, the rings are lubricated with engine oil.
We expel air from the cooling system
The cooling system can become airy for various reasons, and first of all, the heater in the cabin stops blowing warm air, the temperature rises, and the antifreeze boils. If you squeeze the upper and lower radiator hoses, you feel that they are empty, there is no coolant in them. Often, “airing” occurs after replacing the heater radiator, and it is sometimes very difficult to remove air from the system. Alternatively, you can install an additional tee on the lower heater pipe under the hood, and lead the new hose into the expansion tank from above; a plug should be placed in the lower pipe from the tank to the lower radiator pipe.