So we got around to cleaning the injectors or, as they say in the services, the injector. The reason for this action was, as it seemed to me in the last month, insufficient throttle response on the highway. There were no obvious signs of clogged injectors or throttle: the car runs stably at idle. Or maybe I just got too drunk and this condition of mine coincided with a period of driving in fairly hot weather, and in the heat the car stalls even with clean injectors, because the air is less dense than in cool weather.
I remember one day relatively recently I went to my mother-in-law’s dacha to pick berries, we went there at about 11-12 o’clock, we left from there at about 20 o’clock. So, on the way back the car was noticeably faster, accelerated easier, and at the same time instantaneous fuel consumption according to BC was less, like the average per 100 km. However, for some reason I moved away from the topic of injectors, or as Winnie the Pooh used to say: “So, where was I going to go?” And I was going to outline my sequence of actions in the archetypal matter of periodically cleaning the injector, especially considering the quality of our gasoline.
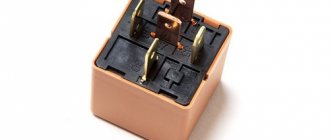
And in general, for the purposes of prevention, it would also be time, otherwise the mileage has already approached 80. I didn’t clean the injector at the service center, it was strangled by a toad - that’s about 1.5 - 2 thousand rubles. And while cleaning, I realized that this is the real price for this work, but it’s better to do it myself, because there is nothing complicated, and the money is 10 times cheaper. You will need a carb cleaner (150 rubles), an injector block, a button and a light bulb with wires (30-50 rubles).
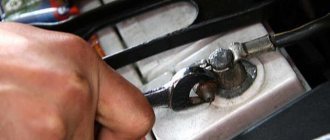
Well, let's get started. The first step is to relieve the pressure in the rail. To do this, remove the terminal from the fuel pump and then try to start the engine. For some, the engine seizes and even runs for some time on the remains of gasoline in the ramp, but mine flatly refused. In general, I turned the starter 2 times at 10 revolutions each. After that, we remove the terminal from the battery, we won’t need it anymore. Next on the list:
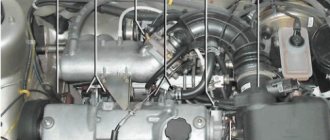
1. Remove the air filter along with the corrugation that goes to the throttle valve and remove the mass air flow sensor connector.
2. I also recommend removing the throttle valve itself. There will be more space and scope for manipulating the removal of the ramp, and you can also clean it. We also remove 2 connectors.
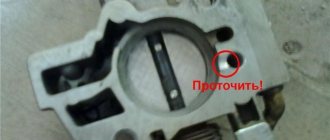
3. Carefully check the temperature of the exhaust manifold with pens! Why do you ask?, but so that the remaining gasoline in the ramp, when unscrewing it from the line, does not flare up (getting on the manifold) and force you to check the expiration date of your fire extinguisher. For example, my pipes were already just warm, unlike the valve cover, it remained hot for quite a long time.
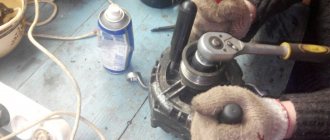
4. Next, disconnect all the injectors from the power supply, unscrew the ramp from the line and unscrew the 2 hex bolts that secure the ramp itself. The bolts are VERY tight! It seems they are coated with a little thread sealant at the factory. The main thing is to tear them out of place, after which they can be unscrewed literally with your fingers.
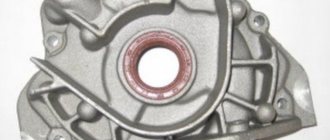
The procedure for removing the ramp is quite sophisticated))). After unscrewing the 2 hexagons, the ramp rests on the injectors inserted into the intake manifold quite well. Although it sways easily. We pull it out by shaking it and at the same time pulling the nozzles out of their seats. Then we turn the ramp along its axis 180 degrees so that the nozzles point upward and pull it out from the side of the 1st cylinder. I was unable to pull it out without turning the ramp over, because it rests on the intake manifold. In Murzilka, removing the ramp involves removing the entire intake tract, but I did it without unnecessary manipulations.
ramp with nozzles
carburetor cleaner
Then remove the clamps from the injectors and pull the injectors out of the ramp. They are held in place on the ramp simply by rubber bands, but they fit so damn tight! Honestly, I barely pulled it out. Immerse the injectors in a container with carburetor cleaner for 30 minutes or more. I recommend removing the rubber bands first. I also filled the ramp with cleaner. While they are soaking, we go to lunch, because war is war, and lunch is on schedule. That's exactly what I did.
injectors drooping
ramp with cleaner
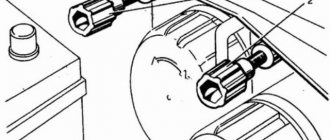
We ate and began assembling the device for direct cleaning. My device consists of a syringe, an injector block, a light bulb and a non-latching button. At the time of soldering, the button died the death of the brave: the soldering iron turned out to be more powerful than necessary and the contact was simply unsoldered inside the case, as a result of which the button stopped working, so the role of the button was performed by 2 tinned wires. By shorting the wiring for a couple of fractions of a second, we simulate the opening of the injector. The power wires were connected directly to the battery. The light bulb is needed for voltage drop and as a current-limiting resistor.
After the injectors have acidified, we take some soft cloth and begin to diligently but carefully clean the visible carbon deposits near the nozzles and on the fuel supply side.
After we have cleaned the injectors, we connect them one by one to our device. Everything is clear with the terminal, I’ll describe it myself, so to speak, the “dropper”. We put the syringe on the gasoline intake end of the nozzle.
IV
True, your injectors may be different because at the factory, even within the same batch of cars, they install the injectors that they have))) this is not critical, but before the flushing procedure you need to think about a couple of options for connecting it to the flushing system. We cut off the nose of the syringe and this end fits perfectly onto the nozzle with the necessary force and tightness, as if these syringes were specially made for these purposes))).
Before putting the syringe on the nozzle, fill it almost completely with cleaner, or put the syringe on, pull out the piston and fill in the cleaner, then carefully insert the piston. It is better to do this work with a partner: one presses the piston, creating the necessary pressure, the other closes the wires, simulating the pulses supplied to the nozzle.
It is impossible to keep the contacts closed for a long time because the injector winding may burn out, because it is designed for intermittent operation. In this simple way we clean all 4 injectors. One more thing: after the injectors have turned off, liquid may get into the contacts; this is not critical when they are lying in this liquid. The main thing before connecting the terminal is to blow the contacts yourself or with a pump in order to dry them and avoid short circuits and damage to the nozzle.
scheme
After cleaning the injectors, I cleaned the throttle body. In general, it was not dirty, there was a slight coating on the inside. Just in case, I bought a throttle body gasket, but as it turned out, it was in vain (or maybe not). The fact is that when installing the gasket, it blocks some hole (not round, but of such a complex shape) going into the manifold. Therefore, in order to free myself from the need to once again remove the throttle, I decided not to install it.
air intake tract
throttle and gasket
After all the cleaning procedures, we reassemble in the reverse order, connect all the sensors, etc. After installing the ramp and everything else, I discovered that I had not installed the injector retainers on the ramp. They apparently serve to ensure that when the ramp is removed, the injectors remain on it and do not stick out from the block. I decided not to bother with this matter for now because... They do not affect the installation strength of the ramp and injectors in any way. The ramp and injectors fit like a glove even without these clamps.
clean
clean
injector seats
The last thing we do is connect the power to the fuel pump and check all the sensors in the engine compartment again. Connect the battery terminal and start the engine. Mine started right away, ran lightly for 10-15 seconds, apparently there were some cleaner residues in the injectors, and it started working smoothly. I drove a little in first gear on a “country” road, turned it up to 5 thousand. Works great. Well, in general, I end my story on this positive note. All the best to everyone!
What injectors are installed on VAZ 2114/2115 cars
Almost all types of injectors that the VAZ 2114/2115 are equipped with at the factory can be considered interchangeable. Depending on the year of manufacture, injectors manufactured by Bosch and Siemens of different markings were installed on the car.
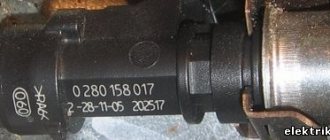
Bosch injectors:
- Model 0280 158 022. The product is compatible only with a 16-valve 1.6-liter engine. The nozzle is black and is designed to operate at an optimal pressure of 3.8 atmospheres.
- Model 0280 158 017. An injector with this marking is installed on 8-valve engines with a volume of 1.6 liters. The body is also black.
- Modification 0280 158 996 is considered obsolete, since injectors with this marking were installed on cars until 2006. The model was intended for 8-valve power units.
Standard equipment of VAZ 2114/2115 injection engines
Siemens injectors:
- VAZ20734 is made in an orange case. The model can be installed on a VAZ 2114/2115 of any year of manufacture, but the modification is paired with an 8-valve engine.
- Model VAZ20735 is intended for a 16-valve engine. In terms of its characteristics, it is practically no different from the previous model. The nozzle has a blue marking.
Depending on the marking, it can be used on different types of engines
Replacing injectors
The difficulty in identifying problems in the operation of injectors is that the fuel system is quite branched and it is necessary to diagnose the functionality of all its parts. For example, a malfunction such as a decrease in engine power can have two reasons - failure of the injectors or exhaustion of the pump's life.
Clogged injectors can result in sudden jerking of the engine while driving or unstable idle speed. In addition, an increase in fuel consumption can be considered a sign of injector failure.
You can check the functionality of each injector even without removing them. Simply start the engine and remove the wires from the connector of each injector one by one. If immediately after removal the engine starts to twitch or stalls, then the injector is fine. If the stability of the engine does not change with removal of the wire, then the injector needs to be thoroughly cleaned or even replaced.
How to remove
The procedure for dismantling and installing injectors is not particularly difficult, but it does take a lot of time.
You need to prepare a set of tools in advance:
- 2 open-end wrenches for 17;
- crosshead screwdriver;
- screwdriver with a flat thin blade;
- hex key 5.
Standard kit
Before removing the injectors for replacement, it is necessary to relieve the pressure in the vehicle's fuel system. This is a necessary measure to ensure safe work and eliminate the possibility of injury.
To relieve fuel pressure, you must turn off the fuel pump. It is located in VAZ 2114/2115 cars in the fuel tank. The easiest way to get to the pump is through the hatch located under the rear seat cushion. For this:
- The seat needs to be reclined.
- Find a small hatch under the rug.
- Unscrew the screws securing the hatch.
- Remove the cover and remove the contact block from the fuel pump housing.
Then you need to start the engine. The engine will run on the amount of fuel that remains in the system, since the pump will not build up pressure after removing the block. You must wait until the engine has completely used up the remaining gasoline and stalls.
The procedure for removing injectors is as follows:
- Open the hood of the car and remove the wire from the negative terminal on the battery.
- For ease of dismantling, it is recommended to remove the air filter box. It will prevent free access to the engine.
- After that, use your finger to snap off the plastic retainer on the engine and disconnect the connector from the throttle valve.
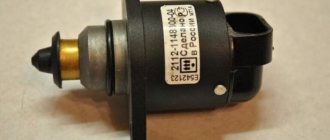
- The connector from the idle air control regulator is removed in the same way.
- Next, you need to disconnect the connector block from the wiring harness of the injectors themselves.
- The injectors can only be removed together with the fuel rail. Therefore, you need to unscrew the bolts securing the ramp to the body.
- After which it will be possible to move the ramp to the side so that each of the nozzles moves slightly out of the mounting socket. The wires are removed from the injectors, otherwise it will be impossible to pull out the ramp.
- The ramp is pulled out and placed in a clean place. Now you can easily remove all the injectors - they are pressed out using a plastic clamp.
Disconnecting the injectors is only possible after dismantling the ramp itself
Accordingly, new products are inserted in place of the old ones. And then the installation work is carried out in the reverse order.
How to clean injectors
Methods for cleaning sprayers may vary; the use of one method or another depends on the level of contamination of the holes and the nature of the deposits. If you carry out preventive cleaning or remove light contamination, you can use special chemicals, the use of which does not involve removing the injectors.
If the injectors are in a neglected state and cleaning with additives does not make sense, then you will have to dismantle the injector and replace the injectors.
First cleaning method
For this method, you will need injector cleaner, carburetor cleaning fluid (spray), a spare O-ring and a pump with a pressure gauge. The first thing you need to do is remove all the nozzles, because if you decide to clean it, you need to do this with all the nozzles, and not just one. Find a suitable container and pour the injector cleaning fluid into it. Place all the injectors in a container and leave them there for a while to allow them to acidify. While the injectors are in the container, take the prepared carburetor spray and clean the idle air control with it. Now inspect the area around the injector nozzle; carbon deposits form there - coke, which in its consistency resembles resin. You will have to take some kind of metal object and tinker with this type of contamination. In order to carry out internal cleaning of the injectors, you need to prepare a power source (from 3 to 12V) and a foot-operated mechanical pump equipped with a pressure gauge.
Remove the tip from the hose and pour injection cleaner into the resulting hole. After this, put the end of the hose on the nozzle. Pump up the pump to 6 atmospheres and apply a voltage of 3V to the injector. If you do not hear the injector click, then you need to add voltage. You need to apply voltage periodically, while not forgetting to pump up the pump to six atmospheres. Clean all injectors in this manner.
Second way
For this method you need a carburetor cleaner spray and also a pump with a pressure gauge. We repeat all the operations indicated in the previous method, only change the injector cleaner to a carburetor cleaner. It is mandatory to carry out external cleaning to remove carbon deposits. To do this, take a clean cloth and apply the cleaner to it. Treat all fuel units with this cloth. Gradually, under the action of the cleaner, the coke will soften and be cleaned off without any problems. You can help yourself with a screwdriver or toothpick.
Read this, it might come in handy: Compressor or turbine?
Both operations should take an average of two hours of your time, but you will save a lot and learn how to clean injectors.
How to clean injectors with additives
If, during diagnostics using a multimeter, it was determined that one or more nozzles need cleaning, then the easiest way to do this is to use special chemicals. In this case, the injectors do not need to be removed from the car. However, this method is not appropriate in all cases. If the sprayers are in a neglected state, they will need to be removed and cleaned on a stand.
Washing of VAZ 2107 injectors is carried out on a special diagnostic stand. To carry out the procedure, you will need to remove all 4 sprayers from the car and install them on the stand. Special products are used as cleaning fluids. The disadvantage of this method is that its implementation will require an expensive stand. Such stands are available in car service centers, and the principle of washing nozzles is as follows:
- All 4 sprayers are secured to the stand.
- A cleaning liquid is poured into a special container; as a rule, it is a carburetor cleaner.
- The program starts, and the stand automatically cleans the injectors for a certain time.
If the option of using a stand is available to drivers only in car repair shops, then the use of special preparations allows cleaning to be carried out at home. To flush the fuel nozzles along with the fuel system, you will need to use special chemicals. They are recommended to be used every 20 thousand km. The principle of their use is that the pump is disconnected from the fuel line. A special cylinder is connected to the hose, from which liquid will be supplied under high pressure.
The engine starts, after which it continues to run at idle for half an hour. After the engine has been running for 30 minutes, you need to turn it off and wait half an hour. During this time, all deposits will soften. The engine starts again, but this time you need to increase the speed to maximum. This will allow the remaining slag and other deposits to be removed from the system.
Repair of injectors VAZ 2114/2115
Repairing injectors involves carrying out a number of works at once:
- cleaning;
- purging;
- replacement of rubber seals.
After the products have been removed from the fuel rail, you need to take a good look at each of the four nozzles. If there are visible signs of leakage on the body, repair will not be practical. You will have to immediately replace the nozzle with a new one. The differences in flushing and cleaning procedures for 8-valve and 16-valve engines are not significant. Therefore, you can be guided by the same scheme.
If the body is clean and there are no deformations or cracks on it, then repair work is allowed. To do this, you will need to remove the seal from the body and the sprayer. It is recommended to leave these parts in acetone or solvent for 1.5–2 hours. While the parts are being washed, you can use a vacuum cleaner to clean the fuel rail. Next, you need to carefully clean the place where the injectors fit into the ramp using a toothpick or a needle.
After this, you can start purging the nozzle from the inside. You will need a roll of electrical tape, an aerosol can for cleaning carburetors and a syringe. An aerosol cleaning liquid is supplied through a thin syringe into the nozzle cavity. It is better to wrap the joint between the syringe and the tube of the canister for sealing with electrical tape. It is recommended to repeat washing the nozzle from the inside three times. Afterwards the product must dry. As soon as the body itself, as well as the seal and sprayer dry after washing, you can assemble the nozzle and install it on the ramp.
A cheap product will perfectly remove dirt and deposits from the nozzle
Before installation, each nozzle is tested for resistance. The tester readings should be in the range of 11–15 ohms.
There is also a simple way to clean the injectors, without dismantling the fuel rail. However, it is only appropriate in cases where the injectors have not yet exhausted their entire service life (120–150 thousand kilometers). The use of cleaning additives in gasoline is allowed. In this case, all elements of the fuel system will be cleaned, but its closed nature does not allow removing dirt and sediment from low-quality gasoline.
The liquid is poured into the gas tank and, together with fuel, cleans all elements of the system
Replacing rubber rings and seals on injectors
Usually, when washing or repairing injectors, car enthusiasts immediately change all rubber elements. This is due to high wear rates. The cost of rings and seals is very low, but after replacement you can immediately observe the stability of the motor.
Rings and seals can be removed with one movement of the hand. However, installing new ones will require care, as it is easy to damage the rubber. The plastic element is first lubricated with gasoline, and then pulled in place of the old seal.
Spare parts for VAZ injectors can be purchased at a minimal price
Almost every driver can clean or replace the injectors on VAZ 2114/2115 cars on their own. Difficulties can arise only in the process of unscrewing the fuel rail or reconnecting the wires to the injector contacts. However, if each stage of work is carefully carried out, even a beginner can independently maintain this element of the fuel system.
Cleaning injectors with your own hands VAZ 2110 8 valves
And Lokomotiv protects him. By the way, Lzhetarasov spoke about the current Coach. Yes, the false DMITRY allegedly said everything correctly. Losers and Suckers are the Russian national football team. And Tarasov had better shut his mouth and not stutter about the courts. We need to take these idlers and parasites to court. They still stutter about some laws - everyone has gone completely crazy.
Cleaning VAZ 2110-21111 injectors is easy!!!
The one who has played the least over all the years, that is, in fact, those who have just begun this season the path to Loyalty to the club. This is: BACHURIN - 2 1 MARTYNOV - 2 1 I. BARANOV - 1 1 The path, of course, seems endlessly long, but the previous winner of the Loyalty to the Club prize KRIVCHUK also played only one match in his first season in 2013. And at the end of his sixth season he won the prize.
So everything is at our feet.
TOGETHER WITH THE TEAM Receives the player who has the highest percentage of points.
Of the participants of the last season, Afanasiev, Vasily, Koren, Kostya, Litvinov, Nozdrov, Opolchenov, Cherenkov all appeared on the field on the main days; they all played 1-2 game days. The rest tested our additional clearings more or less often. We can say that the people voted with their parish for the game on extra days. This can be seen from the attendance statistics.
The average attendance last season was 16.5 people per day.
Russia's string of victories must not be interrupted. And the European Cup too. We will take everything without difficulty. And we will not give Victory to anyone else. The will to win cannot be taken away from us. We're just used to winning everywhere.
In order to remove the ramp on a VAZ, you need to wait until the engine cools down. Therefore, it is recommended to clean injectors only as a last resort, for example, when problems arise with starting the engine, increased fuel consumption, tripping or a sharp drop in power. There are plenty of various additives on the automotive chemicals market that are added to fuel to clean the injector, but they are not always able to cope with the task assigned to them or do not perform it very well.
This is done in the upward direction, but without available tools this is sometimes quite difficult to do, since the fuel rail fits quite tightly. Unscrew the fuel hoses, as well as all electrical components connected to the fuel rail:
Therefore, it is recommended to clean injectors only as a last resort, for example, when problems arise with starting the engine, increased fuel consumption, tripping or a sharp drop in power. Using a hexagon, unscrew the two bolts that secure the fuel rail. After this, start the engine and let it run until it stalls.
After this, start the engine and let it run until it stalls. This is not surprising, given the fact that the ramp in which the injectors are located and, in principle, the injectors themselves can be called the heart of a car engine. Next, you will have to build a simple, yet very effective system consisting of:
Now you can actually remove the fuel rail itself. Remove the ramp strictly parallel to the ground, as any misalignment will only complicate your task.
Unscrew the fuel hoses, as well as all electrics connected to the fuel rail: Therefore, it is recommended to clean the injectors only as a last resort, for example, when problems occur with starting the engine, increased fuel consumption, tripping or a sharp drop in power. Now you can remove the ramp. First of all, you need to de-energize the fuel pump; to do this, disconnect the wires from it. This should be done until the engine stops starting; in other words, your task is to remove pressure from the fuel supply system.
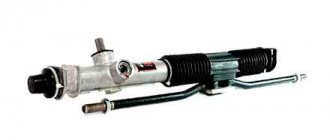
VAZ 2114 car injector system
The VAZ 2114 is equipped with an engine with a distributed fuel injection system (injector), and the stable operation of the engine of this car depends on the quality of gasoline. A low octane number of fuel leads to a drop in power and unstable operation of the power unit. As a result, any parts of the internal combustion engine (ICE) may fail. Mechanical impurities in the fuel lead to clogging of fuel filters, damage the fuel pump, and clog the injectors. You have to disassemble the fuel system (TS) and clean the injector. How the VAZ 2114 injector works, how to clean it and in what cases, how to remove and install the fuel rail, we will look at in this short article.
The VAZ 2115 injector is no different from the VAZ 2114, so when considering the device of the “fourteenth” model, we will also keep in mind the “15th”. The mechanical part of the injector includes:
- Intake manifold;
- Fuel rail (or rail, which is the same thing);
- Throttle assembly;
- Air filter with housing;
- Air pipe (injector corrugation);
- Injectors.
Gasoline injector device
Car enthusiasts who replace the carburetor with a distributed injection system in their “eights” and “nines” are puzzled by purchasing exactly these listed parts, not counting the electrical components.
Functionality check
Checking functionality yourself:
- Check the performance of the injectors on a cold engine, but with the engine running. We touch each nozzle with an ordinary hand. The working nozzle should pulsate and “tremble”. But this method is not entirely informative.
- There is another way to effectively diagnose. Add idle speed and let the car run. Then we loosen the cap nuts holding the injectors one by one, and the engine speed should decrease. When this does not happen, it is concluded that this injector is not working. If a malfunction is detected, you can clean the injectors yourself.
How can you clean the injectors on a VAZ 2114 yourself in order to reduce the cost of replacing spare parts, repairing and servicing the car? Cleaning injectors on a VAZ 2114 is quite simple. First you need to remove them. For safety reasons, turn off the engine and let it cool. Disconnect the negative cable on the battery, remove the protective casing and air filter. We unscrew the high-pressure pipeline from the nozzle and pump, remove it from the bracket supporting it.
Using a spanner, unscrew the nozzle along with the old washer and remove it. In this case, it is necessary to disconnect the electrical connector and slide the lock along the ramp to remove it. And so all 4 pieces. Now let’s get to the main question: “How to clean the injectors on a VAZ 2114”? The injectors need to be examined first. If there are signs of leakage, it is better to immediately replace the spare parts with new ones. For the rest, it is necessary to remove the o-rings from the atomizer and body. Prepared injectors should be soaked in acetone or gasoline for a while, this will allow them to be better cleaned.
While they are soaking, you can simultaneously clean the ramp and valve cover. It is even better to blow out the ramp with a vacuum cleaner. The time has passed to begin the cleaning procedure itself. A lot of coke, resembling tar, always forms around the nozzle of the spare part itself. It definitely needs to be removed. Next, using a blunt pin or needle, carefully clean the funnel-shaped surface around the nozzle. The outside of the nozzle is clean. But the most difficult thing is internal cleaning. How to clean VAZ 2114 injectors from the inside? To do this you will need: electrical tape, a can of carburetor cleaner, a syringe, a tube.
The product is supplied under pressure through a tube, simulating injection.
It will take several such movements for each nozzle so that they break through and begin to spray the liquid evenly.
Then you need to let the injectors dry, put new o-rings on them and reassemble everything in the reverse order, while changing the fuel filter and the fuel pump mesh.
Injectors
The injectors on the VAZ 2114 are an electromagnetic device in which, when there is a pulse in the electrical component, the valve opens and atomized fuel is injected under pressure into the internal combustion engine cylinder. Depending on the magnitude of the pulse, the valve opens to a greater or lesser extent, thereby dosing the flow.
Model 2114 can be equipped with fuel injectors from different manufacturers, and accordingly, the cost of the injectors may also differ. Manufacturers and cost (price range in the Russian Federation):
- GM (1300 – 1400 rub.),
- BOSCH (1000 – 1200 rub.),
- SIEMENS (800 – 1400 rubles).
The VAZ 2114 (2115) is equipped with engines of 1.5 and 1.6 liters (8 and 16 valves), therefore the performance of the injectors must be selected depending on the type of engine. If you make the wrong choice, fuel consumption may increase or the internal combustion engine may lose power. Which injectors are better to install on a VAZ 2114? Here you should focus on the part markings. For example, BOSCH 0 280 158 502 is only suitable for a 1.5 l 8-valve engine. It’s hard to say anything about the manufacturer; the quality of all products is approximately the same.
Symptoms of a problem
There are certain signs of clogged injector nozzles:
- Difficulties in engine operation, jerking;
- High gas consumption;
- Unstable engine operation at idle speed.
And, if the injectors are leaking, the internal combustion engine may not start at all. To improve engine operation, you should clean the injectors on the VAZ 2114.
Removal
Let's look at how to remove injectors on a VAZ 2114 (of course, everything is done with the engine not running, and it won’t hurt to disconnect the battery terminals).
To do this we need a set of combination wrenches, a hexagon, screwdrivers and pliers:
- Relieve the pressure in the system. On the rear of the ramp there is a valve under the cap. We unscrew the cap and press the valve with a thin screwdriver or rod.
- Remove the air filter pipe;
- Disconnect the fuel lines (supply and return);
- Disconnect the electrical connectors from the injectors. The connectors are snap-on and easy to remove;
- We unscrew the two ramp mounting bolts (or a 10mm wrench or a hexagon):
- We dismantle the fuel rail.
Move the latch and take out the nozzle
The injector is removed from the ramp very simply - you need to move the locking washer to the side and pull out the injector using a little force.
REPLACEMENT
Replacing injectors with the fuel rail removed is done simply - remove the old part, install the new one and secure it with a springy split washer. Then we install the fuel rail in place. Changing the nozzle is very simple.
Examination
Before cleaning, it won’t hurt to check the injectors on the VAZ 2114; it’s a good idea to first make sure they are not working. The check is carried out on a removed fuel rail; there is a special stand for this; many modern car repair shops are equipped with such stands.
You can check each individually removed injector by applying power to it and connecting a fuel tank to the inlet. When voltage is applied, the valve should operate and gasoline should spray out of the nozzle. But the test here is conditional; performance is almost impossible to determine.
Even more dubious is the idea with measuring cups, which is often described on resources on the Internet. Let's say all glasses are filled with the same amount of gasoline. How then did you determine the performance when simply cranking with the starter? After all, the engine operates at different speeds, and a faulty injector usually overflows gasoline depending on the voltage supplied to it. What if the electrical part is faulty?
Cleaning
Cleaning VAZ 2114 injectors is carried out mainly by removing parts, but you can try flushing the system with special fuel. The fuel supply hose is disconnected and a container with solvent is connected to the injector (a plastic “one and a half” can be used), pressure is created by an external electric pump. Remove the power connector from the “original” fuel pump. It is better if the injector cleaning (flushing) is carried out in a car service - doing such work with your own hands is quite troublesome, and it does not justify the money spent on it.
You can clean the injectors on a VAZ 2115 with your own hands with the fuel rail removed. A container with a special liquid for flushing carburetors is fitted to the fuel inlet of the injector, and power is supplied to the electrical connectors. When power is applied, the valve in the nozzle will work and it will spray this liquid. Do-it-yourself cleaning of VAZ 2114 injectors is also done.
The idea of cleaning injectors with your own hands is not always justified on VAZ models.
Expensive foreign cars make sense - the parts on them are expensive. And at VAZ, the cost of flushing and lost time will be more expensive than buying new spare parts. In addition, the results of cleaning are not guaranteed to be positive.
Cleaning VAZ injectors
Before cleaning the injectors, you first need to carefully examine them. If signs of leakage are noticeable, they will need to be replaced. Next you need to remove the seals from the body and injector nozzle. Finished parts should be temporarily soaked in acetone or solvent. At this time, you can start cleaning the ramp and valve cover.
To clean it from the inside, you need electrical tape, a carburetor cleaner, a tube and a syringe. The product must be supplied under pressure through the tube. This action must be repeated several times for each nozzle. Then all that remains is to dry everything well, install new seals and put the structure back together.
Signs of injector malfunction: - difficult engine starting; — unstable engine operation; — the engine stalls at idle; — increased crankshaft rotation speed at idle; — the engine does not develop full power; — jerks and dips in engine operation when the car is moving; — increased fuel consumption; — increased content of CO and CH in the exhaust gases; — glow ignition due to leaking injectors.
You will need: a 5mm hexagon, a screwdriver, a 17mm wrench.
1. Remove the wire from the “—” terminal of the battery.
2. Remove the receiver from the intake pipe (see “Replacing the Intake Pipe and Exhaust Manifold Gaskets” in the subsection “Replacing Engine Seal Parts”).
3. Drain the coolant from the engine cooling system (see “Replacing the coolant”).
4. Reduce the pressure in the fuel system (see “Reducing pressure in the power system” in the “Power system” subsection).
5. Disconnect the injector wiring harness connector.
6. Disconnect the vacuum hose from the fuel pressure regulator.
7. Remove the two screws securing the fuel pressure regulator to the fuel rail...
8. ...and take him aside.
9. Unscrew the fuel supply pipe nut...
10. ...and disconnect the tube from the fuel rail. Replace loose or torn tube tip O-ring.
11. Remove the two fuel rail mounting bolts...
12. ...remove the bolts along with washers...
13. ...and remove the fuel rail along with the injector wiring harness and injectors.
https://youtube.com/watch?v=2lX9fJXOk_s
Sources
- https://www.autoposobie.ru/kak-pochistit-forsunki-na-vaz-2115-v-domashnih-usloviyah/
- https://expertvaz.ru/2114/forsunki-remont-zamena-chistka.html
- https://vaz-2115i.ru/2011/08/12/proverka-i-zamena-forsunok/
Removing and cleaning VAZ 2114 injectors
Every car owner of an injection car sooner or later encounters problems in the fuel system and begins to think about cleaning the fuel injectors.
The task of the injector is to maintain the pressure created by the fuel pump and only at the right moment to open for a fraction of a second to allow the required amount of fuel to pass through.
There are a lot of different additives in the fuel, which during engine operation stick to the seat of the injector locking needle. As a result, the injector begins to spray fuel incorrectly or leak fuel when it should be closed. In such cases, it is necessary to clean the injectors or replace them.
The recommended period for cleaning injectors is 25,000 km - 30,000 km. Failure to properly maintain fuel injectors can lead to their complete failure, and then only replacement will be necessary.
How to understand when it is necessary to clean fuel injectors
- Loss of dynamics during car acceleration.
- When you press the gas there are jerks and dips while driving.
- The engine is running rough and unstable.
- Fuel consumption has increased.
- It takes a long time to start the engine with the fuel pump running.
- Black smoke from the exhaust pipe.
There are many instructions and methods for cleaning fuel injectors on the Internet, but we recommend using the most reliable and proven one - cleaning in an ultrasonic stand.