One of the most common models in the country produced by AvtoVAZ can be considered the “eight” or its modification, the “nine”. Owners of VAZ 2108/2109 cars have been convinced in practice of the performance of their vehicles and their ease of maintenance. In order to prevent any malfunctions in the operation of the machine in a timely manner, you need to carefully monitor its technical condition. One of the main tasks of the driver is to control the operation of the carburetor device on the VAZ. The car owner can perform almost all types of repairs and adjustments with his own hands, since the carburetor design has a simple structure.
Models of carburetors for VAZ 2108/2109
Carburetor mechanisms of the Solex series are produced at the Dimitrovgrad Automotive Accessory Plant. The designs are intended for use with front-wheel drive VAZ vehicles, in which the engine unit is located transverse to the body.
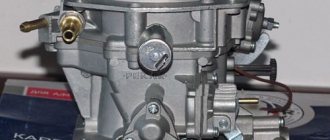
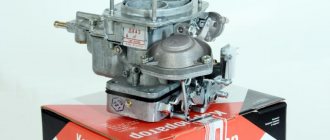
The standard model for equipping the VAZ 2108/2109 is the DAAZ 2108–1107–10 carburetor. It is paired with a 1.3-liter engine. Carburetors 21083–1107010 are installed on 1.5 liter engines.
The DAAZ carburetor is used to equip all cars of the eighth and ninth models
Modern equipment of the VAZ 2108/2109 is provided by carburetors of more advanced models, since they are equipped with a starting device in automatic mode:
- modification 21083–1107010–31 has one stage of automatic control and start in a given mode;
- modification 21083–1107010–35 is equipped with two stages of air damper control, which ensures more stable operation of the power unit;
- modification 21083–1107010–62 is similar to the previous version of the carburetor mechanism, but has the addition of an electrical air-fuel mixture mixing system.
Quick start of a car with carburetor 2108, 21081, 21083 Solex: 2 comments
Thank you! Completely comprehensive advice, with lots of handy links.
There is good useful new stuff for people. Don't advertise it.
Cars of models 2108-09 are truly legendary developments of the Volga Automobile Plant; it was with them that the production of front-wheel drive passenger cars began in the USSR. Also for these cars, a VAZ-2109 Solex carburetor was created and put into production, providing economical fuel consumption and excellent dynamic characteristics.
The carburetor unit (CU) is quite simple to set up and has a generally simple design compared to other similar devices, but it has its own characteristics and characteristic “diseases”. Here we will look at the structure of the carburetor, its dismantling and installation, the specifics of adjustment, adjusting the gasoline level, and debugging the starting mechanism.
Solex design
The carburetor mechanism of all modifications on the VAZ 2108/2109 is emulsion and consists of two internal combustion chambers. At the top of the carburetor there is a cover that prevents dirt from entering the cavity of the device, and fittings - fuel lines are supplied to them. The middle part is the body itself, into which diffusers and cameras are mounted. At the bottom of the carburetor are the float chamber and throttle valves.
The key elements of the system are:
- accelerator pump;
- float;
- throttle thrust;
- forced idle economizer;
- main dosing system;
- trigger mechanism;
- econostat;
- vehicle idle system.
The principle of operation of the Solex carburetor is that gasoline is supplied through the inlet valve in the fitting. The fuel is directed directly into the float chamber. The fuel level in the cavity must always be at a certain level to avoid dips and jerks in engine operation. Level control is carried out through the movements of a needle valve mechanism.
After the chamber, gasoline is sent to emulsion wells, where it is supplied in strictly limited quantities through fuel nozzles. It is in the wells that air flows break up large drops of gasoline, forming a single air-fuel mixture with it.
If you are interested in repairing the fuel pump in VAZ 2108/2109 cars, it is recommended that you study the following material in detail:
The mixture is supplied to diffusers, and through them to the power unit device. Thus, the main task of the carburetor is to form the air-fuel mixture in the desired consistency and direct it to the engine.
The interaction of many elements ensures smooth operation of the motor
Replacing the cardboard spacer
Installing a cardboard gasket will not take much time, but when carrying out this operation, care and caution are required so as not to damage the fragile internal parts of the carburetor, as well as to eliminate the possibility of dust and dirt getting inside the float chamber.
Carburetor gasket sets can be purchased at an auto parts store or ordered online. In the latter case, you definitely won’t have to stand in line.
For Solex carburetors you can find cardboard gaskets sold separately. In this case, the cost of repairs will be almost invisible to the budget.
Carburetor repair VAZ 2108/2109
Repairing VAZ 2108 and 2109 carburetors is impossible without disassembling the device into individual elements. In this case, the main tasks during disassembly are cleaning (rinsing) each element and replacing failed parts with new ones.
When performing repair work yourself, it is recommended to buy a repair kit designed for VAZ 2108 and 2109 cars. It usually includes all types of sealing gaskets, new jets, as well as diaphragms for the accelerator pump and starter. These are the most necessary elements that quickly wear out or fail, so it is advisable to change them every time the carburetor is disassembled.
On VAZ 2108 and 2109 you can purchase all the necessary spare parts for self-repair of the carburetor
The dampers (both air and throttle) cannot be removed unless necessary, as they are quite difficult to install back, which invariably leads to incorrect engine operation.
This article will tell you how to repair the carburetor in VAZ 2106/2107 cars:
Repair instructions for Solex DAAZ 2108–1107–10
- The electromagnetic valve mechanism is carefully unscrewed from the device body, from which the nozzle inserted into it can be immediately pulled out.
- The jet is washed in a container with acetone and blown with compressed air from a can or pump.
- Then unscrew the five screws that hold the carburetor cover. The cover is removed strictly vertically upwards with a slow movement so as not to tear the float out of the chamber.
- The float is dismantled from its axis by pressing the awl onto the center line lock. The device can then be easily removed.
- The gasket must be removed from the bottom of the carburetor and inspected for damage and deformation. If there are pinched areas or breaks, the sealing element will need to be replaced.
- Use a spanner to open the fuel valve. It is recommended to immediately check its functionality. If, when you press the trigger, the needle moves easily and evenly, and has no play, then the valve does not need to be changed.
- Next comes checking the starter. You will need to unscrew the four screws that secure the device to the cover and remove the diaphragm from it. This product must retain its elastic properties and not have any damage or deformation. The return spring must be elastic.
- The fuel filter is unscrewed from its socket and placed in a container with acetone. After washing, it is recommended to blow it out and immediately screw it back in.
- It is best to remove the pump nozzles with a screwdriver. You need to pry them off and pull them out of the carburetor. The elements are placed in acetone for a while and then purged. It is recommended to immediately replace the rubber gaskets of the nozzles.
- Next, you can inspect the accelerator pump itself. You will need to unscrew the four screws that secure it, pull out the device and inspect its diaphragm and spring. It is best to immediately wash the pump parts; if the parts are severely worn, replace them.
- The economizer is checked and repaired in the same way.
- After which you can unscrew the jets. If the holes in them have become larger, it is better to immediately install new jets.
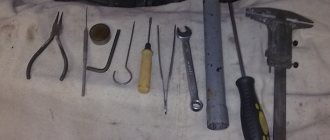
Unscrew the carburetor mounting screws
By performing all these steps step by step, you can qualitatively disassemble and repair the carburetor.
Video: DIY carburetor repair on VAZ 2108 and 2109
Carburetor diagnostics
The following characteristic signs may indicate that there are malfunctions in the carburetor:
- from the moment you press the gas pedal until the car accelerates there is a time gap;
- jerks in the operation of the power unit at high speeds;
- a series of jerks when moving on a flat surface;
- a noticeable decrease in vehicle speed characteristics;
- Fuel consumption has increased noticeably;
- engine is bad;
- instability of the engine at idle speed.
Each of these signs, as well as their combination, indicates that the carburetor has a problem and needs repair or adjustment.
If there are fuel leaks, you need to tighten the connections. It is quite possible that it was the weakening of the connection that caused the carburetor to not work correctly.
What to do if the engine does not start or stalls immediately after starting
The probable cause of this malfunction is a decrease in the fuel level (or its absence) in the float tank. In addition, if the engine does not start, you should immediately inspect the engine compartment for gasoline leaks - it is quite possible that fuel is not getting into the carburetor. If this is not the case, then it is necessary to rinse the float chamber and set the float in an even position relative to its axis.
Unstable engine operation at idle
After the engine has been started or stopped after a long drive, dips may be observed in its operation. There may be several reasons for this behavior:
- the nozzle holes are heavily clogged;
- there was a malfunction in the economizer;
- Damage in the gasket of the quality screw.
One way or another, you will have to remove the carburetor, disassemble it and thoroughly wash all the parts. It is recommended to replace the sealing gaskets even with slight wear.
Difficulty starting in winter
Most VAZ2108/2109 car owners experience problems when starting the power unit at low temperatures. Difficulties can be caused by incorrect operation of the starting device. The choke closes too quickly, so the amount of air entering the emulsion channel may not be enough to prepare the air-fuel mixture. You will need to adjust the operation of the trigger yourself.
The engine is flooded
Due to excessive dosage, the float chamber may not withstand the load and supply an excessive amount of fuel to the system. This leads to the engine being flooded with gasoline and unable to perform its functions correctly. It is necessary to check the functionality of the fuel valve and its tightness.
Sudden jerks when moving - what to do
If a vehicle suddenly experiences sudden jerks or jolts while driving, then the cause of the problem lies in the fuel supply system. The engine simply does not receive the volume of air-fuel mixture it needs. It is quite possible that the valve mechanisms have become depressurized or the filters are severely clogged.
Some information about the exhaust manifold
This device, which is part of the exhaust system of a vehicle, is necessary to remove exhaust gases that depart from the cylinders into a common pipe. The manifold is also intended to improve the process of filling the combustion chambers and their high-quality ventilation. The exhaust manifold operates at high pressures and temperatures. It is attached rigidly to the cylinder head () and connected to the exhaust pipe or to a special catalytic converter.
The design of the exhaust manifold (it is made of stainless steel or cast iron with high heat resistance) is characterized by excellent durability. Repair of this component of a modern car is extremely rare. Experts say that the collector can fail only when cracks form on its surface caused by moisture entering the hot metal.
But the manifold gaskets, unfortunately, are the weakest link of this reliable mechanism, which is accustomed to working in very difficult conditions. It is the gaskets that often let the motorist down. They have to be changed periodically both on cars with high mileage and on very “young” engines. In the second situation, premature wear of the gaskets may be due to the following reasons:
- low quality seal;
- intensive use of the car in difficult road conditions (poor highways, high mileage in a short time, and so on).
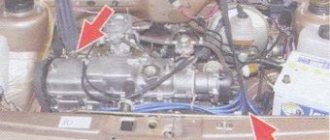
How to remove the carburetor assembly from a VAZ 2108/2109
Dismantling the carburetor is necessary in almost all cases of repair work. It is recommended to remove the device when the engine is cool, since all work is carried out in the immediate vicinity of the intake manifold and its pipes, on which you can easily get burned.
Video: DIY carburetor dismantling on a VAZ
To make work easier, it is best to immediately unscrew the screws securing the air filter box, as it will interfere with dismantling and prevent direct access:
- After this, you will need to disconnect two drives from the carburetor body (one goes to the air damper, the other goes to the throttle). In addition, it is immediately recommended to disconnect the return spring and its retainer from the drive.
- Next, the wire is disconnected from the forced idle economizer screw.
- After loosening the clamps, you will need to remove the fuel supply pipe and the hose that works “for return”.
- The screw securing the heating block is unscrewed and the block is removed.
- The ventilation hose and vacuum hose are disconnected from the fitting at the top of the carburetor.
- After disconnecting all lines, it is possible to dismantle the carburetor assembly itself. To do this, you will need to unscrew the four nuts that secure the carburetor with studs to the intake manifold. The device is pulled out along with the gasket.
It is recommended to close the resulting hole with a plug or a clean cloth while working to prevent dirt and dust from getting inside the motor.
Reassembling the Solex in reverse order
Installation of the carburetor mechanism on the intake manifold is possible after washing and repair, as well as some adjustment steps. It is important to connect all fuel and other hoses correctly so that there are no problems with engine operation. The DAAZ 2108–1107–10 carburetor is assembled in the following order:
- A gasket is applied to the installation site. It serves to reliably connect two units - the carburetor and the intake manifold.
- After this, the carburetor itself is threaded onto the studs and secured with four nuts.
- After the assembly has been carefully attached, hoses can be connected. The first step is to connect the vacuum and ventilation hoses.
- Next, the heating block is screwed to the carburetor.
- On one side, the fuel supply pipe is connected, on the other, the return hose for supplying excess fuel.
- The EPHH drive wire is connected to the corresponding screw.
- To complete the work, you can screw two wires (air and throttle valves) to the screws.
The strict connection sequence is due to the design features of the carburetor
After installing the carburetor, it is recommended to turn on the ignition and check the performance of the engine unit. If oil or fuel leaks occur at the hose connections, turn off the ignition and carefully check all connections.
All work that a car owner performs to maintain his car must be conscious. There is no need to disassemble the carburetor and replace its parts unless there are obvious signs of malfunction. In addition, when self-adjusting, it is necessary to adhere to clear rules of action. Both poor-quality repairs and incorrect adjustments can seriously affect the performance of the carburetor.
How to flush a carburetor assembly without disassembling it
Flushing the Solex carburetor is recommended by the manufacturer in cases where there are clearly any problems with its operation: increased gasoline consumption, jerks and jolts when driving, unstable idle speed, problems with starting.
The traditional method of washing carburetors is to completely disassemble them into individual components, which is not always possible for an inexperienced VAZ owner to do. To simplify the procedure, a technique was created for washing and cleaning the carburetor without disassembling it into components. This technique is based on the use of special aerosols in cans. The most affordable carburetor cleaners are considered to be aerosols produced by ABRO and Mannol - they can be bought at any auto store for 100–150 rubles.
These cleaners do an excellent job of cleaning carburetor mechanisms, and they are also very easy to use. To flush the Solex carburetor, it is recommended to turn off the engine, let it cool and begin the procedure:
- Remove the air filter box from the car and place it to the side.
- Unscrew the solenoid valve from the carburetor body.
- Place a special narrow nozzle on the aerosol can and spray the liquid on the nozzle channels, the first and second chambers, dampers and all visible elements of the carburetor.
- After this, spray the aerosol on the external parts of the mechanism.
- Wait 5–8 minutes (depending on the aerosol manufacturer’s recommendations). During this time, the liquid will be able to corrode accumulations of soot and dirt.
- Next, you can start the engine so that it removes all remaining dirt.
- If during one procedure the carburetor did not have time to be properly cleaned, then you can treat it again with the same aerosol.
After such cleaning, the VAZ 2108/2109 will significantly increase its dynamic characteristics, since the accumulation of dirt will not interfere with the normal operation of all parts of the carburetor.
Video: how to clean the carburetor on a VAZ with your own hands and without removing it from the car
How to replace carburetor parts
Replacing the float, accelerator pump diaphragm, and seals is not particularly difficult. Most often, during repairs, repair kits selected for the type of carburetor are used, which include everything necessary to replace the elements.
The replacement procedure is not regulated in any way: it is enough to remove the damaged part and install a new one in its place. The main criterion: the identity of the elements when replaced.
Engines and their characteristics
Let's start with the power units. For this car, several main engines with different volumes and technical specifications were provided. characteristics. But the VAZ-2108 engine diagram is the same for everyone.
These were 4-cylinder engines with an upper timing belt (8-valve) and camshaft. A distinctive feature from the installations of previous models was the belt drive of the gas distribution mechanism. The method of regulating the thermal clearance of the valves has also changed - rockers were abandoned in favor of shims.
The power system was initially carburetor, but later it was replaced with an injector. Cooling is liquid type with forced circulation of coolant (its volume was 7.8 liters for all types of engines).
Eight engine
The lubrication system is of a combined type (some components were lubricated under pressure, while others were lubricated by splashing). The engine oil required was 3.5 liters.
Initially, the engines used a non-contact ignition system, but after that it was replaced with a microprocessor one (it was used on both carburetor and injection versions).
Finally, perhaps one of the most remarkable features - the engine was located transversely in the engine compartment, which made it possible to increase the space in the cabin, reduce the size of the hood and position it at an angle.
Now about what technical characteristics the VAZ-2108 had. The main powerplants available were: 1.1-litre, 1.3-litre and 1.5-litre. The markings of VAZ-2108 engines were taken according to the brand designation (except for the injection model). So, the base model was considered to be with a 1.3-liter engine, and it was designated as VAZ-2108. And for other versions, to indicate the installed motor, a number was added to the index. As a result, the 1.1-liter version was labeled as VAZ-21081, and the 1.5-liter - 21083.
Next, let's look at what characteristics each VAZ-2108 engine had. So, the basic version was without additional indexes. The VAZ-2108 engine capacity was 1.3 liters, which allowed it to develop a power of 63.7 hp. s., and the maximum torque was 94 Nm at 3600 rpm. crankshaft.
The VAZ-2108 with a 1.1-liter engine was obtained after some processing of the base engine (the piston stroke was reduced), thereby affecting the volume. This engine produced only 53.9 liters. s., and the torque was 79 Nm at the same engine speeds as indicated above.
The characteristics of the VAZ-2108 with 1.5 liters of volume and a carburetor power system were: power - 70 liters. s., torque – 106 Nm at 3400 rpm.
The VAZ-2111 engine installed on the G8 was practically no different in performance from the carburetor version. Their power was the same, but the torque of the injection model was slightly higher than 115 Nm.
These were the main versions of power plants described. But the plant also produced a model equipped with a VAZ-415 rotary piston engine (Wankel engine). This installation had the best performance; it developed 140 hp. With. With a torque of 186 Nm. It was a two-chamber unit with a carburetor power system. But since the service life of the VAZ-415 engines was not very long, this version of the Eight was not particularly popular.
How to adjust Solex DAAZ 2108–1107–10
It is advisable to start the process of setting up and adjusting the performance of the carburetor mechanism from the float compartment. This is due to the fact that there is fuel here, the level of which must be strictly fixed. If the gasoline level is below or above normal, then adjusting other components becomes pointless.
Float adjustment
The adjustment procedure includes several steps:
- First start the engine and let it run for 3 minutes, then turn it off.
- Remove the air filter box and put it aside, as it prevents free access to the carburetor.
- The first step is to disconnect the pipe through which gasoline is supplied from the Solex body.
- Use a flathead screwdriver to unscrew the five screws on the cover to remove it.
- Measure the distance from the edge of the float chamber to the fuel level. It should be equal to 25.5 mm. If there are differences, you will need to set the desired parameter by bending the float bracket.
- You will also need to set the axis of the float so that it can move freely.
- The adjustment of the float chamber and float is now considered complete.
Adjusting the starter
You can adjust the carburetor on the VAZ 2108 and 2109, as well as repair it yourself. This work should be performed on the carburetor, which has been removed from the engine and installed on a flat surface. If the trigger diaphragm was damaged, then it is necessary to initially replace it and only then begin adjustment work:
- Turn the air damper adjustment lever and close it completely.
- Lower the trigger rod with the blade of a screwdriver and hold it in this position.
- Measure the width of the gap between the damper and the chamber wall. The existing indicator should be 1 mm. If this is not the case, then adjustments will be required.
- You will need to loosen the lock nut, which is located on the surface of the accelerator pump, and at the same time turn the quality screw with a screwdriver. If you turn the screw in one direction, the gap will increase, and if you turn it in the other direction, it will decrease.
- Measure the gap thickness again.
- The air damper on the second chamber is adjusted using the same principle.
You can measure the gap width using a drill with a diameter of 1 mm
How to adjust idle speed
This procedure can only be carried out on a carburetor installed in the car, after the engine has warmed up well. In this case, the air filter will no longer impede access, so it remains in its place under the hood:
- Turn off the engine.
- Tighten the air-fuel mixture quality screw all the way, and then unscrew it no more than four turns.
- Start the engine again, simultaneously turn on all the lighting, acoustics and heater to increase energy consumption.
- Working with the quantity screw, you need to set the number of revolutions of the running motor to 750–800 per minute.
- The quality screw sets the maximum idle speed - 900 rpm (in winter, this parameter can be increased to 1000 rpm).
- After this, you will need to tighten the quality screw back until interruptions in engine operation are felt. At this moment you will need to stop and make one revolution back.
Adjusting the idle speed on the VAZ 2108/2109 is necessary to ensure that the car exhibits stable operation in the set mode without high consumption of the air-fuel mixture.
This material will help you independently repair and replace the muffler in VAZ 2108/2109 cars:
Blitz tips and tricks
- The efficiency of the engine and its dynamic performance depend on how the carburetor gaskets are installed, so if problems arise in the operation of this device, you must immediately begin replacing the gasket;
- It is possible to make yourself not only a product from cardboard, but if you need a homemade textolite gasket, then it is made from a sheet of textolite of suitable thickness. In this case, the material is processed using special scissors;
- If necessary, the rubber gasket for the pipe can be made of dense rubber of suitable thickness. Holes for bolts in the rubber gasket are made using a drill and twist drills, but the gasket must be securely fixed between two wooden boards;
- Before purchasing a gasket in a store, you need to disassemble the carburetor and see what the part costs;
- Thermal insulating gasket can be installed in the amount of 2 pieces, when a suitable thickness of the part cannot be found, or the textolite for self-production is not suitable for this parameter. Thermal insulation, in this case, is not compromised, and the unit can be used under normal load conditions.
Replacing the carburetor gasket or making it from cardboard will not be difficult, but you should be very careful about the selection of material, as well as the accuracy of manufacturing this part. After replacing the product, the carburetor is installed on the engine and the engine is test run, as a result of which it will be clear how correctly all repair operations were performed.
Carburetor tuning
Not all owners of VAZ 2108/2109 cars know that you can modify the carburetor yourself. Tuning will not only increase the resource of the power unit, but also increase the speed characteristics of the car. To do this, you will need to ensure a decrease in the resistance of the air flow that is sucked into the carburetor.
To carry out tuning, it is necessary to remove the carburetor, clean it inside and outside to ensure full operation of all its components.
After which it is necessary to remove all the jets and throttle valves from the housing. The cavities of the two internal combustion chambers must be enlarged using a lathe. The larger the volume of the chamber, the less air resistance there will be. And also, simultaneously with boring the chambers, it is recommended to increase the cavity of the diffusers. It is better to entrust work on the machine to a specialist, since this is the only way to avoid damage to the housing.
In addition, you will need to select new jets with larger diameter holes. It is recommended to install fuel and air nozzles with an increase in the opening by 0.05 mm. This is quite enough to increase the throughput of carburetor parts.
In addition, you can change the needle on the economizer device. It is best to replace it with a rubber product. The rubber needle can withstand longer periods of high loads and has an increased service life. Only such equipment will allow you to get rid of the engine freezing when you sharply press the gas pedal.
Increasing internal cavities minimizes air resistance
Setting the float chamber of the Solex carburetor
To check the fuel level and adjust it to the driver’s individual needs, the float chamber should be adjusted. This is done like this:
- start the engine for a few minutes, then turn it off;
- remove the filter (air) from the carburetor;
- the fuel supply hose is disconnected;
- remove the carburetor cover (to do this you need to unscrew five bolts).
After this, measure the distance between the fuel level in the float chambers and their edges using the shank of a caliper. The optimal distance is 25.5 millimeters. The distance can be brought to this value by bending the float brackets (their tongues). The required result is usually achieved by repeating the folding procedure 2-3 times.
When the cover is removed, it is also recommended to immediately check the parallelism of the floats (the edges of these elements). Parallelism can be adjusted by acting on their brackets.