One of the most problematic places in domestic cars is the rear lights of the VAZ 2114. In most cases, the problem lies in low-quality, unreliable rear light circuit boards. As a result, contact with incandescent lamps disappears or is lost over time.
Often the problem is solved by using brute force, by striking the body or base of the lamp. However, such actions do not completely eliminate the problem; periodic failures in the operation of the turn signal, side lights or brake lights occur.
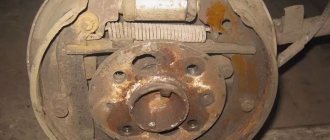
Design of the rear lights of the VAZ 2114
In order to carry out repairs, diagnose and eliminate emerging problems, it is necessary to understand the design and diagram of the rear lights of the VAZ 2114. The rear light design consists of three main elements: - the rear cover; — boards with fasteners, connections for connecting light bulbs; — external decorative cover, light diffuser.
Wiring diagram for components (lamps): 1. direction indicators; 2. overall glow; 3. signaling (brake lights); 4. foglights; 5. designations for reversing.
Causes of breakdowns
The most common reasons for node failure:
- the narrowest point in the entire structure is the elastic board;
- in second place, banal burnout or mechanical damage to light bulbs;
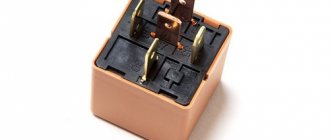
- the third reason is a problem with the fuse or relay;
- oxidation of contacts;
- broken wiring.
First of all, it makes sense to check those elements that do not require removing the entire headlight (for example, fuses, relays). Then check the quality of the connections, the presence of oxidation and the voltage supply level to the illuminator. The last step is to disassemble the taillight, remove and inspect the board.
Replacing the rear lights of a VAZ 2114
In order to remove the rear lighting equipment you will need: - a key to “8”; - a convenient Phillips screwdriver.
All work consists of seven simple steps:
- The first step is to open the trunk of your car. If it is filled with things that may interfere with the work process, free up the interior space.
- In order to gain unhindered access to the rear light housing, it is necessary to remove the decorative fabric trim. It is attached using several self-tapping screws, which can be easily unscrewed with a screwdriver. We remove the casing so that it does not interfere with the future process. On more modern VAZ 2114 models, the trim is attached using regular fabric Velcro.
- We feel for the contact chip that is attached to the headlight circuit board and carefully pull it out of the connector. In this case, do not shake the chip from side to side; carry out all manipulations extremely carefully.
- Now is the time to remove and remove the board itself. To do this, press on the special plastic clamp and pull the product out of the headlight housing.
- At this stage we will unscrew the mountings of the rear lights. Using an “8” wrench, we will need to unscrew one nut from the four mounting studs, which are located in the corners of each lamp.
- All that remains is to disconnect the device body from the car body. To do this, grab the headlight with both hands and pull it towards you.
- The reverse connection of the rear lights on the VAZ 2114 is carried out in a similar way, as well as the removal process.
Conclusion
In order to get rid of the annoying VAZ sore with rear lights, there are two solutions. The first is to periodically check, modify, repair or change the board. The second is to replace the two tail lights (assemblies) with more reliable, alternative products. There are several types of them on the auto market now.
Serviceable headlights on the VAZ 2114 do an excellent job of illuminating the road surface at any time of the day. If a malfunction occurs, the beam strength deteriorates, the daw disappears and harmful flare appears. For safe driving, you need to monitor the optics, make adjustments and change modules in case of damage.
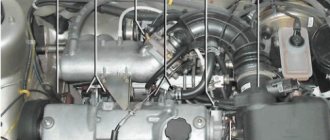
Construction and operation
Xenon and LED equipment is not installed in VAZ from the factory. The optics of the VAZ 2114 are equipped with several modules using a classic halogen lamp for the main light.
The headlight design of the VAZ 2114 is not complicated or modern. To replace the lamps, the optics do not need to be dismantled, and the beam is adjusted using built-in thumbwheels.
The disadvantages of front optics include the appearance of cracks in the glass due to stones or sudden temperature changes during operation.
Headlights
On sale there are lensed headlights for the VAZ 2114 for halogen and xenon. Sports modifications are covered with transparent glass with no reflective lines. The internal reflector of the lens is used to form the daw. In such VAZ optics, two separate lamps are used - for the high beam and low beam.
Malfunctions and repairs
To repair a VAZ headlight, it must be removed.
In the case of rear lights, you should replace standard sockets and chips with high-quality ones, and seal the joints with sealant. This will eliminate problems with contacts and improper operation of modules.
If the front lights of the VAZ do not work, then you need to inspect:
- chips and wiring;
- lamps;
- glass condition.
If problems are detected in the wiring, the faulty parts are replaced. Burnt-out light elements are removed and new ones are installed. If glass is broken, it is not difficult to re-glue it with sealant or remove the defect using special glue.
If after all the work the headlights do not shine well, then the optics need to be replaced with new ones. To do this, you need to decide on the manufacturer and purchase a set of suitable lamps.
Search form
We will talk about modified nines. These lights are much more reliable and beautiful than regular headlights. In some cases, they may even be numbered at the end of the block. Coolant temperature indicator VAZ
Often, in the event of a voltage drop, it may be necessary to remove and replace fuses.
Thanks to this, electrical wires can be directly connected to existing electrical circuits.
The luggage compartment has become more spacious and convenient due to the increase in the trunk lid. Instrument lighting switch.
We pay attention to the normal fit of all parts of the housing, the absence of play or the pressed brass contacts dangling in the sockets, we check the threads and the condition of the fastening screws on the terminals. The new heater design provides efficient heating of the interior.
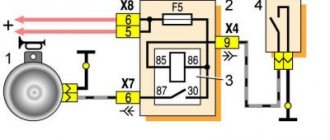
If the procedure is carried out incorrectly, it will create new problems. Windshield wiper relay for VAZ Front and rear headlights are glitchy - Scheme for turning on headlights for VAZ-2113, 2114 and 2115 (Discard relay K 4)
Do-it-yourself headlight replacement
Replacing headlights on a VAZ 2114 does not require expensive tools. For this work you will need a set of wrenches and screwdrivers.
For convenience, you should prepare the car and materials:
- Wash the body and engine compartment.
- Buy dry wipes.
- Prepare sandpaper to clean contacts or new chips protected from moisture.
To change the front headlight, you need to follow these steps:
- Disconnect the battery terminal.
- Unscrew the four bolts and remove the plastic in front of the radiator.
- Disable the chips from the optics and turn signal.
- Press out the turn signal angle retaining spring.
- Press the plastic fasteners and pull the corner along the direction of the car.
- Unscrew the screws holding the headlight.
- Turn the adjuster rod counterclockwise and disconnect it.
- To remove the eyelashes under the optics, you need to loosen the screws of the bumper near the lamp, bend the corner and unscrew the fasteners.
There is a method for removing the headlight assembly with the “eyelash”. To do this, you need to additionally unscrew the three screws holding the “eyelash” and pull out the block assembly.
Do-it-yourself dismantling of rear lights:
- Disconnect the battery terminal.
- Open the luggage compartment and free up space from unnecessary parts.
- Bend back the soft covering.
- Disconnect the plugs.
- Unscrew the nuts from the studs.
- Remove the reverse sensor.
- Carefully pull the headlight out.
When unscrewing the nuts, do not rush. A part that accidentally falls under the trim will require additional disassembly of the trunk and will take extra time.
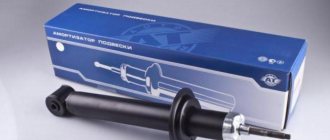
Options for replacement
On the assembly line, VAZ cars are equipped with Bosch or Kirzhach headlights. The main difference is the modified design, which provides spot lighting with optics from Bosch. Despite all the advantages, German optics do not sufficiently illuminate the road directly in front of the car. Therefore, it is better to use such headlights in conjunction with fog lights.
Taiwanese manufacturers offer lensed headlights with LED eyelashes, a dark mask and an improved appearance. Lenses configured for xenon have a wide beam and increased brightness. To install such a headlight, you will need to integrate it into the standard wiring. The seats and fasteners are not subject to modification.
Factory VAZ taillights quickly fade and fail. On store shelves you can find a worthy replacement from Taiwan. LED lights are connected to the standard on-board network and operate under the control of an electrical board in a waterproof case. The advantages of the modification include improved brightness, as well as the absence of problems due to water ingress. Installation of lighting does not require intervention in fasteners or electrical connections.
Front
Simple removal of headlights using available tools does not take much time. The part is washed with soapy water, the condition of the reflector is assessed and, if necessary, the protective shield is peeled off. To replace the glass on a headlight:
- Remove the part.
- Place the headlight in a closed box with a hole for a hair dryer.
- Heat the box for 15-20 minutes.
- Remove the part and carefully tear off the melted sealant.
- You can disassemble the stuck shield using a flat-head screwdriver.
Before reassembly, the surface is cleaned, new glue is applied and the glass is carefully applied.
When installing new optics, you should use the included electrical diagram and connect the wires correctly.
When dismantling the VAZ 2115, fabric gloves are used. The headlights should be removed carefully so as not to damage the paintwork on the bumper or fenders.
Rear
Replacing the rear lights of a VAZ 2114 does not require reconnecting the plugs and power. Ready-made LED lights are offered in different designs, but correspond to the factory fastening method.
Checking the plugs for corrosion will prevent possible malfunctions and loss of contact.
When the rear fog lights are turned on, an orange icon is displayed on the instrument panel, as is the case with factory optics.
Fog
If there are no fog lights in the front bumper, you can install them yourself. To do this you will need:
- button on the panel from the VAZ configuration with PTF;
- new flashlights with good performance, for example Bosch, Kirzhach;
- copper cable;
- plastic corrugation;
- insulating tape;
- knife;
- tightening clamps.
Wiring diagram for fog lights, plastic rims, lamps are included in the kit. Additionally, you will have to purchase a relay and a fuse link for the fuse box.
Installation of fog lights:
- Remove engine protection.
- Mark the mounting points with the template from the kit.
- Cut out the holes.
- Install the internal fasteners and external glasses.
- Screw on the optics.
- Route the power according to the diagram.
- Connect the contacts and the button in the interior.
- Carefully hide the wires in the corrugation.
Installation of fog lights requires knowledge of electrical circuits. If you lack experience, you can contact a specialized service.
Installation of xenon in PTF requires the installation of additional units. Gas-discharge lamps in VAZ foglights are capable of better illuminating the road, but they blind oncoming drivers. The standard reflector is not able to cope with handicraft installed lamps.
It is important to be careful when replacing lights yourself. Factory headlights will not require additional work, and third-party optics are connected through intervention in the on-board system of the car.
One of the most popular domestically produced hatchbacks among car enthusiasts is the VAZ-2114 model. But this car is very far from ideal, and the owners themselves have to bring it to perfection. And they do this through alterations and upgrades, which concern not only the technical part, but also the appearance.
One of the elements that undergoes any changes is the optics on VAZs. Many people are not entirely satisfied with the standard lighting equipment, so they make their own adjustments, including in the rear lights of the VAZ-2114. Note that some modifications not only change the appearance, they also increase the efficiency of the VAZ-2114 rear headlights, which makes the signals they emit even more noticeable. Therefore, tuning the rear lights is not such a useless thing, since it also improves safety.
Types of tuning
Tuning the rear lights of the VAZ-2114 mostly comes down to the installation and use of LED elements in optical devices, which have a number of positive qualities:
- Brighter light;
- Low energy consumption;
- Possibility of installing LED elements at your discretion;
With all this, such conversion is not illegal, so improving the rear lights on the VAZ-2114 will not cause any problems in the future.
Rear lights of AK-47 VAZ 2114
The main types of tuning the rear lights of a VAZ-2114 with your own hands are:
- Complete replacement of the rear standard optical equipment with an alternative one;
- Replacing standard lamps with LED ones;
- Installing more powerful lamps (usually this is done with reversing lights);
- Installation of rear PTFs;
- Tinting of optical instruments (film, varnish);
Types of tuning rear lights on a VAZ 2114 car
Among the scenarios by which rear lights are most often tuned on VAZ 2114 cars, the following deserve special attention (any of them can be done with your own hands):
- LED overlays. Today, LED overlays are the most common option for tuning taillights with your own hands. At the same time, the vast majority of VAZ 2114 car owners prefer hand-made LED trims. There is a good reason for this - factory-made trims are not visually presentable and, for the most part, are not suitable for the lights of this car. Making LED overlays manually is not so difficult - just stock up on epoxy glue and fiberglass;
LED trims on the rear headlights of VAZ 2114 - diode rings. Since any tuning implies the ability to work with electrical devices, making diode rings should not cause problems even for a novice auto mechanic;
Diode rings - use of high power lamps. In most cases, this method is used before treating the glass with tint film, because the pure light of this type of lighting is too bright and can blind other road users. The effectiveness that such lamps create is offset by excessive fuel consumption and the prospect of overheating of the wiring. It is better not to use such tuning in relation to the VAZ 2114 car, since the power reserve of this car is below average;
- DIY installation of individual LEDs. This method is the most creative; it opens up a wide field for imagination. Among the disadvantages is the extra time spent, which will inevitably entail developing a design and installing the LEDs themselves on the lights. One of the advantages is the reduced cost of separately purchased LEDs.
LED lamps on the headlight of a VAZ 2114
Installation of alternative lights
For many car owners, such an operation as a homemade modification of the rear lights of a VAZ-2114 is for some reason difficult to complete. Some people think that everything will turn out “crooked”, others simply don’t want to do it themselves. For such car enthusiasts who want to change the appearance of the car, there is an excellent option - installing alternative taillights on the VAZ-2114 instead of the standard ones. This modification is convenient because you don’t need to change anything in the headlight unit: you bought a tuning kit for the headlights, installed it instead of the original ones, connected it, and that’s it.
How to make a diode ring
In order to make a taillight based on a diode ring, you will need the epoxy-based adhesive mentioned in this article. The basis for creating a lighting device will be the diode rings themselves or the LED strip. The headlight housing will be made from large or small reflectors, which are quite easy to find on the market if desired. You will also, of course, need paint (you can choose based on your personal aesthetic preferences). Most often, to work with VAZ 2114 cars, a coloring agent with a chrome-plated tint is used.
To make a lighting device, follow this algorithm:
- first of all, mount the diode rings in tin cylinders prepared in advance (as a rule, cans left over from drinks or food are used);
- in jars - carefully cut out the holes so that they look like wells. In this case, there should be two wells: external and internal. If, for example, a jar is suitable for an external well, then the internal one can be simply and cheaply made from a painted half-liter plastic glass;
Install a cylinder for mounting diode rings in each internal well with one standard Soviet-made reflector. They, among other things, must create illumination in accordance with the standard scheme: orange conductors, white reversing lights, red fog lights. After this, a large reflector may contain a certain number of elements that will look quite advantageous inside the module. The entire remaining space can be decorated with an LED ring;
Cylinder with mounted diode ring, install diode ring reflectors. At the same time, in order for their adhesion to the body to be normal, you will need fixing ribs made of a substance such as epoxylin;
Installation of reflectors of diode glass rings can be equipped with additional surfaces, also secured with epoxylin.
LED rings on car tail lights
If this algorithm is performed correctly, tuning the VAZ 2114 can be considered complete.
The emergence of modern LED elements has led to the creation of a new stage in car tuning. Motorists began to decorate the car interior, doors and, of course, optics. If the front optics are decorated with “angel eyes,” then the owners of VAZ 2114 and other cars prefer to install LED elements on the rear lights. The taillights on the VAZ 2114 are easy to tune, but almost all of them involve the installation of diodes.
Interesting: in addition to the decorative value, LED lighting also has practical benefits: LEDs increase safety, as their glow is brighter than that of incandescent lamps; Riding becomes more comfortable in any weather conditions. Moreover, such tuning is permitted by law in the CIS countries.
Making LED lights
Let's look at how to make LED taillights with your own hands. This option is suitable for those who do not want to spend money on tuning headlights. Please note that it is not possible to change the appearance of the headlight unit in this way, since standard equipment will serve as the basis. But such a modification to the rear lights of the VAZ-2114 will make their glow more efficient and effective.
LED taillights VAZ 2114
By the way, some stages of the work will help those car enthusiasts whose headlight lenses are damaged, but they don’t know how to change the glass on a VAZ-2114 headlight.
To make LED rear lights for a VAZ-2114, you will need:
- LED strips (red, orange and white);
- Resistors;
- Scotch tape (painting and double-sided);
- Fiberglass;
- Cutting tool;
- Soldering iron;
- Epoxy adhesive;
How to place and how many bulbs to use for each light is up to the car owner to decide. Here it is only important to distribute everything by color: side lights and brake lights on the VAZ-2114 should be red, turn signals should be orange, reverse gear should be white.
And then everything is simple:
- Let's disassemble the headlight. Its glass is sealed, so to disconnect it from the body, we heat up the place where they meet and pry the glass with a knife or screwdriver (this is all that needs to be done for those who need to replace the lens, but did not know how to disassemble and change the glass on a VAZ headlight 2114);
- We dismantle the light bulbs and reflectors (the latter can then be painted black and installed back);
- We select the location of the tapes, solder wires with resistors to them;
- We glue the tapes to the glass from the inside and draw wiring leads from the body;
- Glue the glass in place;
In this relatively simple way, the lamps used on the VAZ-2114 are replaced and LED elements are installed in their place.
How to make overlays
To make LED headlight covers for a VAZ 2114 with your own hands, you will need the following tools, devices and consumables:
Recommended literature on repair and maintenance of the VAZ 2114:
If you have everything you need, you can start tuning. These instructions are suitable for installing LED overlays, both home-made and purchased. The procedure is as follows:
- completely cover the taillights with masking tape;
- Apply fiberglass fabric to the same adhesive tape (it is in it that the LED overlays will be mounted);
- treat the fiberglass with epoxy adhesive liquid (apply it in 2-3 thin layers);
Blanks for overlays
Blanks for overlays before and after sanding and priming
At this point, the tuning of the VAZ 2114 car can be considered complete.
Solving the problem with the boards
A situation often arises when the rear light of a VAZ-2114 does not light up, and the reason for this is a burnt-out board (and it burns out quite often). But there is a way to fix this problem.
It boils down to the fact that the rear light boards of the VAZ-2114 are replaced with conventional light bulb sockets, which are used on earlier VAZ models.
The essence of the method is very simple - we disassemble the headlight, dismantle the board, fix the cartridges in the case instead, connect the power wires to them, and put the headlight back together.
Why don't FZH work?
There are several reasons why FZHs can fail. Let's try to understand them.
| Cause of malfunction | What to do |
| Lamp burned out | Replace the burnt out bulb with a new one, check the condition of the contacts |
| The fuse is broken | Check, replace if necessary. A fuse can lead to loss of functionality of the entire contact circuit |
| There is no ground on the board | The board is located under the lamp. Simple repair to fix the problem |
| The contacts have oxidized and become coated | Cleaning contacts is not difficult |
| The wiring is broken | You will have to diagnose the condition of the circuit, check the integrity of the wiring using a tester and a visual method |
| The contact on the headlight film has burned out | You will need to clean the contacts and replace the elements if necessary. |
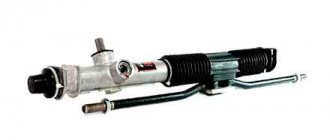
| There is a breakdown in the gearbox mechanism | In such a situation, the issue of gearbox malfunction will have to be resolved. |
| The frog (sensor) has failed | Check the condition of the reverse sensor, replace the device if necessary |
There are a lot of reasons for the failure of the FZH, so the driver must know exactly how to eliminate this or that type of breakdown.
Block ZF
Removing the rear light board
To remove the board, you will need to perform a few simple manipulations:
- Open the trunk;
- Remove everything unnecessary from the space so that it does not interfere with your work;
- Remove decorative trim;
- Remove the plastic casing;
- Remove the back panel;
- Having gained access to the socket and the license plate lamp, you can remove the devices;
- Remove the reversing sensor mounting studs and the headlight itself.
Many people confuse the reverse sensor with the speed sensor, since these devices are located in close proximity to each other.
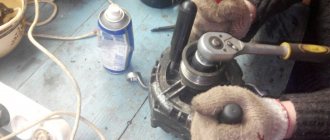
Dismantling works
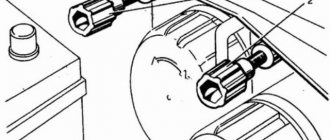
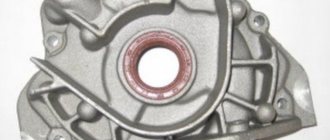
Checking the functionality of the sensor
If the taillights do not turn on, the culprit may be the reverse sensor, that is, a frog in the people.
Remove the contacts from the sensor and clamp them together, then turn on the ignition. If the light appears, the sensor needs to be replaced. If there is still no light, the integrity of the circuit is broken, but everything is fine with the frog itself.
Replacing the sensor is quite simple:
- Place the car on a pit or overpass;
- Apply the handbrake;
- Remove the protection from the bottom, opening access to the gearbox;
- Remove the contacts from the old sensor;
- Place an empty container under the sensor and remove the frog. The container is needed because when the device is removed, oil will leak out of the gearbox;
- Remove the old frog, insert a new one in its place;
- Let the car sit for a while;
- Check the oil level inside the gearbox;
- If necessary, add oil to the required level;
- Reassemble.
Article on the topic: The instrument panel on the VAZ 2110 does not work: combination, pinout
Such repairs can be done with your own hands, and the cost will be approximately 250 rubles. This is exactly how much a new sensor for a VAZ 2114 costs now.
Problem with the light bulb
It is not uncommon for taillights to stop functioning normally due to the failure of the bulb itself.
- To replace it, you need to disconnect the block with wires and remove the contact panel from the flashlight. Here you just need to squeeze the side latches to remove the plastic panel;
- Apply a little pressure on the cartridge and unscrew it counterclockwise;
- Check the condition of the contacts and wiring;
- Screw in a new light bulb that matches the previously installed one;
- If necessary, before screwing in the new lamp, clean the contacts and test the wiring with a tester. There may be a break in the circuit, so a new light bulb will not work.