After the “six” left the assembly line of the Volzhsky Automobile Plant in 1976, traces of a serious modernization of the car and its difference from the “third” model became noticeable. The changes affected not only the exterior of the vehicle, where the emphasis was on the predominance of plastic parts and accessories, the interior of the VAZ 2106 became different - it became more convenient to use and multifunctional.
The interior trim of the “six” has also undergone changes, which has become easier to treat with synthetic detergents. The lighting of the car interior at night and in the evening has received a positive modernization.
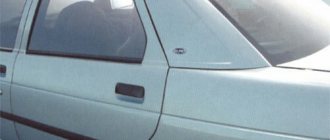
Along with replacing the door trims, the front seat headrests became height-adjustable and much more. External changes to the interior of the VAZ 2106 can be seen in the photo below:
During the subsequent restyling in 1990, the interior of the cabin received high-quality upholstery of seats, which acquired greater ergonomics, and night lighting of the VAZ 2106-90 interior, which became more independent from other electrical equipment of the vehicle.
Do-it-yourself tuning of the VAZ 2106 interior
Making adjustments to the interior is perhaps the most favorite pastime of the driver who owns a car such as the 6th model Zhiguli. Absolutely every VAZ 2106 car owner who is engaged in tuning the car’s interior with his own hands strives to make it unique, inimitable.
Trim tuning
If we talk about the interior trim, or rather, about its state in which it is currently located, then this is one of the important points. As a result of prolonged use of the vehicle, the fabric material and other interior elements that are equipped in the interior of the six become unusable. And this, in turn, forms a negative impression of the vehicle.
However, before you start upholstering the interior, you need to decide on the color range of materials. It can be fabric material or leather. In this case we are talking about flock, carpet, velor, suede or a combination thereof. If you don’t want to bother with sewing new covers, you can simply buy inexpensive new covers, especially for your “six”.
Seat tuning
Traditional seats of the VAZ 2106 salon original require reupholstery or complete replacement with foreign analogues. Here everything depends on your desires, preferences and financial capabilities.
As a rule, chairs are changed based on:
- heavy wear and poor appearance;
- damage to internal components;
- lack of convenience and comfort.
If the seats become unsuitable for further use, they can be restored. This procedure is different in that it does not require larger investments than installing new seats. However, it is not an easy job.
Tuning worn out seats starts with:
- Measurements and patterns required.
- Having received certain dimensions, the driver begins sewing new covers.
- During all restoration work, worn-out material is dismantled, foam rubber is removed, and the springs are subject to careful inspection.
- Having acquired new foam rubber, car enthusiasts stuff their seats with it and put on new covers.
Putting on the covers
We fix and tighten the covers
Additional work with seats:
- Tuning the instrument panel lighting on a VAZ 2106
- Taking a more serious approach, it is possible to adjust the frame base of the seats, giving them a sporty style.
- In this case, any chair can be changed to suit your own needs, taking into account various nuances.
- Also, it must be taken into account that if the driver does not visualize the end result, it is best not to try to create a chair from the very beginning.
- Regardless of what kind of seats the vehicle is equipped with, the main thing is to always take into account such an aspect as safety.
Video of VAZ seat reupholstery:
Tuning door cards
The door map, similar to the seats for the six, does not look the best after prolonged use. The fastening elements of the upholstery fabric are made using plastic caps. The latter, after a certain time, begin to creak.
Also on the website read how to remove doors and change locks on a VAZ 2106
To improve the interior area of the doors, ordinary plywood is often used, which reaches a thickness of 4 mm. It acts as a frame. As for the finishing, a backing is placed, which consists of foam rubber. Its thickness is 10 mm.
When the driver plans to equip the doors with speakers, then along with the standard holes intended for handles and window lifters, it is necessary to make holes for the dynamic heads.
The stages of tuning door panels consist of:
- dismantling old cards;
- removing old upholstery; Removing the old casing
- dismantling old maps (you need to mark them on a sheet of plywood);
- transferring panel parameters to a sheet of plywood using a regular pencil; Redrawing from an old map
- cutting out workpieces using a jigsaw and processing protruding elements; Cutting out new door cards
- door card blanks;
- production and stitching of covers;
- door upholstery (stitched from a material such as, for example, leatherette);
- gluing the cover and fixing the finishing material. For these purposes, use a regular stapler and glue. Gluing new skin
As for fastening the improved panels, it is made using special bushings that have internal threads. To do this, special holes are initially made on the cards in the required places. Then the fastener is inserted. With this installation of upholstery material, it is possible to get rid of knocks and squeaks while moving and while listening to music.
Door card repair video:
Ceiling tuning
There are a lot of options that provide for improving the ceiling of the “six”. In this case, it all depends on the finances available to the car enthusiast. Materials and their colors must be selected according to the wishes and requirements of the vehicle owner.
Changing the ceiling trim
Typically, the ceiling should be striking and at the same time ideally combined with the interior of the cabin and its other components. In particular, do-it-yourself interior tuning also includes installing an LCD monitor. First of all, it is necessary for those passengers who are located in the rear seats.
- Tuning of VAZ 2106 devices
You can also install a temperature sensor. It monitors the temperature inside and outside the car. Some drivers who are planning to modernize the original VAZ 2106 interior install a speakerphone and other elements. To make the ceiling contour more expressive, they install LED lights.
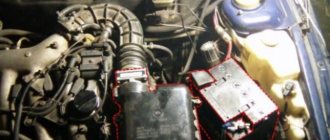
Noise insulation, vibration insulation of the VAZ 2106 interior
Thanks to noise and vibration insulation, the level of comfort not only for the driver, but also for his VAZ 2106 passengers increases. This is especially true for owners of “sixes”. Since factory noise reduction procedures are not carried out for the “six”.
Interior noise insulation eliminates extraneous noise that is emitted by car body elements while driving. To do this, all internal components in the “six” cabin are dismantled. This applies to seats, door upholstery, ceiling, floor covering, and dashboard.
In this case, the metal must be cleaned of various contaminants, rust, and then degreased. At the same time, an adhesive layer is applied to the material. They process metal. Pasting is carried out at positive temperatures to ensure a tight fit. As for vibration isolation, you can’t do without Vibroplast. Pasting of different pieces of vibration insulation is carried out end-to-end .
Glue vibration isolation
But sound insulation is performed using polyethylene foam. It is called differently. It all depends on the manufacturing company. So, the driver can get Splen, Isopenol, Isonel, Izolon.
It is recommended to apply sound insulation over vibration-proofing material. The gluing process is carried out overlapping. This prevents the penetration of sound signals passing through the joints.
Glue sound insulation
If you perform comprehensive sound insulation, then you need to “tinker” with the engine compartment. You will also have to perform certain actions with the luggage compartment and wheel arches.
Radio tape recorder
No upgrade of the “six” is complete without installing a speaker system or at least a simple radio. A standard place for a radio receiver in the beard of a small-sized “six”. It should be trimmed to standard 1DIN. This can be done with a metal file. Then sand the edges with sandpaper.
Installing a radio
The radio tape recorder is attached to the beard using a metal case. Radio installation steps:
- Having bent all the tabs, use special spatulas to remove the radio from the case.
- The metal base is inserted into the prepared hole.
- We fix it using special tongues.
You can bend all the tabs or selectively - Then carefully insert the radio unit itself, which should snap into place.
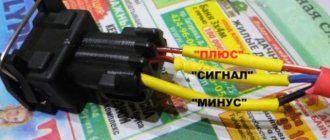
Cables are included to connect the player. The most commonly used are:
- black - “earth”;
- red and yellow (often wound together) - ignition “+”;
- blue - power for the active antenna;
- white - front left (FL) speaker;
- gray - front right (FR) speaker;
- green - rear left (RL) speaker;
- purple - right rear (RR) speaker.
You can connect the radio to the ignition switch to the free INT terminal. Then it will only work when the engine is running and the ignition is on. This connection scheme will protect forgetful car owners from completely draining the battery.
If you twist the red and yellow wires together, the radio will no longer depend on the ignition. You can listen to music with the ignition off too.
The standard connection diagram is usually glued to the cassette player
Typically, a connection manual comes with the audio system. Following the instructions and color scheme, installing audio equipment in the “classic” will not be difficult.
Speaker installation
A good place to place the speakers would be the front door panels. If you choose the right size speakers, they will fit here very well. To install, perform the following steps:
- Remove the trim from the doors.
- On the casing we cut a hole for the speaker. A hole of the required size can be made using a template. To do this, trace the speaker on paper. You need to work carefully so as not to miss the size.
- We attach the column and screw it to the casing using the fastening that comes with the kit.
- We carefully lay the wires in the cavity of the doors so that they do not sag or fall out.
- We install the casing in place.
Don't forget to buy new fasteners for the door trim. Often, when removing the casing, the fasteners break.
To give a finished look, the door cards are covered with leatherette, and a protective grille is installed on the speaker.
Additional speakers are placed on the dashboard or on the side pillars of the windshield.
For better sound distribution, high-frequency speakers are installed at the head level of the driver and passenger
If the car owner changes the entire beard, creating it himself to his own size, then he can place a 2DIN radio in it. A player with a large screen will add charm to the appearance of the car.
If the car has a 2DIN radio, then you can connect the rear view camera to it
Some craftsmen insert speakers instead of air ducts. But from personal experience I know that the standard “six” torpedo does not have side window blowing. In humid and cold weather, windows fog up and freeze. If you remove the air ducts for the windshield, the airflow will worsen even more. Therefore, I do not recommend this installation of speakers.
Video: installing speakers and Shumka
Antenna installation
The “six” did not have a standard antenna installed, but a place for it was provided on models before 1996. Adherents of original spare parts can find their original antenna on the car market. It is attached to the front fender of the car.
To do this, you will need to make a hole in the wing, install the antenna, tighten the bolts and connect the wires to the radio and ground. This installation method is quite complicated and not every car owner will decide to make holes in the body.
The “native” antenna of the VAZ 2106 works well only in the city
The ease of installation is distinguished by the interior active antenna, which is attached to the windshield. It is not exposed to precipitation, does not require additional care, and does not interfere with aerodynamics when the car is moving. When purchasing an interior antenna, please note that the kit should include instructions, fasteners and stencils to simplify installation. There are two ways to install a radio antenna inside the cabin:
- The housing is attached to the glass behind the rear view mirror, and the whiskers are glued in opposite directions at the top of the glass.
- The antenna body is secured to the top of the windshield on the passenger side, and the poles are glued along the edges of the glass at right angles to each other.
The antenna installed in the upper corner of the windshield does not interfere with the view
Find out how to disassemble the rear view mirror on a VAZ 2106: https://bumper.guru/klassicheskie-modeli-vaz/kuzov/zerkala-na-vaz-2106.html
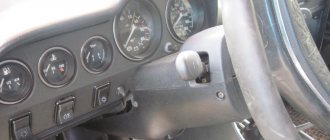
Tuning the instrument panel of VAZ 2106
The front panel is the main element of the cabin, which is able to attract the admiring glances of onlookers. Instead of the standard dashboard, you can attach a “tidy” to the “six”, which will have a stylish look.
For example, this is a part from a vehicle such as the BMW E-36. To do this, you need to know how to connect electrical wiring. Otherwise, you cannot do without the help of a qualified automotive electrician.
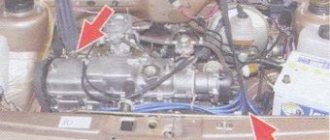
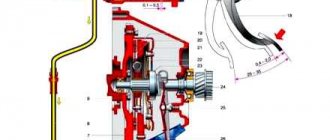
- Engine 2106 - the fourth generation of VAZ engines
However, tuning a VAZ 2106 on your own does not end with just a complete replacement of the torpedo. It is possible to install a brighter indicator scale.
Tuning the instrument panel can be done simply by covering the “tidy” with some beautiful material. You can also replace the panel from another vehicle.
In general, you can change the appearance of the instrument panel:
- by reupholstering using high-quality materials;
- by installing a number of additional devices that will monitor certain indicators (in this case we are talking about a voltmeter, a tachometer, which is made in a sporty style);
- replacing the instrument panel with a more attractive tidy;
- by upgrading the standard lighting.
Alternative way
In order to modernize the instrument panel in a different way, you will need plywood, tubes of “liquid nails,” plumbing and carpentry tools, fasteners and fabric material.
Tuning stages:
- First, the components of the tidy are marked on a sheet of plywood. Let's cut them out.
- Then we adjust a small block of wood to the place where the panel will be installed. We place it in the space between the plywood and fix it with self-tapping screws.
- We make holes in the plywood sheet for the radio or gearbox handle and other elements.
- The outer surface is treated with “liquid nails”. Apply glue
The fabric material necessary to cover the carpet is applied.Glue the trim
- We install the panel.
As you can see, upgrading the interior and dashboard of a VAZ 2106 is by no means a complicated process. The main thing is to follow the above recommendations.
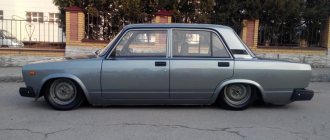
Cost of the car after tuning
Now the car can only be bought in used condition, since it is no longer produced. It costs between 60-90 thousand rubles, sometimes 100 thousand, depending on the availability of major repairs and safety. However, if the car has undergone external and internal upgrades, then its cost may be at least twenty percent more. For example, a VAZ-2106 car, the price of which is on average 70 thousand rubles, after tuning can cost 100–110 thousand. It all depends on how updated the car is.
Improving the appearance and interior of the car
We recommend that every owner of a domestic “six” make some effort to create an original and presentable car.
To do this, you should initially change its appearance so that everyone, at the first visual inspection, admires it and does not believe with their own eyes that the most ordinary “six” is standing in front of them.
Qualified advice from experienced craftsmen will allow you to carry out auto tuning of the VAZ-2106 at the highest level.
Modernization of the external surface of the housing
If you are impressed by the tuned domestic VAZ-2106, you also want to do the tuning of the VAZ-21063 yourself, start with a visual inspection of the car’s surface. If chips, dents, or cracks in the paintwork are found, you should think about eliminating such defects.
Try to level out the dents, clean the surface of the body, remove old paint, prime, and then paint, thereby ensuring that your car looks as if it had just left the showroom.
Unfortunately, some car owners are sometimes unable to carry out such manipulations, not because of the complexity of such actions, but because it is extremely important to have a sufficient set of special equipment and tools available.
Without such a kit, it is impossible to level the body, carry out welding work, prepare it for painting, and then carry out the painting process itself. In this regard, most car owners prefer to carry out just such auto-tuning with the help of experienced technicians, including by taking their car to a service station.
However, upon completion of painting, you can continue useful modifications to the VAZ-2106, or more precisely, its body.
In particular, the mirrors can be easily replaced and are a successful tool for the driver, providing him with a panoramic view of the rear space.
https://www.youtube.com/watch?v=MqAchkVdgLk
It is useful to install new and interesting optics, transform the bumper, and purchase original wheels.
Some owners of the Six, when tuning the VAZ-2106 at home, tint the windows. Indeed, this significantly improves the appearance of your iron “horse,” but you must remember that excessive tinting can cause serious problems with traffic police officers.
To replace the headlights, first remove the old ones and try on those that have been making your mouth water for a long time at the sight of them. Make sure that the desired headlights can be fixed. However, you are unlikely to experience any difficulties with this, since using an electric drill, making new holes for fastening will not be difficult.
Don't forget to install mounting springs on the bolts. This will allow you to subsequently adjust the direction of the light flow.
Many car owners prefer to install xenon headlights. This approach gives the vehicle not only originality, but also some “aggressiveness”. It is only important to remember that xenon light can seriously dazzle oncoming drivers, so before installing exactly such headlights, you should think about how ethical it is.
Interior modernization
Do-it-yourself modification of the VAZ-2106 also involves taking actions aimed at modernizing the interior.
To make up for the lack of information on how to tune a VAZ-2106, experienced craftsmen recommend getting rid of the instrument panel, upholstery and front seats.
It is no coincidence that such recommendations are accompanied by increased rigidity, since the interior of the “six” was not modernized during its release, and accordingly, it became obsolete.
If you want to make your “horse” exclusive, it is important to get rid of everything standard and outdated.
After eliminating all unnecessary things, install noise and heat insulation. Subsequently, you will appreciate such actions. Sound insulation will significantly reduce the penetration of noise into the car interior. Thermal insulation will effectively maintain a comfortable temperature inside the cabin. In summer you will not experience excessive heat, and in winter the heat coming from the stove will be retained.
Install new seats equipped with an adjustment mechanism and lateral support, which will create conditions for a comfortable position of the body, especially when covering long distances.
You can install an armrest between the front seats, which can be easily purchased at a specialty store. Many people still resort to replacing the steering wheel, preferring the sports version.
All that remains is to replace the upholstery that you previously removed. It's easy to get a new one. To do this, purchase special automotive fabric, sew new upholstery on door cards and seat covers, using old copies instead of a pattern.
Reducing noise
In the VAZ 2106, tuning the interior, first of all, involves increasing comfort. And this can be achieved, among other improvements, through additional sound insulation. It is very important to know that:
Sound insulation work should be carried out after the completion of welding work and after installing the seats.
The noise must be glued all over the bottom of the car, including the bulkhead of the engine compartment. It is recommended to use proven and high-quality material, preferably of different thicknesses. Don’t forget that the car is pre-cleaned and treated with anti-corrosive. For greater effect, sound insulation can be carried out simultaneously both from the bottom and from the inside.
The second is as follows: a carpet is laid on the bottom of the cabin, which, after several hours of precipitation, is screwed directly to the floor. Such simple combinations significantly increase the comfort of the cabin of the 06 model.