Replacing the instrument panel on a VAZ 2103, VAZ 2106
Welcome! The instrument panel - it occupies a very important place in the car interior, because if it were not there, how would you know how fast the car is traveling, what the temperature of the engine is, etc.
Read below about how to replace the instrument panel on a VAZ 2106 car. Note! To replace the panel, you will need the following tools: First, stock up on pliers and two screwdrivers, and you may also need a basic set of wrenches and a marker!
Question? For what purpose do you change the instrument panel on your car? (Write your answer in the comments)
Summary:
LED panel lighting
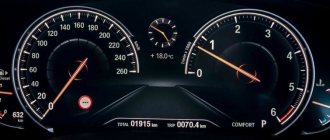
The most popular is the VAZ 2106 LED. The panel looks especially beautiful at night. LED lamps of various colors are used for illumination. At least 2 bulbs are installed on the speedometer and tachometer dials. For small sensors, one LED is sufficient.
LED lighting around the entire perimeter will look more impressive. LEDs must meet the 12-volt voltage of the on-board network. When installing LEDs, be sure to observe polarity. Thanks to tuning, the VAZ 2106 tidy takes on an individual look and becomes more convenient and functional.
Loading …
How to replace the instrument panel on a VAZ 2103, VAZ 2106?
Note! Replacing the panel in most cases is not replaced, but only removed in order to replace devices and switches, so if you want to replace only devices or switches, then use the special article on replacement, entitled: “Replacing panel devices”!
Removal: 1) First, taking a screwdriver in your hands, use it to unscrew the five screws that secure the upper and lower parts of the steering column housing.
Note! The letter “A” in the photo indicates the screw that secures the casing to the steering wheel switch; it also needs to be unscrewed, but only carefully!
2) After removing all the screws, remove the lower and then the upper part of the casing from the steering column.
Note! When removing the casing, do not lose the ignition switch ring, which is indicated by the letter “A” in the photo above!
Helpful advice! You can remove the instrument panel without removing the casing; to do this, use a wrench to unscrew the two nuts that secure the steering column compensator.
When both nuts are unscrewed, the steering column will drop sharply down to prevent this from happening, hold it with your hand when unscrewing the nuts. When your instrument panel is installed, then before you start tightening the compensator mounting nuts back, first check the ease of rotation of the steering wheel, and only then tighten the nuts!
Note! The second nut that secures the compensator is located in exactly the same way but only on the right side!
3) Next, using two flat-head screwdrivers at once, pry up the lower part of the panel in the places where it is attached with brackets to the dashboard. After prying, pull the panel towards you and, as a result, remove it from the car.
Note! In general, to remove the panel, it is best to press the panel fastening brackets through the special holes. If these holes are covered with a facing film, then these holes can be easily found at the place where the film will sag, and after finding it, carefully using an awl, you can remove the film so that it does not cover these holes.
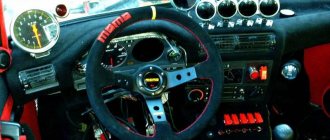
Self-tuning of the dashboard
2106 dashboard with your own hands is not so difficult. First, release the torpedo placed underneath. Prepare your car instruments with fashionable snow-white dials. The car owner can make dials with a whitish color without the help of others: on the global network you can find the necessary standards and reproduce them on a printer using photo paper. Holes are cut out in the scale, and the device hands are painted with dark varnish to contrast with the snow-white dial.
Once released, the dashboard is covered with flock or covered with artificial leather. This will give her great attraction. It is carefully cleaned, coated with Moment glue, onto which the leatherette is attached, the material is smoothed, after which the panel is left for some time so that the glue dries.
During the drying process, excess leatherette is trimmed, the remains are folded and glued again. You can use electric backlighting consisting of blue light diodes, replacing at the same time an old light filter. Diode bulbs are a great addition to the tachometer and speedometer, and to highlight small sensors and devices, 1 diode is enough.
Introducing a circle cut out of felt for the edging of the dials will give the LED backlight a striking look. Holes are cut in the panel for the measuring sensors, all excess is removed, then the sensors are inserted and connected to the existing wires.
Instead of a clock on the “six” dashboard, it is best to install a voltmeter with a snow-white dial, choosing it so that its appearance is identical to other sensors. The work on transforming the “six” dashboard is considered very thorough, but the foreign exchange costs for its implementation will be very small.
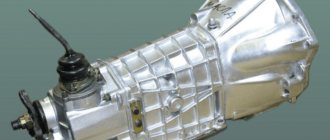
How to remove and install the instrument panel of a VAZ 2106-2103
Let's talk about what the dashboard of this car is. In essence, it is a solid and non-separable metal structure, filled with polymer foam and covered with the same film. This panel includes a variety of vehicle controls, control mechanisms and instruments.
The kit we need to remove and install the instrument panel includes a 10mm wrench and two screwdrivers.
When do you need to remove and install the instrument panel? First of all, when you want to replace the old panel with a new one. Also, the panel must be removed if body work of various types is carried out, which may result in damage to the dashboard.
Removal and installation of the instrument panel occurs as a result of the following steps:
- We remove the storage shelf; to do this, unscrew the four screws that secure it;
- We dismantle the radio panel. We find two fastening screws on the left and right at the very bottom, then unscrew the upper fastening screw, which is on the left;
- Remove the bar with additional controls by prying it off with a screwdriver. Under the bar we will find two more screws securing the radio panel. We unscrew them. Remove the radio panel, holding the mounting plate;
- Having unscrewed the fastening screws, remove the two decorative trims of the windshield pillar. The overlays are located on the right and left;
- We remove the decorative lining of the steering column. To do this, we also unscrew the fastening screws;
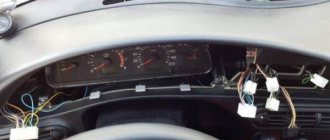
- We dismantle the instrument cluster panel. We pry this panel off with a screwdriver. in those places where the clamps are located and pull it out a little. Disconnect the cable and speedometer. Next, which is very important, mark the wires so as not to get confused when re-installing. Disconnect the marked wires. Finally, remove the instrument cluster panel;
- Let's start disassembling the panel itself. We pry the watch with a screwdriver and take it out. Again, mark and then disconnect the wires. We take out the backlight lamp from the clock and disconnect the wires;
- Then, carefully separate the interior heater fan switch. Again, we mark the wires and directly remove the switch. Unclench it with a screwdriver and remove the heater damper;
- We separate the glove box illumination lamp from the wire. We dismantle the side of the glove compartment by unscrewing its two fastening screws.
- We find four screws on the instrument panel that secure this very panel from below to the car body;
- Back to the glove compartment again. We find in it two screw nuts that secure the dashboard on top. Two more nuts are located under the instrument cluster. We also unscrew them;
- Hold the panel in your hands and gently pull it towards you. After that, it will separate from the car and remain in your hands;
Instrument panel - removal and installation
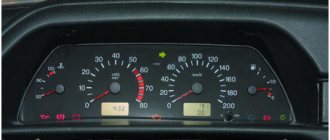
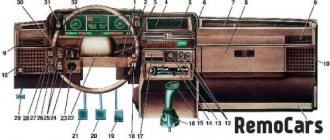
Location of lamps and instruments on the dashboard:
1 — speedometer; 2 — speedometer backlight lamp (AMH12-4 (W4W); 3 — tachometer; 4 — tachometer backlight lamp (AMH12-4 (W4W); 5 — oil pressure indicator; 6 — fluid temperature indicator in the cooling system; 7 — fuel level indicator ; 8 — fuel reserve warning lamp (AMH12-3 (W3W); 9 — fuel level indicator illumination lamp (AMH12-4 (W4W); 10 — shield mounting bracket; 11 — liquid temperature indicator illumination lamp in the cooling system (AMH12-4 (W4W); 12 — warning lamp for insufficient oil pressure (AMH12-3 (W3W); 13 — backlight lamp for the oil pressure indicator (AMH12-4 (W4W); 14 — warning lamp for turning on the parking brake (AMH12-3 (W3W); 15 — battery charge indicator lamp (AMH12-3 (W3W); 16 — indicator lamp for closing the carburetor air damper (AMH12-3 (W3W); 17 — indicator lamp for turning on the external lighting (AMH12-3 (W3W); 18 — indicator lamp for switching on direction indicators (AMH12-3 (W3W); 19 — high beam indicator lamp (AMH12-3 (W3W)
1. Prepare the car for work (see “Preparing the car for maintenance and repair”).
2. Disconnect the wire from the negative terminal of the battery (see “Battery - removal and installation”).
3. Remove the steering column casings (see “Steering shaft casings - removal and installation”).
4. At the bottom of the instrument panel, disconnect the wire from the air damper close warning lamp switch.
5. Using a screwdriver, pry off the top of the shield and remove it from engagement with the panel.
If the top of the shield cannot be pressed out, we pierce two holes with an awl at the bottom of the instrument panel in special places (shown by arrows). Using a thin screwdriver or a metal rod, press out the spring clips and remove the bottom of the shield.
6. Remove the shield from the instrument panel.
7. Having pulled out the shield as much as possible, unscrew the knurled nut securing the speedometer cable by hand and disconnect the cable.
8. Disconnect the two connectors of the dashboard wiring harness from the instrument panel wiring harness.
9. Having previously marked or remembered the location, disconnect the wire blocks from the three key switches.
10. Remove the shield.
Installation of the instrument panel is performed in reverse order.
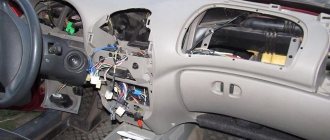
How to remove the instrument panel
I would like to warn you right away that, unfortunately, it was not possible to prepare a detailed manual, since I did this work in the summer, and I had already forgotten the whole procedure, but as always, I will try to outline the main essence, with pictures, in this article.
I’ll immediately give a list of tools that will be needed to remove the instrument panel on a VAZ 2106:
- Screwdriver flat and Phillips
- Driver (or better yet a ratchet)
- Extension cord small
- Socket head for 10
First of all, you will need to do the following:
- Remove the instrument panel from the panel
- Remove the heater housing and disconnect the heater damper control cables
It is necessary to unscrew the screws from the bottom along the entire area of the panel. Here is a photo on the left side:
Now near the choke handle:
Also, two self-tapping screws are located on the right side of the instrument panel, below the glove compartment:
And the last bolt from the bottom, if memory serves, is located below the stove control levers:
Everything seems to be from below. Now you can unscrew the nuts that secure the VAZ 2106 instrument panel from above. The first two are located on the left side, in the place where the instrument panel would be:
Then two nuts on the right side, they are visible in the glove compartment opening:
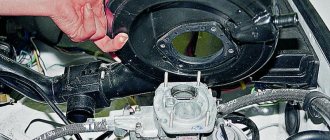
If I'm not mistaken, there are no more fastenings. Moving the panel a little to the side, disconnect the central air duct of the stove:
And it will also be necessary to disconnect the heater damper control cable along with the levers. To be honest, I don’t remember how I did it, but there didn’t seem to be any particular difficulties:
And after that, you can completely remove the instrument panel, since nothing else holds it:
Stages of work
At the initial stage of improving the illumination of VAZ-2106 instruments, it is necessary to dismantle the panel panel, as a result of which access to the indicators becomes available. Next, remove all index arrows. Then unscrew a couple of small bolts and remove the scales. To remove the speedometer indicators, unscrew the screws and turn the scale to the left. At this stage, the gauge needle will drop slightly and begin to dangle. After it freezes, you need to mark the position with a marker. This is necessary for subsequent accurate operation of the speedometer.
After dismantling all the scales, they begin to paste them. New white elements are applied over the standard equipment. To prevent the background from blending in with the arrows, they are highlighted in a different color. To improve the backlight, you will need to remove the light filter, then you can begin installing the LEDs. For these purposes, metal bases are used, which are heated and mounted on the side parts of the panel. If there are VAZ-2106 devices in dark-colored cases, it is advisable to lighten them using white “self-adhesive”.
At the final stage, the LEDs are connected by connecting them to the main wiring of the vehicle through wires. As a result, you will be able to change the color of the scales and arrows, as well as improve the backlight, which is immediately noticeable when driving at night. Most representatives of the domestic “classics” will be improved in a similar way.
How to remove the instrument panel of a VAZ 2106
The instrument panel of the VAZ 2106 car itself is a non-dismountable metal structure, which is filled with polymer foam and covered with a polymer film. The instrument panel consists of various vehicle control and control devices.
To disassemble the panel we need a ten-size wrench and two screwdrivers. The panel is removed when it is replaced with a new one or during all kinds of body work, during which the panel may interfere or become damaged.
The sequence of actions when removing the panel will look like this:
- After unscrewing the four fastening screws, remove the storage shelf.
- We remove the radio panel; to do this, unscrew the fastening screws on the left and right at the very bottom, then unscrew the upper right screw that secures the panel.
- Carefully, using a screwdriver, remove the bar with additional controls from the radio panel; under this bar there will be two more screws securing the radio panel, which also need to be unscrewed and holding the mounting bar, remove the radio panel.
- Remove the left and right decorative trims of the windshield pillar by unscrewing the three mounting screws.
- After unscrewing the fastening screws, remove the decorative lining of the steering column.
- Next, remove the instrument cluster panel; to do this, use a screwdriver to carefully pry the panel at the fastening points and pull it out a little. Disconnect the cable from the speedometer. We mark the bundles of wires so that they do not get tangled during installation and separate them. Remove the instrument cluster panel.
- Using a screwdriver, carefully pry the clock out of the panel. We also mark and disconnect the wires, remove the backlight lamp from the watch and remove the watch.
- Remove the interior heater fan switch, mark and disconnect the wires and remove the switch. Next, remove the heater damper handles using a screwdriver.
- Disconnect the wire from the glove compartment lamp. Remove the side panel of the glove box by unscrewing the two screws securing it.
- Remove the four screws that secure the instrument panel to the car body.
- In the glove box, unscrew the two nuts on the upper fastening of the instrument panel and two more nuts located under the instrument cluster.
Lift the panel up and towards you and remove it from the vehicle. This completes the process of removing the VAZ 2106 instrument panel.
Tuning seats VAZ 2107
Unlike earlier VAZ Seven models, the factory was equipped with anatomically shaped seats and headrests connected to the backrest. The front seats of the VAZ 2107 are quite fragile and quickly fail - the frame breaks, the backrests warp, and the upholstery wears off.
Standard VAZ 2107 seats are not particularly ergonomic or durable
On our “seven” the seats were exactly like this: wobbly and creaky. The adjustment mechanism also constantly jammed - before adjusting it to suit you, you had to spend a lot of effort.
The easiest way to tune seats is to install covers. Covers for VAZs are sold in almost any auto store; custom-tailoring is also possible.
Installing seat covers on the VAZ 2107 improves the appearance of the interior
Seat trim for VAZ 2107
After upholstering the seats, the interior of the car becomes very attractive. For this you can use:
- genuine leather;
- leatherette;
- suede;
- velvet;
- velours;
- flock;
- carpet;
- alcantara.
Natural leather is undoubtedly the most durable. But as you know, this is a very expensive material, and in hot weather it is uncomfortable to sit on leather seats. The most budget-friendly and fairly reliable upholstery is made from Alcantara and velor. Therefore, these materials are most widely used among car enthusiasts.
Based on the purpose of tuning and financial capabilities, you can do a complete reupholstery of the interior, including the ceiling, door trim, sun visors, steering wheel, and dashboard.
After you decide on the type of material, you need to choose its color. Traditionally, seat upholstery is made in the same color as the interior upholstery, but a harmonious combination of different shades can make the car interior more original and attractive.
The seats of the VAZ 2107, covered with artificial leather, look representative
Video: self-upholstery of VAZ 2107 seats
Changing seat mountings
When installing non-original seats on the “seven”, a situation may arise that the seats do not fit the mounts. In this case, you will have to resort to welding.
Experts believe that any seats that fit the dimensions can be installed on the “seven”. However, changing their mounting is a very labor-intensive job, so if possible, it is better to choose seats that do not require welding for installation.
Installation of seats from another car on a VAZ 2107
Seat covers are a great tuning option, but if they are already loose, they will have to be replaced. On the “seven” you can install both new original seats and seats from foreign cars. Seats from a 1996 Mercedes W210 and a 1993 Toyota Corolla are suitable. Seats from SKODA and Fiat are suitable, but to install them you will need to make two additional holes.
In addition to the above, Peugeot and Nissan seats are used, but they do not match and require modification of the fastening. The seats from Volkswagen fit almost without modifications, but they are too high for the VAZ 2107, therefore, despite the increased comfort, installing them is not recommended.
Peugeot seats fit the VAZ 2107, but to install them you need to slightly modify the fastening mechanism
Torpedo VAZ
The torpedo (correctly - torpedo) is the upper part of the front panel of the car. The lower part (where the gearshift knob and radio is located) is called the BEARD. The torpedoes of old VAZ models are distinguished by their asceticism and unpretentious design, which is why many car owners have a desire to improve them.
There are several methods to improve them.
1. The most radical thing is to replace the VAZ torpedo with a torpedo from a foreign car, or from an older VAZ model. This will be explained in more detail below.
Here is a video of a torpedo on a VAZ 2101 from a Mercedes 123
2. Painting the torpedo - this method is the least common, due to this. That the surface of the torpedo is not hard and is difficult to paint correctly. Also, the painted surface of the vase torpedo often does not look as attractive as other methods.