Thanks to the icons on the dashboard, the driver can always know the condition of the components and assemblies in his car. But in order to know exactly what we are talking about, it is necessary to take into account the pinout of the instrument panel of the VAZ 2110 car. We will talk about this in more detail below.
The device of the instrument panel on the VAZ 2110
The term “instrument panel” on cars means a block of control lamps and indicators located in front of the driver. The correct name of the part is the shield, which is installed in a plastic panel called the dashboard.
The instrument panel on the VAZ 2110 includes:
- a device for determining the speed of movement - a speedometer;
- speed meter - tachometer;
- indicators of coolant temperature and fuel level in the tank;
- control indicator lamps equipped with yellow, orange, green, blue and red filters;
- lighting system (6 separate lamps);
- installation location of the warning lamp.
On VAZ 2110 cars it is possible to see several options for instrument combinations:
- The first releases used an electromechanical version of the panel with serial number 2110-3801010. Externally, the device is easily identified by a mechanical odometer mounted on the speedometer scale. Its drive is made from an electric motor, the rest of the indicators operate on a magnetic principle. On the back of the shield there are two connection blocks located at right angles.
- Later, an electronic version of the dashboard appeared, equipped with a liquid crystal display on the bottom of the speedometer. There are “gauges” with a “suction” indicator (which was not installed on the VAZ 2110 with such a panel from the factory) or with an airbag lamp in the same place. There may be cars with a double display window - under the tachometer and speedometer.
- A very rare variant of the instrument cluster is designed for the VAZ 21106, equipped with a 2.0-liter Opel engine. The part number is 21106-3801010 and features an extended speed measurement range (up to 240 km/h) and an additional liquid crystal display on the bottom of the tachometer.
- On the latest versions of the VAZ 2110, a shield began to be used, unified with the 2118 Kalina car (model 1118-3801010), differing in the layout of the scales. Such a part is called a “new sample” panel among its owners. The device is installed in a modified type dashboard.
Depending on the manufacturer and date of assembly, there are different designs for the VAZ-2110 instrument clusters. It is possible to digitize the tachometer in hundreds or thousands of revolutions, write technical information on the scale, etc.
Description and location of indicators on the panel
After 2006, a new dashboard was installed on VAZ 2112 cars. For reasons that are not entirely clear, any description of it includes the prefix “euro”, probably due to its modernity and quality.
But in order to use it, you need to know the symbols, which are not always easy to understand even from the instructions. You can often only guess what this or that indicator and light bulb mean.
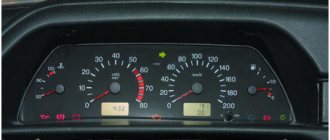
To make this task easier for yourself, pay attention to the diagram of the instrument panel below and its explanations
Description of the panel
- Arrow pointer. Intended to indicate the approximate coolant temperature. The data is obtained from a sensor that is installed between the cylinder head and the thermostat. This allows you to obtain accurate data. The sections have a range of 20 degrees, the lower level is 50, and the upper level is 130.
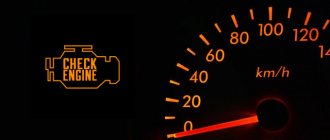
- Tachometer. Its purpose is known to any driver - to show engine revolutions per minute. Sections of 5 units, digitized every 10 units. To get the real value, add a couple of zeros to the number. Starting from 55, the engine enters the red zone in terms of revolutions.
- Left turn signal indicator.
- A similar indicator for the right turn signal.
- Speedometer. It is of the induction type and receives speed data from the sensor on the gearbox. Unfortunately, it’s definitely not very high; the error can be up to 5 km/h or even more.
- Fuel level indicator. The sensor is located directly in the tank.
- A warning light indicating a dangerously low fuel level.
- Low beam indicator.
- Lamp for monitoring the amount of brake fluid.
- High beam indicator.
- Lever for adjusting the clock.
- Total (odometer) and daily mileage.
- Alarm.
- Failure of electronic systems leading to critical engine failure.
- Clock and thermometer.
- Low battery charging voltage.
- Handbrake warning lamp.
- Critical oil pressure level.
- Fuel mixture enricher indicator.
Based on the above diagram, you can easily remember what this or that alarm light means. And although this is an instrument cluster for the VAZ 2112, it is approximately the same on other VAZ cars.
Instrument panel pinout
The instrument cluster is connected to the vehicle's on-board network using plugs located on the rear wall. The connectors are made of white plastic (indicated as X1 in the diagrams) and red (X2 in the diagrams). Depending on the manufacturer, the pinout of the plugs is different. This point should be taken into account when performing repairs.
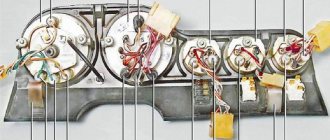
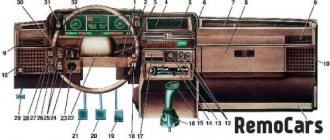
Placement of elements on the rear wall of the shield
- 1 – fuel remaining lamp;
- 2 – panel illumination;
- 3 – right turn indicator;
- 4 – left turn indicator;
- 5 – white block X1;
- 6 – coolant temperature indicator;
- 7 – lamp for side lights;
- 8 – indicator of activated “suction”;
- 9 – control lamp for engine oil pressure;
- 10 – indicator of the applied parking brake;
- 11 – indicator of lack of battery charging;
- 12 – tachometer;
- 13 – Check Engine indicator;
- 14 – speedometer and red block X2;
- 15 – lamp for emergency brake fluid level drop;
- 16 – operation of external emergency signaling with turn signals;
- 17 – high beam indicator;
- 18 – a device that displays the fuel level in the tank.
Purpose of wires in the white plug of old-style combinations. The pin positions of the block are indicated in the diagram above.
Why does the instrument panel not work on the 16 valve VAZ-2112?
The situation when the instrument panel on a VAZ-2112 does not work is not uncommon for the domestic automobile industry. Any transport has its shortcomings and disadvantages. For this reason, the owner of a VAZ-2112 has no choice but to independently identify and fix the malfunction, or seek support and assistance from a service station.
Instrument panel device
On the instrument panel of the VAZ-2112 there is:
- Speedometer.
- Tachometer.
- Fuel level indicator.
- Direction indicator.
- Liquid temperature indicator in the cooling system.
- Control lights.
- Blocks for connecting wires.
Before you start doing any work on the dashboard, it is recommended that you familiarize yourself with its pinout. In other words, you first need to understand where each wire goes and what it is intended for.
Pinout and instrument panel diagram
Instrument panel pinout
1 — fuel reserve warning lamp; 2 — instrument cluster lighting lamps; 3 — right turn indicator lamp; 4 — left turn indicator lamp; 5 - backup warning lamp; 6 — coolant temperature indicator; 7 — indicator lamp for external lighting; 8 — control lamp for the carburetor air damper; 9 — oil pressure warning lamp; 10 — parking brake warning lamp; 11 — battery charge indicator lamp; 12 — tachometer; 13 — control lamp “CHECK ENGINE”; 14 — speedometer; 15 — brake fluid level warning lamp; 16 —hazard warning lamp; 17 — control lamp for high beam headlights; 18 — fuel level indicator.
Diagnostics of the instrument panel on a VAZ-2112
The video shows the process of self-diagnosis of the instrument panel on a VAZ-2112. You can see the operation of all arrows and signaling devices. For example, an unscrupulous seller may remove the “Check Engine” light.
Troubleshooting
There are several most common problems that may cause the instrument panel on a VAZ-2112 to not work. These are:
- The backlight does not light up. Here you will need to check all contacts, wiring and its condition. Fuses or light bulbs may also simply blow out. There can be many reasons for this, and therefore it will not be possible to quickly solve the problem. We need to understand everything in detail. We had a case where all the instrument panel backlight diodes burned out at once. I had to change all the light bulbs.
Checking and replacing backlight bulbs
Location of the instrument panel backlight fuse on an editorial car. We have an easy tuning, there is a 7.5 Ampere fuse, 5 Amperes were knocked out. It is not good.
You can find it on the mounting block. If it is burnt out, you just need to replace it. It is also necessary to discover the reason why it failed. Usually a short circuit in the wiring leads to such consequences.
- The arrows are jumping . Here the main reason is that the mass on the shield is bad. To get to the ground wire you will need to pull out the car radio. Such a wire may be shifted to the side when installing, for example, an alarm system. Therefore, if there is an alarm in the car, and there is no wire under the radio, you need to look for it in another place. It may be behind the upholstery in the area of the driver's left foot. Also, the ground wire may be damaged during the installation of a new radio. You need to take the time to fasten such a wire to the car body.
- Problems with the instrument panel . Here you will need to check if everything is fine with him. To do this, you need to pull it out from its seat, but do not disconnect the wires. You need to check the voltage in the wiring. Be sure to also look at the back of the device to make sure that the conductive paths are not damaged.
- Cigarette lighter . Often the instrument panel may fail due to the cigarette lighter (for information on replacing the cigarette lighter, see “replacing the cigarette lighter on a VAZ-2112 with your own hands”). Drivers can use various additional devices through this connector, for example, phone chargers. As a result, a large amount of energy is consumed, which causes fuses to blow. For this reason, the instrument panel may also not work correctly. In this case, you need to check fuse F18 and replace it if necessary.
Cigarette lighter fuse - F18
conclusions
In practice, it is clear that the main part of the reasons why the instrument panel fails can be identified independently. But here you need to have certain experience and skills. If they are not there, then you should contact a service station.
Repair of instrument panel VAZ 2110
On cars of the VAZ 2110-2112 family, the dashboard includes control lights and on-board instruments, with the help of which the driver can easily monitor the condition of the car. The following indicator lights are displayed on the instrument panel: coolant temperature, turn signals, tachometer, fuel level, speedometer, an image in the form of a gas station, indicating that it is necessary to refuel, lights for turning on the dimensions and high beams, low brake fluid level, a screen reflecting the vehicle’s mileage, emergency alarm, Check Engine, which signals engine malfunctions, a display with a clock, an indication of a generator malfunction or battery recharging, an indication of the handbrake, a low oil pressure light in the engine and, on carburetor engines, a choke light).
The VAZ-2110 dashboard does not work: reasons, troubleshooting methods, tips
Cases when the dashboard on a VAZ-2110 does not work are not uncommon for owners of domestically produced cars. Any car has some shortcomings, so car owners simply have no choice but to fix the problems that constantly arise. And you will learn further about what to do when the dashboard on a VAZ-2110 stops working.
Arrangement
So, what can you see on the instrument panel in this car? The combination consists of several components:
Features of panels of different VAZ-2110 models
On VAZ-2110 cars of different years of production you can see different options for instrument combinations.
Causes
The VAZ-2110 dashboard does not work - what to do in this case? First of all, it is necessary to understand the situation in detail and identify the original causes of the problem.
Of course, the most impressive malfunction of the panel is its complete failure. In such a situation, the instruments themselves, the indicators, and control lights stop working, and the arrows simply fall down. To solve this problem, the first thing you should do is check the functionality of the fifteen-amp fuse, which is designated “F6”. Often this is the reason why the dashboard on the VAZ-2110 does not work.
Disassembly and replacement of devices
To replace (repair) devices, you must perform the following actions in a strictly established order:
1. The entire instrument cluster must be removed completely.
2. Unscrew the screws (2 pcs.) that secure the tire. After this, the bus itself must be disconnected from the instrument system board.
3. Unscrew the screws (7 pcs.) that secure the frame with glass.
4. It is necessary to remove the frame by disconnecting it from the instrument system.
5. Unscrew the 2 screws that secure the instrument cluster board.
6. Disconnect the left light filter, which has warning lamp symbols.
7. Disconnect the right light filter, which has warning lamp symbols.
9. Unscrew the nuts securing the fuel level sensor, coolant temperature sensor and tachometer. Each device is secured with 3 nuts.
10. Disconnect the board from the instrument system housing.
11. Unscrew the screws securing the instrument scale to the body (5 pcs.).
12. Remove the scale with instruments from the system body.
13. Very carefully, prying the arrow of the fuel level indicator with a screwdriver, you need to remove it from the axle.
14. Unscrew the screws (2 pcs.) that secure the fuel level indicator to the scale.
15. Disconnect the fuel level indicator. Install a new one in its place. When installing the sensor, perform all steps in the reverse order of removal.
16. Replace the remaining devices in the same manner as described. This is the entire repair of the VAZ 2110 instrument panel. As you can see, there is nothing complicated and there is no need to go to a specialized service center and pay money.
17. Assembly of the instrument system should be carried out in the reverse order of disassembly. When carrying out this work, it is necessary to take into account that the nuts that secure the tachometer have a different thread.
Installing the dashboard trim
The cover will be installed after complete disassembly - it’s easier and more convenient. The instructions say that the trim must be cut around the perimeter. Now you can assemble the case: we place in it the accessories and instrument connectors that came in the kit. Carefully lay out the wiring from the base of the cover. All joints of the new VAZ 2110 panel must be glued with anti-creak.
We attach additional harnesses to the standard wires and tighten them with zip ties. Please note that there are additional buttons on the cover - standard connectors must be connected to them. The cover is attached to the original panel using self-tapping screws. Now you can carry out the installation in reverse order.
Arrows indicate places for self-tapping screws
1. First, disconnect the negative cable from the battery.
2. Secondly, you will have to remove the steering wheel and steering column switches.
3. Remove the top lining of the floor tunnel.
4. Now you need to open the glove compartment and unscrew the 2 fastening screws from below. After this, you need to disconnect the wires from the glove compartment lighting and remove the glove compartment itself.
5. Remove the mounting block with the cover.
6. Pull it towards you and remove the hydraulic corrector switch handle.
7. Unscrew the nut securing the switch and remove it from the other side so that it hangs on the rods.
8. Using a screwdriver, press down the plastic latch and turn the upper side nozzle and remove it. In the same way, you need to remove the nozzle from the opposite side.
9. Unscrew the nuts under the upper side nozzles on both sides.
10. Unscrew the fastening screw from the bottom left.
11. Unscrew the fastening screw in the niche of the mounting block.
12. Unscrew the fastening screw on the left side of the console.
13. Unscrew the fastening screw on the right side of the console.
14. Unscrew the screw in the glove box niche.
15. Unscrew the screw from the bottom right. 16. Remove part of the seal from the front pillar.
17. Now pick up the decorative trim in three places so that the fastening pistons come out of the holes and remove it. The cover on the opposite side is removed in the same way.
18. Cut off the clamp securing the wire bundles next to the ignition switch and disconnect the block from the ignition switch wires.
19. Disconnect the connector from the wires under the instrument panel.
20. Now push the terminal of the black-green wire into the return block of the ignition switch and remove it from the block.
21. Unscrew the nut securing the controller block bracket to the panel amplifier.
22. Disconnect the three ground wires from the bracket.
23. Near the gas pedal, disconnect the connectors from the wires.
24. Using a screwdriver, disconnect the black immobilizer block. Also disconnect the green block of the immobilizer.
25. Now disconnect the 2 blocks with wires from the brake signal contacts.
26. Disconnect the clamp that tightens the bundles of wires in the niche of the relay and fuse box.
27.On the left under the instrument panel, disconnect the connectors from the wires on the harness. Now you can remove the instrument panel from the pins and take it out of the cabin.
28. Install the instrument panel so that the guide pins fit into the holes on the instrument panel.
29. At the same time, move the steering column adjustment knob into the hole on the instrument panel.
30.Using a screwdriver, drive the threaded rods into the holes on both sides of the panel.
31. Install the foot heating duct so that..
32…. the air duct has entered the hole in the air distributor housing.
33. Connect all terminals to wires in reverse order. Secure the panel and reinstall all components that were removed during disassembly. After completing the work, check the operation of all devices.
The instrument panel on the VAZ 2110 serves to display the necessary information about the condition of the car and contains a tachometer, speedometer, fuel level and coolant temperature gauges, as well as 12 warning lamps. Due to the fact that it is made of plastic of not very high quality, after a short amount of time the plastic begins to crack or the corner of the instrument panel peels off. To remove these defects, it is necessary to remove the entire dashboard, but how to remove the panel on a VAZ 2110?
Replacing warning lamps in the instrument panel
In many cars, including the VAZ 2110, warning lamps A12?1,2 are used in the instrument cluster. When replacing the lamp, do the following:
2. The socket together with the burnt-out lamp should be turned counterclockwise all the way.
3. Remove the lamp socket from the instrument system.
4. A new lamp is installed in place of the burned out one in the reverse order. All other instrument cluster lamps are replaced using the same method.
Diagram, pinout, repair of the VAZ 2110 dashboard
The instrument panel does not work on the VAZ 2110? For repairs you will need a diagram and panel pinout. As in any other model, the “tens” dashboard serves to display the status of the car, it shows the amount of fuel, speed, and also informs the owner of the VAZ 2110 about problems in the operation of components. But the panel is not an open book for all motorists, especially for novice drivers. This material describes the pinout, operating principle, purpose of the devices, main malfunctions, as well as repairs.
Disassembly
Now let's talk specifically about how to remove the panel on a VAZ 2110. To do this, it is enough to follow a certain sequence that will allow you to dismantle the unit correctly and quickly without unnecessary risks.
Removing the lining
Many motorists, being confident in their own abilities, ignore recommendations and do not follow instructions. At the same time, they remove the panel, while simultaneously dismantling another half of the interior.
The step-by-step guide we offer will allow you to avoid unnecessary manipulations, save time, effort and nerves.
- Buy special self-adhesive pieces of paper. The type that they stick on products in stores. You will also need a marker, pen or just a pencil. Each element to be removed should be marked so as not to get confused later when reassembling the elements. Write down the sequence on a piece of paper, or have your assistant do it under your dictation.
- Removing the front seats will make access to the instrument panel much easier. You won’t have much time to sit on them, and in order to get to certain fastening elements, the chairs may simply get in the way.
- There are screws on the sides that will allow you to remove the tunnel. Moreover, the upper part is removed first, and only then the lower. The order is not important, you can try in reverse order. Only then will it be frankly inconvenient for you to work. Tested by many craftsmen when disassembling the dashboard.
- Remove the steering column cover. This way you can remove the cover itself, as well as the steering wheel. To perform this task, three self-tapping screws and four fixing screws are removed. The steering wheel will sit on the splines quite firmly, so you will have to remove it with force. You can shake the steering wheel to the sides, tug. Just take care of your face, because with a sudden force the steering wheel can fly out of its seat and fly right at you.
- The steering column switches must be removed.
- Remove the glove compartment fasteners and remove it from its seat.
- After that, proceed to the mounting block. You have to remove not only the cover, but also remove all the connectors and relays.
- Now it’s time to figure out how to remove the VAZ 2110 panel trim and pillar trims. This is done quite simply, given that all fasteners are not hidden. Be sure to unscrew the fasteners of the headlight hydraulic corrector and push it inward.
- Now comes one of the most important moments - removing the screws that hold the instrument panel. They connect the panel to the body of your car. Unscrew the screws and two studs. It is not difficult to find them, since these studs are located under the cover of the air supply tunnel to the side windows.
- Having completed all the specified procedures, only the lower air duct and the steering shaft will hold the panel. After this, you can begin the planned repair or modernization of the car, which required the mandatory removal of the dashboard.
The dismantling procedure cannot be considered complete at this point, since when you open the dashboard, you will find a huge number of wires underneath it. What should we do with them?
Indicators
Dashboard
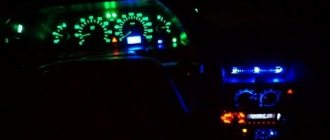
At the moment of ignition, all the lights on the instrument panel light up; after the engine starts, most of the indicators go out. Sometimes, even after starting the engine, one light continues to glow or even blink. This alarms drivers, because it is difficult to say which component in a VAZ 2110 car is malfunctioning; diagnostics are required to determine the breakdown.
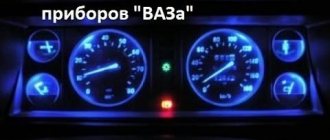
We know that the “ten” can be old or new. In both versions, the designations remain identical, the only difference is the location of the light bulbs and their diagram.
At the bottom of the instrument panel there are indicators that indicate a malfunction in the operation of various systems of the VAZ 2110. If they continue to light when the engine is running, it means that repairs will have to be carried out.
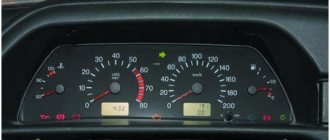
This is what the indicators of a VAZ 2110 look like with the ignition on
We go from left to right:
- The leftmost light, located on the instrument panel, refers to the air damper - the indicator is present in models with a carburetor engine;
- Oil can icon. If the indicator lights up or flashes, it means that the oil compression in the power unit has dropped and the pump is not working properly;
- The letter "P" inside a circle. The dashboard tells you that you forgot to turn off the parking brake;
- A light indicating a faulty battery or generator. Perhaps the alternator belt has broken, there is an open circuit in the circuit, charging is not performed;
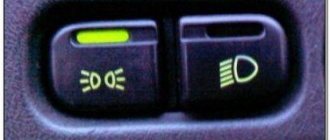
- When the “high beam” is working, the headlight icon lights up on the panel;
- On light bulb icon – the indicator shows the lights on;
- "Check Engine" indicator. If it burns, then it is urgent to carry out diagnostics and subsequent repair of the VAZ 2110 engine; serious defects have appeared in the operation of the power plant. The best solution is to stop moving;
- Directly above the faulty engine sign is a warning light.
In addition to these indicators, the front part is equipped with a display showing mileage. Also in this area are the clock and setting keys for it. In the “tens” of the new generation, the screen may be of a narrow format, but the layout remains the same.
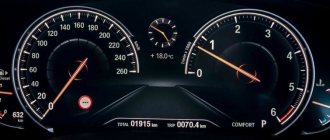
Additional panel
New cars have an additional panel with useful indicators. A flashing icon depicting a person with a seatbelt informs you that you should fasten your seat belt - this applies to both the driver and his companions. While driving, the wheel icon may light up; there is a possibility that the pads are worn out and require repair.
- Oil light - lights up when the oil level drops below normal - you should check the level as soon as possible.
- Windshield washer - it tells us that the washer fluid is almost empty.
- The thermometer above the container indicates an increased temperature of the coolant.
- A crossed out arrow icon means the parking or brake lights are not working.
Dashboard diagram
Connection diagram taken from the VAZ 2110 operating manual
The figure above shows the connection diagram of the instrument cluster. That is, using this diagram you can determine the connection location on the dashboard of the faulty indicator. You will need it if you have to change, for example, the battery warning lamp due to a malfunction. But in addition to the wiring diagram, you also need a pinout diagram, which is described below.
Pinout
If you want to perform repairs or other operations on the instrument panel, then you need a VAZ 2110 pinout. If you don’t have it, you will have to track every wire from the indicator, button to the device. The diagram allows you to determine which of the devices does not work in the event of a malfunction in one or another node. If the indicators in the old and new VAZ 2110 are identical, then the pinout is slightly different. There are two pads - red and white. Pinout may seem complicated only at the beginning. Let's take several connectors as an example.
Detailed pinout for white and red blocks
The first number indicates the black wire that goes to ground. The thirteenth number is tied to the oil pressure sensor in the system, as the diagram tells us. The white block indicates the connector number, the wire and the unit (unit) to which the wiring goes. The red block is read in exactly the same way. The first connector contains blue and red wires; they go to the external temperature sensor. As for number thirteen, here the white wire leads to the ignition switch.
The pinout and diagram shown in this article are basic. They may differ in color marking, because many variations of the VAZ 2110 have entered the market. To avoid confusion, it is recommended to compare the data from the article with the instruction manual, which also contains a diagram and pinout.
Malfunctions and repairs
Instruments or indicators may fail. This could be part of the indicators or even the entire speedometer. VAZ 2110 owners rarely encounter this situation, since the dashboard works properly, especially in domestic cars. Before changing the instrument panel or repairing individual parts, you should make sure that the sensors are working properly - we use the on-board computer.
Inaccurate installation leads to failure of elements. On the instrument panel board, the parts are attached using simple rivets, hence the negative result. The body is constantly subject to vibrations, so the installation simply “falls apart” and breaks appear in the circuit. Repair in this case involves soldering the rivets and thoroughly cleaning the contacts.
Instrument panel device
Control panel of the domestic “ten”
What to do if the instrument panel does not light up and does not work? How is the instrument panel tuned and how should it be disassembled if necessary? First of all, let's look at its device.
The vehicle instrument cluster includes the following elements:
It should be noted that the red block on the electrical circuit is marked with X2 symbols, and the white block with X1 symbols, so it is impossible to confuse these elements. If we talk directly about the “tens” control panel, then these cars use several types of instrument panels located on the dashboard. In this case, the majority depends on the year of manufacture of the vehicle - the car can be equipped with either an old or a new version of the tidy.
- One of the features of the old dashboard is that all the devices are installed symmetrically.
- In the control panel of the new model, several indicators - the temperature of the power unit and the gasoline level - are located with a slight shift to the right.
Instrument panel wiring pinout
If appliances do not work or light bulbs stop lighting, often the only solution is to disassemble the panels. In practice, certain components may well refuse to work; the disassembly and diagnostic procedure, as a rule, helps solve the problem. However, before repairing the instrument panel of the VAZ 2110, we recommend that you familiarize yourself with the pinout of the panel. This is done in order to understand where this or that wire leads and what function it performs, what safety elements are used, etc.
In principle, “reading” a disassembled dashboard is not a problem, especially since all the necessary information is contained in the service manual for operating the vehicle. If you have such a book and a machine at hand, as well as the desire, you can fix any problems in the operation of the control panel without the help of an electrician.
How to beautifully illuminate the buttons of a VAZ 2110 panel
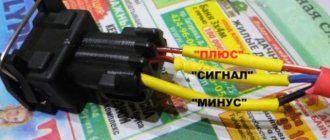
When tuning the panel of the presented car, among other things, you can also beautifully illuminate the “tidy” buttons. Let's take, for example, the power button. First you have to dismantle and disassemble it. To do this, you need to pull its moving part and body in different directions.
Once the button is pulled out, the light bulb can be accessed. If you wish, you can take it out. If you can’t pull out the light bulb, then we move on. Using a screwdriver or knife, pry up the latches on both sides. A switch mechanism will appear in front of us. Here we need a black staple. By prying it off, we will calmly scatter the entire mechanism.
Now we can easily remove the lamp; tweezers are suitable for this. Now you can use your imagination. You can purchase an LED lamp in any color. It should be borne in mind that the positive one is contact No. 6, and the negative one is No. 7. You can find out the polarity by looking at the back of the case. A block with wires is inserted here. Next, we check how the backlight works. If everything is fine, move on to the next part.
Getting rid of the green filter. It can be drilled, but this must be done carefully so that the drill does not go right through the entire structure. As a result, we remove the light filter from the structure and check its functionality.
It should be noted that almost all buttons, if desired, can be modified in this way. The only exception is the position of the negative and positive contacts; they need to be looked at in the electrical diagram. If there is no diagram, you can easily find a photo of it on the Internet. The negative contact is usually designated by a black wire, the positive contact by any color.
Most often he is white. You can remember, but it is better to sketch or photograph the contact connections; then there will be no confusion during the assembly process. The assembly process must be done in reverse order.
Common faults and solutions
Tidy "tens" with installed LEDs
The control panel may stop working for several reasons.
As a rule, removing the instrument panel is carried out for the following malfunctions:
- The backlight on the “tens” control panel stopped working. In this case, it is necessary to diagnose the condition of the contacts, as well as the condition of the wiring responsible for the suspension. The shield could stop working simply due to the combustion of safety elements, or the lamps could fail due to wear, often the cause is a short circuit. In principle, as practice shows, there are more than enough reasons, so sometimes identifying and solving a problem without a tester can be very problematic.
- One of the most serious problems for which a disassembled device may have to be replaced is complete failure. If there is a system failure, and all sensors and indicators on the dashboard stop working without exception, the controller arrows fall down, and the light bulbs simply do not light up. To eliminate the problem, you must first diagnose safety component number 15, it is marked as F6 and this part is located in the fuse block. If this component is burned out, then this problem can be solved simply by replacing it with a new one. However, first you need to figure out exactly what the reason for its burnout is. First, you should find and eliminate the cause, only then install a new element. As a rule, the cause of a blown fuse is a short circuit in the on-board network.
- The arrows began to spontaneously move up and down. This problem occurs quite often in domestic dozens; as a rule, the main reason is the problem of poor ground contact. Firstly, the ground wire is connected to a partition designed to separate the passenger compartment and the engine compartment. If you need to get to it, you will need to dismantle the audio system from its installation location; the quality of its fixation must be checked. Secondly, quite often during installation the mass is removed to another place so that it is more conveniently accessible. So if you have an anti-theft system, but there is no wire under the car radio, try looking for it under the trim, in particular, next to the driver’s left foot. Thirdly, the ground wire could have been damaged during installation of a new car radio. When the negative wire is connected, the ground wire must be unscrewed. Next, it is reinstalled, however, as practice shows, it is often less reliable than it was originally. As a result of vibrations that occur during driving, driving on uneven roads, including potholes and bumps, the mount begins to weaken over time. Accordingly, this leads to the contact being lost, and this, in turn, leads to the inoperability of the control panel. So, first of all, you need to securely fix the wiring, as this can cause certain difficulties in the future.
- Malfunctions related to the operation of the device itself. If you need to qualitatively check whether everything is normal with this device, dismantle it as much as possible from the installation site, but to do this, do not disconnect the wires that power it. First, the white wire marked X2 is diagnosed, which is connected to the first contact. In addition, using a multimeter, you should also diagnose the presence of voltage on pins 9 and 10. If the system is working properly, you will notice when diagnosing that the system voltage is 12 volts. We also recommend checking the back of the dashboard - all conductive tracks on it should be intact.
- As practice shows, the problem of the control panel not working is often caused by the failure of the cigarette lighter itself. This is because many car enthusiasts practice connecting various electronic devices and gadgets to this socket for various functions. For example, it could be a charger for a mobile phone, a tablet; the charger can also power a video recorder, radar detector, GPS navigator and other devices. Since devices of this type consume a large amount of current, the devices are often damaged by the cigarette lighter itself, and the problem of burnout of the F19 fuse element can also often occur. Accordingly, the control panel either turns off completely or continues to function, only incorrectly. If the fuse is working, you can try to disconnect the plug socket. If these steps do not produce any results, then simply replace the safety device.
- Tuning the dashboard of a VAZ 2110 is often the reason for its performance. The new shield may not have been installed correctly and is no longer working. Or, during installation of the device, not all wires were connected, or they could simply be bent. If the problem is in the wires, then replacing them will solve the problem (video author - LedStyle70).
In fact, most of the malfunctions that are associated with the operation of the control panel can often be resolved independently at home. Especially when it comes to the product of the domestic automobile industry - the “top ten”. But there are some things to consider here. If you do not have experience or knowledge in working with electrical and electronics, then you should not engage in independent repairs. It is better to contact a qualified specialist. Even if you pay money, you will be sure that everything will be done correctly.
Sorry, there are no surveys available at this time.
Lada 2112 ᵀᴴᴱ ᴼᴿᴵᴳᴵᴺᴬᴸ › Logbook › WHY VAZ 2110-2112 DEVICES DO NOT WORK
The instrument panel of the VAZ-2110-2112 contains: speedometer, tachometer, fuel level indicator, coolant temperature indicator, 12 different indicator lamps, 6 dashboard backlight lamps, one reserve socket for the indicator lamp and two wire connection blocks. It is very easy to distinguish the pads, the one that is white in electrical diagrams is designated as X1, and the one that is red is designated as X2. The instrument panels themselves, installed on VAZ-2110 cars, can be of two types: the old model, where the instruments are placed symmetrically, and the new model, with fuel and coolant level indicators shifted to the right side of the dashboard.
The biggest malfunction of the instrument panel will be its complete failure. In this case, neither the control lamps nor the devices themselves work. The driver, first of all, needs to check the 15 amp fuse F6. It is located in the mounting block. If it burns out, it is necessary to look for the cause of this phenomenon, otherwise the new one installed will repeat the fate of the previous one, that is, it will also burn out. The cause of blown fuses is a short circuit in the electrical circuit.
There are times when instrument needles begin to jump along their scales from minimum to maximum. Most likely, the reason for such actions of devices will be poor contact with ground. The ground wire coming from the instrument panel is attached to the partition separating the engine compartment from the passenger compartment. You can find it by removing the radio from the socket. But if an alarm was installed on your car, then it is quite possible that the fastening of this massive wire, for ease of operation, was moved to another place, more accessible. Usually, alarm installers move it behind the interior trim in the area where the driver’s left foot is located. A similar picture may occur when installing a radio. When connecting its negative wire, the ground wire of the instrument panel was unscrewed, and then it was wrapped poorly, as a result of which it weakened under the influence of vibrations transmitted to the car body. They wrap it poorly because it is not very convenient to do so.
If everything is in order with the fastening of the ground wire, then you will have to check the instrument panel itself. To do this, you need to pull it out as far as possible from its mounting location without disconnecting the wires going to the pads. You will need to check on the white block X1 the ground wire going to contact 1, and at the same time check the voltage on contacts 6, 9, 10, it should be equal to 12 volts. Look, on the back side of the instrument panel, for the integrity of the paths along which electric current flows to the corresponding consumers.
Another cause of instrument panel failure may be the cigarette lighter. The fact is that through this socket, some drivers connect additional devices, such as: a cell phone battery charger, an electric tire pump, or a car interior vacuum cleaner. Considering that these consumers require high current, either the cigarette lighter itself fails or fuse F19 blows, which leads to failure of the instrument panel. By the way, you can also disable the cigarette lighter by holding it in the on position for a long time. In these cases, you can make the instrument panel work by disconnecting the cigarette lighter connector if fuse F19 is intact.
In principle, the driver himself can eliminate all malfunctions associated with a complete failure of the instrument panel. For this, he does not need any additional knowledge in electrical engineering. The only thing he needs to know is the probable causes of failure of the instrument panel.
Wednesday, June 17, 2015
Repair of instrument panel VAZ 2110
On cars of the VAZ 2110-2112 family, the dashboard includes control lights and on-board instruments, with the help of which the driver can easily monitor the condition of the car. The following indicator lights are displayed on the instrument panel: coolant temperature, turn signals, tachometer, fuel level, speedometer, an image in the form of a gas station, indicating that it is necessary to refuel, lights for turning on the dimensions and high beams, low brake fluid level, a screen reflecting the vehicle’s mileage, emergency alarm, Check Engine, which signals engine malfunctions, a display with a clock, an indication of a generator malfunction or battery recharging, an indication of the handbrake, a low oil pressure light in the engine and, on carburetor engines, a choke light). Disassembly and replacement of devices
To replace (repair) devices, you must perform the following actions in a strictly established order:
1. The entire instrument cluster must be removed completely.
2. Unscrew the screws (2 pcs.) that secure the tire. After this, the bus itself must be disconnected from the instrument system board.
3. Unscrew the screws (7 pcs.) that secure the frame with glass.
4. It is necessary to remove the frame by disconnecting it from the instrument system.
5. Unscrew the 2 screws that secure the instrument cluster board.
6. Disconnect the left light filter, which has warning lamp symbols.
7. Disconnect the right light filter, which has warning lamp symbols.
9. Unscrew the nuts securing the fuel level sensor, coolant temperature sensor and tachometer. Each device is secured with 3 nuts.
10. Disconnect the board from the instrument system housing.
11. Unscrew the screws securing the instrument scale to the body (5 pcs.).
12. Remove the scale with instruments from the system body.
13. Very carefully, prying the arrow of the fuel level indicator with a screwdriver, you need to remove it from the axle.
14. Unscrew the screws (2 pcs.) that secure the fuel level indicator to the scale.
15. Disconnect the fuel level indicator. Install a new one in its place. When installing the sensor, perform all steps in the reverse order of removal.
16. Replace the remaining devices in the same manner as described. This is the entire repair of the VAZ 2110 instrument panel. As you can see, there is nothing complicated and there is no need to go to a specialized service center and pay money.
17. Assembly of the instrument system should be carried out in the reverse order of disassembly. When carrying out this work, it is necessary to take into account that the nuts that secure the tachometer have a different thread.