Knock Sensor Circuit Low Signal
Self-diagnosis of Chevy Niva controller errors when buying a car is very simple
Chevrolet Niva (NIVA Chevrolet). The check is on. Do-it-yourself engine diagnostics.
Diagnostics and error codes of the Chevrolet NIVA instrument cluster
1 1 Error Code 14 Chevrolet Niva Firmware
Niva Chevrolet phase sensor died: we diagnose the ECM, panel self-diagnosis
Self-diagnosis of Chevrolet Niva! Or a standard bookmaker!
NIVA CHEVROLET+ELM327=DIY diagnostics
Diagnostic device ELM327 review for Chevrolet Niva
Treating the underbody of a car against corrosion – Chevrolet Niva
Problems with engine detonation can occur due to various faults. They are often associated with the operation of the electrical circuit from the knock sensor to the electronic control unit, or with the knock sensor itself. The diagnostic scanner can detect 4 common knock errors - P0325, P0326, P0327 and P0328. For the purposes of this article, we will look at error P0327, which indicates that a low signal level is coming from the knock sensor to the ECU.
Engine operating principle
Detonation very often occurs when going uphill. In this case, the car is moving slowly, and the speed is increased. But do not worry, since this phenomenon is called glow ignition, and it does not indicate that the engine is not working properly.
Any internal combustion engine works according to the following principles:
- A mixture of gasoline and air is supplied to the combustion chamber of the cylinders, where it is ignited by a spark on the spark plug. Moreover, the piston should be literally a few millimeters from top dead center. As soon as the piston reaches the top position, the greatest pressure is generated in the cylinder. At this moment, the entire air-fuel mixture will completely burn.
- During normal operation of the knock sensor on the Chevrolet Niva, signs of this phenomenon will not appear. This device will help get rid of the manifestation of detonation. And it appears when the mixture begins to ignite much earlier than it should. This usually happens halfway to top dead center. And when the air-fuel mixture burns, a force is exerted on the upper part of the piston, which pushes it in the opposite direction. At the same time, the engine power is reduced, and significantly, and its parts wear out.
How to troubleshoot P0327?
The following step-by-step guide will help you resolve the P0327 code.
Inspect the sensor and its connections
Many problems can be easily found in the harness and connectors. Begin your diagnosis by visually inspecting the knock sensor and its wiring.
Check sensor output
To test an older style knock sensor, connect a digital multimeter set to AC voltage between the DD signal output wire and the housing.
Then tap the engine near the sensor. You should see an AC voltage reading on your multimeter. If not, the sensor is faulty and must be replaced.
To test a car with a resonant type sensor, you must connect a digital multimeter in the same way as in the example above. But instead of knocking on the cylinder block, you will be removing the fuel pump relay.
Start the engine, keep your foot on the brake. Raise the revs a little. When the car is starved of fuel, it begins to knock and you should see an AC voltage output from the sensor. If there is no voltage, the DD is faulty and must be replaced.
Check the diagram
If the knock sensor is good but P0327 is still present, you will need to check the sensor circuit. Using a multimeter set to Ohms (resistance), connect one probe to the DD connector and the other to the knock sensor input pin on the ECU. This checks the continuity of the circuit between the sensor and the control unit.
If the device shows “OL”, then there is an open circuit in the circuit that needs to be repaired. If not, the ECU is likely the problem and needs to be replaced.
While older style knock sensors are grounded through the sensor itself, resonant type sensors typically have a separate ground circuit.
In this case, use a multimeter to make sure that the ground wire is ok before blaming the ECU. Look at your vehicle's wiring diagram to determine which pin on the connector is power and which is ground.
Then connect the red lead of the multimeter to the positive terminal of the battery and the black lead to the ground on the connector. You should see a reading of about 12 volts, indicating a good ground. If this is not the case, you will need to look at the wiring diagram to determine the cause of the circuit failure.
Detonation effect
On a Chevrolet Niva, a knock sensor error can be read using a special diagnostic scanner.
If there is an on-board computer, an error code will be displayed on it:
- 0327 - excessively low signal level from the knock sensor. Most likely, there is a break in the circuits connecting the sensor to the control unit.
- 0328 - signal level too high. The cause of this error may be a malfunction of the device itself.
The Chevrolet Niva is a very specific car, as it is designed for driving in conditions where there is practically no road. Therefore, any problems with it can simply be fatal. The risk of stopping in the middle of the forest increases several times.
Causes of error P0327
There are several main reasons that lead to error P0327:
The knock sensor is not installed correctly or has defects that prevent it from transmitting information correctly, for example, oxidation of the contacts or poor fastening;
To fix the problem, you need to step by step check the possible faults indicated above.
Typical breakdowns
Be sure to listen to how the engine operates as the load increases - if even the slightest metallic clatter appears, be sure to make a diagnosis.
Otherwise, you may experience the following problems:
- Burnout of the gasket under the cylinder head. When detonation occurs, the engine temperature increases.
- Destruction of the pistons, as they all corrode.
- Very often, elements of the crank mechanism and cylinder head are destroyed.
If you are driving your car up a hill and the gear is in high gear, be sure to monitor the engine. If you subject the engine to heavy loads, you will contribute to the appearance of detonation knocks. As a result, many elements of the car will fail, and this is the first step towards a major overhaul.
How to check the knock sensor?
Unfortunately, the knock sensor can also fail. In this case, a person without special knowledge will be able to notice this only by the lit indicator. No other obvious signs will be noticed. The car will continue to operate in the same mode and start without any signs of breakdown.
At this point, it is necessary to remember that this device is not mechanical, it is part of an electronic system, and therefore the breakdown is considered electronic.
A knock sensor malfunction can happen for a number of different reasons, including:
- There has been a breakdown inside the sensor itself.
- Closure.
- The signal wire or braided shield is broken.
- Damage to the engine control unit.
Thus, it will not be difficult to identify the breakdown. In order to determine it, it is necessary to conduct a test.
The easiest way to check is to go to a car service center. There, experienced craftsmen will open the engine protection and identify the breakdown in just an hour.
But those who are not looking for easy ways can always carry out this simple process on their own. Self-checking occurs according to the following scheme:
- First, we remove the protection in the garage. You will have to work directly with the engine block.
- Now we rule out a break in the signal wire and shielding braid. If it is torn or the braid is torn, you need to check the fastening of the plug and socket of the sensor. The integrity of the braid must be checked.
- If a break is excluded, the outlet itself is assessed. It is possible that its connection is faulty and requires replacement.
- You can detect faults in the device itself using a voltmeter. In this case, the car must be started and idling.
- You also need to check the condition of the device contacts.
Knock protection
The engine management system contains a knock sensor - it allows you to determine the presence of knocks, as well as evaluate their strength. If detonation suddenly appears and the sensor is faulty, the electronic engine control unit will generate an error signal. On the contrary, when the sensor is working properly, it will begin to produce a signal.
The design of the device is based on a piezoelectric element, which generates energy under the influence of impacts. And after that, the electronic control unit processes the signal and analyzes its level. After this, it sends a signal to change the ignition timing.
Error P0340 - what it means, symptoms, causes, diagnosis, solution
Error P0340 - camshaft position sensor (CMP) sensor A, bank 1, circuit malfunction.
Internal combustion engines require proper synchronization of the air-fuel mixture supply and ignition timing. If the timing is incorrect, you will have a misfire.
Modern cars use a control unit (ECU) to determine the correct ignition timing. For this purpose, camshaft position sensors are used.
If the sensors are faulty, the ECU receives incorrect signals. A vehicle with improper timing will experience a loss of power and may be difficult to start. Additionally, your Check Engine light will come on.
The camshaft position sensor also records the camshaft speed and sends this information to the ECU. The controller will use this information to regulate the amount of fuel and ignition timing. This is necessary for fuel efficiency.
Some engines have multiple camshaft sensors, but usually there is only one. Sometimes you get information about the engine side (bank 1, bank 2) from the fault code if you have a V-twin engine.
Bank 1 is located in cylinders 1-3-5-7-9, and Bank 2 sensor is in cylinders 2-4-6-8-10 and so on.
| Error code | Location of damage | Probable Causes |
| P0340 | MAF sensor A, bank 1, circuit malfunction | Wiring, DPRV, ECU |
Replacing the sensor
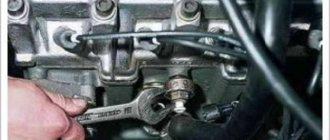
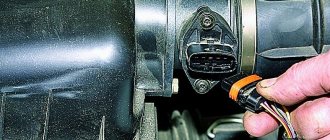
The procedure for replacing the knock sensor on a Chevrolet Niva is quite simple. You need to adhere to the following sequence:
- Find the location of the element on the engine block. And it is located in the middle part of the block; a wire made of a corrugated tube is connected to it.
- Prepare your tools. A 13mm wrench and a screwdriver will be enough.
- For convenience, you need to unscrew the bolt securing the front tube strut in the gun. After carrying out the necessary manipulations, this spacer must be moved to the side.
- Press the latch to disconnect the block from the sensor.
- Using a 13mm wrench, unscrew the bolt that secures the sensor to the engine block.
- Install the new element in reverse order.
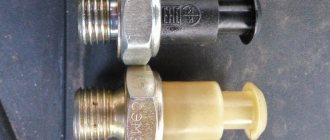
It is advisable to check the integrity of the electrical wiring before installing a new sensor to ensure that it is working correctly. Depending on where the knock sensor on the Chevrolet Niva is purchased, its price may vary between 450-650 rubles.
From time to time, the State-Chevy BC displays error 327 - low signal level of the knock sensor, while the car begins to slow down a little, but the check-engine lamp does not light up (according to the description, it should light up after 2-3 cycles). It usually occurs in wet weather or after overcoming puddles (subjective). After the reset, it may not appear for a week or two, and then the same thing happens again, i.e. the defect is floating.
Cleaning the contacts and checking the wires does not lead to results - everything is in order, but the error occurs again and again. I changed 2 sensors and started sinning on the controller, until the store told me to contact the Volgarians - their cars have been equipped with a knock sensor manufactured by BOSCH for a long time, catalog number KS 0261231046. After the replacement, the error has not occurred for half a year.
Addition dated 12/30/04
, by Chaynik (original).
I read the article and did not understand the meaning of the action. If, with a known good sensor (and correctly installed) and wiring, the controller generates an error, then the controller needs to be replaced. If the error disappears with some other sensor, this does not mean that it produces the signal that is needed, and this signal is correctly processed by the controller. IMHO, this is not a solution to the problem, but masking it. PS I had a similar problem on my new machine. Cured by correct tightening of DD.
How to replace a faulty knock sensor on a Chevrolet Niva
If an indication of errors in engine operation appears on the instrument panel, this does not mean that the problem lies precisely in a faulty sensor. But if corresponding problems also arise when driving, then its urgent replacement is necessary. It should be done in accordance with the table.
After installation, you need to check the continuity of the circuit with a tester. To do this you need to follow a few simple steps:
· Switch the multimeter to DC voltage measurement mode
Connect the connectors to the sensor output
· tap the sensor with a small hammer. In this case, the voltage should change.
· If the voltage does not change, then the sensor is most likely faulty
The cost of a knock sensor on a Niva is 500-600 rubles, so you shouldn’t delay replacing it so as not to spend much more on engine repairs.
Priora Knock Sensor 16 Valves Where is it located ~ AUTOTEXNIKA.RU
Purpose of the knock sensor
DD is involved in the formation of the fuel mixture, and also participates in setting the ignition timing (IAF). If there is any noise in the internal combustion engine, the sensor transmits readings to the electronic engine control unit (ECU), which in turn, according to the sensor data, levels out the operation of the internal combustion engine.
The sensor itself is a round element with a plug and a hole in the center. Inside there are threads that allow you to find resonance and a piezoelectric element. When detonation occurs, the threads begin to vibrate and are converted into an impulse, which is transmitted to the ECU.
Knock sensor cut in half
When the ECU receives readings based on voltage, it sets the ignition timing. This is necessary for more correct combustion of fuel in the cylinders, thereby ensuring more correct and smooth operation of the engine. This process is continuous throughout the engine operation.
Replacing coolant Renault Logan/Sandero
The main purpose of DD is to extend the service life of the engine.
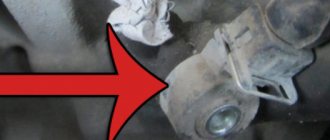
Purpose and location of the knock sensor
A knock sensor (DS) is a device that is installed on the outside of the cylinder block wall to monitor the appearance of abnormal vibrations caused by detonation in the engine, that is, explosive self-ignition in the combustion chamber of the working mixture. The DD produces an alternating current signal, the voltage amplitude and frequency of which depend on the vibration parameters of the cylinder block.
Photo of Priora knock sensor
Each level of intensity and frequency of oscillations of the engine walls corresponds to its own signal. The engine control controller constantly analyzes the data received from the engine.
When detonation occurs in the cylinders, the amplitude of vibrations of the corresponding frequency increases, and the DD generates a signal, after processing which the controller adjusts the ignition timing, making it later, which leads to the suppression of detonation of the working mixture.
The Priora DD consists of a washer-shaped plastic body, which has a hole in the center for a bolt with a 13-head head, and on the side there is a two-pin connector for connecting wires from the controller. The main part of the DD is located inside the case - a sensitive piezoceramic disk element, which, in fact, generates voltage (signal) when exposed to vibration.
In the photo - DD Priora
The DD Priora is installed on the cylinder block, namely: on its front wall under the intake module, next to and slightly above the dipstick socket for monitoring the oil level in the engine. It is not visible from the top of the hood. It can only be seen from below, for example, from a pit, when the lower engine protection is removed.
Article on the topic: How to connect a phone to a radio: methods, problems, solutions
Price
The knock sensor cannot be repaired and if it malfunctions, it only needs to be replaced with a new sensor. Fortunately, its price is not high, and there are also enough non-original, high-quality analogues on the market, which are listed below in the table. There are no differences between DD in engines with 8 and 16 valves; the sensors for both types of engines are exactly the same.
Below is a table with the article number and cost of the knock sensor for the Lada Priora
| Manufacturer | vendor code | Price (rubles) |
| LADA (original) | 21123855020 | 200-400 |
| Samara, 2112 | 3855020 | 180-250 |
| ERA | 550489 | 300-400 |
| "Road map" | 21123855020 | 250-360 |
| Decaro | 2112-3855020 | 380-500 |
| Fenox | SD10100O7 | 200-400 |
Knock sensor malfunction
The most common fault is “low signal level” code 0327 . With the ignition off, the integrity of the circuits from the sensor block to the controller, and from the block to the sensor, is checked. It’s a good idea to check the tightening torque. If the torque was insufficient and it was necessary, you can restore it and test for the absence of code 0327.
If the circuits are serviceable, the serviceability of the knock sensor is determined. Here are a couple of methods for checking the sensor itself without using special diagnostic tools.
- With the engine idling and the wiring harness block disconnected, connect a voltmeter to the sensor contacts in AC mode. The presence of a signal on the DD contacts indicates serviceability.
- The second method is to remove the DD from the engine. Then a bolt is installed in the sensor hole and a voltmeter is connected to the contacts. By lightly tapping the head of the bolt, the presence of a reaction to vibration is determined by the deflection of the voltmeter needle.
If the circuits and DD are working properly, the fault relates to the controller. When a breakdown of the knock sensor is determined, many drivers recommend using the Bosch sensor from the injection Volga as a replacement.
Symptoms of sensor malfunction
You can determine whether the sensor is broken without a dashboard. But this will require experience and a special approach to your car. You need to know him very well. We list the signs by which you can understand that the device is broken, from here it will be immediately clear what the knock sensor affects:
- Fuel efficiency will drop. This may not be noticeable right away, but over time the driver will definitely notice it.
- Also, as the throttle increases, the engine detonates longer than usual. The knock sensor affects the acceleration of the car.
If you determine the breakdown yourself, then it’s not far to independently diagnose the sensor, as well as replace it yourself. In principle, this is not difficult, but it requires some understanding of the process.
Decarbonization of engine piston rings. - there is more useful information here.
If it requires replacement, then it is necessary to purchase a new device and install it as soon as possible. All car enthusiasts are primarily interested in the price of a new device. It is low and depends on the make of the car and on the country in which the part was manufactured.
Replacement can be done in several ways, the easiest way is to contact a specialist and pay money. On average, all this will cost 2000-3000 rubles.
You will be interested in this article - Flushing the injector, cleaning the injectors with your own hands.
You can carry out the replacement yourself when the engine has cooled down by disconnecting the negative terminal of the battery. It is necessary to achieve the most convenient access to the sensor so that it can be removed. The fact is that it also depends on the car model.
You can remove it with a 12 mm wrench; to do this you need to unscrew the bolt. Before you pull out the faulty device, unplug it. A new sensor is installed in the same place, and everything is repeated, but only in reverse order.
Thus, the knock sensor is a simple device, yet very useful for an electronic control system. It is not difficult to determine its malfunction; you can check it yourself, even in rural areas.
It will also be inexpensive to replace the sensor. It doesn’t matter whether this is done by a specialist or independently.
The knock sensor on the 16-valve VAZ-2112 has the same causes of malfunction as some GAZ, Toyota, Gazelle, Priora and Kalina cars. Of course, not every motorist will be able to determine that this is exactly the sensor, but you can consider the direct and indirect causes of the malfunction.
The video provides an overview of the main faults and diagnostics of the wide-band knock sensor on the VAZ-2112:
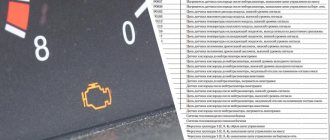
Chevrolet Niva error diagnosis
The most reliable way to identify what is wrong with a car is to diagnose electrical appliances and equipment. The procedure allows you to accurately identify breakdowns and quickly repair your car.
There are two ways to detect a problem in a car.
Self-diagnosis VAZ 2123
The simplest procedure allows the motorist to independently identify the damaged area and repair the damage. Thanks to the successful firmware of the on-board computer, some errors are displayed on the standard display. In this case, nothing happens on its own - you will need to perform several steps manually:
If the manipulations are correct, one of the indicated codes will appear on the display, and each Niva Chevrolet error number will be responsible for its own section of the highway:
- 0 – error 0 Niva Chevrolet indicates that there are no problems in the on-board circuits; most likely, the breakdown is purely mechanical in nature;
- 1 – standard error of the Niva Chevrolet ECU – the processor is not working correctly;
- 2 – for a Chevrolet Niva, error 2 indicates a lack of power to the gas tank float;
- 4 – malfunction of the battery or generator; a critical excess of the rated voltage of more than 16 volts was detected in the on-board circuits;
- 8 – has the opposite meaning; on a Chevrolet Niva, error 8 indicates an excessive voltage drop in the wiring due to a deep discharge of the battery or a malfunction of the generator;
- 12 – error 12 Chevrolet Niva reports a breakdown of the control indicator;
- 13 – signal transmission from the lambda probe is disrupted, you need to check the device and main power lines;
- 14 – on Niva Chevrolet, error 14 indicates a critical antifreeze temperature, the system requires cooling, otherwise the power unit may boil;
- 15 – the motor is too cold for normal operation, usually the error disappears after a good warm-up or replacement of the sensor;
- 19 – malfunction of the DPKV, the encoding indicates an incorrect speed of rotation of the unit;
- 21/22 – the throttle position differs from the calculated values up/down;
- 23/25 – the air mixture on the intake manifold is excessively cooled or overheated;
- 24 – open circuit of the speedometer, accompanied by a lack of response of the instrument needle to the driver’s manipulations;
- 27/28 – incorrect display of the actual amount of exhaust from the calculated value;
- 33/34 – Mass air flow sensor, the indicators of the device are overestimated or underestimated, relative to the actual state of the system;
- 35 – incorrect operation of the engine at idle, you need to check the correctness of the mixture formation settings;
- 41 – the phase distribution sensor or DPRV has detected an open circuit or the data received is erroneous;
- 42 – multiple misfires were detected, the system turned off the fuel supply to the damaged cylinders;
- 43 – the detonation channel sensor generates an error;
- 44/45 – fuel mixture is too rich/lean; you need to check the fuel lines for mechanical damage;
- 49 – the vacuum gauge is out of order or overloaded;
- 51 – ROM has failed, or there is a breakdown in the power cables;
- 52 – RAM is not working correctly, damaged, no power;
- 53 – the adsorber purge valve is faulty;
- 54 – octane corrector controller is de-energized or broken;
- 55 – the calculated load on the internal combustion engine differs from the established one;
- 61 – the oxygen quantity controller in the intake system transmits incorrect data to the computer.
At the same time, you need to accurately understand that, for example, when error 10 is on the display, the Chevrolet Niva tells the driver that there are several problems (standard, unambiguous codes are summed up).
You should also know that Niva Chevrolet self-diagnosis errors do not reflect the exact location of the breakdown. Codings can only show the section of the wiring where you need to look for the cause of the malfunction. Also, these encryptions may be the result of a software failure after an unsuccessful wash or disconnection of the battery. To obtain more accurate data, the user needs to connect a special diagnostic scanner.