Replacing valves on a VAZ-2112 16 valves with your own hands
Next we look at how to replace the intake or exhaust valve on the 21120 engine. The engine was installed on cars of the “tenth” family, including the VAZ-2112.
Our method involves removing the cylinder head. In general, on VAZ-2112 engines, replacing valves does not have the features characteristic of some foreign cars. The only thing is that it is recommended to grind the valves. The advice applies to all VAZ engines, but decide for yourself whether to use it or not. The method of using lapping paste is shown in the video.
Let's see.
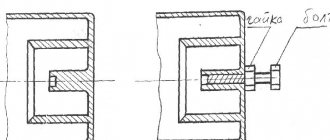
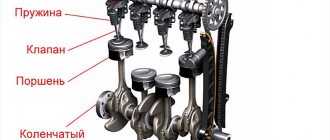
Sectional view of the valve mechanism
Replacing valves on a VAZ-2112 includes all the actions carried out when replacing hydraulic compensators. Having removed the compensator, you can see the valve stem and the upper plane of the disc. Plate 3 is held by two crackers 2 (see diagram).
Valve mechanism design
Dismantling includes the following steps:
- A “soft stop” (braided rope, etc.) is placed under the valve from below;
- Press down on the plate from above;
- The crackers are removed with tweezers or a magnetized screwdriver;
- Carefully move the plate upward, preventing the spring from rebounding.
Sometimes in “step 2” you have to hit the plate with a hammer, and here you need to be extremely careful. In general, there is special equipment, such as shown in the photo.
Spring compression equipment
The puller works on the principle of a vice. But the force when screwing should be small, otherwise they conclude that the crackers “stick” to the plate. And in this case, take a hammer.
Articles
- 21120-1007010 – inlet valve;
- 21120-1007012 – exhaust valve;
- 21120-1007028 – cracker;
- 21120-1007025 – upper plate;
- 21120-1007300 – hydraulic compensator (about checking them here).
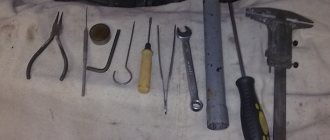
Necessary parts and tools for repair
Troubleshooting the cylinder head begins with the purchase of original parts and various consumables, the list of which is as follows:
- Fuel intake system valve 8 pcs. (art. 21120-1007010).
- Exhaust gas valve 8 pcs. (art. 21120-1007012).
- Set of hydraulic compensators 16 pcs. (art. 21120-1007300).
- Gaskets for valve cover, cylinder head, intake manifold, exhaust manifold (all come as a set art. 21120-1002064-86).
- Bolts securing the cylinder head to the engine crankcase (art. 21120-1003271-018).
- Timing belt (art. 2112-1006040-02RU), timing tension roller (art. KT100507/100513), drive belt for mounted units (art. BP638).
- Engine oil and oil filter.
- Cooling system fluid.
Installation of valves on a VAZ 2112 is carried out using a standard set of tools, as well as several specialized types of keys:
- standard set of spanners from 8 to 24 mm;
- socket sockets in a set from 8 to 27 mm;
- end internal hexagons;
- mechanical valve retaining ring remover (depressurizer);
- torque wrench for tightening the cylinder head and camshaft bolts;
- paste for grinding valves (set for rough and fine grinding);
- metalworking cloth gloves to protect hands while working.
The work of replacing 16 valves on a VAZ 2112, the price of which as of this fall is about 50 thousand rubles at AvtoVAZ dealerships (or approximately 35-40 thousand rubles at ordinary car repair shops), is not a very complicated process. You can carry out the work yourself, for which it is enough to purchase the above-described spare parts and the necessary tools.
VAZ 2112 engine breakdowns and repairs
To solve the problem of preserving valves from deformation when the timing belt breaks, you can install pistons from a 124 engine, but in this case several horsepower is lost. Therefore, when using a belt drive, as the instructions indicate, you need to periodically listen to the sound that the drive makes. So:
- At the beginning of wear, the rollers begin to squeak when cold, then rustle, then collapse.
- The pump begins to leak, which will lead to the presence of coolant on the belt.
- Seals that have become unusable lead to oil getting onto the belt.
- When the shafts wear out, the belt begins to slide to the side, which then rubs against the roller flange, which creates a grinding sound when cold.
- The belt may slip due to bending of the rollers.
- All of the above reasons can lead to belt rupture and, as a result, valve deformation.
Repair of valves for VAZ 2112 cars
First of all, it is necessary to disassemble the valve block of the VAZ 2112 engine:
- All parts that are attached to the cylinder head are removed: timing belt, pulleys, thermostat, rollers, intake manifold, exhaust pipe, all wires are disconnected.
- The valve cover is disconnected.
- A brush is put on the drill and the cylinders are wiped clean from carbon deposits until they shine, for which you need to turn the crankshaft twice.
- Using a special device that clamps the spring, the valves are loosened and removed with tweezers.
- Diamond chips are applied to the edge of the valve, as shown in the photo.
Applying diamond chips to the valve
- A rubber pipe is placed on the end of the guide valve and the valve is turned with both hands. Grinding must be carried out until a ring-shaped uniform mark is formed on the seat and valve plate.
Tip: To increase friction, the valve needs to be pulled down a little.
- Carefully remove any remaining lapping paste from the seat and valve.
Valve after lapping
- The valve is installed in place.
- If grinding does not help, the gap does not decrease, the valve must be replaced.
- Assembly is performed in reverse order.
Advantages of the VAZ 2112 with 16 engine valves
By installing 16 valves in the cylinder head, record engine power is achieved, whether it is turbocharged or naturally aspirated. So:
- to an increase in power. So the 8 valve VAZ 2112 engine with a volume of 1500 cc. centimeters has 77 horsepower, and the 16 valve engine in the VAZ 2112, which has the same volume, produces up to 90 horsepower.
- Changing the shape of the combustion chamber makes it possible to increase the knock resistance of the engine with 16 valves. This indicator is important, especially when low quality fuel is used.
- In such devices, the engine cooling system works better, which increases the reliability and durability of the unit.
- During the layout, the intake and exhaust tracts are spaced in different directions from the head on a VAZ 2112 with a 16 valve engine. This makes it easier to install the correct intake and exhaust manifolds.
Eight-valve engine tuning
To increase the power of an 8-valve engine, it can be equipped with a 16-valve cylinder head. To do this, the 8-valve engine of a VAZ 2112 is disassembled and parts are replaced:
- The bolts that attract the head to the cylinder block are changed; they differ from the 16-valve device in diameter and length. When installing the cylinder block and head from different engines, modified bolts are required. In this case, the bolts are used with a diameter similar to that of an 8-valve engine and a length similar to that of a 16-valve engine.
- To install a 16-valve head, you need to drill holes for installing bolts.
- The head gasket is also being finalized, its holes are also drilled out.
- Installing modified bolts increases engine reliability.
- Before installing the cylinder head, the cylinder block itself is assembled.
- The pistons of 16 and 8 valves are different. Therefore they need to be replaced.
- If the car is equipped with old connecting rods used on the VAZ 2108, then they need to be replaced with others from the VAZ 2110. This is due to the fact that the piston pin is pressed into the old connecting rods, and 16-valve pistons can only be mounted in a new type connecting rod.
- After assembling the motor, it is necessary to modify the wiring. This is due to the displacement of some sensors, which leads to lengthening of the wires for them.
Tip: To avoid additional expenses associated with replacing the engine control unit, you need to leave the old ignition module and connect it via high-voltage wires to the spark plugs.
- The last operation is to configure the VAZ 2112 16 valve engine control unit using a special program.
Tip: To increase power, you can install tuning of the exhaust manifold; its price is much lower than that of a standard 16-valve manifold with a catalyst.
This is how the VAZ 2112 engine turns out to have 16 valves. 8 valves are replaced by 16, which increases the power and reliability of the car.
Purpose and design of valves
VAZ engine with an aluminum intake manifold
During engine operation, the VAZ-2112 valves are subject to significant thermal and mechanical loads, and therefore such spare parts are made only from specialized metal alloys, which are characterized by increased resistance to external factors and elevated temperatures.
The use of an engine with 16 valves in the VAZ-2112 is due to the desire to achieve record engine power. An increase in power is ensured in this case due to greater filling of the cylinders with a warm-air mixture. Thus, the eight-valve engine has only 77 hp. with a volume of 1,500 cm3, while a similar engine with 16 valves already produces 90 hp.
By making adjustments to the shape of the combustion chamber, the engine's knock resistance increases. This parameter is especially important for those motorists who use low-quality fuel. Also, this motor has a more efficient cooling system, which has a positive effect on its durability and reliability.
Causes and signs of wear
The most common reason that requires valve repair on a VAZ-2112 is excessive heating. In practice, problems requiring replacement of valves on VAZs are far from the most common malfunctions of such cars, but they appear for the following reasons:
- Refueling VAZ-2112 with low-quality fuel;
- Incorrect change in the controller firmware (in case of refueling the car with propane).
Since this design involves the operation of valves near the pistons, one of the popular problems among owners of this vehicle is also a timing belt rupture.
Materials, what is better to choose
In order to repair the cylinder head, you need to buy original parts, as well as all the necessary consumables that may be required for work:
- Spanners 8-24 mm;
- Socket sockets 8-27 mm
- Internal hexagon sockets;
- Torque wrench;
- "Desiccant";
- Paste used to grind valves;
- Grinding kit;
- Gloves.
If you have these tools, replacing valves on a VAZ-2112 will not be a problem.
Before replacement, you should place the car in an inspection hole and completely turn off the on-board power supply. After this, you will need to unscrew the crankcase protective elements in order to drain the oil from there. It is important to remember that such operations can only be carried out on a cooled engine in order to avoid the risk of injury when replacing valves on a VAZ-2112.
Dismantling the cylinder head
Removing the cylinder head
On the VAZ-2112 engine, it is highly recommended to carry out preliminary dismantling of the cylinder head. In this case, the valve guides can, in principle, not be touched, but in this case it will be necessary to dismantle various equipment, namely:
- disconnect the connector under the fuel pump hatch so that it stops pumping;
- start the engine and wait until it stalls;
- remove the air filter by loosening the clamps and disconnecting the connector, as well as unscrewing the screw with a “10” wrench.
Chemicals for cleaning
The bearing housing in the VAZ-2112 fits tightly to the cylinder head cover, and the connection between these two elements must remain sealed for normal operation of the vehicle. To maintain the desired properties, Loctite-574, KLT-75M or other similar sealants should be applied to the edge of the housing.
In principle, the cylinder head gasket does not necessarily need to be lubricated during the replacement process, since applying grease or graphite can ultimately lead, on the contrary, only to unpleasant consequences. There are VAZ-2112 owners who prefer to use graphite lubricant to treat valve stems, but this should not be done either, since this procedure is carried out exclusively with engine oil.
Valve replacement and seat repair
Valve fixing plate
Replacing valves on a VAZ-2112 (16 valves) is not such a complicated procedure as many people imagine it to be. All you have to do is do everything according to the instructions:
- All components of the cylinder head are removed and the wires are disconnected.
- The cylinder head cover is removed.
- All carbon deposits are completely removed from the cylinders. To simplify this procedure, you can use a special brush attached to a drill.
- All valves are loosened and removed with tweezers. To do this you will need to tighten the spring.
- Special diamond chips are applied to the edge of each valve.
- The valve is installed back in its place.
- The cylinder head is being assembled.
In most cases, car owners have problems treating the edge of the valve with special chips. This procedure is carried out as follows:
- a rubber pipe is threaded onto the guide valve;
- the part is scrolled until a uniform mark is visible on its edge;
- All remnants of lapping paste are carefully removed.
If after performing this operation it was not possible to achieve the desired result, you should replace the used valve with a new spare part.
If, after dismantling the VAZ-2112 valves, you see that a large amount of carbon has accumulated in the channels, before replacing it, you should completely remove it from there using a special sanding felt or a flat screwdriver.
You can see the master’s work more clearly in this video:
Replacing valve stem seals
Ideally, the valve stem seals should be changed after dismantling the cylinder head, but in practice, not every car owner will be able to implement such conditions. It should be understood that this procedure is quite lengthy and takes a lot of time, which should be prepared in advance.
You will need to install a new valve cover gasket, and it is best to worry about this feature in advance so that you do not experience difficulties in the future and do not have to look for where to buy it.
The procedure itself is carried out like this:
- The negative terminal is removed from the battery.
- High voltage wires are disconnected.
- The candles are unscrewed.
- The first piston is clamped in order to prevent confusion in the valve timing.
- The valve cover is removed.
- Various wires going to the pads are disconnected.
- The mounting screws are unscrewed, after which the ignition coil is removed.
- The throttle is removed. Many people simplify this procedure, preferring to dismantle only the drive cable. If the entire throttle assembly is removed, it should be examined for contamination, since in most cases it is also cleaned in parallel with the repair.
- The screws are unscrewed, after which the fixing hose of the power steering is moved to the side.
- The mounting screws are unscrewed and the valve cover is removed.
- The mounting screws of the rocker arms are unscrewed, after which they are removed from the structure.
- “Desiccation” is performed.
- The caps are being repressed.
- The structure is carefully assembled in the reverse order.
Some installation tips
The piston of cylinder No. 1 must be placed at its dead top point before installation. The key for 17 will help with this.
The pulleys have grooves and the camshafts have spikes. Each pulley has marks and they should face up. It’s better to place the crankshaft according to the mark that is on the gearbox unit.
When dismantling, it is necessary to note at what angles the tension rollers are fixed. The key plate must be set at the correct angle and the nut must be tightened with a force of 40 N*m.
The screws and their working part must be lubricated with engine oil and tightened in the correct order.
Then you need to turn the screws 90 degrees during the second pass and 90 degrees again during the third pass.
If you find an error, please select a piece of text and press Ctrl+Enter.
How to change valves on VAZ 2110/2112 (instructions)
- Replacement must be done in a garage or closed box, where there is no wind and dust.
- Turn off the power to the car and disconnect the battery.
- Drain the engine lubricant and cooling fluid.
- We dismantle all the attachments: hoses, fuel supply, vacuum system, we get wide access to the parts that need to be worked with.
- Remove the cover from the main cylinder block (cylinder head).
- Remove the casing and belt.
- We unscrew the bolts that secure the cylinder head.
- After removing the cylinder head, we arm ourselves with a special puller (if it’s not available, ask your neighbors in the garage - it’s really more convenient to do the work with it). We remove the camshaft and disassemble the pushers from the cylinder head. We attach the removal device to the studs. And put a stand under the plate and take out the fastener crackers. We remove the plate along with the springs, as well as the stop plates located under the springs (before that, we also remove the valve seal).
- We remove worn out or damaged valves.
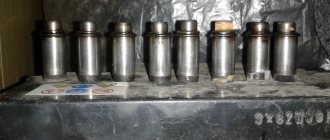
- The next step is to replace the guide bushings. It is better to use a special device (screw version) because when struck there is a chance of damaging not only the head, but also the landing site. We press out the guides and treat the new ones with lubricant.
- We press each bushing into its proper place. They have special locking rings installed on them, so we press them in until there is a characteristic click, which means that the part has found its place. Everything should happen without strong tension, which could damage the bushing. If things get tough, don't rush. When the guide is pressed in, it is adjusted to the required fit dimensions (we use a reamer 8 mm in diameter, install it in the guide and scroll).
- We blow air through the holes, removing any foreign debris. We take measurements of the guide holes. We insert new valves.
- If you notice that the valve does not fully adhere to the seat, you need to grind the valves. It is produced on special machines. However, it should be remembered that you should not grind the valve too much, and after grinding it must be thoroughly washed. An ideal grind is considered to be one in which the working visible strip is 1 millimeter.
- We assemble the cylinder head in the reverse order and connect the fuel and air supply and cooling systems. We connect the battery.
Checking geometry and repairing cylinder head
Taking a wide steel ruler, check:
- The ruler is pressed against the mating plane of the cylinder head (see photo);
Control measurement - If the gaps exceed 0.1 mm, the cylinder head assembly is replaced along with the bearing housings.
Measurements are taken along each of the diagonals. Use a set of feeler gauges.
- Replacement of VAZ 2112 engine valves is carried out independently
How to replace valves with your own hands?
Replacing VAZ 2112 valves is carried out as follows:
- First of all, you need to remove all the removable parts of the cylinder head, and also disconnect the wires.
- Then the cylinder head cover is removed.
- Carbon deposits are removed from the cylinders. This can be done by putting a special brush on the drill.
- Next, the valves must be dried out and removed with tweezers. To do this, you need to tighten the spring.
- Diamond chips are applied to the edge of the valve.
- The valve comes back.
- The cylinder head is being assembled.
Point 5 presents a particular difficulty. It is worth dwelling on it in more detail. So, grinding is carried out as follows:
- Place the rubber tube onto the guide valve.
- Rotate the valve until a uniform pattern of diamond chips forms on its edge.
- Remove any remaining lapping paste.
If this method does not help, the valve should be replaced with a new one.
What can cause a malfunction in a 16-valve engine?
The main reason for the failure of the VAZ-2112 valves with 16 such elements is strong heating, which leads to burnout of the pump components. Car enthusiasts do not encounter this problem too often, but it arises due to:
- Filling the car with low-quality gasoline.
- If the vehicle is fueled with propane and the controller firmware has not been properly modified.
- The VAZ-2112 with 16 valves does not have the required number of spark plugs.
- The engine constantly detonates the injectors.
- The vehicle is operated at speeds higher than permitted, as a result of which the clutch readings begin to deteriorate and the parts are subject to increased load.
How to change it yourself?
Replacing the cylinder head gasket in a VAZ 2112 16 valves with your own hands is a rather complicated procedure. You need to change the head seal yourself if you have certain knowledge and experience.
If you read the instructions below, then taking into account all the nuances, you can independently replace the seal on a 16-valve VAZ 2112.
Tools and materials
So, if we change the gasket with our own hands, before performing the task we prepare the following:
- set of spanners;
- fresh engine oil and coolant if consumables are mixed;
- a torque wrench, it will be used to tighten the cylinder head bolts;
- container for collecting waste liquid;
- two screwdrivers - with a Phillips and a flat tip;
- clean rags.
The Basile Fomin channel published a video demonstrating the procedure for replacing the head gasket in a VAZ 2112 engine.
Algorithm of actions
Below we will look at how to remove and install the cylinder head in a VAZ 2112 car to repair the gasket:
- The car is driven into a garage with a pit or onto an overpass. You will need easy access to the bottom of the car.
- Open the hood of the car and turn off the power to the on-board network; to do this, use a wrench to loosen the bolt on the negative terminal of the battery and remove it.
- The coolant is poured into a pre-prepared container; to do this, the drain plug is unscrewed.
- If the replacement procedure is performed immediately after a trip, then you should relieve the pressure in the vehicle's fuel line. To do this, press down on the latch and disconnect the cables connected to the fuel pump.
- Then the intake manifold of the exhaust system is disconnected from the exhaust manifold. The thermostat is being dismantled. To do this, loosen the fastening clamps on the pipes and disconnect them.
- When the nuts securing the bracket are unscrewed, it must be moved to the side. The cylinder head with camshafts is dismantled. To do this, use a torque wrench to unscrew all the bolts securing the cylinder head. With the head, the housing of the bearing devices and the fuel rail are removed.
- After this, the engine fluid pressure controller in the power unit, as well as the DPKV, are removed. First, you must disconnect the connectors with wires from these devices.
- Loosen the tension roller screw and remove the timing belt. The toothed pulley on which the strap is mounted must be secured to prevent it from turning. Unscrew the fixing screw and remove it with the washer.
- Then, using the prepared screwdrivers, remove the disc from the camshaft.
- Disconnect all cooling system lines from the car engine, remove the antifreeze temperature controller in the engine. Remove all screws securing the head and washers. The device with the old gasket is removed. The surfaces at the point of contact of the head with the block are cleaned from residual sealing gum and dirt to prevent them from entering the power unit. Clean the threaded holes to remove any remaining coolant and lubricant.
- A new gasket is being installed along the guide elements. Please note that the hole for the intake of engine fluid must be installed as in the image below.
- Before installing the BC head, you must make sure that all marks on the shafts match.
- After installing the cylinder head, the bolts securing it are tightened. The screws are tightened in a certain sequence, as shown in the diagram - first the central parts, then the side ones. The stretching procedure is carried out in several stages. First, all bolts are tightened with a force of 20 Nm. Then the screws must be tightened with a torque wrench to 70-85 Nm. It is important that the moment of force is the same for all bolts. Next, each screw is tightened 90 degrees, and after all the parts are tightened, they must be turned again 90 degrees. To tighten, be sure to use a torque wrench, since it will not be possible to install the bolts correctly and tighten them without this tool.
- The procedure for assembling all components and connecting the lines is performed in reverse order. When the installation is completed, the valves are adjusted and the timing belt is tightened.
Preparing to remove valves
We will make a replacement on this engine (21120)
However, on a VAZ-2112 engine it is easier to replace valves by dismantling the cylinder head: to press in new guides, the cylinder head plate would have to be heated. It's best to leave the valve guides in place. But then you will have to remove different equipment:
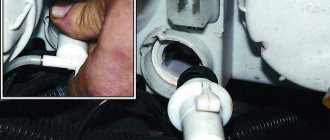
- There is a connector under the fuel pump hatch (photos 1 and 2). Turn it off so that the fuel pump stops pumping;
- Start the engine and let it stall;
- Remove the air filter: loosen clamps 1 and 2 and disconnect connector 3 (photo 3). Then use a 10mm wrench to unscrew the screw (photo 4).
All actions are illustrated by one photo.
Lowered the pressure, almost removed the filter
Remove the plastic filter housing along with the supply hose.
Disassembling the timing mechanism
Our goal is to remove both camshafts. On the VAZ-2112 engine, valve replacement can be performed even without removing the cylinder head. But the shafts will interfere in any case. Procedure:
- The negative terminal is disconnected from the battery;
- Remove the wires from the spark plugs, then disconnect them from the coils;
- The ignition module must also be removed (photo 2), and the crankcase ventilation hose must also be removed (photo 3);
- The bracket securing the injector wiring is screwed to the cylinder head cover (photo 3). Remove it! The same is done with the bracket of the second harness (DPZ and IAC);
- You will need to remove the receiver (photo 4). And the intake manifold holes are covered with fabric.
Study what the list says.
Preparing to dismantle the cylinder head cover
Like this
The cover itself is held in place by 14 bolts. A socket wrench is needed here. But first, let’s remove the plastic protection by unscrewing the six bolts with a 10mm wrench (photo 1).
We remove everything unnecessary in the timing drive
The timing mechanism has been removed!
Disconnect and remove the phase sensor under the right timing pulley. It is also necessary to disconnect the pressure sensor - it is located near the bracket that was removed. Using a 17mm wrench, without turning the pulleys, loosen the two mounting screws. A screwdriver is installed in the round holes - it is used as a stop. It remains to loosen the belt tension by partially unscrewing one nut (photo 3).
At the final step, after removing the belt, unscrew the screws on the pulleys. Each pulley is removed from the shaft. Then tighten three screws located flush with the pulleys (screws on plastic).
To remove the shaft, follow these steps:
- Remove the cylinder head cover;
- Unscrew 20 bolts (photo 1);
- Using two 15mm wrenches, unscrew the nut on the upper rod (photo 2). Do the same with the three nuts on the rod bracket (key “13”). The bracket is removed from the studs;
- Dismantle the bearing housing (photo 4);
- Now both camshafts can be removed (photo 5).
The meaning of what has been said is clear from the photo.
Timing drive disassembled
Hydraulics, that is, compensators, can be easily pulled out with a magnet.
Removing the cylinder head on a VAZ-21120 engine
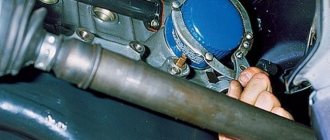
We need to get rid of the fuel rail: use the “17” keys to unscrew pipes 2 and 3 (photo 1), and also remove clamp 1.
The ramp needs to be temporarily removed
The screws on the bar with the fuel line are unscrewed with a screwdriver. Then the rubber rings are removed from the pipes. You will also need to remove the tube with the oil dipstick - here you unscrew one “10” screw (photo 2). Finally, the two ramp mounting bolts are removed.
The main thing is to partially drain the coolant. Then top it up! Now unscrew the two nuts on the thermostat (photo 1) to move it to the side.
The thermostat should not interfere
The thermostat gasket is also removed. Using a “13” wrench, unscrew the nut with the “zero” wire. You can also disconnect the connector of the DTOZH sensor.
The VAZ-2112 engine is ready to replace the valves: use a “10” wrench to unscrew the bolts on the cylinder head and remove the plate along with the valves. Follow the turning sequence. Similarly, observe the sequence and tightening torque when assembling the cylinder head.
Recommended sequence (turn away)
Next, the actions specified in “Chapter 1” are carried out. We wish you success!
What are valves and cylinder head?
As we know, most engines in cars operate on the principle of internal combustion. The cylinder head (also known as the cylinder head) serves as a kind of cover that covers the engine cylinders themselves and forms a closed internal combustion chamber. And valves are elements of the cylinder head. Very often, in cars such as the VAZ-2112, valves break and must be replaced. (below we will look at the reason for their breakdown).
The VAZ-2112 car has a “16 valve” type engine, it has many advantages: 16 valves are a lot, so they give more power to the engine, thereby making your car faster, also this engine has a better cooling system, which very important. In addition, the peculiarity of such an engine is also repair. This one is simpler and easier to repair.
What are the causes of valve failure in an engine?
The main reason for the malfunction of the engine valves of the VAZ-2112 car is the excessive heating of the engine.
It is due to this that important parts in the engine itself burn out. But then why does the engine heat up so much? (Take note so as not to repeat such mistakes in the future):
- Filling your car with bad or unsuitable gasoline.
- Initially, this machine does not have the required number of spark plugs for a 16-valve engine. As a result, the engine heats up.
- Improper use of the transport itself, because of this, all parts of the machine are heavily loaded, and cannot work for a long time in this mode - the parts begin to deteriorate and wear out, and the valves themselves change shape.
Conclusion: always monitor the condition of your car!
Replacing valves with a 16 valve engine
As was written above, replacing valves is not difficult; no special equipment is needed. But of course, when replacing, you must follow all the rules that will be described below. Everything must be done sequentially, without jumping from one stage to another.
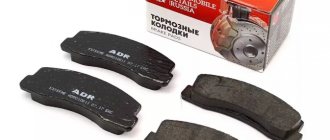
But first you need to determine which valves need to be installed in the engine of the VAZ-2112. There are many valves for this machine. They all differ in price as well as quality. But among car enthusiasts one stood out - Original number 2112-1007010. Its cost is around 300 rubles.
Replacing valves with a 16 valve engine
So, we have decided on everything necessary, now let’s move on directly to replacing the valves. (Let me remind you that we do everything strictly point by point, carefully and carefully):
- To begin with, place the car in a garage or any other enclosed space where there is no interference, dirt, water or wind.
- Disconnect the car and also the battery
- Next, you need to drain all fluids: lubricant, as well as cooling
- We need to remove all unnecessary parts to open access to the engine itself and improve performance: we remove all the hanging hoses, the vacuum system, and the fuel supply system. Ready! Now we see all the necessary parts that we will work with.
- It is necessary to open the cylinder head (cylinder head - cylinder head), to open it you need to remove the timing belt, as well as the valve cover. Next, remove all the elements that hold the cylinder head itself. There are 10 of them in total. They are easily removed with a screwdriver. But! Some elements are also located inside the car head - we unscrew them too.
- Next you will need a tool, it is called a puller. Of course, you can do it without it, but believe me, it will be much easier and more convenient with it. If you have it, that's great. If not, the best solution would be to borrow it from friends. (But if you want to buy your own, then know that it will cost around 2000-2500 thousand rubles.). You will need to remove the camshaft and cylinder head lifters. And then you need to carry out a process called “decompressing the valves,” we take our puller and, according to the instructions that come with it, we take out the crackers, as well as a plate with springs and an oil seal.
- We take out our damaged valves. You can look at how they have deteriorated or become deformed.
- Next, you need to replace all the bushings in the car. After we pulled them out, we take new ones, lubricate them and insert them in place of the old ones. It is not difficult. but during this process, quite a lot of important parts can be damaged, which will be difficult to repair. Therefore, it is better to use a special tool. Of course it costs money. But its price will be much lower than your possible breakdown of other parts. In general, everything is at your own peril and risk. Also, regarding the process of installing new bushings. Very often, many people do not insert the bushings all the way. Because of this, they simply fall out. This is of course bad. Therefore, at the place where the bushings are installed, there are special rings. And if you install the bushing correctly, completely, without breaking anything, you will hear a characteristic click. After which you can rejoice and calm down, since we have already done all the most difficult and basic things. But that is not all.
- Next, we clean the places for installing the valves. After that, we install the valves themselves, carefully and carefully.
- Sometimes it happens that the valve does not fit completely into place, or does not fit correctly. There is no way to avoid this, and it is not your fault. Using a special machine, you need to sand the valve a little and then wash it. Surely, you don’t have such a machine, so you need to go to a service center. But I repeat that this is not a mandatory operation, and this does not happen to everyone. In 95% of cases, everything will go well!
- Next, after successful installation and replacement of the valves, we assemble all the parts in the reverse order. Don't forget about lubricant, coolant, hoses, vacuum system, fuel supply system, etc.
- All is ready! You can start the car and check if everything works. Is the engine knocking anymore, are there any problems starting the car? Are the machine parts heating up?
What are cylinder head and valves? How are they connected?
So, valves in a car are an element of the cylinder head (cylinder head). It is this part that is responsible for the processes of fuel combustion in the engine and the removal of exhaust gases (see figure).
Its components include:
- Cover to protect against mechanical damage.
- Rubber gasket that performs the sealing function. It is located in the place where the cover is attached.
- In the front part of the block there is a camshaft drive and a chain tensioner.
- Combustion chambers.
- Threaded holes for injectors and spark plugs.
- Holes for mounting inlet and outlet manifolds.
The top of the cylinder head also contains other parts, such as camshafts, backing washers, etc. The gas distribution mechanism (GRM) is also located here.
Non-removable parts of the cylinder head include valve seats, which serve to ensure the tightness of the timing belt. Fixed parts also include valve guides.
To avoid this, experts recommend that while driving you periodically pay attention to such points as:
- Presence of knocking noise while the engine is running.
- Stopping the engine when starting the car.
- Reducing compression in cylinders.
The presence of any of these symptoms may indicate a valve malfunction.
Of course, the best solution in such a situation is to contact a service center. However, a difficult financial situation or lack of time often does not allow resorting to the services of professionals. Then you can try to fix the problem yourself.
Replacement process for a 16 valve car
The procedure for replacing the cylinder head gasket on a VAZ 2112 with engines that have 8 and 16 valves is similar. To carry it out you need to prepare:
- a set of spanners and wrenches;
- torque wrench;
- new consumables;
- container for draining coolant;
- clean rags.
For the convenience of the procedure, it is better to use an overpass or inspection hole.
Engine VAZ 2112 16 valves
Other cases in which dismantling of the cylinder head is required
Of course, it is not necessary to remove the cylinder head for every breakdown. This is only necessary if major repairs are needed. Such “major” cases include:
- Gasket wear.
- Formation of carbon deposits on parts.
- Valve deformation.
- Need to replace guide bushings.
- Failure of the camshaft, etc.
Of course, repairing it yourself or through a service in any case involves certain financial costs. To ensure smooth operation of the engine, regular diagnostics of the cylinder head are necessary. It is recommended to use high-quality fuel. In addition, try to prevent the car from overheating - because of this, the cylinder head may lead.
- Replacement of cylinder head gasket VAZ 2114 8 valves
- Changing the oil in a VAZ 2110 engine. Video instructions for changing engine oil on a VAZ 2110 with flushing
- Replacing a VAZ valve seat Photo instructions on how to change a VAZ valve seat
- Replacing the steering rack of a VAZ 2110 Photo instructions on how to change the steering rack of a VAZ 2110