Any experienced car owner will tell you that a stable cylinder head is a guarantee of reliable functioning of the car’s engine. A VAZ 2107 cylinder head in good condition reduces fuel consumption and improves vehicle dynamics.
VAZ 2107 car
Inexperienced car owners should know that head repair work should be carried out only by highly qualified specialists. Otherwise, an incorrectly adjusted unit can lead to damage to many engine components. Restoration work can cost a considerable amount. But experienced car enthusiasts with the required skills can replace, repair and tighten cylinder head bolts themselves.
[ To uncover]
[Hide]
Step-by-step guide to replacing the cylinder head gasket of a VAZ-2107
To replace the cylinder head gasket in a VAZ-2107, you should perform the following manipulations:
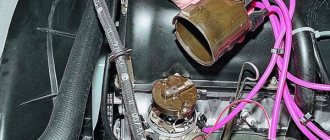
- The initial stage involves dismantling the filter that filters the incoming air flows. If the VAZ-2107 is equipped with a carburetor, this is easier to do than performing the same work with an injector. Your task is to unscrew and disassemble all the parts of the entire system; this is the only way to get to the cylinder head.
- Remove the carburetor.
- Unscrew absolutely all pipes that remain visible.
- Get rid of the cylinder head cover by disconnecting the fasteners. Put the nuts and clamps aside, do not lose them, otherwise you will not be able to assemble the mechanism into a single whole.
- Place a container under the hose and carefully drain the remaining coolant in the car.
- Protect your health from electrical current by removing the battery.
- Place the ignition distributor cap aside.
- Pull out the hoses from the carburetor - one responsible for heating, and the second coming from the vacuum format regulator, which distributes the ignition.
- Remove the air collector and remove the throttle linkage.
- With your own hands, remove the sensor that controls the temperature regime from the cylinder head of the VAZ-2107.
- Connect the indicators on the camshaft drive sprocket with the markings located on the camshaft bearing housing. This simple technique will avoid re-installation of the distribution phase at the time of assembly.
- Next, bend the edges of the sprocket fixing washer in different directions and unscrew the bolt. Let the star remain in its place.
- Loosen the tensioner nut half a turn and use a screwdriver to press out the shoe. As the chain loosens, tighten the fasteners again.
- All that remains is to disconnect the bolt holding the sprocket and remove it. To prevent the timing chain from falling, support it with a soft wire.
- Remove the housing base from the bearing located on the camshaft and disconnect the nuts of the VAZ-2107 cylinder head.
- When the head cover comes off easily, position the new gasket.
- Assemble the components into a single whole, following the reverse order of the proposed instructions.
- Correct valve operation.
Removing the cylinder head
Sequencing:
- Remove the battery. This will provide convenient access to the GBS head and protect against short circuits.
- Remove the air filter.
- Remove the carburetor on the carburetor version of the engine.
- Remove the ignition wires and distributor (if equipped).
- Drain the coolant from the cylinder head by unscrewing the plug. Before draining, you need to wait until the engine has cooled down.
- Loosen the clamps and disconnect the rubber pipes of the cooling system going to the cylinder head.
- Remove the valve cover by unscrewing the 8 nuts and removing them along with the shaped pressure washers.
- Loosen the chain tensioner by unscrewing the fixing nut. For convenience, you can completely dismantle it.
- Using a screwdriver and hammer, bend the edges of the lock washer on the camshaft gear mounting bolt and unscrew the bolt. Remove the gear. Tie the chain removed from the gear with wire so that it does not fall into the engine sump.
- Unscrew the camshaft mounting nuts (10 pieces) and remove it.
- Unscrew the brass nuts securing the exhaust pipe to the exhaust manifold and remove it along with the gasket.
- Using a powerful wrench, unscrew the 10 bolts that tighten the cylinder head and the eleventh bolt installed on the head casting. Remove the head. It is quite heavy, so in order not to scratch the car, it is better to remove it from the block together.
Video about replacing the cylinder head on a VAZ
Start of work
The very first step is to remove the air filter. Of course, on a carburetor engine it is somewhat easier to remove it. If you have an injector, you will have to tinker with its rubber fasteners. But the essence remains the same - it is necessary to disassemble the fuel system completely to get to the cylinder head. But we will look at the example of not an injection, but a carburetor seven. Still, there are many more classic cars with such a power system.
It is advisable to dismantle the carburetor, since if you remove the head along with it, you can accidentally damage it. On all classic series cars, the carburetor is removed in the same way. This procedure is quite simple, but it will take some time. Now you can unscrew the nut securing the distributor and remove the distributor along with the wires. Getting closer to the engine, all that’s left to do is drain the antifreeze from the system.
And then turn off all the pipes that you see. After this, it will be possible to dismantle the cylinder head cover. It is secured with nuts and shaped washers. Don't lose them during repairs. That's all, the preparation is complete, you can begin the most difficult part - dismantling and installing the cylinder head.
We recommend: Removing chips from the car body yourself: what and how to do?
Replacement of cylinder head gasket VAZ 2114(2115)
On VAZ models 2113-14-15, injection 8-valve engines are mainly installed, so replacing the cylinder head gasket of a VAZ 2114 (2115) is slightly different from replacing the cylinder head gasket on a “nine”.
Unlike 2109 on the “fourteenth” and “fifteenth” models:
- the air filter housing is removed differently, and along with it you also need to disconnect the injector corrugation (pipe) and the plug from the air flow sensor;
- otherwise the fuel hoses are disconnected;
- there is no distributor on the engine, but the pipe goes behind the cylinder head;
- it will be necessary to remove the high-voltage wires, and it is better to remember their installation order (sometimes they are not numbered);
Otherwise, there are no fundamental differences in replacing the cylinder head gasket 2114 from 2109.
Gasket replacement and assembly
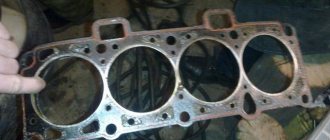
If your car had pronounced symptoms of a gasket failure, then you don’t even have to look for its damage; it still won’t be possible to repair it. Immediately buy a new one and put it in place. But you need to clean the entire surface that the gasket is attached to beforehand. There should be no remnants of the old one left. You can even evaluate how smooth the surface of the head and the block itself are. It is quite possible that the cylinder head has an uneven surface, which is why, no matter what gasket is installed, it very quickly begins to leak antifreeze or air.
Before installing the VAZ 2107 cylinder head, it is necessary to check the serviceability of all valves. If there is such a need, replace the seals. This will reduce oil consumption. When everything is complete, place the gasket on the block. Place the head on top. Please note that there are two types of gaskets - old and new. The latter is produced by a very thin layer of sealant around the entire perimeter.
Do not forget to align the gasket so that it is positioned as accurately as possible. There are two guides for this purpose. And the time has come to tighten the cylinder head of the VAZ 2107. First, tighten all the bolts and tighten them by hand until they stop. And then you arm yourself with a torque wrench and, according to the diagram, tighten it. This diagram is shown in the figure. However, it is not difficult to remember it, since everything happens criss-cross.
It is necessary that all bolts are tightened as evenly as possible. To do this, they need to be pulled in two or three passes. During the first, the tightening torque of the VAZ 2107 cylinder head is 4 kgf*m. During the second pass, you need to set the moment to 11.5 kgf*m. The small bolt should be tightened to approximately 3.8. Installation of the camshaft is carried out in almost the same way; its fastenings will need to be tightened crosswise, but the moment here is not so important. The main thing is not to break the thread.
That's it, assemble your VAZ 2107 and try to start it. Just remember to fill the cooling system with water. If the engine is working perfectly and the gasket does not allow air or water to pass through, then you can add antifreeze.
Many drivers are concerned about a fairly common issue, namely replacing the cylinder head gasket of the VAZ 2107. Cars of this model have proven themselves well on our roads and in our operating conditions. But problems associated with the repair and replacement of certain components and systems remain and many have to be solved independently.
The replacement process itself, both with an injector and on an engine with a carburetor on a VAZ 2107, is simple and in order to cope with it, you just need to carefully study the material we offer and watch the video.
Tightening on VAZ model 2107
Now it's time for the puff. After installing the head, tighten all the bolts by hand (that is, without a key). Continue until they stop giving in. During the process, make sure that the cylinder head does not move.
Next, tightening is carried out. The work is carried out according to the standard scheme: the two central bolts are tightened first, then those located to the left and right of them, and then the corner ones.
To ensure the correct tightening torque, you should use a special torque wrench. And even then, the procedure is performed in several stages:
- for the first time, bring the torque to 4 kgf m;
- on the next lap, increase it to 11.5.
Tighten the small (11th) bolt only to 3.8 kgf m.
After completing the installation of the cylinder head, reassemble the engine in the reverse order to that described. Try starting the engine. If everything works, then fill in the coolant.
Step by step guide
VAZ 2107 cylinder head in the engine compartment
Many problems can be solved after tightening the bolts, but if this does not help, then a major overhaul of this unit may be necessary, which involves removing not only the cylinder head, but also other parts of the block. Some parts may need to be replaced, such as gaskets, valve stem seals and valve guides.
Tools
To work we will need the following tools:
- a set of keys;
- micrometer;micrometer
- flushing liquid;
- pliers;
- hammer;
- mandrels for removing and installing valves and caps;
- torque wrench;torque wrench
- tiles (preferably the spiral is closed);
- desiccant.Valve desiccant
Before starting repair work on the cylinder head, it must first be removed and cleaned of dirt.
Stages
Preparatory work and head removal
- The first step is to drain the coolant from the engine.
- We remove the carburetor.
- Having disconnected the pipes and hoses, remove the air barrier. Disconnect the hoses and pipes
- Remove the head cover.
- We align the marks on the crankshaft pulley with the mark on the camshaft drive and the marks on the camshaft pulley with the mark on its body as shown in the photo. Aligning the marks
- By disconnecting the camshaft lock washer, loosen the chain tension.
- Having torn off the bolt, remove the sprocket.
- Unscrew the fastenings.
- We remove the camshaft with the housing. Camshaft
- Having previously made marks using a marker, remove the rockers. Removing the rockers
- Disconnect the wires.
- We remove the pipe and unscrew the bolts securing the cylinder head to the block.
- We remove the head.
- We inspect its condition and clean it of dirt. Inspection of the condition of the head
This video shows the process of removing the cylinder head.
Checking status
Now it's time to dry out the valves. This is done with a special device. If chips, cracks, and rust are not visible, we conduct a further inspection. We evaluate the condition of the saddles, the repair of which is recommended every two hundred thousand kilometers.
Changing guide bushings
We inspect the guide bushings; if they are in unsatisfactory condition, they must be replaced.
A special tool is used to remove them. If you don’t have this on hand, you can get by with pliers and a clamp. After removing the bushings, we measure their diameter. We buy similar ones, the size of which is 0.05-0.07 millimeters larger than the ones being replaced.
The guides are pressed in using a mandrel, an electric stove, a hammer and lubricant.
- We place the head on a stand at the edges.
- We place the electrical device under the place of work.
- We wait until the metal heats up to about one hundred degrees (so that it expands).
- Now you need to properly lubricate the bushing with grease.
- Having removed it from the holders, we drive in new guides.
- When all eight are replaced, we wait for the cylinder head to cool down.
- The valves should not dangle and move freely, there should not be any jamming.
Checking the tightness of the head
Leak test
To ensure a tight fit of the valves to the seats, you must do the following. Using lapping paste, lubricate the valve and insert it into the head. There are several techniques for rotating it, here are some of them:
- using a hose tightly placed on the part;
- using a device very similar to a corkscrew.
The main sign of good valve lapping will be a specific matte surface of the seat in the place where it contacts the part.
The tightness of the head can be checked by pouring kerosene into the collectors; you can also use gasoline. If done correctly, there should be no leaks for the first five to seven minutes.
Attention! All engine parts must be washed with a special solution, this will ensure long-term and uninterrupted operation of the power plant for a long time.
When assembling the head, be sure to pay attention to the correct tightening of the bolts. It must be carried out strictly according to the scheme. In case of incorrect broaching, distortions may appear and, as a result, all your previous work will be crossed out. If you have any questions, watch the video.
You are repairing the cylinder head on your car
Survey
- On one's own
- At the service station
- No problems yet
Loading …
Two methods of tightening the cylinder head. Which one is correct? Let's figure it out
I once had to climb into the engine and remove the head due to a burnt-out valve. Then the question arose: how to actually tighten the cylinder head according to science? In different manuals, this operation is described by two methods.
It turned out that the real compression of the gasket began only after 11 kg and took place in different areas with different intensities. If I had used the angle method, I would have gotten a scatter of moment across the entire plane and a bend in the cylinder head, which would have inevitably led to gasket burnout. Why is the gasket crimped at different speeds over its entire area?
This may be due to the design features of the gasket itself; perhaps there is a curvature of the plane of the cylinder block. In any case, it is necessary to tighten solely using the torque on the torque wrench; this is the only way to guarantee tight and, most importantly, uniform pressing of the cylinder head plane to the block. At what torque should you turn? I settled on 13.5 kg, perhaps a bit too much, but good compression is guaranteed.
Cases when it is necessary to replace cylinder head gaskets
Replacing the cylinder head gasket of the VAZ-2107 is mandatory in a number of cases:
- If there is damage near the combustion chambers, engine overheating leads to this unpleasant situation. When the cooling system malfunctions, and the driver prefers not to pay attention to the malfunction and puts off repairs, the condition of the cylinder block and its head leaves much to be desired.
- A leak of antifreeze or coolant is noticed - a breakdown is often accompanied by incorrect operation of the ventilation device, thermostat, or a banal leak of substance from the hoses.
- There is an engine oil leak. If traces of oil leakage are noticed on the outside, it means the gasket is not fitting well. Tighten the head bolts, if this does not help, then you will have to replace the cylinder head gasket yourself.
When should you change?
Note that replacing the cylinder head gasket on a VAZ 2101-2107 is rarely done with your own hands. The manufacturer does not regulate the period for its replacement, since the part is installed for its entire service life. However, there are times when it burns out.
How to determine this malfunction? The first sign is engine overheating. The second is a leak at the junction of the block and the head. Both antifreeze and oil can escape from here. Also, these two fluids are mixed in the expansion tank. When the engine is running, there are small gas bubbles in the engine. All these signs indicate that the car needs to replace the head gasket. VAZ "Classic" is a simple car to use. Therefore, you can do this procedure yourself.
Finding the cause of gasket damage
After the VAZ 2107 cylinder head is removed, you should inspect the gasket for damage and try to determine the cause. If the cause is not identified and eliminated, it is possible that the new gasket will soon also burn out.
Burnout of the gasket between the cylinders occurs due to engine overheating, constant detonation of low-quality fuel, or cylinder head deformation due to temperature effects or improper tightening. In this case, you will have to grind or change the head before assembly.
The gasket can be destroyed by rust. This happens if water is used in the cooling system instead of antifreeze. The VAZ engine is not designed for cooling with water, so after installing the gasket and cylinder head, it is necessary to flush the system and fill it with antifreeze.
Another reason for the destruction of the gasket is its poor quality. In this case, it is enough to simply replace the gasket with a good one.
Need for replacement
There are few reasons for replacement and some of them require immediate intervention, while others not so much, that is, the vehicle can be used, albeit in a gentle manner.
Reasons for replacement:
- Damage to the gasket in the area of the cooling system channel and the drainage channel of the lubrication system. When this happens, the coolant ends up in the oil pan and mixes with the lubricant. The result is a mixture with a brownish tint. This can be detected by checking the lubricant level in the power unit on the dipstick. This malfunction is also indicated by a decrease in the coolant level in the radiator. If you do not intervene in time, the consequences can be catastrophic, including the destruction of the power unit.
- Damage to the gasket in the area of the cooling system channel and cylinder. This may occur due to a poor quality gasket or an incorrectly installed head.
- Burnout in the cylinder area. This malfunction is detected and diagnosed by a decrease in compression in the cylinders and unstable engine operation.
Burnout between cylinders - Destruction of the gasket. If coolant begins to leak through the gasket and all efforts to tighten the cylinder head do not bring any results, then an urgent replacement is necessary.
Replacing the cylinder head gasket VAZ 2109 (21099)
On all carburetor cars of the 2108-09-099 family, replacing the head gasket is quite simple, first remove the cylinder head:
- disconnect the battery terminal (ground wire) and drain the antifreeze;
- remove the air filter housing;
- We pull off the crankcase ventilation hose from the valve cover, having first unscrewed the clamp;
- as on the “Classic”, we disconnect from the carburetor: the gas cable, the choke cable, the gasoline hose from the fuel pump;
- remove all pipes from the cylinder head - vacuum booster, radiator, stove hose;
- unscrew the nuts securing the exhaust pipe; you can get to them from above, from under the hood;
- remove the timing belt cover;
- dismantle the valve cover (2 nuts);
- unscrew the cam gear mounting bolt;
- loosen the tension roller, remove the belt and the gear itself;
- unscrew the bolt securing the iron timing case to the cylinder head;
- we unscrew ten cylinder head bolts, the rest need not be removed (the carburetor, distributor and intake manifold remain in place).
At this point, the removal of the cylinder head is completed, we change the gasket, thoroughly cleaning the surfaces of the cylinder head and block. Labels are set as follows:
- the camshaft marks are aligned along the left edge of the cylinder head (as in the picture);
- The crankshaft marks are aligned on the flywheel (in the gearbox housing window).
After replacing the VAZ 2109 cylinder head gasket, fill in antifreeze and start the engine; as the engine warms up, add coolant to the expansion tank and monitor the engine temperature.
Video “Replacing a burnt gasket on classic Lada models”
In this video, an experienced master will clearly show and explain in detail how to correctly change the cylinder head gasket on classic Lada models. On a VAZ 2107 with an injection and carburetor engine, all work is carried out according to the same scheme.
Replacing the cylinder head gasket of a VAZ 2107 on an injection engine is carried out in the event of its breakdown when coolant begins to flow into the cylinders. To carry out repairs, it is necessary to drain the coolant from the unit by unscrewing the drain plug in its lower part.
The order of dismantling work is as follows:
- After draining the coolant, remove the battery from the car.
- Disconnect the power wire from the temperature indicator sensor. The sensor is screwed into the block head.
- We remove the exhaust pipe. To do this, unscrew the nuts securing it to the intake manifold studs.
- Now you need to remove the upper housing assembly with the camshaft. Before removing it, it is necessary to set the piston of the fourth cylinder to the TDC position. We remove the upper housing, and then tie the camshaft drive chain with wire so that it does not fall through.
- Remove the starter heat shield by unscrewing the nut securing it.
- We disconnect the ground wire from the intake manifold stud, and then remove all the pads with wires from all sensors. Disconnect the wiring harness from the idle speed sensor and the wiring harness from the fuel injectors.
- Disconnect the throttle valve drive cable and remove it. Unscrew the nuts securing the bracket and move it to the side. Disconnect the coolant drain hose from the throttle body.
- At the next repair step, we need to remove the thermostat bypass pipe and the radiator inlet pipe. Next, remove the car interior heating hose from the pipe.
- Disconnect the fuel supply pipes from the fuel rail.
- Remove the vacuum hose from the receiver pipe.
Now that all the attachments have been removed from the cylinder head, you can unscrew the bolts securing it to the block. To do this, unscrew ten internal bolts with a socket wrench and one outer bolt with a thirteen key. After unscrewing the bolts, you can remove the cylinder head and gasket.
Replace the gasket with a new one and install it back on the cylinder block, having first passed the camshaft drive chain through the opening. Before installing the block head, measure the length of the bolts using a caliper; their length should not exceed 11.5 cm; if exceeded, replace the bolts with new ones. At this point, the repair work on removing and replacing the cylinder head gasket of the VAZ 2107 is completed.
Dismantling the unit and preparing for repair
Carrying out work of this kind requires fairly high qualifications and special equipment. Removal of the cylinder head is carried out in the following sequence:
VAZ 2107 engines use gaskets made of fire-resistant composition. After dismantling the head from the cylinder block during the repair process, it is necessary to transfer it to a workbench for inspection and repair. It is necessary to start with a thorough inspection and testing of all components to identify parts with significant deviations from the nominal values. All such parts will require replacement with spare parts.
The VAZ 2107 block head is installed on a wooden stand on the desktop. It plays the role of a fixing valve device during their disassembly. Defective parts are removed and replaced; all sealing gaskets are also subject to renewal. At this stage, preparation for repairs can be considered complete.