Snapshot441
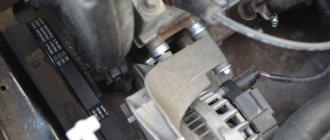
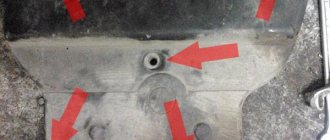
Drive of auxiliary units on a car with air conditioning: 1 - drive pulley of auxiliary units;
2 - tension roller; 3 — bracket for the right support of the power unit; 4 — generator pulley; 5 — air conditioning compressor pulley Drive of auxiliary units on a car with air conditioning: 1 — pulley of the drive of auxiliary units; 2 - tension roller; 3 — bracket for the right support of the power unit; 4 — generator pulley; 5 - air conditioning compressor pulley
How to change the alternator belt on a Lada Priora with your own hands, instructions with photos
The new version of Lada-Priora really attracted domestic car enthusiasts. But, like any other car, it needs timely service. For example, the Priora alternator belt must be changed after a certain mileage, and its condition must be checked regularly.
Lada Priora differs from previous models in comfort and improved handling. But the main differences are under the hood. Everything here is located differently than in previous models. As a result, not all specialists even know how to replace the belt and tension it. New models are equipped with additional systems. Air conditioning and power steering (EUR) added comfort, but such changes complicated the approach to the generator.
In versions with power steering or air conditioning, the belt is longer when compared with the regular version of the car. As a result, we will look at how the change occurs in the first and second cases on models 16 and 8 valves.
In what cases does a car need to be replaced?
Typically, the need to replace the alternator belt appears due to wear during its use and deterioration of adhesion to the roller surfaces. Also, tightening or changing is necessary if, as drivers say, it starts to whistle.
This video shows the generator drive whistling.
The instructions that come with the car indicate that the alternator belt should be replaced every 60 thousand km. If the car is used infrequently, then replacement should be carried out every two years.
Step-by-step instructions for replacing without power steering
Do-it-yourself replacement work on a Priora without power steering (EUR) and air conditioning is more convenient to carry out in the inspection pit.
- a set of keys;
- fender liner removal device;
- balloon wrench.
Stages
- First, loosen the nut with a wrench of the appropriate size.
- Unscrew the adjusting bolt.
- We move the generator towards the power plant.
- Remove the right front wheel.
- We remove the fender liner and get access to the old belt.
- We replace it with a new one and do not forget to tighten it.
- Checking the tension. It should not be weak, but tightening it on a model with power steering (EUR) is also dangerous. The generator bearings may be the first to suffer.
Replacement instructions with power steering
Since the power steering pulley in this modification is at a low height, the creators ran the generator belt around the engine mount. This makes it a little more difficult to do the DIY change.
Stages
Use WD40 to moisten the bolts that secure the motor mount and bracket. These bolts need to be moistened with liquid. After about a quarter of an hour, you can begin to unscrew the bracket nut. Let's jack up the wheel. Next, we place some object under the motor and remove the wheel. We lower the car a little. Unscrew the tension roller. Bend the belt. Now you can unscrew the bolts that secure the pillow. These bolts need to be unscrewed. Next, we lower the car so that the engine begins to hang out. The cushion moves towards the motor. Move the pillow Now you can change it. Next, we lift the car with a jack so that the power unit lowers
We do this carefully so that the belt and pillow do not move. Tighten the bolts and nuts. Put on the wheel and lower the car
We put on the wheel and lower the car.
At this point, work on the model with power steering can be considered completed.
Tensioning and checking the belt
The belt in Lada Priora is tensioned as follows:
- The first step is to loosen the roller nut; to do this, the cage is held with a wrench.
- We rotate the roller cage by rotating the key.
- We tighten the roller nut.
- The tension is checked on the longest section between the pulleys.
- When pressed, the alternator belt should bend approximately 10 millimeters.
- On a model with power steering, the tension should be a little tighter.
You can also test it by ear. If the tension is insufficient, a whistle will be heard and you need to tighten it. If it is too much, you will hear the hum of the bearings and the tightening will need to be loosened. Roller key
The work is not difficult, but a little troublesome due to the need to dismantle some components in models with power steering and air conditioning with your own hands, but it is doable even for a novice car enthusiast. But calculate how much such work costs at a service station and whether it would be better to use this money for other purposes.
Sleep
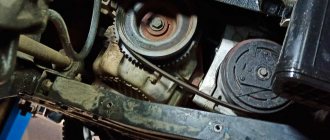
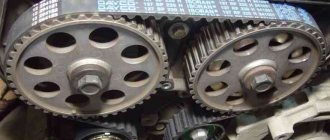
Using the “17” head, turn the crankshaft clockwise by the bolt securing the auxiliary drive pulley and inspect the belt along its entire length.
Using the “17” head, turn the crankshaft clockwise by the bolt securing the auxiliary drive pulley and inspect the belt along its entire length.
The belt should not have cracks, tears, or separation of rubber from the fabric base. We replace the defective belt.
Sn9shimo
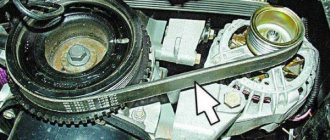
To check the belt tension, hold the belt with your fingers in the middle between the tension roller and the generator pulley and turn the belt.
To check the belt tension, hold the belt with your fingers in the middle between the tension roller and the generator pulley and turn the belt.
The belt should not rotate more than 90°. Otherwise, the belt tension needs to be adjusted. To tighten the belt, turn the tension roller counterclockwise, and to loosen it, turn it clockwise. To do this, insert a special key into the holes of the tension roller in the form of two rods with a diameter of 4 mm, welded to the base of the key (the distance between the rods is 18 mm). You can use the key for the old-style timing belt tension roller, installed on all front-wheel drive VAZ cars. If you do not have a special key, you can insert two pins (screws) with a diameter of 4 mm into the holes of the tension roller. Using the screwdriver shaft located between the pins, turn the roller.
Generator malfunctions and ways to eliminate them
There aren't many problems. They come in two main varieties.
| Type of faults | Signs |
| Mechanical. | First of all, these are mechanical damage to the housing, fasteners, wear of bearings, graphite brushes, overrunning clutch or pulley. |
| Electrical faults. | They consist of a short circuit on the rotor or stator windings, failure of the rectifier unit, voltage regulator, etc. The fact that the generator may soon fail is indicated by characteristic signs associated with difficulty starting the engine, dim headlights. Problems are also indicated by a warning light on the instrument panel that does not go out when the engine starts. |
The generator and battery always work together. For the battery, the generator is the only autonomous power source, which allows it to remain as a backup power source for the on-board network when the generator is not working. In turn, by constantly recharging the battery, the generator makes it possible to start the engine at any time.
Generator malfunctions do not occur out of nowhere; there are usually preconditions for breakdowns. And the owner has the opportunity to correct the malfunction in a timely manner. Otherwise, the generator will need to be repaired on Priora.
Difficulty starting the engine
Problems with starting the propulsion system directly indicate problems with the generator. If it malfunctions, the battery experiences a constant lack of charge, which means it does not have enough power to rotate the engine flywheel through the starter. A discharged battery is the main result of a generator breakdown. A malfunction of this device can result not only from a lack of charge, but also, conversely, from overcharging. Such phenomena arise due to the failure of the relay regulator, i.e., current is generated in much larger volumes. This leads to boiling of the electrolyte in the battery banks and, as a consequence, to failure of the battery.
Headlights are dim or flickering
The second main sign of malfunction is easy to notice in the dark. As a rule, as the load on the on-board network increases, the brightness of the headlights decreases significantly. Such a symptom may indicate a breakdown of both the device itself and its drive belt (the tension should be checked). A decrease in brightness is observed not only in the headlights, but also in the dashboard lighting.
The control lamp is constantly on
If it works on the panel all the time, this can only indicate that the battery is not receiving sufficient charge. Thus, the on-board computer warns that the car will not start at all soon. In other words, the on-board network uses a battery rather than a generator as the main power source. In this situation, after just a few kilometers the battery will be completely discharged and the engine will stall, since the spark plugs will no longer be able to produce a spark.
If such a problem occurs, first of all you need to turn off as many energy consumers as possible (headlights, audio system, heating, etc.). And try to get to the nearest car service center. Otherwise, you will have to turn off the engine and call a tow truck.
Some modern batteries may become unusable after the first full discharge, which means that the services of a tow truck will save money.
Drive belt whistle
Often when starting the engine, especially in the cold, it starts to whistle. This sound occurs because the generator drive belt is too loose and simply slips. In this case, you need to tighten the belt as quickly as possible, eliminating the malfunction.
Ignoring the whistle leads to the fact that insufficient rotation speed of the pulley due to slipping causes a voltage drop, since the generator does not generate the necessary electricity. This is especially true on simple engines without additional equipment. As a rule, on power plants with power steering and air conditioning, a special roller is used to automatically tighten the strap.
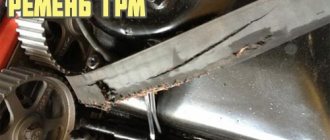
Belt damage
If smoke and a characteristic smell of burnt rubber appear in the area where the generator is located, it means that some drive begins to jam, as a result of which the generator belt on a Priora with air conditioning heats up and peels off. In some cases, a broken belt not only causes the generator set to stop, but can also cause a malfunction of the gas distribution mechanism if pieces of rubber get under the timing rollers or pulleys. Overheating and destruction of the belt may also indicate wear of the bearings; they should rotate freely.
Ringing and other extraneous sounds when the generator is running
The device is equipped with rolling bearings. Their operating conditions involve elevated temperatures and heavy loads, which leads to a decrease in their service life. With use, these devices begin to wear out, and their lubricant burns out. As a result, the lack of the proper amount of lubrication leads to the appearance of characteristic sounds of worn-out bearings. Operating a generator with such symptoms usually ends in the destruction of the bearings and failure of the entire assembly.
The overrunning clutch may also make noise. As it wears out, it begins to deform and can no longer perform its normal functions. In any case, to troubleshoot problems, you should remove and disassemble the device, replacing damaged elements.
A special electric hum
When the motor winding closes, a sound arises that cannot be confused with another. When it occurs, it is easily identified even by a beginner. In this case, the easiest way is to change the generator assembly or find a stator or rotor from the same device.
You should not go on long trips with a problem unit. Failure of the device can cause the engine to stop completely and require outside assistance. Without tools, spare parts and other necessary materials, it is impossible to solve the problem on site. Especially if in most cases the battery is completely discharged. To avoid this, you should regularly inspect the generator and identify even the slightest malfunctions in time.
It is recommended to remove the assembly every 80,000–100,000 kilometers and completely disassemble it for troubleshooting and inspection.
Sn9shimo4
To tension the belt, use a 17mm spanner to loosen the bolt securing the tension roller and use a special wrench to turn the roller counterclockwise.
To tension the belt, use a 17mm spanner to loosen the bolt securing the tension roller and use a special wrench to turn the roller counterclockwise.
Having adjusted the belt tension, tighten the tension roller mounting bolt to a torque of 34–41 Nm.
To replace the belt, place an adjustable stop under the oil pan through a wooden block.
Preface
Changing the alternator belt on an 8-valve VAZ-2114 with your own hands: tips, adjustment
Every car owner has encountered such a problem as creaking and slipping of the alternator belt when turning on the headlights, air conditioning, or when driving the car in wet weather. In most cases, to solve this problem, you just need to tighten the belt and everything will fall into place, the creaking and slipping will disappear.
There are times when tightening does not help and the belt has to be replaced, and then Prior owners have a question: what size belt is installed on my car?
The alternator belt in a Lada Priora car can be made in several sizes depending on the vehicle configuration.
In this article we will talk about alternator belts for the Lada Priora car. Below we talk in detail about belt sizes, their manufacturers that you can easily trust, and of course about the process of replacing the alternator belt.
Sn9shimo442442411
To replace the tension roller, completely unscrew the bolt securing it and remove the tension roller.
To replace the tension roller, completely unscrew the bolt securing it and remove the tension roller.
Install the tension roller and auxiliary drive belt in the reverse order. After installation, adjust the belt tension (see above).
Lada Priora: replacing the auxiliary drive belt on a car with air conditioning
How to change the alternator belt on a Lada Priora with your own hands: instructions with photos
Lada Priora differs from previous models in comfort and improved handling. But the main differences are under the hood. Everything here is located differently than in previous models. As a result, not all specialists even know how to replace the belt and tension it. New models are equipped with additional systems. Air conditioning and power steering (EUR) added comfort, but such changes complicated the approach to the generator.
In versions with power steering or air conditioning, the belt is longer when compared with the regular version of the car. As a result, we will look at how the change occurs in the first and second cases on models 16 and 8 valves.
In what cases does a car need to be replaced?
Typically, the need to replace the alternator belt appears due to wear during its use and deterioration of adhesion to the roller surfaces. Also, tightening or changing is necessary if, as drivers say, it starts to whistle.
This video shows the generator drive whistling.
The instructions that come with the car indicate that the alternator belt should be replaced every 60 thousand km. If the car is used infrequently, then replacement should be carried out every two years.
Step-by-step instructions for replacing without power steering
Do-it-yourself replacement work on a Priora without power steering (EUR) and air conditioning is more convenient to carry out in the inspection pit.
- a set of keys;
- fender liner removal device;
- balloon wrench.
Stages
- First, loosen the nut with a wrench of the appropriate size.
- Unscrew the adjusting bolt.
- We move the generator towards the power plant.
- Remove the right front wheel.
- We remove the fender liner and get access to the old belt.
- We replace it with a new one and do not forget to tighten it.
- Checking the tension. It should not be weak, but tightening it on a model with power steering (EUR) is also dangerous. The generator bearings may be the first to suffer.
Replacement instructions with power steering
Since the power steering pulley in this modification is at a low height, the creators ran the generator belt around the engine mount. This makes it a little more difficult to do the DIY change.
Stages
Use WD40 liquid to moisten the bolts that secure the motor mount and bracket. These bolts need to be moistened with liquid
After about a quarter of an hour, you can begin to unscrew the bracket nut. Let's jack up the wheel. Next, we place some object under the motor and remove the wheel. We lower the car a little. Unscrew the tension roller. Bend the belt. Now you can unscrew the bolts that secure the pillow. These bolts need to be unscrewed
Next, we lower the car so that the engine begins to hang out. The pillow moves towards the motor. Move the pillow
Now you can change. Next, we lift the car with a jack so that the power unit lowers
We do this carefully so that the belt and pillow do not move. Tighten the bolts and nuts. We put on the wheel and lower the car.. At this point, the work on the model with power steering can be considered completed
At this point, work on the model with power steering can be considered completed.
Tensioning and checking the belt
The belt in Lada Priora is tensioned as follows:
- The first step is to loosen the roller nut; to do this, the cage is held with a wrench.
- We rotate the roller cage by rotating the key.
- We tighten the roller nut.
- The tension is checked on the longest section between the pulleys.
- When pressed, the alternator belt should bend approximately 10 millimeters.
- On a model with power steering, the tension should be a little tighter.
You can also test it by ear. If the tension is insufficient, a whistle will be heard and you need to tighten it. If it is too much, you will hear the hum of the bearings and the tightening will need to be loosened. Roller key
The work is not difficult, but a little troublesome due to the need to dismantle some components in models with power steering and air conditioning with your own hands, but it is doable even for a novice car enthusiast. But calculate how much such work costs at a service station and whether it would be better to use this money for other purposes.