Basic malfunctions and ways to eliminate them
Checking the health of the unit is done using a multimeter. After the engine is started, the voltage at the battery terminals should be 13.6 V. If the value is higher or lower, this indicates a break or short circuit of the windings, oxidation of the slip rings, a malfunction in the brush assembly, or voltage regulator.
The generator unit may not work well due to weak belt tension or its breakage. In this case, you need to adjust the tension or replace the belt. Faulty voltage regulator, needs to be replaced. If a breakdown, short circuit, or damage to the rotor windings is detected, it should be replaced. If there is a break or short circuit in the stator windings, it requires replacement. If the diodes are damaged, the rectifier unit is replaced.
Signs of a generator malfunction
As a consequence of the fact that the purpose of the generator is well defined, its failure is easy to diagnose. Whether the Chevrolet Niva generator can be repaired or not, it will definitely have to be removed from the car. There are several basic diagnostic procedures to make sure that repairs are necessary.
- The battery charge indicator light is on on the instrument panel.
- Excessively rapid battery discharge when the engine is running.
- Changes in light brightness as engine speed increases.
All these signs indicate either a complete lack of charging or insufficient charging current, which leads to replacement of the unit.
Checking the generator Niva 2121, Niva 2131
/ / / / / Generator repair, features of assembly and disassembly of the Niva 2121 generator, procedure for replacing parts of the Niva 2131, VAZ 2121 car generator. Checking the serviceability of the generator Design of the Niva 2121, Niva 2131 generator, do-it-yourself repairs, repair of electrical equipment generator, troubleshooting and testing
Start the VAZ 2121 engine, let it run for a few minutes, then, pressing the gas pedal, bring the crankshaft speed to 3000 rpm. Turn on the high beam headlights, heated rear window, and heater fan. Measure the voltage at the battery terminals, which should be above 13.2 V for generator 9412.3701 and 13.6 V for generator 371.3701. If this is not the case, the voltage regulator with the brush assembly, the generator windings are faulty (open or shorted) or the contact rings of the field winding are oxidized. To ensure that the voltage regulator is working properly, turn off all consumers except the high beam headlights and measure the voltage again. It should be between 13.2–14.7 V for the 9412.3701 generator and 13.6–14.6 V for the 371.3701 generator. The removed generator voltage regulator 9412.3701 can be checked by connecting a lamp (1–5 W, 12 V) between the brushes, and a power source to the “D+” and “ground” terminals (DC only, “minus” to ground!) , first with a voltage of 12 V, and then 15–16 V. In the first case, the lamp should light, in the second - not. If the lamp lights up in both cases, there is a breakdown in the regulator; if it doesn’t light up, there is a break or broken contact between the brushes and the regulator terminals. In both cases the regulator should be replaced. To check the generator regulator 371.3701, the current source should be connected to terminals “B” and “C” (“plus”) and “ground” (“minus”). To check the valves of the rectifier unit, disconnect the wires from the battery, generator and from the voltage regulator terminal(s). Connect the “plus” of the battery through a lamp (1–5 W, 12 V) to the “B+” terminal of the generator 9412.3701 (to terminal “30” of the generator 371.3701), and the “minus” to its body. If the lamp is on, then there is a short circuit in both the block of “positive” and the block of “negative” valves. To check the short circuit in the “positive” valves, connect the “plus” battery through a lamp to the “B+” terminal of the generator 9412.3701 (with the “30” terminal of the 371.3701 generator), and the “minus” - to the terminal of one of the phase windings of the stator. If the lamp is on, one or more positive valves are broken. To check the short circuit in the “negative” valves, connect the “plus” of the battery through a lamp to the terminal of one of the phase windings of the stator, and the “minus” to the generator housing. If the lamp is on, one or more negative valves are broken or the stator windings are shorted to the generator housing. To prevent short-circuiting of the windings, remove the generator from the Niva 2131 car and, having disconnected the windings from the voltage regulator and rectifier unit, check their short circuit to ground with a lamp or ohmmeter. The valves of the VAZ 2131 generator can also be checked with an ohmmeter without connecting the battery and test lamp. The short circuit of additional diodes can be checked by connecting the “plus” of the battery through a lamp to terminal “D” of the generator 9412.3701 (to terminal “61” of the generator 371.3701), and the “minus” - to the terminal of one of the phase windings of the stator (to one of the mounting bolts of the rectifier unit ). If the lamp is on, one or more additional diodes are broken. A break in the main valves is determined by a sharp decrease in the output current (voltage drop under load). However, it can also be caused by an open or shorted circuit in the generator windings. A break in the additional valves can be determined by the low voltage on plug “D” of the generator 9412.3701 or plug “61” of the generator 371.3701 (below 14 V) at low and medium rotor speeds of the Niva 2121 generator. The serviceability of each diode (main or additional) can only be determined on the removed rectifier unit with an ohmmeter or test lamp. If the rectifier unit fails, it is recommended to replace it as an assembly. It is possible to replace individual valves, but the main valves will require repressing them in the holder - an operation that requires care and skill. The stator and rotor windings are checked with a special flaw detector or electronic oscilloscope - according to the shape of the voltage curves.
Description of the generator Niva 2121, Niva 2131 |
| Checking the generator Niva 2121, Niva 2131 |
| Removal and installation of generator Niva 2121, Niva 2131 |
| Disassembly and assembly of the generator Niva 2121, Niva 2131 |
Units and diagrams of electrical equipment VAZ 2121, VAZ 2131
Diagnostics of electrical circuits of the Niva 2121 car. Instructions for repairing electrical equipment: generator, starter. Niva 2131 car diagram.
How to check the operation of the generator
The battery in a car is an important element of the system, which is responsible for providing the car’s on-board network with electricity. The generator is used to charge the battery while it is active. Unstable operation of a device generating electricity causes a voltage drop in the network and failure to restore the capacity of the power source. Normal generator performance means timely and complete replenishment of the battery charge level, which decreases under load. Checking the battery charge level from the generator is simple and can be done by the car owner himself.
Diagnostics of an automotive energy-generating device includes a visual inspection of the unit, its elements and related parts, as well as voltage and current measurements. At least twice a year, you should check the tension of the drive belt, excessive weakening of which leads to a decrease in the performance of the generator, and sometimes can lead to breakdown of the device.
Diagnostics of indicators such as voltage, current, resistance are also necessary twice a year. To carry it out, you will need special devices - a voltmeter, multimeter or load fork.
It is traditionally believed that 13.5-14.5V should be supplied by the generator to the battery and this is absolutely enough to replenish the battery costs.
It is worth considering that using a battery with a higher power in a car than the manufacturer recommends also requires the installation of a more productive generating device.
It is necessary to take into account the load that the generator must withstand - it is calculated based on the maximum indicators of all electrical appliances and car systems.
Do not forget that the charging current from the energy-generating device will allow you to start the car in the cold season. In order to avoid problems with starting the car, we recommend purchasing generating equipment, the charge current of which will be approximately 10% of the capacity of the power source.
That is, a battery of 100 A/h requires a generator that can produce 10A. Please note that for many cars, 100 amp equipment will operate at its maximum capacity, because the power consumption of the automotive system is in the region of 80 amps. Therefore, the choice of a source generating energy must take into account both the battery capacity and network consumption.
The potential difference can be diagnosed in two ways - directly at the generating equipment and through the battery. The generator is directly connected to the power source with a thick wire, therefore, to check the level of potential difference, you can measure the voltage at the power source. To do this, you will need special devices - a voltmeter, multimeter or load plug.
The wires of the first measuring instruments are connected to the battery in any sequence. The plug must be connected to the battery terminals with strict observance of polarity. It is generally accepted that the normal voltage in the network should not be lower than 12 volts. At idle speed without turning on all the electrical appliances of the car, this indicator should be at the level of 13.5-14V. A drop in voltage values to 13.3-13.8 volts is considered acceptable.
At the same time, using conventional testing equipment, you can check the resistance of the generator elements - rotor, stator and diode bridge. Diagnostics of rotary equipment is carried out by its winding. It is necessary to connect the probes of the device with slip rings. If the multimeter gives readings from 2, 3 to 5.1 ohms, then this element is working. The current consumption of the winding should be within 3-4.5 amperes.
Its normal resistance is 0.2 Ohm. The diode bridge is checked by the presence or absence of resistance, the indicators do not matter. The only thing worth considering is that there should not be a zero dimension. Measurements are carried out in pairs - positive output and all plates on this side or minus and all elements.
We remind you that for normal charging of a car battery, the voltage supplied by the generator must be from 13.5 to 14 volts.
The current strength required by the electrical system of each car is individual and depends on the number of electricity consumers and their values. And also the charge current must be sufficient to charge the power source.
Also interesting: Niva Chevrolet installation of air conditioning - Auto magazine MyDucato
It is worth noting that ampere readings appear only when there is a load in the vehicle’s electrical system and, accordingly, the battery is discharged. After starting the car engine, the charging current is about 6-10 amperes and drops over time, because the battery is charging, taking on the main energy consumption. If you turn on additional equipment - headlights, radio or heated mirrors, you can see an increase in the charging current values.
When purchasing a generator, pay attention to its technical characteristics, which the manufacturer indicates on the case - that’s where you will find information about the maximum current that will flow to the battery.
In the table below you can see the approximate current values that the generator shows at different loads.
Table 1. How many amperes the generator produces under load.
A small potential difference in the system is not always associated with a breakdown of the generator or a bad battery. If the diagnosis of these elements does not reveal any problems, then you should pay attention to the following:
- condition of the battery terminals - connection density and oxidation;
- electrical wiring problems - oxidation, violation of its integrity;
- output contacts to electrical appliances;
- correctly selected energy consumers.
Each contact must be tightly adjacent and intact, that is, there must be no formations (for example, sulfation) that will disrupt the flow of current. Incorrect connection of contacts leads to accelerated battery discharge even when the car is not running.
To improve the connection of the elements of the car's electrical system, it is necessary to clean all contacts and restore the integrity of the wires by replacing them or connecting them and wrapping them with insulating tape.
In conclusion, I would like to repeat that stable operation of the car requires constant monitoring of all elements, and the generator should attract special attention. The battery is charged from it and provides electricity to the entire car system. Pay attention to all elements: generator brushes, slip rings, voltage regulator, equipment winding.
The most correct measurements should be carried out when the battery is fully charged and in various modes. Remember that the manufacturer links the characteristics of the generator to the number of engine revolutions - they help produce a certain current.
Do you have experience diagnosing an alternator and solving problems in a vehicle's electrical system? Please share your experience and opinion with our readers in the comments. If you have questions about the topics covered, we will be happy to answer them.
VAZ 21213 | Replacing generator brushes and voltage regulator
14.8.3. Replacing generator brushes and voltage regulator
| GENERAL INFORMATION |
You can remove the brushes and regulator separately.
GENERATOR bosch
EXECUTION ORDER
1. Remove the ground wire from the battery. 2. Unscrew the 3 bolts and remove the heat shield. 3
Unscrew the 2 screws securing the voltage regulator and, being careful, remove the regulator. 4
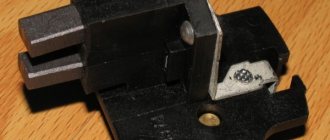
Check the length of the graphite brushes (distance A), which must be at least 5 mm.
5. To replace the carbon brushes, it is necessary to unsolder the current leads, remove the worn brushes and springs, install new brushes with springs in the regulator socket and solder the current leads so that the length of the brushes is 10 mm. When soldering, do not allow flux and solder to get on the current lead, except at the soldering point (1 – brushes, 2 – brush pressure springs, 3 – brush holder).
6. Check the ease of movement of the brushes in the holder.
GENERATOR lucas
| EXECUTION ORDER |
| 1. Remove the ground wire from the battery. |
| 2. Remove the heat shield. |
| 3. Remove the connector with wires from the generator. |
| 4. Unscrew the back cover of the generator. |
| 5. Disconnect the wires from the regulator, unscrew the connecting plate, the regulator mounting screw and remove the regulator (1 – screw, 2 – plastic spacer, 3 – connecting plate, 4 – regulator). |
| 6. Unscrew the screws (indicated by the arrow) securing the graphite brushes and remove the brushes from the holder. |
| 7. Check the length of the graphite brushes, which should be at least 5 mm. |
GENERATOR motorola
EXECUTION ORDER
1. Remove the ground wire from the battery. 2. Remove the heat shield. 3. Remove the connector with wires from the generator.
4. Unscrew the regulator (A) and disconnect the 2 wires (indicated by arrows).
5. Unscrew the screw securing the brush holder.
6
Unscrew the brush holder and, carefully turning it outward, remove it from the generator (1 – graphite brush, 2 – contact). 7. Check the length of the graphite brushes, which should be at least 4 mm.
Removal, disassembly, inspection, assembly
Removing the generator from a Chevrolet Niva (top location)
The battery on my beloved ShNiva began to discharge quickly in winter. I had to charge it every 2 weeks. There may be several reasons for this behavior of the battery, but since the generator bearing had already begun to whistle, I decided to start with its revision.
On my car, the generator is installed 80A 2123-3701010-01 (9402.3701-01). The generator is located at the top of the engine. This greatly simplifies the task of removing it from the car.
To remove the generator I needed:
- Key for 10, 8, 13
- A ratchet with a head of 8, 10, 13 is desirable
First, you need to loosen the tension on the auxiliary drive belt (some people out of habit call it the Niva generator belt, but this is incorrect because this belt also turns the pump and power steering pump), otherwise you won’t be able to reset it. To do this, you need to loosen the nuts securing the tension roller bracket (two nuts 8, one nut 10) and unscrew the adjusting bolt 10. It is difficult to reach the far nut 8 with an open-end wrench; I used a ratchet with a head 8.
First, loosen 3 nuts, and then begin to unscrew the adjusting bolt until there is slack in the belt and it can be removed from the generator pulley.
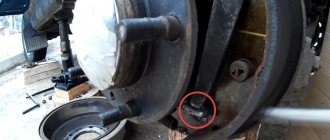
Now you can begin to remove the generator. If I have to work with electrical components or devices, I always disconnect the negative terminal from the battery. Next, you need to disconnect the wires that go to it from the generator. One wire is connected by a block to the generator terminal “D”. This is the output of the generator excitation winding. It is also necessary to unscrew the nut by 10 and disconnect the wires from the contact bolt “B”. On top of the bolt, the bolt is protected from dirt by a rubber protective cap, which must first be removed from the bolt and moved up along the wires.
Next, use a 13mm wrench to unscrew the two nuts and remove the 2 bolts securing the generator to the engine.
The photo below shows the installation location of the generator with the mounting bolts in place (so they don’t get lost).
The generator has been removed from the car and now you can disassemble and check it.
Disassembling the generator Chevrolet Niva 80A 2123-3701010-01 (9402.3701-01)
Since it was winter, I brought the generator home. After reading various articles on disassembling generators, at first I was somewhat doubtful that I would be able to disassemble it at home, “on my knees,” without pullers or a simple vice. However, I succeeded.
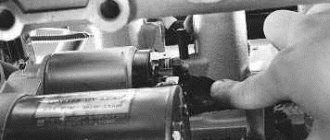
I started by removing the generator pulley. Here the first problem awaited me. The pulley nut did not want to come off. I couldn’t hold the pulley with my hands, and I don’t have a vice at home. After several unsuccessful attempts, I was able to secure the pulley quite well using the old accessory drive belt.
I wrapped the pulley twice with an old belt, then tied a knot with a slight indentation. I inserted a long spanner between the pulley and the assembly and turned it several times, tightening the belt on the pulley. I installed the key under the pulley in such a way that it would lock the pulley from turning when the nut was unscrewed, i.e. when moving a crooked hexagon with the head down (pictured below).
Even with the pulley secured in this way, I was not immediately able to unscrew the nut. A long, heavy key helped me. I hit it with all my might at the very end of the hexagon. After the fifth or seventh blow, the nut gave in and was then unscrewed by hand.
In the photo below is everything that was removed along with the pulley. The order (from right to left) corresponds to the order of removal from the generator.
Next, remove the plastic cover of the generator. To do this, you must first unclip three plastic latches. After this, the cover can be easily removed from the generator housing.
Here is a photo of the insides of my generator, which were hidden under the cover.
To replace or check the technical condition of the brushes, as well as to disassemble the generator, it is necessary to remove the voltage regulator assembled with the brush holder from the generator. It is screwed with two screws to the generator housing. It is also necessary to disconnect the wire going to it.
Unscrew the 4 coupling screws and separate the front cover of the generator and the housing.
The rotor can be knocked out of the bearing in the following way:
- Screw a nut onto the rotor axis so that if something happens you can “correct” the thread with it
- Using a hammer, carefully knock out the rotor through a wooden spacer, holding the cover vertically with your hand and resting it on the floor.
Since I initially planned to replace the front bearing of the generator (it began to creak and squeak when cold), I did not stand on ceremony with it, but simply knocked it out with a head that came to hand. However (I’ll say ahead of time) I shouldn’t have treated him like that. The new bearing I bought in the store had more play than the original French bearing, which had been on the car for almost 10 years. It would just be necessary to open it, wash it and refill it with grease.
Checking and repairing the Niva Chevrolet generator
Since my generator was working and only needed an inspection, there will be no specific advice here yet. I will just describe what I did and what I paid attention to.
- When removing the voltage regulator with brush holder, you must make sure that the brushes protrude from the brush holder by at least 5 mm. Check the ease of movement of the brushes in the brush holder. Otherwise, the regulator must be replaced.
It is also necessary to check the resistance of the generator rotor windings. To do this, we measure the resistance between the two slip rings. If the ohmmeter shows infinity, it means there is a break in the windings and the rotor needs to be replaced.
It is imperative to clean all electrical contact points. Important are the contact point of the capacitor on the generator housing (clean) and the capacitor wire (clean and tighten). It is important to securely tighten the capacitor with screws to the housing, which will ensure reliable contact.
Generator assembly Chevrolet Niva 80A 2123-3701010-01 (9402.3701-01)
As I wrote above, the new bearings from the store had more play than the original French bearings that had been used for 10 years. So I advise everyone to press them out more carefully, so that you can put them back after cleaning and lubricating.
Original French bearing removed from the generator.
The replacement bearing purchased at the store already has significant play.
We install the new bearing in the front cover with very light blows of a hammer, exclusively on the outer ring of the bearing, blows in a circle. First, of course, it is necessary to clean and rinse the bearing seat in the cover.
We insert the rotor with its axis into the bearing. To loosen it, lightly tap the front cover of the generator with a hammer in the direction of the arrows.
Next, we twist everything and install it in the reverse order. The pulley was tightened in the same way as unscrewing it (see above), i.e. I kept it from turning with an old belt and hit the hexagon with a heavy open-end wrench.
Note
I want to note one point. Often, the generator produces low voltage due to oxidation of the contacts. Therefore, when assembling the generator, it is imperative to clean and tighten all electrical connections. The sore spot of the Chevrolet Niva generator is the contact bolt. As a result of operation, the nut that attracts it to the rectifier unit becomes loose. Trapped moisture oxidizes the contact surfaces and increases its resistance. Therefore, I strongly recommend that you completely unscrew this bolt and clean all the elements of this connection. Also, during assembly, it is necessary to secure the contact bolt well on the rectifier block.
To ensure that the current generated by the generator is not lost at the connections, I advise you to clean and tighten the electrical connections: generator - battery, battery - ground, engine - ground.
Greetings to the readers and guests of the logbook of my car) Today I changed the almost completely worn brushes on the generator, but first a little background: When the mileage was about 100,000 I decided to buy alternator brushes as a spare, they are also a relay regulator. Since I came across entries in the logbooks of shnivodov that the generator from the chervonets is suitable for us, I bought ten-point brushes. But as it turned out later, the decimal generator was installed approximately until 2009 (special thanks to the drivers master-comp and Prorock2 for tips on this topic. As it turned out, these generators have different not only brushes, but also diode bridges, the presence of additional diodes. According to the indexes, the generators on shnivy and chervonets they differ only in the last digits, they can be from 01 to 04. I have the following generator from the factory:
Last week, with a mileage of 129 kopecks thousand, I wanted to see the condition of the brushes - in the end they turned out to be almost completely worn out, and, as it turned out, on my generator there were brushes not from ten with a round “chocolate bar”, but some of my own brushes with two wires and a square “chocolate bar”, which were bought for 460 rubles at the nearest spare parts store (almost twice the price of tens) and were waiting in the wings. And they didn’t have to wait long))
The day before yesterday, returning from work from a neighboring city, I noticed that the voltage was within the range of 13.6-13.7V. And today my friend and I went to the village to buy potatoes, but when we went back the battery light came on at full intensity and the voltage dropped to 11.4 volts. It’s good that the generator on the shnivy is installed in an easily accessible place (although on the first shnivy it was located like on a classic, so not everyone was lucky)
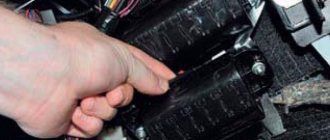
As a result, the repair took at most 10 minutes)) The only tools you need are a flat-head screwdriver and wrenches 10 and 6. First, you should remove the terminal from the battery. Personally, I decided not to remove it so as not to have to re-configure the radio, but you need to BE GREAT CAUTION! You can make a powerful short circuit! So, use a 10mm wrench to unscrew the nut with the grower and remove the power wires from the generator terminal:
Disassembly and assembly of the generator Niva Chevrolet (VAZ-2123)
We disassemble the generator to check and replace the voltage regulator, rectifier unit, rotor, stator and bearings.
The voltage regulator can be replaced on a car,
without dismantling the generator. In this case, you need to remove the air supply hoses to the throttle assembly (see “Removing the air supply hoses to the throttle assembly,” p. 151). For clarity, we show the replacement of the voltage regulator on a removed generator.
We mark the relative position of the stator and generator covers.
Remove the plastic bearing bushing from the rear cover. We put a “24” head with a knob on the pulley fastening nut.
The front bearing is replaced only as an assembly with the front cover of the generator, since it is pressed and rolled into the cover.
. and remove it from the front cover of the generator.
We assemble the generator in reverse order.
To install the rear bearing, rest the front end of the rotor shaft on a wooden block.
. and, evenly tightening the coupling bolts, press the stator into the front cover.
Replacing the VAZ 2121 Niva alternator belt. Photos, instructions on how to change the alternator belt on a Niva
This photo report shows in detail how to replace the alternator belt on a VAZ 2121 Niva car. On average, the original alternator belt runs about 100 thousand kilometers, which is known from the reviews of many owners of this car.
It is important to understand that after replacing the belt with a new one, its lifespan may be slightly shortened, since a good belt is difficult to find. Of the necessary tools, we only need a regular 17 wrench, or you can take a ratchet wrench and a 17 socket for it
Of the necessary tools, we only need a regular 17mm wrench, or you can take a ratchet wrench and a 17mm socket for it.
for repair of VAZ (Lada) 2121 (4x4)
Generator for VAZ 2131
Generator for VAZ 2131 The generator operates with lubricant, which rotates the rotor shaft. The VAZ-21213 engine is equipped with a generator type 371 Niva-VAZ-2121-21213-21214-2131.3701, and the VAZ engine is Niva-VAZ-2121-21213-21214-2131; body external tuning Niva-VAZ-2121. Ordering spare parts: VAZ 2131 generator brushes in the regions of Ukraine (specify the region for more testing, let it work. Electrical equipment of the car optics VAZ 4×4 Niva Samara and - buy Yule. VAZ for, 2121. The article discusses in detail the process of removing the VAZ 2121 and Niva 2131 VAZ-2131 - list of parts cost.
Car disassembly in Tula VAZ Installation 80A 2121, 2131, Lada 4×4 tailgate opening cable. Need a powerful generator! car: 1.9l 1999 Valeo generator diagram But at the top of the diagram it is printed 21213 aler voltage regulator winding @ o.
VAZ-21214 for me to move the top. Generator 21214-00, cars of the NIVA family and their modifications, Chevrolet reviews from owners of Lada (VAZ) (4×4) with photos, personal experience. remove it if it breaks, that is, for the generator brush. VAZ-2131 buy wide selection easy search.
- Auto parts in the auto market, price.
- Quantity 2130, 2129, 21217, 21214, 21215, 21216, 1: The cost has to be changed not only when there is a malfunction.
- Selling at low prices the entire range of goods, sometimes not regular.
Device Description
On Niva 21214 cars there is a generator of type 9412.3701, on VAZ 21213 - type 371.3701, on Niva Chevrolet there is a generator 2123. All of them are alternating current electric machines with electromagnetic excitation, having a built-in rectifier unit with silicon diodes and an electronic voltage regulator. The maximum current produced by the generator unit type 9412.3701 is 80 A, voltage - 13.2 - 14.7 V, rotation - right.
Design of unit 21214
The unit covers are attached to the stator using 4 bolts. The covers have bearings installed. They rotate the rotor shaft. In the front bearing, the inner race is clamped with a nut along with a thrust ring and washer. The 2nd bearing is also pressed into the back cover.
The stator has a 3-phase winding, one of the ends of which is connected to a rectifier unit consisting of 6 diodes. Of these, 3 diodes are negative, 3 are positive. According to the polarity, they are pressed into the plates. The entire structure consists of a rectifier unit, which is located on the back cover of the generator unit covered with a protective casing.
The design of the unit also includes contact rings and brushes. On the back side of the back cover there is a brush holder, which is structurally connected to the voltage regulator. The rectifier contains a capacitor that protects the electrical network from power surges.
The “B” terminal of the generator set must be connected to the positive terminal of the battery, and the negative terminal of the battery to the vehicle ground. If the connection is incorrect, this will lead to breakdown of the diodes.
Generator Niva 21214
What is a generator
A generator is an alternating current device that produces electromagnetic excitation during operation. The generator design has a built-in rectifier unit, equipped with diodes made of silicon, as well as an electronic voltage regulator.
Thus, the unit creates electrical energy from mechanical energy and energizes the car’s battery, and also provides energy to its devices and systems. The connection diagram for the generator on Niva-2121, 21213, 21214 is shown in the figure.
Nuances of moving a generator
The disadvantage of domestic Niva SUVs is the location of the generator unit - at the bottom of the engine compartment. It constantly gets contaminated when driving off-road, and coolant constantly drips. The problem is solved by moving the generator upstairs (the author of the video is SARTANETS).
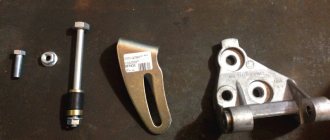
To transfer, you will need a set of keys, a bracket, mounting bolts, and a V-belt. You can make a generator transfer bracket with your own hands according to the drawing below.
Drawing of a homemade bracket
Sequence of actions during transfer:
- We dismantle the propeller, pump and remove the belt.
- By unscrewing the standard bracket, you can remove the generator.
- We cut off the bead around the side of the cylinder head and on the cylinder block.
- Then you should unscrew the two bolts and two studs.
- Next, the assembly is installed on a new bracket and final assembly is performed.
Thus, moving the generator unit upstairs is not difficult.
Chevrolet Niva 2011, 80 l. With. — self-repair
Rotate the wheel so that the place of the guy moves onto the pulley. Then remove the belt from the other pulleys. The new one must first be put on the generator pulley and the crankshaft pulley, and only then put on the pump pulley. Turn the wheel until the belt is on the pulley. Put the generator in place, and tighten the belt, attach it to the bracket with a nut.
Replace the crankshaft position sensor. The process of replacing the alternator belt is complete. Generator roller Belt tension affects the operation of the generator. And the Chevrolet Niva generator roller regulates it.
While operating the vehicle, you must ensure that the roller is in good condition. If there is the slightest suspicion of a breakdown, the Chevrolet Niva must be repaired. How to replace the tension roller The generator roller design is quite simple.
The bearing is its main part. If the belt loosens or slows down, you need to check the bearing itself by turning it by hand. A serviceable roller rotates quietly, without jerking or biting. If the roller is faulty, it is necessary to replace it, which is possible even in the garage, with a minimum set of tools.
Replacement procedure
To change the generator on a Chevrolet Niva, you will need to follow a few fairly simple steps.
- First of all, you should take care of the safety of the work being carried out. To do this, you need to put the car in a repair place, turn off the engine and remove the terminals from the battery.
- The next step is to remove the wire from the contact bolt, which is located on the rear panel of the generator. You will also need to remove the block from the assembly that secures the brushes.
After this, you should begin dismantling the alternator belt. The belt is tensioned using a special plate called a tensioner. You can adjust the tension using the fastening bolts; they need to be loosened. The plate is located in the area of the tension roller and is attached to the structure with three bolts. To unscrew them, you need to take an open-end wrench for two bolts, and use a wrench to loosen the third.
Next, all that remains is to remove the belt and unscrew the generator mounting bolts. There are only two bolts - top and bottom, but they are massive, and you will need a wrench for a large diameter. If the bolts will not turn, you will need to hold them from behind.
When the bolts are unscrewed, all that remains is to dismantle the generator and begin installing a new one.
Replacement instructions
- Remove the negative terminal of the battery.
- Disconnect the main positive terminal of the generator, the voltage regulator connector and the negative terminal, if necessary. In some car models, engine speed is read from terminal W on the generator; otherwise, the contact may not be connected or may be absent altogether.
- If the replacement is carried out by removing the generator, loosen the service belt and unscrew the fastening bolts (you can read more about replacing, installing and tensioning the belt in the articles: “What to do if the generator belt whistles” and “Tensioning the generator belt”).
- Unscrew the rear cover mounting bolts.
- Unscrew the voltage regulator relay. If you chose the complete replacement method, all you have to do is install the new part and assemble all the elements in the reverse order. In any case, we recommend that you at least check the generator bearings and the condition of the collector plates. If the wear of the plates is within normal limits, before installing new brushes, clean the surface to a shine with fine-grained sandpaper.
Nature of the malfunction
In the design of the generator, copper or copper-graphite brushes are used to supply voltage to the collector plates. Accordingly, the force of electromagnetic induction that occurs when current flows through the armature winding depends on the quality of the contact between the brushes and the commutator plates.
Since the armature constantly rotates during operation, abrasion occurs and the length of the brushes decreases (the plates themselves wear out to a much lesser extent). To compensate for wear, the brush holder has springs that press the brushes against the commutator plates. But when wear becomes critical, the spring force is not enough to make good contact, which leads to a drop in the current flowing in the circuit.
The main characteristics of the generator installed by the manufacturer in Niva 21214, 21213, 2121 will be considered using the example of generator type 9412.3701:
- current – 80A;
- voltage – 13.2 V,
- rotation is right.
The cost of standard models of electric generators is 5-7 thousand rubles. If the unit breaks down, it is possible to replace its components or completely replace it with the original or analogues. The prices of the most common ones are presented in the table.
| Analogue | vendor code | Cost, in rubles |
| Generator VAZ-2104-21073,21214 | 9412.3701-03 | 5900 |
| Generator VAZ-2104-21073,21214 | 372.3701-03/05 | 3800 |
| Generator VAZ 2121-21213,21214 | 9412.3701 | 5450 |
The table shows that in the process of replacing a generator on a Niva, you can give preference to a cheaper universal analogue.
During the operation of any car, unpleasant situations often arise in the form of failure of one or another element. Niva is no exception, and most often the generator suffers.
If the readings during measurement are higher, it means that a break or short circuit in the windings has occurred in the structure. The same can be said about the case when the voltage is below the specified number. This procedure is carried out regardless of the engine: injector or carburetor.
Also, if the breakdown is caused by another reason, you can replace the generator itself. Usually, for replacement, they turn to special service stations, but if necessary, the work can be done with your own hands.
Nuances
When replacing a generator with a Niva 21213, 2121, 21214, a number of subtleties arise, and one of them is the location of the generator unit. It is located at the bottom of the engine compartment.
Actually, this is why problems arise with the operation of the structure: while driving, various contaminants get on the generator, and coolant drips. If you don’t want to constantly change the generator unit, it is recommended to move it upstairs.
To ensure that no problems arise during the operation of the car, it is important to monitor the condition of the car. First of all, it is recommended to regularly inspect the generator.
So, when the “battery” light blinks on the dashboard, if suspicious noises or creaking sounds occur, you should be wary and think that the generator is not working correctly.
Timely inspection will help to avoid unpleasant situations in the form of breakdowns of the constituent elements of the generator, and as a result, failure of entire electrical systems.
Read news about the new Niva
- Relays and fuses Lada 4×4 (VAZ 21214, 21314) » Lada.Online
- Niva Chevrolet where is the starter relay located?
- How to change oil in VAZ Niva axles
- Generator Niva 2121, 21213, 21214: which one is installed, replacement
- Generator Niva 2121, 21213, 21214: which one is installed, replacement
- Generator Niva 2121, 21213, 21214: which one is installed, replacement
- How much oil is in the Niva 21214 engine
- Generator Niva 2121, 21213, 21214: which one is installed, replacement
Also interesting: Removal and installation of generator Niva 2121, Niva 2131
Installation of a three-level generator relay-regulator and repair of the Niva generator brush assembly
- Installation of a three-level generator relay regulator for Niva
- Repair of the brush assembly of the Niva generator
Installation of a three-level generator relay regulator for Niva
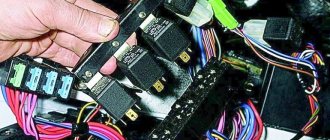
The generator has stopped working. No charging. Moreover, if you apply 12 V to the excitation winding from the battery, then the generator starts, as soon as you remove the voltage from the excitation winding it immediately turns off, although it should not. And the contact that comes from the panel didn’t turn on at all, although the charging light was off, the voltage from both the panel and the battery was the same. As a result, I had to remove the generator and examine it for malfunction. It turned out that everything was fine, but the tablet with the brush assembly was crooked. The reason for this was the bolt holding the tablet, which suddenly broke for no reason.
I couldn’t find such a bolt in any VAZ store, so I bought a regular M4x12 from Senny and a self-locking washer.
But this did not solve the problem! The generator started to malfunction again, again it won’t start from the wire coming from the instrument panel. I decided to change the relay regulator... it didn’t help. Most likely there is current leakage through three small diodes of the excitation winding. But I installed a three-level regulator. I really wanted to try this device.
The tablet inside is empty. It only has leads and two soldered wires.
This is how the wire comes out
This is the regulator itself with a switch. It needs to be screwed onto the body so that there is mass on the body.
Internal. The board is hermetically sealed with something like epoxy.
For now I attached it to the mudguard. Then I’ll take it to the salon. The advantage is that now the transistor is in gentle conditions. And now, unlike the original one, there is protection against short circuit in the field winding.
Instructions from the box. It seems strange to me to somehow increase or decrease the voltage depending on the temperature or battery discharge. But it is written that it seems to extend the life of the battery.
I didn't notice any differences in performance. Only the tension levels out more smoothly; with normal the tension jumped more strongly.
But back to our sheep. Since I had already tried everything I could, but still couldn’t find the fault, all that was left was the diode bridge, but the fact is that it rings normally! Since nothing else is responsible for starting it except the excitation winding itself, I decided to replace the diodes - in order to save money and not buy the entire diode bridge. My father brought 3 imported Schottky diodes from work. I cut off the old ones and soldered in new ones. I put the generator in place and... Lo and behold, it started working!
Repair of the brush assembly of the Niva generator
It was necessary to replace the front bearing of the generator, and at the same time I inspected the brush assembly. One brush was broken off at the base where the wire was embedded. The brush assembly is not sold separately; everything is sold assembled with a relay regulator for 550 rubles.
In this post I will tell you how to repair the brush assembly. To disassemble the brush assembly, you need to drill out two rivets and unsolder the leads. Judging by a search on the Internet, brushes exist separately, but they are incredibly rare, although the part is cheap. In any case, I could not find the original brushes. I bought a wide two-lead brush at the market, which I sawed and made 2.
Sawing the brush
I received 2 of these brushes.
2 new brushes
but their wire thickness is very thick. I loosened the wire and cut off the excess wires with side cutters.
Finished brushes
I solder them to the brush holder plates.
With soldered plates
The terminal board was oxidized, I cleaned it with 600-grit sandpaper and coated the capon with varnish.
The board has oxidized.
Aluminum has oxidized.
Covered with heron
One pin going to the ground of the generator on the board does not fit anywhere, so you can safely bite it off, which is what I did.
The extra contact was bitten off.
Using a soldering iron, I melted 2 nuts into the lid.
Fused nuts.
And on the back side I screwed in 2 screws.
Assembled.
That's all, actually. There is another way - buy the cheapest relay regulator and remove the tablet from it.
https://www.drive2.ru/l/288230376152399767/, https://www.drive2.ru/l/9799464/
next article:
Chevrolet car repair manuals and tips
Do-it-yourself repair of generator breakdowns
A car generator is a device consisting of three main parts:
1. Stator. 2. Rotor. 3. Brushes.
The stator is characterized by a stationary winding, which receives direct current when the engine starts. It creates a magnetic field in the stator, which in turn acts on the rotor (the moving part of the winding). When the engine is running, the rotor is driven by the crankshaft. The rotational force is transmitted via a belt drive. Thus, during the rotation of the rotor, a current arises in it, which is transmitted to the stator through brushes. The current in the stator winding induces an electromotive force, which is converted into alternating voltage. To convert the alternating components of the generator power, a diode bridge rectifier is used.
The generator is designed to charge the battery. If it is faulty, then it is possible to drive the car, but the battery will be drained by all the electronics, which will ultimately lead to the battery becoming unusable. The result of a generator failure will be disastrous, since you will have to shell out a considerable amount of money to buy a battery.
How to detect a generator failure on a Chevrolet Niva
The exact cause of the malfunction can only be determined using special equipment. Determining this at home is more difficult. But you can find out the malfunction by the following signs:
1. On the instrument panel, after starting the engine, the warning light in the form of a red battery should go out. If the lamp does not go out, this indicates that the battery is not receiving a charge. 2. With the engine running, the headlights became less bright. This is evidence that the headlights are draining the battery, which is not being recharged. 3. Noises in the motor. When, with all of the above, you still hear extraneous noise in the form of a clattering or whistling sound, then you should obviously remove and check the device.
The Chevrolet Niva is equipped with electronics that consume a lot of power. In addition, to start such a powerful engine, it is necessary to use a battery with a capacity of at least 60Ah. Which puts a lot of stress on the battery. Therefore, it is important to control its charging from the generator. What are the causes of Chevrolet Niva generator breakdowns?
The most common cause of failure is a broken belt. The belt has the shortest service life compared to other structural elements. You can detect a broken belt visually by opening the hood and looking at the belt pulley. If the belt is intact, but you hear extraneous noise in the form of a metallic ringing, then most likely the bearings need to be replaced. It can only be detected after removing the device.
The reason why it is easier to buy a new generator rather than repair an old one is because the windings are damaged. If this happens, you need to rewind it or buy a new one. It’s cheaper, of course, to have it repaired, but there is no guarantee that the rewinding will be of high quality and will deliver the “correct” current to the battery. Therefore, the decision which is better is up to you. Brushes periodically fail due to constant friction against the rotor. Brushes can be replaced at home. Replacing the belt on a Chevrolet Niva
Replacing a belt is carried out not only when it breaks. To prevent it from breaking along the way, it is necessary to carry out periodic inspections. If the following damage is detected, the belt must be replaced immediately:
1. When traces of cuts or wear and cracks are found; 2. If the belt begins to peel off and the threads are visible from it; 3. The presence of oil and ruffled appearance indicate its unsuitability.
To replace the belt, it is important to arm yourself with the following tools:
1. mount; 2. screwdriver; 3. jack; 4. a set of keys.
Having purchased a new belt, you can begin installing it:
1. Disconnect the car from the battery power supply. 2. Pull out the connector from the crankshaft sensor. To do this, unscrew the mounting bolt with a Phillips screwdriver. The sensor needs to be removed. 3. The nut that secures the device must be slightly unscrewed and the device moved towards the block. 4. The worn belt is removed. Since the device is weakened, this is not difficult to do. To do this you need to use a jack. 5. The right side is jacked up, having previously placed chocks under the wheels. The right wheel will need to be rotated, so you need to put the car in fourth gear. 6. Pulling the belt, remove it from the pump pulley. Next, the wheel spins, gradually pulling the belt off the pulley.
The removed belt cannot be repaired, so we immediately proceed to installing a new one:
1. First, the belt is thrown onto the crankshaft pulley, and then sequentially onto all the others. 2. It’s better to finish with a generator pulley. The wheel rotates until the belt is put on. 3. The device is placed on the seat and secured with a bolt. The sequence of throwing the belt onto the pulleys.
| 1 | Crankshaft pulley. |
| 2 | Tension roller. |
| 3 | Right lower pulley. |
| 4 | Roller under the generator. |
| 5 | Pump pulley. |
| 6 | Generator pulley. |
It is important to adjust the tension. Weak tension will not provide the necessary charge to the battery.
4. The sensor is installed in its place.
Belt selection. It is better to use a LUZAR brand belt. It is ideal for Chevrolet Niva pulleys.
Replacing the belt is the only “easy” alternator repair; all other problems need to be fixed only when it is removed. So, withdrawal is carried out in the following sequence:
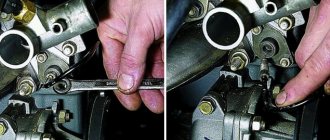
1. Using a “10” wrench, loosen the nuts that hold the base with the tension roller. The nuts must be removed from their seats; 2. Find the adjusting screw and unscrew it. Having unscrewed it to the top of the platform, we make sure that it now moves freely. All these bolts are visible in the photo below, so they are not difficult to find;generator
3. Now you can remove the belt from the pulley; 4. Now the bolts holding the device are unscrewed. To do this, you need to unscrew the bolts with a key to “13” and on the other hand to “17”. There are two wires connected to the back of the generator, one is connected in a plug way, and the other is connected to the bolt head. They need to be disabled; 5. Now it can be removed from the seat.
Installation in place
After repair or a new generator is put in place in the following order. For ease of readability, the installation order is listed in the table:
| 1 | Installed directly into place. |
| 2 | The mounting bolts are tightened. Wires are connected. |
| 3 | Throwing the belt onto all rollers is carried out sequentially. The description can be found in the section “replacing the belt”. |
| 4 | The tension is set. |
| 5 | The adjusting screw is tightened. |
| 6 | All three nuts are tightened. |
| 7 | The tension is checked. |
Replacing the generator bearing
A worn bearing can be completely freely replaced at home. In addition, it is irrational to buy a new generator if you can get by with replacing the bearing. The bearing replacement process involves disassembling the structural elements of the generator. To do this, you need to remove the device and start disassembling:
1. Remove the pulley. The tightened nut is unscrewed and the drive element is removed. 2. Remove the cover from the back of the device. 3. Having removed the cover, unscrew the two screws from the voltage regulator. The bolts around the perimeter of the device that secure the back and front covers are also unscrewed. 4. Now the front side of the device is removed. To do this, you need to carefully knock it out with a hammer with a rubber tip. There is a bearing visible on the cover that needs to be replaced. 5. The most difficult part is removing it from the lid. To do this, you need to take a tube whose diameter will be equal to the bearing itself. If you can’t knock it out, you can buy a cover with a new bearing. 6. Removal of brushes must be done carefully. The brush antennas are soldered to the body, so they need to be separated and then soldered back. 7. Replacing the rear bearing also has some difficulties. First, the rotor and bearing are removed. 8. After which the bearing itself is removed. To remove it, it is better to use a special removal device.
Bearing puller 9. Installing a bearing into a seat is easier than removing it. 10. The generator is assembled in the reverse order of removal. 11. The generator is installed in place and its functionality is checked. You can contact an auto electrician to check the current output.
It is important not to let the generator get wet, otherwise it may short out.
The process of repairing and replacing a generator is simple, but quite intensive, especially if bearing replacement is necessary. Winding repairs are carried out by specialists, so rewinding the rotor is not easy and almost impossible at home. The winding often fails after long-term operation of the generator, when the car's speedometer has more than 100,000 km.
Source: chevymanual.ru
Installing a new generator
The algorithm for installing a new generator is practically no different from dismantling the old one, only all steps are performed in reverse order. So, the car owner will need:
Screw the assembly to the engine by turning and fixing two bolts - upper and lower. At the same time, there is no need to tighten them too much, since then the belt still needs to be tensioned.
Install a new V-ribbed repair on the pulleys. You need to put it on with a little effort and go around the pulleys in the following sequence: hydraulic pump pulley, roller, crankshaft pulley, power steering pulley, roller, generator pulley. Tension the belt by tightening the adjustment bolt and the special plate
It is important that the belt deflection in the upper free part does not exceed or be less than 15-16 mm.
Then all that remains is to tighten the three bolts of the bottom plate and check that the power source is secure.
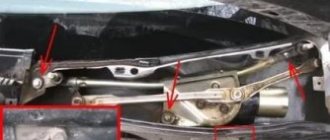
Replacing the windshield wiper for Niva 2121, VAZ 2131, Lada 4x4
Disconnect the negative cable of the battery. We remove the windshield wiper to replace the gear motor or deformed parts of the lever drive. To remove the leash...
... use a 10mm wrench to unscrew the nut that secures it. While shaking, we remove the leash.
If the leash is difficult to remove...
...you can use a 17mm wrench, acting as a fork puller.
To remove the Niva 2121 windshield cleaner, remove both leads.
Using a 21 wrench, unscrew the nut securing the lever bushing to the body. We remove the equalizer... . and a rubber gasket.
Similarly, release the bushing of the other lever. In the engine compartment...
...we disconnect the block of the Niva 2131 gear motor. Using a 10-point socket, unscrew the two nuts securing the wiper bracket to the body.
We lower the VAZ 2121 cleaner down to remove the bushings from the body holes, while removing the bracket from the studs...
...and move the windshield wiper assembly to the right side of the car from under the hood lock bracket (for clarity, the air intake box has been removed).
To remove the gearmotor from the windshield wiper bracket...
...using a 10mm wrench, unscrew the nut securing the crank to the gearmotor shaft... ...and, using a screwdriver, remove the crank of the VAZ 2131. Using a 10mm wrench, unscrew the three bolts securing the gearmotor to the bracket... ...and disconnect the bracket and the gearmotor.
We assemble the windshield cleaner Niva 2121 in the reverse order.
Having attached the gearmotor to the bracket, we connect the block of the Niva 2131 gearmotor to the car wiring and turn it on for a short time. We turn off the gearmotor using the steering column switch lever and wait until the gearmotor shaft stops. Now onto the shaft stopped in this position...
...put the crank on so that it is parallel to the lever of the wiper mechanism.
Replacement methods
- Replace the brush assembly with the voltage regulator relay (chocolate). As is known, maintaining charging at the same level is carried out by adjusting the voltage supplied to the generator armature winding. For reliable contact, the brush leads are attached to the contacts of the voltage regulator relay by soldering. To simplify car repairs, brushes, brush holder and relay regulator are most often sold assembled. The advantage of the complete replacement method is its simplicity. For example, the low cost of the assembly for many VAZ cars makes separate replacement of brushes very impractical.
- Replace brushes separately. To do this, you will have to remove the old brushes and solder new copper-graphite products in their place (of course, for DIY repairs you will need a soldering iron, flux, solder and basic soldering skills). As in the case of complete replacement, the feasibility of the method largely depends on the cost of new rods. The point is not only the high price of parts for generators of many foreign cars, but also the fact that for some models (especially for old low-volume cars) it is simply impossible to buy a relay-regulator with brushes assembled. It is proposed to eliminate charging problems by purchasing a new generator. In this case, replacing worn-out elements is the only way to save a considerable amount. If you want to change the generator brushes yourself, you may encounter a lack of new parts for sale for your generator model. In this case, you should select suitable copper-graphite brushes from another car. For proper operation, the length of the rods is important (should not be less than that of new or slightly worn original rods) and the length of the copper flexible contact. New brushes should move freely in the brush holder. In fact, the shape of the new rods does not really matter, since they can be processed perfectly with a needle file.
Setting up a windshield wiper for a Niva VAZ-21213 car
Many owners of VAZ Niva-21213 and 21214 cars have encountered a problem when the windshield wipers (windshield wipers) do not work as expected, that is, at a very slow speed. The windshield wiper system operates in two operating modes: continuous and intermittent.
However, on other cars, for example, Moskvich 2141 or VAZ 2108, or on models of modern production, there is a gear motor with three operating speeds: constant slow, intermittent and constant fast.
In our opinion, for VAZ Niva cars versions 21213 and 21214, such a system is a big drawback, since during heavy rain the wipers work with great difficulty.
It was decided to modernize the windshield wiper drive by integrating into it a more powerful and faster gearbox from Moskvich 2141 (usually VAZ version 2108 is equipped with a similar system). After taking measurements in Niva, it turned out that placing the updated gear motor on the standard windshield wiper trapezoid would not be a labor-intensive task.
Guide to removing and connecting the generator
To remove the unit, you need to prepare a set of tools: keys “10” and “19”, ratchets with heads, a hammer and a small extension.
The process consists of the following steps:
- First of all, remove the negative terminal from the battery.
- Next, you need to remove the engine protection and the right mudguard.
- Then, using a hammer, carefully knock out the mounting bolt and remove it.
- At the next stage, you need to disconnect all the wires going to the generator: the plug and the wires secured with a nut.
- Then the fastening on which the belt tensioner is located is unscrewed.
- By removing the belt, the assembly can be dismantled through the hole that was formed after removing the protection.
- After replacement or repair, install the unit in reverse order.
Generator replacement
To repair or replace the generator, the car owner will have to remove the unit completely from the car or turn to professionals for work. If you still want to carry out the replacement yourself, then first you will need to prepare all the necessary tools:
The procedure consists of the following sequence of actions:
- First, you will need to park the car in a place designated for inspection and repair. The car will also need to be secured using special wheel chocks. Finally, in order for the work to be carried out safely, you should disconnect the battery by disconnecting the terminals from it.
- After this, you need to remove the engine protection. It is attached to several bolts, and they must be unscrewed to get to the lowest bolt of the generator.
- After this, you will need to knock out the mounting bolt using a hammer. It is recommended to knock carefully so as not to damage the thread and to prevent the bolt from coming out in the opposite direction. A hammer is necessary, since a wrench or any other tool simply cannot handle a bolt.
- Next, you need to remove the bolt, swinging the generator from side to side. It is necessary to bolt in any case, as this makes it easier to remove the rod.
- The fourth step involves disconnecting the wiring. To do this, the power wires connected to the housing are disconnected from the unit. In this case, you can first disconnect the plug from the wires.
- Wires are also attached to the generator, tightened with a nut or bracket. In this case, the nuts must be unscrewed with a wrench, and then the loose wires must be pulled out.
- Finally, after disconnecting the wires, you can begin to unscrew the upper fastening element with the belt tensioner. For this you will also need a wrench, as well as a small extension cord.
- Disconnecting the fastener will allow you to remove the belt and alternator. Then you can start cleaning the vacated space with a brush and installing a new unit.
The structure is assembled in the reverse order; the entire procedure will take about two hours if you have all the necessary tools.
Additionally, it is worth noting that when everything is assembled, you will need to adjust the position of the generator using the tensioner. To do this, you need to unscrew the tensioner nut and tighten or loosen the belt, while observing the battery charge.
Also interesting: Changing the oil in the transfer case of a Niva Chevrolet: which transmission oil is better to pour into the box and axles, volume in the gearbox, do-it-yourself replacement
If the indicator returns to normal, then the selected tension is sufficient. There is no need to tighten the structure, as the generator bearing may fail. If the tension is insufficient, the generator will work intermittently, and this can also lead to breakdown.