Lada Vesta from the ZR park: testing all available options
Our Luxe sedan is equipped, by class standards, very generously. And skeptics are probably sure that all this wealth is mercilessly buggy. I hasten to disappoint them.
LADA > Vesta
I have repeatedly heard and read the opinion that, they say, only expensive cars need all sorts of bells and whistles, while a budget car should be without any frills.
On the one hand, a logical explanation for this approach is not difficult to find: the simpler the design, the higher the reliability. And this parameter is almost in first place for inexpensive cars. But let's not forget that we live in the 21st century, and the criteria with which we approached Zhiguli and Samara three decades ago are, to put it mildly, outdated. In addition, our market has not been closed for a long time, and competitors are not shy about offering all kinds of options. So, in my opinion, AVTOVAZ’s policy of saturating its models with additional equipment is correct. After all, not everyone chooses a car just for its willingness to serve for years without breakdowns. Today's buyers look at the design, the equipment, and the level of comfort. I'll start with the climate system. It has eight fan speeds and 15 temperature levels. Domestic models have never offered such wealth before! Each person has his own concept of a comfortable microclimate, and Vesta will probably satisfy everyone. You only have to play with the settings at the beginning of the trip, and on a long journey there is no need to touch the knobs. And this is the best compliment considering that our car has a regular manual air conditioner (now the top version already sports single-zone climate control). The system works very efficiently for cooling, and subjectively turning on the compressor does not affect the dynamics of the car.
Male colleagues like to reproach the fact that all Ladas are still content with single-stage seat heating. They say you can’t set a comfortable temperature. However, I don't see a problem with this. Driving with the heater on all the time is harmful to men's health. Therefore, there is no need to play with the degree of heating: turn it on after starting the engine, enjoy the effect for the first ten minutes, the most unpleasant in winter, and turn it off. Vesta warms up both the fifth point and the lumbar area well. According to rumors, the station wagon will also have heated rear seats - an unheard-of sybaritism for the Lada, which not all competitors have yet.
Expecting something supernatural from the audio system of a $10,000 car is stupid. Therefore, we will ignore the issue of sound quality. To my non-automobile taste, the Vesta is no better and no worse than those of its foreign-car classmates. Otherwise, the head unit in the flagship Lada is decent. The display correctly displays Russian tags from external media, the speakerphone works well, and the Bluetooth connection is reliable. For comparison: the multimedia in the Nissan Almera was very selective with smartphones, and wireless synchronization periodically failed.
Special thanks for the large control keys. Nowadays, almost everyone has standard double-din audio systems, but for some reason this does not always mean successful ergonomics. Often, creators prioritize the beauty of a large display, which is absolutely useless in the absence of navigation or a rear view camera. Vesta’s priorities are correct: it’s easy to get to the right button without looking, and two lines on the screen are more than enough to display the necessary data.
Some may regret the lack of a CD player, but let's be objective: this format is becoming a thing of the past. It is more convenient to use SD cards and USB flash drives. It’s much easier to record and re-record music on them, they don’t take up any space at all, and they hold so much data that you won’t be able to listen to everything in every “long-distance” trip.
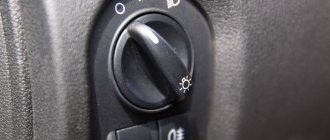
There is one complaint about the light sensor: it would be nice to parallel it with the windshield wiper switch. Rain and snow reduce visibility by definition. This means that working wipers should be a signal to turn on the low beams. Now in bad weather you have to turn on the headlights manually. However, there is a way out. On Vesta, the lights go out completely after the ignition is turned off. You can set the switch on the left steering column lever to the low beam position and not touch it anymore: the battery will not run out and you can forget about manually controlling the headlights.
Lada Vesta SW Cross Red 1.6 manual transmission › Logbook › A trifle, but nice… (Ode to rain and light sensors)
Good health to everyone!
My inner writer craves creativity, and I want to write something useful, or at least about how I changed my shoes. But I’m unlikely to write something useful on the technical side, unless it’s plagiarism. Wheels are only on order, tires are in the garage 200 km away... So that’s also a bummer. Yes, a post about a trip to waterfalls weighs heavily, but as they say, it’s not a hundred##t, i.e. the muse did not visit me here. But there is still an unplowed field of all sorts of things. What do I want to say about the rain sensor
. When we bought a “white favorite” (Priora station wagon 2009), a rain sensor was a bonus for the luxury package, which was chosen because of 2 airbags. As a navigator, I insisted on this. My smart driver did not argue with the navigator, so that there would be no discord on the road). At that time, this function was a priority for me, but my husband considered it an unnecessary function. When we brought the car home in March and there was snow on the street, my husband played snowballs with the car while it warmed up. The first 40 years of childhood are the most difficult.
Then, during the operation of the car, my husband fell in love with this function. By the way, the rain sensor was adjusted very well and worked well, my subjective opinion is better than in the West. When in a new car (prior SE station wagon blue), the cracked glass was replaced with new heated glass, but without a rain sensor (they didn’t check it when they took the glass, and when they noticed it was stupid to go deal with the OD). The husband was very upset. Naturally, he drives and turns on the windshield wiper and nothing seems to live... But that’s not what the story is about.
And when I was choosing a car, my rain sensor was an important function. They looked at me like... But everyone has their own cockroaches - this was my personal favorite cockroach. And all foreign cars with this function were already in luxury and... automatic. And this contradicted my MAIN cockroach - the manual transmission. Honestly, I made an agreement with both my favorite cockroach and the MAIN one when I wanted to take the X-Line, but when it turned out that there was no door lighting when leaving the salon... In general, a rebellion among the cockroaches led to a revolution and a return to the roots. In general, there is a sensor, yes, so far it infuriates me. But he is.
And yesterday I finally realized what this strange “light sensor” function is.
Before that, I thought I was a sclerotic and I don’t remember when I turned on the headlights, but they were on, and I don’t remember how I turned them off either. With two screaming children behind you, you forget where you are going. YES, and in general you are driving in neutral)) (those who understand, smile). Of course, I knew that I had this function. But how does it work? But religion did not allow me to open Google or a manual book. Attention plagiarism: “The principle of operation of a light sensor or, as it is also called, a light sensor, is extremely simple. As soon as the illumination around the car drops and dusk sets in, the electronics, having detected this, automatically turns on the side lights and low beam headlights.” It’s very convenient, although at dusk I turn on the headlights myself; I think the DRLs are too weak for this time of day. This morning, when I drove into the forest, where it was darker, the headlights turned on and off on their own.
I have auto mode on both the rain sensor (both the front glass and the rear window are cleared), and auto on the headlight mode.
All these are goodies and, one might say, excesses, but with them life is easier and driving is more comfortable.
I'm curious what your opinion is on these goodies. Did you choose them consciously or were they a pleasant bonus? Do you use it? Like ?
source
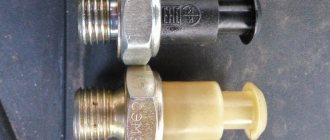
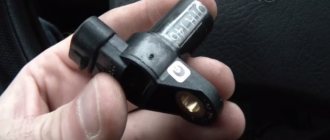
Sensor design, operating features
A light sensor (hereinafter referred to as DS) is a microcontroller board in a plastic housing. In the center of the module there is a lens for “capturing” the light flux (photocell).
The operating principle of the DS is as follows: when the switch lever is in the “Auto” position, the sensor determines the brightness of the light beam. As soon as the actual brightness indicator is below the “programmed” range, the low beam and dashboard lights are automatically turned on.
The DS is automatically deactivated when the brightness level increases.
Characteristic symptoms of malfunctions
| Signs | Malfunctions |
| When moisture gets on the glass, the wipers do not move. | Damage to the light element DD |
| Brushes operate in the same mode, despite changing speed | Failure of the relay-breaker |
| Brushes work late | The digital controller has failed, the contact board has oxidized |
| Increased speed of windshield wiper blades | Short circuit in the on-board circuit. The relay breaker fuse has blown (No. 38) |
What functions does the sensor have?
The functionality of the DS is small: activation and deactivation of low beam, instrument panel illumination when the light brightness reaches in the range from 100 to 3500 units.
How the light sensor works: while moving, the sensor constantly “scans” the visibility area, assessing the lighting brightness parameter. The microprocessor receives data from the photocell about the brightness range and decides to send a signal to activate the low beam.
In a Lada Vesta DS car, the DS is programmed to activate the BS and the dashboard backlight. If necessary, the vehicle owner can reprogram the DC to additionally use fog lights and DRLs.
You can update the firmware at any certified service station that has portable scanners. “Upgrade” does not guarantee the functionality of the equipment on its own.
Review of Manufacturer Prices
| Name / catalog article | Price in rubles |
| Lada / VAZ 285356725 (original) | From 2000 |
| Fram 2458753 (analogues) | From 2000 |
| Otex 3697412 (analogues) | From 2000 |
| * prices are current as of 05/01/2019 | |
The process of replacing a rain sensor yourself is not at all difficult, but it requires care on the part of the repairman. Do not violate the manufacturer's regulations. When laying the wiring, be extremely careful not to damage the insulating layer. A short circuit to ground will damage the digital controller.
Disadvantages of light sensors on Lada Vesta
Instability of the sensor is most often due to poor-quality assembly of the switch lever and low cost of materials.
Auto electricians strongly recommend carrying out diagnostics at a service station using digital equipment, which will help quickly identify the source of the breakdown.
How to check the functionality of the sensor
You can independently check the DS for serviceability in the following way:
- activate the sensor manually;
- check the integrity of the fusible element on the fuse (No. 38);
- cover the DS installation area with a sheet of paper or cloth in order to artificially lower the brightness level.
In a service station, auto electricians use multimeters and portable scanners to read errors, make adjustments, and display data.
Replacing the light sensor on Lada Vesta
Given the complexity of the design, the sensor should be replaced at a service station. In the absence of experience in repair work, the risk of damage to the board is quite high.
Speed sensor location
The speed sensor on the Lada Granta is located between the BDZ (throttle valve unit) and the brake fluid reservoir.
Replacing the speed sensor
- The sensor can be removed by removing the air filter and inlet pipe.
- The sensor is secured with a nut, which can be easily unscrewed with a regular 10 mm wrench.
- Unscrew the nut, disconnect the chip, and remove the speed sensor.
After you have removed the sensor, clean it; debris may have gotten on it. Since its body consists of a magnet, it could become clogged when it hits a curb.
However, this is unlikely; most likely it has failed and requires replacement. But if there was dirt on it, then there is a chance that it is working. Put it back, connect the chip and test drive it to check.
Hidden functions of the Lada Vesta, which are not described in the instruction manual
Modern cars, even budget ones, contain a lot of electronics and advanced features. At the same time, the manufacturer often does not talk about all of them in the instruction manual. Some functions are intended for dealer service by professionals, so the car owner is not told about them. In this article we will talk about such “tricks” in the Lada Vesta, which has become very popular among domestic drivers.
Will the article be useful? Don't forget to give a "thumbs up"
and
subscribe to the channel
!
I would like to note that the functions below may not work on all versions of cars
.
Some car owners are faced with the lack of such solutions, or the algorithm for turning them on is different. Why AvtoVAZ engineers decided to make changes, I don’t know. However, most car enthusiasts were able to use “hidden” functions on their cars
.
Let's start with a simple and fairly well-known one. On Vesta, in order to turn on the turn signal, it is not necessary to move the steering column switch to another position
.
It is enough to slightly move it up or down, depending on the direction you are going to turn. In this case, the turn signal will blink three times
, which is convenient when changing lanes, because you won’t have to turn it off.
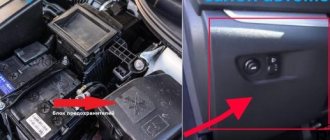
Setting up the central locking
Immediately after purchasing the Lada Vesta, the central locking program was not configured on it. The doors do not close automatically when driving. They can only be closed manually by pressing the button shown in the photo.
How to program it? The procedure is as follows:
- Start the engine or simply turn on the ignition.
- Press the central locking button and hold for several seconds (5 s) until a sound signal appears (the buzzer will beep once).
- The automatic central locking system has turned on.
You can check its operation like this. You start and drive, and you hear a click on all 4 doors. The locks closed automatically. When a certain speed is reached (7 km per hour), the central locking function is activated. To disable it, you need to repeat the steps. In this case, the buzzer will beep not 1, but 2 times. Maybe many drivers are already familiar with it, but we only found out recently.
How to adjust the sensitivity of the rain sensor
On the front side of the sensor there are two indicators and a button for quickly changing the operating mode. There are modes: rain\snow\standard. The rain sensor also has automatic level adjustment (to adjust to different glass, tinting, lighting). When turned on, the sensor shows the current sensitivity:
- Low sensitivity - 1 indicator flash.
- Average sensitivity - 2-3 flashes
- High sensitivity - 4 flashes.
To change it, press and hold the button for 3 seconds. This will be followed by a number of flashes indicating the current sensitivity. We continue to hold the button until a series of flashes follows. Release the button when the desired level is reached. An example of a rain sensor operating at a minimum level:
Have you ever had to install a rain sensor on your Lada car? What feedback can you give about his work? Let us remind you that the website presents other useful improvements, for example, replacing the washer nozzles with fan nozzles or installing a rear view camera washer.
The subtleties of the wipers and washer
Let's move on to a more serious feature that drivers don't know about. It is in the reviews, but not everyone understands it. The videos are filmed and shown in poor quality. The washer and wipers turn on simultaneously when you press the right steering column switch towards you.
The direction of pressure is shown by the red arrow. In this case, the windshield wipers make 3-4 repeated movements on the glass. But often several movements are not required, but only 1 time and a small amount of liquid is enough. When the wipers are cleaned several times, the last movements are already on dry glass, and a strong squeak is heard. But how to enable one-time cleaning with a wave of cleaners?
To do this, press the indicated switch once, but sharply, and immediately remove your hand. As a result, the wipers will wave once and stop.
Where is DD
The digital sensor is located between the back of the windshield and the rear view mirror. The location of the deployment can be changed, the main thing is that the controller does not go beyond the perimeter of cleaning with windshield wipers.
Note to the driver. The installed sensor should not interfere with the natural visibility of the windshield. Otherwise, you risk being fined by the traffic police.
Diagnostics of device health
This is done by analogy with the Priora, but on the devices of the Lada Vesta there is no button that needs to be held.
Diagnostic instructions:
- Press your finger simultaneously on the two buttons on the right switch under the steering wheel.
- Turn on the ignition.
- All indicators and lights on the devices should light up, the arrows will deviate to the maximum position and move back.
- Then press the top button of the same switch. This turns on the “Soft” mode. On the right is the firmware version of the electronic unit.
Installing a rain sensor
The rain sensor is mounted under the windshield on the back of the rear view mirror. During installation of the device, the following nuances are taken into account:
- The sensor must be located on the windshield in such a way that it does not interfere with the driver's view of the road. It is important to install it in an area that is cleared by the wipers while they are running. Otherwise, the device may not function correctly.
- There should be no cracks or other defects in the area where the sensor is located, since the efficiency of its operation depends on this.
- Before attaching the device, you need to make sure that the wipers effectively clean the windshield and do not leave dirt.
The sensor can be installed either at a service center or independently. Moreover, it is not at all difficult. No special tools are required for installation.
Below we provide instructions for installing a simple rain sensor DDA-35.
First you need to “aim” - select a place on the inside of the windshield where the sensor will be glued. As mentioned earlier, it should not interfere with the driver's view. For beauty, it is advisable to check the location and install the sensor at the top in the middle, next to the mirror mount.
Purchased rain sensors most often come with a special cloth for wiping and degreasing the glass. Thanks to this, the sensor is attached better.
If such a napkin is not included in the kit, you can use any glass napkin.
Carefully wipe the area on the windshield where we will glue the rain sensor.
We remove the protective film from the inside of the sensor, thereby revealing the fasteners that will hold the sensor on the glass.
After this, apply the rain sensor to the selected place on the glass and carefully press the device against the glass. We try to make sure everything goes smoothly, since we won’t have a second chance. With each disconnection, the holder will stick to the surface worse and worse.
We push the wire from the sensor under the headliner.
If there is not enough space under the upholstery, then slightly loosen the screws securing the visor.
Remove the cover plate from the rack and lay the wire under it. After this we put the cover back on.
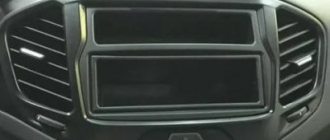
A little about the multimedia radio
The music system works without problems, nothing slows down. People ask how to make the screen display the climate control and door opening. To do this, you need to buy a special device and connect to it. Then the display will show the operating parameters of the climate system and doors.
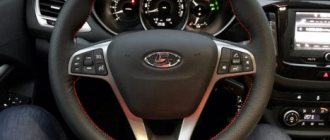
The steering wheel was covered with braid, which was ordered from a well-known online store. We bought the seat covers there.
Read your car's manual often, it contains interesting things. Rarely does anyone look at this useful book. Subscribe to the channel, write what you would like to know about. Good luck to everyone on the roads!
Turning on the interior lighting on a Lada-Vesta car using a motion sensor.
Short tests of the previous design revealed small (glitches) spontaneous operation in sunny weather. Therefore, we decided to try another option, with a capacitive sensor. Of course, the initial sensitivity of the sensor of 10-15 mm was not satisfactory (to turn on the lamp you have to practically stroke it, that is, touch it with your hand). But by increasing the size of one of the plates (the sensitive element), it was possible to increase the sensitivity. Now the response distance is quite comfortable - 50 - 60 mm.
A few nuances for those who want to repeat the idea in their car.
These comments relate to the sensor itself and how to use it; by the way, a sensor from the Tolyatinsk company STATE was used: https://www.shtat.ru/shop/product-category/beskontaktnye-sensory-shtat-ts
1. The sensor is capricious in a very humid environment or in a situation where water runs along the plastic lining of the trunk lid. That is why using it as a trunk opening button does not always lead to good results. Sometimes it works on its own in snow or rain. Cases of opening at the sink have been recorded)).
2. Very frequent operations (namely, these happen in rain or snow, but this again only applies to using it as a trunk opening button) can lead to it hanging in the on position and, accordingly, to high consumption for the entire period of freezing. From experience (we measured the current consumption of a Lada-Vesta car with this sensor frozen in the ON state, used to open the trunk) is it approximately 400 mA? And this is a lot.
3. Using the sensor in the cabin has not yet led to the identification of any shortcomings, everything is clear and convenient. Testing has been going on for almost a week, under different conditions, day and night, both in a cold car and in a warm interior. Moreover, forced repeated switching on and off (that is, with a hand movement) never led to the sensor freezing, although when testing the device before installing it in a car, on a table, it was possible to catch a frozen state a couple of times. That is why we do not recommend connecting the sensor to constant power.
4. In the cabin, the sensor is connected via power to the ACC circuit (standard power supply for the interior lamp), which turns off in the car after about 2 minutes. Accordingly, even if you turn it on (the interior light) using the sensor and forget to turn it off when leaving the car, nothing bad will happen. After 2 minutes, the car will turn off the ACC itself and, accordingly, the sensor will be de-energized. And it is for this reason that you will not be able to turn on the lighting with a sensor if, for example, you spent the night in a car and woke up and reached out to turn on the light. The ACC circuits are disabled and the lamp will not turn on. Accordingly, the use of the sensor allows you to obtain convenient and comfortable control of the light in the cabin with the car running, on the road, in the parking lot while waiting for passengers with the engine running.
After playing with and testing the sensor in operation for more than a week, the same one was made for rear passengers.
Well, to complete the topic of using capacitive sensors in a car, one more video.