How to tighten or replace the Chevrolet Niva parking brake cable with your own hands
As on any other car, the Chevrolet Niva parking brake is an integral part of the braking system.
Its purpose is to prevent spontaneous movement of the vehicle during parking or temporary parking with the engine running. But the handbrake can also replace the main brake system in the event of its failure, which allows you to safely get to the repair site. You have to use the handbrake quite often, so its cable and brake pads are subject to intense wear. As a result, car owners over time have to take measures to adjust the system or replace its individual parts. While some people turn to a car repair shop for this, others prefer to carry out repair work themselves. If you belong to the second category of car enthusiasts and would like to know how to tighten or replace the handbrake on a Chevrolet Niva, then the material in this article will be useful for you. The design of the Chevrolet Niva parking brake differs little from similar systems in other passenger cars
The design of the parking brake of a Chevrolet Niva is quite simple and is not much different from similar systems in other passenger vehicles. It consists of the following main parts:
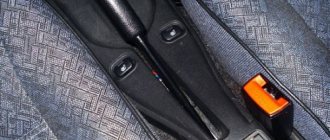
- Handbrake lever - serves to transmit the force of the human hand to the actuator, which, in turn, acts on the brake pads to lock the rear wheels.
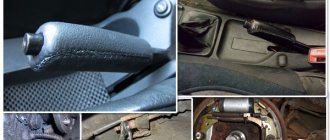
- The handbrake cable is a carbide, specially manufactured steel wire that runs under the bottom of the vehicle and operates the brake pads on the rear wheels.
- Brake pads are the final elements of the brake system, made of friction materials. By pressing against the brake drum or disc, they immobilize the wheel.
The manual braking system also includes such functional elements as a spacer sleeve, a brake pad drive lever, a spring, a protective sheath for the rear cable, a cover for the front handbrake cable, and a ratchet mechanism for the lever.
The handbrake system contains many structural elements
How to check and adjust the tension of the handbrake cable
If the parking brake is able to hold the car stationary on a 25% slope, then it is doing its job as expected. If you pull the handbrake lever seven ratchet clicks or more, but the car still rolls, the conclusion is the following: the handbrake system is not working effectively. In such a situation, adjustment of the Chevrolet Niva hand brake is required. This type of repair is simple, performed relatively quickly and does not require the use of special equipment. All you need for work are two keys “12”, pliers and a jack if it is not possible to put the car on the inspection hole.
If you were still not familiar with the structure of the brake system and have never encountered the need to repair the Niva hand brake, this is not a reason to contact service station specialists. Being careful and patient, you can do everything yourself, and the instructions below will provide information on how to tighten the handbrake on a Chevrolet Niva:
To work, you need to put the Chevrolet Niva on the inspection hole
- First, check whether the handbrake really does not hold the car on the road at a slope of 25%. To do this, place the vehicle on an overpass or find a suitable section of road. If the problem occurs, then we proceed to adjustment.
- Setting the optimal parking brake cable tension is done under the car, so it is better to place it above the inspection hole. If this is not possible, use a lift or jack. In any case, the rear of the car must be raised.
- When the vehicle is ready for use, secure it and release the handbrake lever.
- Next, using a wrench, loosen the lock nut on the handbrake adjusting rod, then use a second identical wrench to tighten the adjusting nut until the cable is properly tensioned. By the way, pliers are needed to keep the rod from turning during the adjustment process.
- Now tighten the locknut and make a full stroke first to the working position, and then lower it. After this, spin each rear wheel by hand. The rotation must be uniform, jerking is not allowed. If any are felt, adjusting the Chevrolet Niva handbrake requires repeating.
And the last stage is a handbrake test in road conditions. That is, you need to carry out a standard check of the parking brake's effectiveness, as described in the first paragraph of the manual.
After assembly, the handbrake must be tested in road conditions.
How to replace the handbrake cable
Sometimes adjusting the handbrake does not bring the desired result due to the fact that the rear cable is overstretched. In this case, the only way out of the situation is to replace the Chevrolet Niva hand brake cable. In addition, the cable will have to be replaced if it regularly jams in the protective sheath or breaks due to wear. If during an external inspection you notice that the cable is damaged, replace it immediately - do not risk your own safety. You will find out how to replace the cable below:
- To carry out the replacement, the rear of the vehicle must be in a hanging position. Therefore, lift it using a lift or jack and remove the brake drums from the rear wheels.
- Using a “12” wrench, loosen the locknut on the adjusting rod and completely unscrew it together with the adjusting nut. You must first remove the spring from the rod, as it will not allow you to unscrew the nuts.
- After this, you can easily remove the cable equalizer and remove the cable itself from it.
- Next, by pulling the cable towards you, remove the ends of the shell from the brackets located on the left and right on the bottom of the body.
- Using manual force, remove the right and left branches of the cable from the rear axle beam brackets.
- Using a wrench, unscrew the bolts securing the holders to the brake flaps.
- Now, having disconnected the cable ends from the brake pad drive levers, pull it to remove it from the hole in the brake shield.
After dismantling, install a new Niva rear hand brake cable. To do this, also use these instructions, but perform all the steps in reverse order. And with this, the replacement of the Chevrolet Niva handbrake cable is completed, and finally, do not forget to adjust the degree of its tension. It is also important to lubricate the adjusting threads on the rod upon completion of the repair work to avoid problems with unscrewing the nuts during the next adjustment or replacement.
Source: carextra.ru
Replacing the handbrake cable Niva 21214
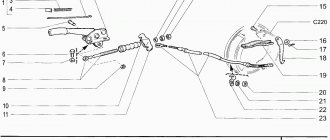
Adjusting and removing parking brake system components
If the parking brake system does not hold the vehicle on a grade of up to 25% when the drive lever is moved 4-5 ratchet teeth, the parking brake must be adjusted.
We install the car on an inspection ditch or a lift.
We hang the rear axle of the car and lower the parking brake lever to the lower position.
Holding the adjusting nut with a 13mm wrench, use the same wrench to loosen the locknut.
Holding the end of the cable with pliers, use a 13mm wrench to tighten the adjusting nut.
You can also hold the tip of the cable at the point where it connects with the spring by clamping its end with pliers. In this case, the full stroke of the parking brake drive lever should be 4–5 teeth of the ratchet sector. When the lever is fully lowered, the wheels should rotate freely without binding. In this position, tighten the locknut. To remove the front cable and the parking brake system drive lever, lower the lever to the lower position.
Remove the tension spring.
Use two 13mm wrenches to loosen the nuts.
Holding the tip of the front cable with pliers, use a high “13” head to simultaneously unscrew the adjusting nut and locknut.
Remove the spacer sleeve from the end of the front cable.
Remove the rear cable guide.
Use pliers to remove the cotter pin...
...remove the thrust washer...
...and disconnect the front cable from the parking brake lever.
Inside, use a Phillips screwdriver to unscrew the screw on the side securing the lever casing...
...and a self-tapping screw for the rear mounting.
Remove the lever cover.
Remove the sealing gasket.
Using a 10mm socket, unscrew the four bolts securing the lever bracket to the floor.
Remove the parking brake lever.
To remove the rear parking brake system drive cable, disconnect its ends from the rear brake pad manual drive levers (see Replacing the rear brake pads). Remove the rear cable guide.
Slide the protective rubber cap off the end of the cable sheath.
Use a screwdriver to move the end of the cable sheath...
...and remove it from the hole in the body bracket.
Using pliers we straighten the eye of the rear axle beam bracket...
Using a 10mm wrench, unscrew the two bolts securing the cable sheath holder to the brake shield.
We remove the cable tip from the hole in the brake shield.
In the same way, release the other end of the rear cable.
Remove the rear parking brake system drive cable.
Install the cable in the reverse order. We adjust the parking brake system.
The car's parking brake is responsible for holding the car on an inclined surface. In Niva, this is done using rear drum brakes.
The principle of operation of this mechanism is as follows: at the moment the handbrake is tightened, the cable, mechanically connected to the handle, on one side (and on the other, to the rear right brake lever) is tensioned.
Next, the lever moves inside the brake device, thus forcing both shoes to diverge to the left and right, pressing their friction layer against the inside of the brake drum.
As a result, the drum is rigidly fixed and, in turn, blocks the rear wheels.
However, as the vehicle is used, there comes a point when the vehicle can no longer be held on an inclined surface (or the parking brake must be applied a significant amount of force). The fact is that the rear pads wear out and the cable needs tightening.
Let us note, by the way, that using the handbrake after driving through winter puddles is not recommended - in this case, water may get into the pads; The water will subsequently turn to ice and cause the shoes to freeze to the drum, causing the rear wheels to become locked.
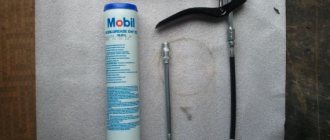
To adjust the parking brake cable, the only tools we need are two 13mm open-end wrenches and pliers (round nose pliers).
Next, locate the metal cable running under the bottom of the car. More precisely, we are interested in the place where there are 2 nuts on the cable next to the spring - one of them is an adjusting nut, the second is a lock nut. The first is located further from the spring, the second is closer to it.
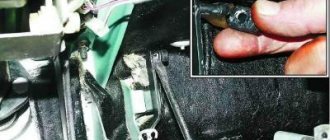
Hold the adjusting nut (on the left in the photo) with one wrench and begin to unscrew the lock nut (on the right in the photo).
For some, it will be more convenient to use pliers or round nose pliers instead of the first key.
After this, you need to grab the cable with pliers, and then start turning the adjusting nut with a wrench. This should be done clockwise - it is in this direction that the cable tension is ensured (counterclockwise - weakening). After several rotations, you will need to get out from under the bottom and tighten the parking brake handle: the tightening force should correspond to four to five clicks. If these numbers are different, adjust the position of the adjusting nut to the required number of clicks.
If our settings correspond to the required ones, we check whether the wheels rotate freely when the handbrake is lowered. If this is okay, don’t touch the locknut for now, but drive to the nearest hillock, stop there, turn off the car and check the operation of the parking brake. It happens that the rear pads do not hold the car enough.
In this case, we go back, park the car as before and tighten the cable to 3 clicks. We go again to where it is possible to check the handbrake. The case when the forces of the rear pads are again not enough to hold the car on a hill serves as a signal to replace the rear brake pads. Old pads will need to be replaced with new ones, checking the condition of the drum at the same time.
Thanks for subscribing!
Do not forget to tighten the lock nut with a 13mm wrench. In this case, the adjusting nut should be held with pliers.
Fix the locknut completely to prevent it from turning arbitrarily.
If during the work the parking brake cable was replaced, then after a certain period of time it should be adjusted again. As mentioned above, optimal tightening is achieved with 4-5 clicks of the parking brake handle ratchet mechanism.
Greetings to the readers of the logbook of my Shevik) I decided to somehow tighten the handbrake cable, otherwise it would not hold the car on a hill with the lever fully raised. There were no problems with the tightening, but when I tried to use it the next day, when I lifted the lever, there was a “bdynnnn” sound and the lever began to simply dangle. I thought that the cable had broken - in fact, no, the fastening on the right side of it had simply burst and the cable had moved along with the shell from the holder:
The cable served 120 thousand kilometers in 2 years 8 months, which is not bad in principle) For the last 2 weeks I drove without a handbrake - it’s somehow unusual, so today I replaced the old tired cable. Since BB did not have a cable for the shniva in stock at that time, I bought it from the officials for 400 rubles, in the store it would have been 70 rubles cheaper. Special thanks to Ivanokk, who kept up the conversation in the garage and poured fresh kvass into the mug)
First, remove the spring and unscrew the locknut and nut that tension the cable. Remove the washer and guide plate. If the tension nut does not unscrew, but turns together with the front cable, use WD 40 to help and hold the front cable with pliers.
The following is shown using the example of the right wheel; on the left side everything is similar: We pull the cable out of the holder, paying attention to how the metal ring is positioned - closer to the wheel:
There is no need to remove the brake mechanism; we simply pull back the rod on which the cable loop is attached with a knob and remove it:
Spray WD 40 outside and inside on the bolts securing the handbrake cable to the rear wheel and unscrew them with a 8mm wrench:
Screwing the bolts into place is not very convenient - they are small, and the shock absorber is in the way) To make future removal of the drum easier, I again lubricated the landing plane of the hub and the lower parts of the studs with lithol (I hope no one will lubricate the threads of the studs)))) You can use graphite lubricant, but I wasn't there:
We do the same with the left side. We insert the cable into the holders (you can push it in from the back by hand, from the front you knock it through a drift):
We connect the cable to the front one - it’s a little tight to pull, but we managed to screw the nut and washer a couple of turns without the help of an additional tool. Well, we adjust the tension of the cable - for some reason I got more than half of the thread on the new cable, but at 4-5 clicks the handbrake holds perfectly:
We counter, install the spring, rejoice at the working handbrake))
Source
Replacing the handbrake cable and little things... — logbook Chevrolet Niva “Zolotse” on DRIVE2
Niva. Here's the handbrake!
If you belong to the second category of car enthusiasts and would like to know how to tighten or replace the handbrake on a Chevrolet Niva, then the material in this article will be useful for you.
REPAIR MAINTENANCE OPERATION OF VEHICLES Chevrolet Chevrolet Niva. Chevrolet Chevrolet-Niva. Replacing the rear parking brake cable. Read…
I did this in less than a minute, because when I changed the rear pads at thousands of miles, I lubricated the adjacent plane of the hub with lithol.
Replacing the rear parking brake cable Niva Chevrolet
Replacement of the rear parking brake cable on a Niva Chevrolet is carried out in case of excessive stretching, when it becomes impossible to adjust it, and it is also changed in case of breakage, damage to the sheath or jamming inside the sheath. To carry out repair work, prepare a standard set of tools, drive the car onto an inspection hole or overpass and perform the following sequence of actions:
- Place the rear of the car on supports and remove both wheels.
- Next, we dismantle the brake drums.
- At the tip of the front cable, holding the adjusting rod with pliers from turning, loosen the lock nut. Then unscrew the counter nut and the adjusting nut completely.
Replacing the handbrake cable and small things... — logbook Chevrolet Niva on DRIVE2
The rib of the brake pad is installed in the opposite groove of the bar. Replacing the rear parking brake cable Replace the rear cable if it is excessively stretched, it is impossible to adjust the parking brake, there is mechanical damage and loss of mobility in the sheath. You will need: Remove the brake drum, see
Full size Lubricate the landing planes Do the same with the left side. We insert the cable into the holders at the back, you can push it by hand, in the front you knock it through a drift: Full size The new cable is in place We connect the cable to the front one - it’s a little tight to pull, but it was possible to screw the nut and washer a couple of turns without the help of an additional tool.
Now the cable will not freeze if water gets inside, or even rot. I also cut the springs on the cables, an old technique worked on a nine and a six; in a Chevrolet Niva, replacing the handbrake cable would not be possible on a Niva.
Zoom if you compress it with pliers, then it turns out to be 5 mm. By the way, on the new car the handbrake also worked, as far as I remember, quite acceptable.
Replacing the lever and front cable of the Niva Chevrolet parking brake
It's also time to change the front brake pads. By tradition, I purchased products from the Ukrainian brand DAfmi. Let me remind you, just in case, that the pads from a regular Niva are very suitable for a Chevrolet Niva. A set of DAfmi SM pads was purchased for 40 hryvnia. I liked these pads, Chevrolet Niva handbrake cable replacement, they work quietly and for a long time.
Taking this opportunity, I also changed the oil.
Like last time, Bizol Gas Energy 10W engine oil was filled in, which is positioned as oil for gas-powered engines. I would like to note that between changes I had to add a little oil because the hydraulic compensators began to knock.
I drove kilometers between replacements. Last time I didn't add oil between changes.
Replacing the handbrake cable on a Niva Chevrolet video
As I wrote earlier, slowly but surely, my handbrake cable was getting damaged, and the cable jacket was calloused. Finally, it got warmer outside from -25 to -3, and it was stupid to miss the last days of vacation.
I didn’t think that you might not find spare parts in stock for a Russian-made car, but ShNG is a different story. I drove around all the shops in the city, and everywhere I say that I have one cable like on 2106 or 2121, they stare at me and either snub 2 cables, or try to sell me from 21 Niva. Somehow I managed to find the required cable from catalogs in the store and order it. The factory DAAZ arrived, with notes that for 2123 and when compared with Tos 2121 it turned out to be 5 cm longer, and the shirts were about 2 cm longer.
A week ago, I poured motor oil into the cable jacket and hung it so that it spread along the entire length. On the third day, it started dripping from the second end of the shirts, which means everything was lubricated as it should. Now the cable will not freeze if water gets inside, and it will not rot either. I also cut the springs on the cables, an old technique worked on the nine and six, why not do it on the field.
When replacing everything is standard, we hang up the axle, take off the wheels, take off the drums, but here’s the problem. The old owner left a gift, where there should be a threaded hole for removing the drum, a piece of a bolt sticks out, and it was not possible to tighten it with one bolt until I heated it with a gas burner. Upon further inspection of the drum, I find a second jamb.
Greetings to the readers of the logbook of my Shevik) I decided to somehow tighten the handbrake cable, otherwise it would not hold the car on a hill with the lever fully raised. There were no problems with the tightening, but when I tried to use it the next day, when I lifted the lever, there was a “bdynnnn” sound and the lever began to simply dangle. I thought that the cable had broken - in fact, no, the fastening on the right side of it had simply burst and the cable had moved along with the shell from the holder:
Parking brake Niva Chevrolet
The work of replacing the handbrake cable, front brake pads and changing the engine oil cost UAH. Let's move on! Mileage km Z.
If you carefully consider the figures from the material above, the conversion of hryvnias to dollars may seem incorrect. This is explained by the fact that the spare parts were purchased at different times, and the course along the way is essentially replacing the handbrake cable.
Other materials in the category Sources: Adjusting the NIVA hand brake. We change the handbrake cable and adjust the bumper on the Niva AutoFormula 4x4 This time the AutoFormula team “shamanizes” Lyokhin Niva, changes the parking brake cable and adjusts the fasteners Repair of the suspension, brake system, replacement of pads, cardan Niva Chevrolet https: We will repair the Niva Chevrolet: How to properly adjust the handbrake .
The handbrake doesn't hold.
Handbrake lever - Lanos. Connecting to AIR - http: Troubleshooting problems with the handbrake button. Adjusting the handbrake.
Replacing cables and parking (hand) brake lever
Manual adjustment The handbrake does not hold even after tightening the vases. I eliminate the problem! Leave comments. If something is not clear, ask! Chevrolet Niva frozen, replacing the handbrake cable brake pads - What to do? If suddenly the car cannot be removed from the handbrake, the handbrake pads are frozen.
With the onset of frost, it gets blocked. The handbrake cable is pulled out of the body on a VAZ Niva. A soured handbrake cable, how to remove a stuck drum and extend the life of the parking brake cable, Adjusting the handbrake of a Chevrolet Niva. Replaced the gasoline filter.
How to adjust the handbrake of a Niva Chevrolet? This channel is dedicated to cars, modifications, trips How to replace the handbrake cable of a VAZ classic About adjusting the parking brake and more: What to do if the handbrake cable freezes inside the jacket? One way to release the rear wheels from the parking brake.
Chevrolet Niva | Replacing parking brake cables
Replacing parking brake cables
All models under consideration are equipped with an airbag. The airbag is constantly in an “alert” state and can operate (inflate) at any time when the battery is connected. To prevent accidental airbag deployment (and resulting injury), turn the ignition key to the LOCK position and disconnect the negative cable from the battery whenever performing any work on any safety system components. After disconnecting the cable from the battery, wait at least two more minutes before proceeding (the system is equipped with a capacitor that takes time to discharge). For more information about the operation of the security system, see Chapter On-board electrical equipment system.
Chevrolet Niva RAMMSTEIN › Logbook › Replacing the front parking brake cable
The year before last, before a trip to Crimea, I changed the rear handbrake cable on the shnivy, I installed it from an AT company (Czech Republic). After installation, a week later, the handbrake stopped holding, and I drove without a parking brake for almost 2 years. And here we recently cleared the snow in front of the house so that the car is parked on a slope and constantly rolls towards the gate. And so that it wouldn’t roll, I decided to fix the handbrake after all.