Upon completion of replacing the generator brushes, you need to tension the alternator belthow to do this is written here.
Note! The first few days there may be errors indicating that the generator is faulty, as well as poor battery charging. You should not be afraid of this, since this phenomenon occurs as a result of grinding in new brushes; after a few days of operation, the errors should disappear.
As you can see, replacing the VAZ 2108 generator brushes yourself is quite possible, there are no special difficulties here, the vast majority of motorists do it with their own hands. We hope that with the help of this guide, you can become one of these drivers. All the best!
VAZ 2109: replacing alternator brushes on your own
In a VAZ 2109 car, replacing the alternator brushes is necessary if they are even slightly worn out. Otherwise, the generator may be damaged. And this will lead to the fact that it will be impossible to use the machine, since without a generator you can forget about normal functioning. Simply put, the car will not be able to start. And besides, the battery will discharge too quickly. If any defects are noticeable in the operation of the generator, they urgently need to be eliminated. Replacing the brushes of a VAZ 2109 generator is a simple process and anyone can handle it.
Tips for owners
Many vehicle owners turn to service centers for such a service. Replacing brushes is an affordable service, for which you will need to pay up to 1000 rubles. If the vehicle owner does not have sufficient skills, then you can use the service of technical maintenance services. Most owners of the VAZ 21099 model are experienced motorists who can easily cope with the replacement.
In the first days after the procedure, slight malfunctions in the battery may occur. Charging may be too slow or fast. This situation happens often because new brushes need to get used to. After several days of work, their length will become optimal and the process will normalize. If malfunctions continue to occur, it is worth re-inspecting the brushes. Perhaps they are not fastened correctly or there is a breakdown in the fastening system.
All steps to replace generator brushes at home take no more than a couple of hours. All work can be easily done independently without outside help. After replacement, the battery will begin to charge steadily, which will extend its service life.
Source
Reasons for replacement
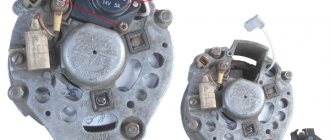
Replacing generator brushes VAZ 2109
Generator brushes need to be changed in the following cases:
- They have worn out so much that they have ceased to perform their main function - to maintain battery charge.
- The battery drains quickly.
Note: there are many reasons why the battery discharges quickly. Therefore, this does not always signal bad brushes. But just in case, it is better to check them, since perhaps the reason is hidden precisely in them.
Quick brush replacement
Replacing brushes in a VAZ 2109 generator
To replace the brushes you will need the following tools:
- 8 key (or 8 socket).
- Flathead screwdriver (to remove the cover).
- Open-end wrench 13.
To replace brushes quickly and easily, do this:
- Loosen the nut and bolt that secure the generator.
- Remove the alternator belt.
- Start the engine.
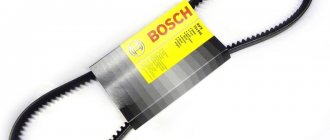
Note: By the way, a bad belt can also cause alternator problems. It needs to be checked and replaced if necessary. To check, you need to bend it and see if there are any cracks on it.
- Disconnect the battery (to do this, disconnect its negative terminal). This must be done extremely carefully, since the battery contains acid that can damage the skin if it comes in contact with it. This must be done in order to avoid a possible short circuit.
- Disconnect the wires from the generator.
- Remove the front crankcase protection.
- Unscrew the lower mount of the generator.
- Use a flat-head screwdriver to block the rotor until it becomes completely stationary.
- Unscrew the pulley.
Replacing brushes on a VAZ 2109 generator
- Remove the generator casing.
- Remove the protective plastic cover to gain access to the brushes.
- Use a screwdriver to hook onto the small power plug coming from the brush holder.
- Pull it up. Pull until the plug is removed.
Note: the slower things happen, the better. After all, you cannot allow the solder to come off the voltage regulator, since after this it will be difficult to reconnect the battery.
- Disconnect the plug from the brushes.
- Unscrew the bolts that secure the brushes to the brush holder.
- Remove the voltage regulator. Unscrew the brushes together with the brush holder. It comes off easily. Don't be afraid of damaging it when removing it, as it will be replaced soon anyway. But first you need to complete the removal of the generator.
Replacing brushes on a generator on a VAZ 2109
- Unscrew the four bolts that secure the generator halves.
- Remove the back cover. To do this, insert a screwdriver into the gap between the generator and the cover and pull it up. After a few seconds the cover will be removed.
- Screw the nut onto the rotor.
- Carefully remove the generator (see Repairing the VAZ 2109 generator is easy and simple).
- See if all its parts are in usable condition.
- Unscrew the large bolt coming from the brush holder (but not all the way, it only needs to be loosened slightly).
- Take new brushes and insert them in place of the old ones.
- Tighten with a wrench so that they hold well.
- Assemble the generator and insert it into place.
Replacing brushes without removing the generator
If the problem is definitely in the brushes and not in the generator, then it is not necessary to remove it. In this case, the replacement will be accompanied by the following actions:
- Disassemble the generator to get to the brushes (but do not remove it completely).
- The brush holder seat should be blown out with compressed air.
- Then clean it with a soft cloth.
- Carefully remove the brushes (to do this you need to use a soldering iron).
Note: the brushes can be removed in another way - together with the brush holder. However, in this case, you will need to buy a new brush holder, and not just brushes. This will be much faster, but also more expensive.
- Clean all contacts.
- See if the springs have sufficient elasticity.
- Polish the slip ring if there are noticeable defects on its surface.
Why is the battery not charging?
The generator stops charging the battery if the brushes, diode bridge, rotor or stator winding, as well as the belt connecting the rotor to the crankshaft fail.
| What's wrong | What to do |
| Worn graphite brushes are the most common generator malfunction. | They have their own resource and wear out over time. Thus, the contact of the brushes and rings on the rotor weakens, and the VAZ 2109 does not charge. There is only one solution to the problem: replacing the brushes with new ones. They are inexpensive and are sold at any auto store. |
| Due to poor connection of the output contact, diode bridge and stator winding, the bridge heats up, melts and fails. | But it was precisely on the VAZ 2109 and VAZ 2108 models that the most reliable diode rectifiers were installed from the factory. Tested by time. Therefore, the bridge on the “nine” rarely fails. Well, in the event of a breakdown, the entire bridge will have to be replaced. |
| Another common case is a broken, slipping or insufficient tension of the generator drive belt. | To check whether the belt is tensioned, press in the middle part and check the downward deflection. The permissible deviation standards are specified in the VAZ operating manual. The pulleys can also wear out, causing the belt to slip. Well, if the belt breaks, we simply replace it with a new one. |
Generator repair
Repairs occur in the following sequence:
- Remove the generator and then the plastic casing.
Note: since it is made of plastic, it can only be removed by hand, without using any tools. This may damage its surface.
- Unscrew the screws securing the voltage regulator.
- Remove the brush holder along with the brushes.
- Disconnect the battery terminal.
- Remove the block by turning all the stator fasteners down.
- Remove the tightening screws (4 of them).
- Remove the generator cover (a screwdriver can be used for this).
- Clamp the rotor until it becomes stationary.
- Unscrew the nut that secures the pulley.
- Remove the spring, pulley and thrust washer.
- Remove the rotor from the drive side.
- Remove the slip ring. You can sand it, but this is not necessary.
- Check the rotor.
- Inspect the stator.
- Reassemble the generator in reverse order.
- The generator repair has been completed.
You can replace the generator brushes with your own hands, as it is not difficult to do even at home. The price of new brushes ranges from 300 rubles. Of course, you can buy them together with a brush holder. In this case, the repair will become even simpler, but you will have to pay a little more. And at a car service you will need to pay two or even three times more. Of course, before starting the repair itself, it’s worth reviewing photos and videos on this topic. Instructions wouldn't hurt either.
Pro tips: in which cases is it better to replace the generator completely?
As a rule, a generator lasts a long time and often its breakdown is not a reason to throw it away; it is enough to replace the faulty elements of the generator device so that it functions normally again. It is necessary to completely replace the generator if its breakdown is serious and it cannot be repaired.
If the brushes show signs of breakage, replace them. If repairs are not carried out in a timely manner, there is a possibility that a new generator will be needed soon, which is a completely different cost. The battery can only hold brushless ignition for a few minutes, meaning it will need to be constantly charged. And soon, he replaced it.
- Open the protective cover (cover).
- Disconnect the brush power wires.
- We will receive two bolts that provide the required element.
- On the right side, using a 13mm wrench, we will get one nut.
- The voltage regulator must be raised.
- We check old brushes.
- Clean their location.
- We install new elements and put everything back together in reverse order.
Replacing generator brushes Lada 2109 (VAZ 2109)
After disassembling the generator series 37.3701 on a VAZ 2109 car, along with the stator and armature, it is necessary to check the functionality of the voltage regulator, brush holder and capacitor.
Checking the voltage regulator and brush holder of the generator . To check, you will need a current source with the ability to change the voltage. For example, charging for a battery. As well as a control lamp for standard voltage.
- Connect a test lamp to the regulator brushes. Then apply 12 V voltage by connecting the minus to ground, and connect the plus to the regulator terminal. The indicator lamp should light up. Next, we increase the voltage to 15-16 V and the control lamp should go out.
How to check the voltage regulator of a VAZ 2109?
If it is installed on the car
The procedure is as follows:
- Take a voltmeter.
- Start the engine, set the speed to about 1500-2000 per minute.
- Turn on the low beam headlights.
- Take measurements directly at the battery terminals.
The measurement result should be in the range of 13.5-14.2 Volts. If there is a deviation in a smaller or larger direction, then there is a malfunction of the VAZ 2109 voltage regulator; it is useless to repair it, you just need to change it. Just make sure that the entire breakdown lies in it, and not in the warning lamp on the dashboard. The fact is that power is supplied to the excitation winding through it. And if the lamp burns out, then the excitation winding is not energized and the generator simply does not work.
Diagnostics on a removed device
The new VAZ 2109 voltage regulators come in the same housing with brushes. This design is compact and quite reliable, and during diagnostics it is possible to identify problems in the brushes themselves. For example, wire breaks. To work you will need:
- A 12 Volt lamp with a power of no more than 3 Watts.
- External power supply (or a pair of 1.5-volt batteries).
- Wires.
Connect power to the ground terminal, “B” and “C”. The voltage should be 12..14 V. The lamp should then light up if the VAZ 3209 voltage regulator is working. But when you connect power above 16 Volts, it should go out. In order not to bother with finding a suitable source, you can use a battery in the first case, and in the second case, connect a pair of finger or little finger batteries in series. If the lamp does not light or lights up with any power supply, this indicates a malfunction of the unit. If it does not ignite in either the first or second case, then there is a break. But the solution in any situation is a complete replacement.
Generator VAZ 2109 - repair, replacement, device
Generator VAZ 2109
The VAZ 2109 generator is a special unit that charges the battery and also supplies current to the on-board network of any vehicle. It only starts working when the car is started. And the faster the engine turns, the more current will appear.
Thanks to the operation of the generator, the switching on, as well as the operation of other electronic devices in the car, never deteriorates. At the same time, it can easily be configured to supply the maximum current, which really helps, especially when the device is old or there are too many devices connected, leading to rapid battery drain.
But the main thing you should always remember is that the generator must be taken care of. After all, if it breaks down, the entire automotive system will immediately begin to fail. Thus, timely diagnosis will help to avoid any, even the most undesirable, complications.
How does the generator work on the VAZ 2109?
On the VAZ 2109, a generator is constantly installed according to the traditional scheme, which plays an incredibly important role in the power supply system. That is, it makes it possible to work correctly. In addition, it charges the battery. Therefore, during operation of the vehicle, it is necessary to constantly monitor the operating process of the generator. Therefore, it is not recommended to wait until suddenly a special light comes on on the dashboard. It is necessary to regularly carry out diagnostics, then immediately replace or repair broken elements.
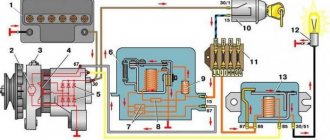
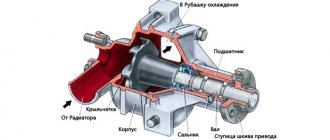
Generator circuit 37.3701
The generator, as a rule, consists of such main housing components as: an armature, two covers, a stator and a pulley with a fan. There are windings on the stator as well as the rotor. The first is divided into three parts, because at the output you need to get a voltage consisting of three phases. There is only one reason - this scheme makes it possible to get rid of all kinds of pulsations. This means that the efficiency of the device will be much higher. However, all this in turn imposes certain requirements. The basis of the work is that the rotor moves inside the stator winding. There is a coil on it, powered by the on-board transport system. As a result, a moving magnetic field appears around the rotor. Therefore, for efficiency it is imperative to ensure voltage stability on the rotor winding. Which is precisely an important condition for the operation of the generator set, which comes in two different types.
Generator connection diagram 37.3701
One part of the machines operates on a 37.3701 series V-belt drive, and the second uses a 94.3701 series poly-V-belt drive. However, in any case, all of them are necessarily located in the front part of the car, that is, on the internal combustion engine.
Technical specifications 37.3701
What does generator 37.3701 consist of: 1 – capacitor; 2 – voltage regulator assembled with brush holder; 3 – terminal block for additional diodes; 4 – insulating bushings; 5 – rectifier block; 6 – contact bolt; 7 – stator; 8 – rotor; 9 – spacer sleeve; 10 – inner bearing mounting washer; 11 – drive side cover; 12 – pulley; 13 – outer bearing mounting washer; 14 – coupling bolt; 15 – front rotor ball bearing; 16 – bushing; 17 – cover from the side of the slip rings; 18 – buffer sleeve; 19 – clamping sleeve.
How should a good generator work?
To understand why the battery is not charging, you need to have a clear idea of how the generator operates in normal mode. First, let's understand that the generator is much more important than the battery. The second performs only two functions in the car: starting the ignition system and powering electrical consumers when the engine is not running. Therefore, the battery of the VAZ 2109 carburetor and VAZ 2109 injector functions more as an auxiliary current source. It consists of lead plates combined into sections. These elements interact with the electrolyte (water + sulfuric acid). In this way, the battery converts chemical energy into electrical energy.
The generator consists of the following basic elements.
- Stator (a stationary element made of round steel sheets).
- Stator winding (coils placed in its slots).
- Rotor (a movable element rotating inside the stator; consisting of a shaft with a core on which many layers of copper wire are wound - an electromagnet, and 2 six-pole cores are installed on top).
- Back and front covers.
- Brush holder with graphite brushes; Since 1993, the brush holder for the VAZ 2109 has been equipped with a voltage regulator.
- Contact rings.
- Voltage output contact.
- Diode bridge.
Why can't the generator start the engine on its own? Because of the principle of its operation.
In order for this current source to begin generating electricity, the rotor must be transferred to rotational motion from the crankshaft. The crankshaft and rotor pulleys are connected by a V-belt. The crankshaft begins to rotate, transmits torque to the rotor shaft, the electromagnet creates induction, and voltage appears. The circuit between the battery and the generator is closed and the battery is no longer needed
Then the generator itself supplies energy to all devices and, most importantly, charges the battery
But the current produced by the generator is supplied from the stator winding to the output contact not directly, but through a diode bridge. The bridge plays the role of a rectifier. It converts the alternating current of the stator winding into direct current, which is necessary for all Nine electrical appliances. The brush holder also has a voltage regulator that prevents high voltage from reaching consumers. Due to a breakdown of the main components of the generator, the battery may not be charged.
Replacement and repair of generator for VAZ 2109
If any problems are detected, it is imperative to carry out only high-quality work to replace or repair the device. Remembering to connect everything correctly during assembly. Since this is a good guarantee of good performance of the repaired or replaced generator.
How to remove a generator on a VAZ 2109
Moreover, you can replace or repair the generator not only at a service station, but also with your own hands.
1. Disconnect the block with the wire from the generator terminal.
2. Slide the rubber boot, unscrew the nut and disconnect the wires from the “ZO” terminal of the generator.
3. Loosen the adjusting nut and the lower generator mounting nut.
4. Move the generator to the engine and remove the belt.
5. Unscrew the bolt securing the adjusting bar.
6. From the bottom of the engine compartment, unscrew the two bolts securing the bracket, holding the generator.
7. Remove the generator from the vehicle.
8. Install the generator in reverse order. When attaching the generator bracket, the longer bolt is installed closer to the generator drive! After installation, adjust the belt tension.
But at the same time you should always adhere to the necessary stages:
- disassembly,
- troubleshooting,
- replacement of broken elements,
- installation,
- connection.
Replacing a generator on a VAZ 2109 takes approximately 30 minutes. And for this you will definitely need to take spanners for 10, 13 and 17, as well as screwdrivers and a vice.
- The battery is turned off to de-energize the entire on-board system,
- All existing wires that are connected to the generator are disconnected,
- The top nut is completely unscrewed,
- The generator is held at the bottom thanks to a long bolt, which should be held with one key, and the nut should be tightened with the second,
- The generator is carefully removed,
- All broken elements are removed and replaced with new ones,
- Then everything is reassembled and installed. Moreover, the work is done in the opposite direction.
And the final touch is a mandatory check of the generator belt tension. To do this, you need to charge the battery and start it to understand that everything is working as it should again.
Generator repair for VAZ 2109
Repair of the generator on the VAZ 2109 is carried out only when faults have been discovered inside the device. In such a difficult situation, it is definitely worth doing a special diagnosis with a multimeter.
Thanks to the basic principles of operation, it is possible to very successfully replace or repair the device. But sometimes there is only one way out - installing a new one.
The main thing to remember is that timely detection and identification of breakdowns will help you avoid all of the above problems. Plus, you can extend the life of the generator itself for a long time.
Replacing generator brushes Lada 2109 (VAZ 2109)
After disassembling the generator series 37.3701 on a VAZ 2109 car, along with the stator and armature, it is necessary to check the functionality of the voltage regulator, brush holder and capacitor.
Checking the voltage regulator and brush holder of the generator . To check, you will need a current source with the ability to change the voltage. For example, charging for a battery. As well as a control lamp for standard voltage.
- Connect a test lamp to the regulator brushes. Then apply 12 V voltage by connecting the minus to ground, and connect the plus to the regulator terminal. The indicator lamp should light up. Next, we increase the voltage to 15-16 V and the control lamp should go out.
How to check the voltage regulator of a VAZ 2109?
If it is installed on the car
The procedure is as follows:
- Take a voltmeter.
- Start the engine, set the speed to about 1500-2000 per minute.
- Turn on the low beam headlights.
- Take measurements directly at the battery terminals.
The measurement result should be in the range of 13.5-14.2 Volts. If there is a deviation in a smaller or larger direction, then there is a malfunction of the VAZ 2109 voltage regulator; it is useless to repair it, you just need to change it. Just make sure that the entire breakdown lies in it, and not in the warning lamp on the dashboard. The fact is that power is supplied to the excitation winding through it. And if the lamp burns out, then the excitation winding is not energized and the generator simply does not work.
Diagnostics on a removed device
The new VAZ 2109 voltage regulators come in the same housing with brushes. This design is compact and quite reliable, and during diagnostics it is possible to identify problems in the brushes themselves. For example, wire breaks. To work you will need:
- A 12 Volt lamp with a power of no more than 3 Watts.
- External power supply (or a pair of 1.5-volt batteries).
- Wires.
Connect power to the ground terminal, “B” and “C”. The voltage should be 12..14 V. The lamp should then light up if the VAZ 3209 voltage regulator is working. But when you connect power above 16 Volts, it should go out. In order not to bother with finding a suitable source, you can use a battery in the first case, and in the second case, connect a pair of finger or little finger batteries in series. If the lamp does not light or lights up with any power supply, this indicates a malfunction of the unit. If it does not ignite in either the first or second case, then there is a break. But the solution in any situation is a complete replacement.
Checking for serviceability
Repair of the VAZ 2109 or VAZ 21099 generator is carried out in case of failures in the operation of the unit. There are several ways to determine generator malfunctions. The most optimal of these is diagnostics using a multimeter, but you will also need an assistant to carry it out. We will tell you further about how to check the generator on a VAZ 21099 or 2109 using a tester.
So, to determine generator faults with a multimeter, follow these steps:
- First of all, it is necessary to diagnose the VAZ voltage regulator. As practice shows, if the generator on a VAZ 2109 or VAZ 21099 does not work correctly, the problem may lie in the functionality of the three-level voltage regulator. This is especially facilitated by overvoltage in the electrical circuit. To check, you need to set the voltage measurement mode on the tester. So, start the engine and measure the voltage at the battery terminals or at the terminals of the generator unit itself. If everything is normal, then this parameter will fluctuate around 14-14.2 volts. Then press the gas and check the parameter again - it should increase, but no more than 0.5 volts. If the indicators on a VAZ 2109 carburetor or VAZ 21099 injector are different, this indicates that the element is not functioning correctly. Most likely, the VAZ 2109 voltage relay will have to be replaced.
- Next, the diode bridge of the generator is diagnosed. The bridge itself consists of six elements, three of which are considered positive and the remaining three are considered negative. Some diodes have mass at the anode, and the other part at the cathode. To check the diode bridge of the VAZ generator, the tester is switched to sound mode, that is, when the probe outputs are shorted, you can hear a characteristic sound. You are required to test each diode in different directions, and the sound should be heard in only one of them. If during testing the sound is heard in both directions, this indicates that the diode is broken. The best option would be to replace the diode bridge.
- Before disassembling the unit and repairing it, check the functionality of the stator; it is a steel cylinder, inside of which the winding of the mechanism is located. For diagnostics, you need to disconnect the stator leads from the diode bridge. First, inspect the element visually - there should be no signs of damage or burning. The multimeter is set to resistance measurement mode. First, measure the resistance parameter between the winding terminal and the housing (any terminal can be used). The obtained indicators should be high and tend to infinity. If the readings are 50 kOhm, this indicates the need to replace the generator.
- Using a multimeter, you can also check the performance of the rotor - it is a steel rod with a wound winding. At one end of the rod there are rings through which the brushes of the VAZ generator pass. You need to dismantle the rotor and visually inspect the condition of the generator winding and bearing. The integrity of the winding can be checked using a multimeter, after which the resistance parameter between the rings is measured. The results obtained should be no more than a few ohms. Replacing the VAZ 2109 generator brushes is required if they are worn out.
Node diagnostics with a tester
Do-it-yourself replacement of VAZ 2108 generator brushes
Alternator brushes for VAZ, according to the manufacturer’s recommendations, must be checked at least every 50,000 kilometers or at least every four years. Moreover, this operation does not require removing the generator itself - it is enough to gain access to the brushes themselves. In addition, it should be noted that in different VAZ models, checking and replacing brushes is carried out in the same way.
Signs of brush failure:
- low battery charge;
- low voltage levels;
- “weakness” and “winking” of the voltmeter needle;
- The indicators on the dashboard also begin to “blink” periodically.
Experienced car enthusiasts already know that similar “symptoms” indicate problems with the alternator belt, and therefore, first of all, check the level and correctness of its tension.
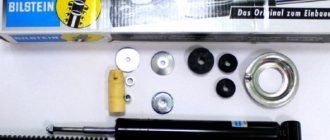
In addition to the standard set of tools, to replace the generator brushes you will need a soldering iron. This is the case if you replace only the brushes, and not the set of brushes along with the brush holder. In the second case, everything is much simpler and only a little more expensive.
Basic faults
- First, remove the generator. You can do without removing it, but this is only if you are 100% sure that the problem is in the brushes, and also that the other parts of the generator are absolutely in good working order.
- Then you need to disassemble the generator to get to the brushes. You can learn how to do this from previous articles, links to which are given above.
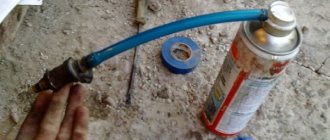
- Blow out the brush holder seat with compressed air, then wipe with a clean cloth.
- We solder the generator brushes; for this you will need a soldering iron. Note! You can also replace the generator brushes in another way - together with the brush holder. In this case, you will have to buy a new brush holder with new brushes; this option is much simpler, but also more expensive.
- We also recommend cleaning the contacts and checking the elasticity of the springs.
- Polish the slip ring (optional).
REPLACING THE GENERATOR VOLTAGE REGULATOR RELAY. GENERATOR BRUSHES. Replacing generator brushes. VAZ 2110.
After replacement, you may receive errors about a faulty battery or generator; you do not need to immediately try to find the cause of the failure. This phenomenon is not uncommon, because new brushes are just starting to get used to it. After some time, everything will return to normal and you can safely continue to operate the car.
REPLACING THE GENERATOR VOLTAGE REGULATOR RELAY. GENERATOR BRUSHES. Replacing generator brushes. VAZ 2110.
The work of replacing the brushes of the VAZ 2108 generator takes place in several stages:
- Carrying out a visual inspection of the brushes. We turn off the generator before starting work (to do this, just remove the “-” terminal from the battery), remove the voltage regulator, gaining access to a visual inspection of the brushes. A visual inspection allows you to determine their condition. Depending on the degree of wear, they may protrude from the seat by a distance exceeding the critical 5 mm or less. In the latter case, the brushes must be replaced as soon as possible.
- Replacing generator brushes. To gain access to the brush housing, you will have to partially disassemble the generator. If only the brushes are replaced, the brush holder must be thoroughly blown out with compressed air, and then finally wiped down with a clean, thick cloth. Dense - so that there are no fibers of fabric or non-woven fabric left on the brush holder. Removing the brushes is done using a soldering iron, but if you are replacing the brushes together with the brush holder, there is no need for it.
Tip: when replacing the generator brushes, you can simultaneously check the elasticity of the springs, clean the contacts, clean or even polish the slip ring. This is not burdensome, and maintaining internal “hygiene” is of enormous importance for your car.
If you still decide to work with a soldering iron, remove the brushes and install new ones very carefully. After soldering is complete, check the brushes for obstructions. We return the regulator to its place, remembering that the material of this spare part is extremely fragile, and therefore we act very carefully.
Important: in some cases, in order to gain access to the brushes, you have to remove the generator. You shouldn't be afraid of this, at least if you're not doing it for the first time. You will find detailed instructions for removing the generator on our website.
Immediately after replacing the brushes, your car may display information about errors, generator malfunction, or low battery charge. As a rule, this is a consequence of “grinding in” the new element, disappearing within a few days after installing the brushes.
What is a generator diode bridge and what functions does it perform?
The rectifier unit (another name for the device) is an integral part of the generator and serves to modify the alternating current produced by the unit into direct current, necessary for charging the battery and powering all electrical appliances of the car.
It is located on the frame of the generator and consists of 4, 6, 9 or more diodes placed on two insulated aluminum or steel horseshoe plates that act as cooling radiators.
The main components of the bridge are semiconductor diodes (most often silicon) that conduct current in the required direction. They are the rectifiers that convert alternating current into direct current. The battery acts as a capacitor, softening the inevitable voltage drops.
Instead of diodes, the circuit can use valves of any type - for example, selenium columns, the principle of operation of the circuit will not change.