Glass is an integral element in the design of any car and the VAZ 2107 is no exception. Without this part, safe and comfortable driving would be impossible. Therefore, this body element must always be not only clean, but also free from defects. If such occur, it is advisable to replace the damaged glass.
- Windshield
How to remove glass - How to install glass
Video: replacing a windshield on a “classic”
- Which manufacturer's glass should I install?
- How to replace
Video: tinting the rear window on a Zhiguli
- Video: repair of heated rear window
- How to remove glass
- How to remove glass
Replacing the rear side glass on a VAZ 2101-VAZ 2107
Welcome! The rear side window of a car - it can break in different situations, for example, it can break if you hit it with a ball or if you just slam the door hard, besides, there are a lot of thieves and different people walking along the streets of our cities, trying to take possession of anything strangers stealing it from the first car they come across, but in order to get into the car they basically break its windows, or if a more experienced person, then use a special hook and sleight of hand to open the car.
Note! In order to change the side window of a car door, you will need tools with which you will remove parts to get to it, these tools include: A set of wrenches and two different types of screwdrivers!
When should you replace your rear side window? Each car owner decides for himself when he needs to change the glass to a new one, but there are some people who change the glass only because of strong dirt that has appeared on it and has dried out over a long time, in this case it is not necessary to go to the car store and buy new glass, first try to wipe off all the dirt with a rag and water, in extreme cases, if this does not help, then using a special glass cleaner that is sold in household chemical stores, you can try to wipe the glass again, maybe this will help.
Note! We will give you advice for the future so that you then know what to do in that situation when a crack appears in the glass, namely, have you ever noticed that after a crack appears on the glass, over time it goes a little further until it reaches the end of the glass, so So that this doesn’t happen and you don’t have to immediately go to a service center or garage and replace the glass with a new one, you can extend the life of the old glass, to do this, using a cutter used to cut glass, make a strip across which the previously formed crack will rest against, and thereby She won’t go any further all over the glass!
How to replace the rear side glass on a VAZ 2101-VAZ 2107?
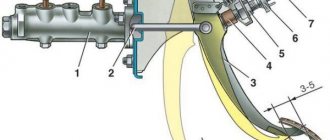
Removal: 1) At the beginning of the operation itself, you will need to get to the window lift mechanism, because in order to remove the glass itself from the car, you must first loosen the window lift cable and remove the glass groove, but in order to loosen the cable and remove the groove, you first need to get to them by removing To do this, cover the trim from the car door on which you are replacing the glass. (For information on how to remove the trim from the door, see the article using the example of removing the trim from the front door; you can see this example in the article called: “Replacing the front glass on a car”, see points 1-4)
Note! Before you start removing the trim, unscrew the button that locks the car door by hand or using a screwdriver (see photo 1), and when the button is unscrewed and removed, unscrew the screw that secures the window sill trim in the front part (see photo 2 ) if you have it of course!
2) Then, when the trim is removed from the door, you will need to remove the protective film, which you may or may not have at all, this film covers the entire window lifter mechanism from dirt getting on it, and this protective film is attached to the adhesive tape by peeling it off , you can easily remove the film from the car door.
3) Now proceed to removing the window sill, there are only four plastic holders that secure it, disconnect all these holders from the door using a screwdriver and then you can remove the window sill from the car door.
4) Next you will need to remove the rear glass groove, to do this, first disconnect the plastic clamp from it (It fits into the hole) that attaches the rod to the groove and after the clamp is disconnected (see photo 1), pick up a wrench and use it to completely unscrew the nut and bolt that secure the rear channel to the car door and then remove it (see photo 2).
5) After removing the groove, insert a handle with which you can lower and raise the window of the car, but only the trim and rosette of this handle do not need to be installed, just put one handle in its place and, holding the glass with your hand, lower it to the very bottom until it stops .
6) Next, unscrew the two screws that secure the pressure plate (Indicated by the red arrow), which in turn firmly fixes the cable and does not allow it to go anywhere.
7) When the screws securing the plate are unscrewed and the plate itself is removed, use a wrench to slightly loosen the nut that secures the tension roller (see photo 1), and after loosening the roller will move and thereby the cable itself will weaken a little; after the cable has loosened, you will need to remove it from the tension roller and from the lower roller which is indicated by the red arrow.
 Now use a screwdriver to pry up the chrome inner glass trim and then remove it so that it does not interfere with the removal of the glass; you need to remove it through the top of the car door.
9) And to finish removing the glass, first unscrew the screw that secures the fixed glass to the car door (see photo 1), then completely or just a little (at your discretion) remove the upper seal of the sliding window as shown in photo 2, then tilt the fixed glass forward and remove it and finally lift the sliding glass to the top and tilt it inward, also remove it from the car door (see photo 4).
Rear door side glass
At the back of each side of the Zhiguli there are two windows - movable and fixed. The first is not completely recessed, and the second is a type of window.
How to remove rear door glass
In order to remove the rear side window of a Zhiguli, you will need to take several steps:
- Raise the glass completely;
- Remove the door card;
- Disconnect the drive rod from the guide;
- Unscrew its fastening;
- Lower it down and out from under the counter;
- Move the glass down a few centimeters and unscrew the cable fasteners; Lower the glass all the way down;
- Loosen the cable;
- Remove the cable from the roller and then secure it to the door.
- Remove the glass.
- Remove the seal and unscrew the fastening of the small stand.
- Tilt it forward slightly along with the fixed glass. At the same time, remove the chrome trim on both sides.
Useful video:
Purpose of the windshield and rear glass
Glass is a transparent shield that is mounted in front of the car and protects passengers from air flow while driving. Additionally, this element affects aerodynamics and the final drag coefficient.
Front and rear windows increase torsional rigidity and retain heat in the cabin.
A shield with several layers is called triplex and is installed in the front of the car. A transparent film is glued between the layers of the part, which firmly holds large particles in the event of an accident or a large object. The multi-layer shield ensures the safety of passengers and the driver, eliminating serious injuries from fragments.
The hardened part consists of one layer. It is used for side arrangement and rear shield. The temperature effect increases the strength of the part and prevents the formation of large fragments in the event of an accident. After hardening, high-quality parts are broken into small particles with rounded edges that are not capable of causing injury. You can strengthen the rear panel using a tint film, which will hold the fragments in case of complete cracking.
The evenness and transparency of the glass surface ensure the safety of the driver while driving, and models with protection from ultraviolet rays prevent the interior from quickly heating up in countries with hot climates.
What is required for the work
To replace a defective element on a VAZ 2021 with your own hands, you need to prepare the following tools:
- degreasing and cleaning agent;
- clean cloth;
- a cord with a cross-section of 4-5 millimeters and a length of at least 5 meters;
- assistant, since some operations are performed only by two people;
- new sealing rubber;
- molding.
You need to thoroughly wash and degrease the new product before starting work. This will prevent it from accidentally slipping out of your hands, and will also ensure a tight grip in the rubber groove.
All work should be carried out in a warm, windless place, observing safety precautions when using degreasing chemicals.
Dismantling the lobovukha
Replacing the windshield on a VAZ 2107 will require dismantling the interior decorative trims, as well as the rear-view mirror.
To dismantle a part from a VAZ:
- Wash the car at the car wash and drive it into a warm garage.
- Bend the wiper blades.
- Use a screwdriver to pry up the windshield lock, which is located in the lower frame.
- Remove the wedge molding around the entire perimeter of the glass.
- Gently press on the corners from the interior side to press out the shield, holding it from the outside.
- When dismantling, you need to press the seal with a screwdriver, squeezing it out.
- When removing, it is important to be careful and not to fumble when pulling the part out of the groove. Do not press on the shield as this may cause the part to crack and cause injury to your hands.
Unusable VAZ consumables should be placed on a soft cloth or rubber mat. This will prevent chips in the corners and the appearance of potholes that could cut your palms during subsequent transportation.
Removal
1. We prepare the car for operations (see “Preparing the car for maintenance and repair”).
2. Set the glass to the lower position.
3. Remove the rear door trim in the same way as removing the front door (see “Front door trim - removal and installation”).
4. Remove the protective film of the door.
5. Using a Phillips screwdriver, unscrew the self-tapping screw securing the rear upper guide of the sliding window.
6. Remove the seal from the top of the door frame.
7. Using a 10 mm socket or socket wrench, unscrew bolt A and nut B securing the rear guide.
8. Remove the upper part of the guide from the fixed glass seal.
9. Tilting the upper part of the fixed glass forward, remove it.
10. Remove the seal from the fixed glass.
Attention! Before performing the following operation, it is recommended to note the position of the cable relative to the pressure plate.
11. Using a Phillips screwdriver, unscrew the two screws securing the cable pressure plate to the glass bracket.
12. Remove the plate and lower the glass all the way.
13. Remove the door trim and two chrome trims (see “Front door glass - removal and installation”).
14. Lifting the sliding glass with its bracket and tilting it inward, remove it from the door.
Self-installation
Installing a windshield is not a difficult, but responsible process. Before starting work you need to do the following:
- Wash the surface of the frames and inspect for chips, rust, and abrasions.
- Degrease the surface.
- Place the cord in a new elastic band. The ends of the rope are located along the bottom edge in the place where the lock is located.
- Prepare a new part.
If pockets of corrosion are detected, clean the area with sandpaper, apply a primer and paint over it with enamel. The presence of rust in the contact area is unacceptable: this reduces the strength of the fastener, which is why water may enter the VAZ interior.
Before starting installation work, remove the side trims from the frames and the rear view mirror. This will make it easier to pull out the rope.
- Put on the rubber seal.
- Lay down the rope.
- Carefully attach the part to the frame.
- One person adjusts the position from the outside of the VAZ, and the second carefully pulls the rope into the interior. It's better to start from the bottom edge.
- When pulling out the rope, an assistant adjusts the part and presses slightly towards the seal.
After the seal is in place, the shield will take its position. The windshield frame on the VAZ 2107 is installed in the reverse order. This is where a flathead screwdriver with a large handle comes in handy.
When going around the bottom corners, be careful not to scratch the panel with the cord. After installing the seal on the glass, you can put the rear view glass and decorative trim on the pillars back in place.
To replace the windshield of a VAZ yourself, you will need one assistant, a minimum number of tools and 2-4 hours of free time.
Why did it happen so?
Replacing the cylinder head gasket on a VAZ 2107
Perhaps the automatic requests do not belong to you, but to another user accessing the network from the same IP address as you. You need to enter the characters into the form once, after which we will remember you and be able to distinguish you from other users exiting from this IP. In this case, the page with the captcha will not bother you for quite a long time.
You may have add-ons installed in your browser that can make automatic search requests. In this case, we recommend that you disable them.
It is also possible that your computer is infected with a virus program that is using it to collect information. Maybe you should check your system for viruses.
If you have any problems or would like our support team, please use the feedback form.
You will need: a screwdriver, a blanket (or something similar) to lay under the glass, a piece of cord (preferably nylon slippery) with a diameter of 3.5–4 mm and a length of about 5 m.
Do the work with an assistant.
Pay attention to the marking in the upper right corner of the windshield. Buy new glass with the same markings
Moreover, to avoid buying fake glass, check its strength by rubbing it with a cloth moistened with a solvent. The markings on branded glass cannot be removed, but on fake glass they are often easily washed off.
1. Move the windshield wiper arms and blades away from the glass.
2. Unscrew the three screws securing the decorative trim of the front side pillar of the body and remove it (the right one is shown, the left one is located symmetrically).
3. Remove the rear view mirror (see “Rear view mirrors”).
4. Remove the sun visors and their holders (see “Interior fittings”).
5. Disconnect the front fastening of the right handrail (see “Interior fittings”).
6. Remove the decorative trim for the left ceiling lining mounting.
7. Remove the screw and remove the cover holder.
The pad is held in place by its own elasticity, but it is better to have an assistant support it.
Rear window replacement
The rear window of the VAZ 2107 can be heated or without it. Structurally, the parts are the same, with the exception of contacts that are disconnected before removal. The sizes and shape are the same.
- Using a screwdriver, remove the locks that are installed in the lower corners.
- Remove the wedge cover.
- Press out the glass from the inside.
- Remove the old shield from the posts.
If the shield is firmly in place and is not squeezed out from the inside, you should use a screwdriver to knead the molding along the contour and repeat the dismantling again. Removal is done with an elastic band, this will protect your hands from damage.
Rear part installation:
- Clean and degrease the surface of the frames.
- Install new locks and seals on the glass.
- The rope is inserted along the contour of the elastic band and overlaps at the bottom.
- The glass is applied to the frame and pressed down.
- Carefully pull out the rope, which must be inserted into the rubber edging.
After installation, the locks are latched with a screwdriver and the molding is mounted. All elastic bands and retaining clips are changed completely: this will increase the strength of the fastening.
Installation of new glass
Here you will need the same screwdriver and another 3.5-4 meters of twine. A nylon linen sheet with a thickness of at least 4 mm is suitable. Be sure to take someone to help you - you won’t be able to do it without a helper.
The rope is bent in half - this is how the middle of the segment is discovered. It is placed on top of the outer groove of the seal (there are two of them - choose the one that is located closer to the outside of the front cover). After this, the twine must be pushed deeper with a screwdriver. Work from the center to the sides. Continue in the same way until the rope is in the middle of the bottom of the glass. On the other hand, it is recessed in the same way.
As a result, the ends of the twine will meet at the bottom edge
Here it is important to overlap them (from 6 to 10 cm). Make sure the string is at the very bottom of the groove - just give it a tug and it will fit as tightly as possible
Now place the prepared glass on the hood closer to the bottom of the frame. To avoid forgetting, immediately throw the ends of the rope into the cabin.
The lobovka is placed on the opening so that the lower part of the frame fits into the groove with the twine. Afterwards, all the glass is carefully settled. When you are sure that the element being replaced cannot accidentally come off, proceed to the second stage.
While your partner holds the trap in place, climb into the cabin and begin to carefully pull the twine toward you (keep it strictly perpendicular to the seal). Gradually the edge of the elastic will enter the cabin
Having reached the turn, they again seat the glass lower.
Now you need to go through the corners - on the right the rope is twisted counterclockwise, and on the left vice versa. There is no need to pull the twine - it will come out slowly and without your help. It is not advisable to rush in this section - there is a risk that the seal will sit crookedly.
As the action progresses, the glass must be regularly pressed into the interior - do not knock on it, just gently push it with your palms. When the rope comes out of the groove completely, inspect the elastic from the interior side - sometimes its edge goes beyond its allotted limits and even creeps onto the dashboard. If this problem happens to you, then push the seal into place with a screwdriver.
Finally comes the turn of the last stage - the final seating of the lobovka. This is done like this:
- From the outside, place your palm on the upper edge of the glass strictly within the seal;
- hit it (lightly) with your fist;
- Working from the center to the corners, go all the way.
Sometimes it is discovered that small gaps remain between the frame and the seal - this is due to the excessive hardness of the new rubber band or the shift of the glass. In three or four days everything will fall into place. It will take approximately 3 hours to replace the windshield. To ensure everything goes smoothly, try not to put too much pressure on him and follow the instructions exactly.
Types of glass
The following types are available for sale:
- classic, without darkening;
- with silk-screen printing;
- with spraying.
Factory spraying allows you not to glue the tint film on the rear and side windows, while protecting the interior from sunlight and improving the appearance of the car.
Silk-screen printing along the contour of the shield or in its upper part improves not only the appearance, but is also used as a visor from the bright sun. There are options on sale with images or inscriptions that are applied to the part using spraying.
The grille for the rear window is made of plastic and is attached to the rack using clamps or double-sided tape. The part transforms the car, but reduces visibility in the rear view mirror.
Transparent glass without chips or defects not only ensures an excellent appearance of the VAZ, but also affects the quality of viewing in bad weather conditions. Ease of replacement allows drivers to carry out the work themselves without visiting car repair shops.
Rear window of a VAZ 2107: what is the best way to tint?
If you decide to reduce the visibility of the car interior by tinting, you should be very careful when choosing the method of completing the work. When you need to tint the rear window of a VAZ 2107 yourself, you need to strictly follow the instructions, performing all operations step by step. If you don’t want to bother with film, spatulas and a hairdryer, visit a service station, where the craftsmen will tint the windows, taking into account your wishes and requirements. True, for such work you will have to pay a certain amount, which you can save by performing all the operations yourself.
Content
2 3 Improvement of the VAZ 2107 stove. 4 Caring for the VAZ 2107 stove.
- 4.0.1 Operating procedure.
Despite a decent number of shortcomings, VAZs remain loved by our compatriots. Today, we will tell you how to improve the operation of the stove on the classic. The heater and ventilation provide a favorable atmosphere inside the car. In the VAZ 2107, air is supplied from the street. Air, through gaps in the hood of the car, enters the inside of the car. At the same time, depending on the setting, it heats up or cools down.
The air intake box is located in the rear part of the engine block; the air is purified from moisture. The box is protected from the engine by special (rubber) gaskets. Moisture comes out, and the air flow enters the heating system. The gaps in the box are closed with a special partition (lid). When driving, part of the air flow exits through devices located above the dashboard.
Rules for tinting windows
In order to properly and efficiently tint the rear window of a VAZ 2107 on your own, you must remember several important rules.
- If you are doing tinting yourself for the first time, it is better to purchase the cheapest Chinese film. Whether it is removable tinting or regular tinting, there is no fundamental difference. The main thing is not to buy expensive material until you are sure that you will do the job perfectly.
- The room in which the work on fixing the film will be carried out must be absolutely clean, not dusty, and without drafts. The average garage, where old sofas, fur coats, books are stored and there is a lot of dust, is unlikely to be suitable.
- To work, you will need not only film, but also a lot of tools and materials. It is advisable to purchase them in special stores. Used materials and tools are suitable only for those that do not come into contact with the subject of tinting.
So, to tint the rear window of a car, you will need:
- spray;
- car glass cleaning solution;
- a rubber scraper that will help get rid of microdots on the glass;
- a special hair dryer for smoothing the film;
- film for tinting car windows;
- microfiber cloth;
- sharp scissors.
Sequence of work
How to tint a car window so that the work goes smoothly and the result pleases you? Proceed according to the following instructions.
- Remove the rear window, this will provide you with convenience and quality work.
- Clean the work surface from dust and dirt by washing it with a special solution and wiping it dry with a lint-free cloth.
- Make sure that there is not a single speck of dust left on the surface of the glass.
- Cut the tint film according to your pre-measurements.
- Separate the layers of film using two pieces of tape glued at different levels.
- Apply the film to the canvas and adjust its position. To achieve ideal placement of the film sheet, you can use a soap solution.
- Now it's the turn of the rubber spatula. Tinting the rear window of a VAZ 2107 on your own will work perfectly if you move the spatula in one direction. Use a spatula until all air bubbles are out of the contact area between the glass and the film.
- Use a hair dryer to shape the film at the curves.
Percentage of light passing through film
Remember: the film is glued from top to bottom. It dries in about three days. During this entire time, the material must not be touched with hands, so place the car where no one can touch the glass, even by accident.
Tinting the rear window of a VAZ 2107 with your own hands will be much easier if you use a removable film instead of a regular film. This film adheres to the glass using static energy, does not impede the movement of the side windows, and can be removed and reapplied if necessary. It has significant advantages, because condensation does not accumulate under it. Removable tinting is also performed in conditions of perfect cleanliness.
Tinting the rear window of a VAZ 2107 on your own is not an easy procedure, but not extremely difficult either. With a minimum amount of knowledge and skills, and a good amount of patience, every car enthusiast can perform tinting without problems. Skillful hands, a bright mind and a good mood are the main components of high-quality work with any car!
How to apply tint yourself
The tint coating should only be applied to clean glass. If work is carried out indoors, there should be no dust in it. Polluted air is one of the reasons for the appearance of bubbles. If you perform the steps without removing the glass, then the interior should also be clean.
If, due to complexity, you want to refuse a job, you always have the opportunity to contact the service. In addition to the fact that the window should be smooth, you should remove everything unnecessary from it, for example, the antenna.
What you will need
Before work, you need to prepare tools and material. Among everything you may need, consumables should not be neglected.
- Tinting film. The quantity should be enough for the side windows, as well as the front and rear glass.
- Rubber spatula and plastic scraper.
- Shampoo.
- Spray.
- Stationery knife with a retractable blade.
- Lint-free cloth, dry.
- Clean and warm water.
- Home or technical hair dryer.
Also, before work, the material must be prepared. Cutting out the film is not a difficult task, and involves cutting out pieces that will be 2-4 centimeters larger than the size of the surface to be tinted.
Car preparation
The next stage is preparing the machine itself. For quality work, be sure to wash the car and workplace
Even grains of sand can cause defects during operation, so attention to detail is worth paying attention to. The film should only be applied to a clean surface and in clean conditions. Therefore, car windows must first be washed on both sides using a special cleaning solution.
Therefore, car windows must first be washed on both sides using a special cleaning solution.
Even after washing, when wiping the car with a soft cloth, you must make sure that no lint remains on it - you cannot glue the tint material without bringing the coating to perfect cleanliness. Work should begin with the side windows.
Only after pasting them over can you gain experience and begin working on the rear and front glass. Then the process can go in two directions - removing the glass or not removing it. The most convenient way is to remove the glass; the effect of this is much higher, although it forces you to tinker, doing extra work.
We make the film ourselves
The advantages of tint film have already been described in detail, but the question remains: how and what is it made from? The production of car tinting is based on polyester material. The base for production must be of high quality, and very few companies produce such polyester. The classic film consists of several balls. The thickness of each is 20 microns. The manufacturing technique is quite complex; the layers are rolled at a certain temperature.
It is very important that when used, the film does not distort the appearance of things and the interior. To achieve this, much attention is paid to the uniformity of the physical indicators of the base in its different sections. This property allows the film to be glued to any type of glass.
This property allows the film to be glued to any type of glass.
You can also tint your car at home. However, it is not possible to create a high-quality product that will meet modern norms, standards and operational requirements. Tinting film is made using temperature and chemical composition in a factory; recreating the process at home can be an impossible task.
Pasting technique
The methods for gluing the coating to the side, front and rear glass are not much different. Experts advise starting with the sides. Only then, having gained experience, can you begin to apply coating to the rear and windshield.
Before starting the procedures, the side windows are washed with water and a scraper, and then wiped with a rubber pad. The edges are wiped with a napkin, and hands are washed with soap before the second part of the work. The glass is moistened with soapy water, and the protective coating is removed from the pattern. The adhesive part is wetted with the solution, as are the fingers. The film is carefully applied to the glass, the absence of gaps is checked and how smoothly the applied material fits. Excess water is removed. Drying too hard can scratch the coating. Water is removed with progressive movements from the center to the edges.
The upper part of the film coating is fixed a little later. The remaining part is also moistened with soap solution. The film is tucked under the lower seal; kinks should not be allowed. The remaining liquid is removed from under the film with a hairdryer and distillation. There should be no water bubbles after finishing work. They can be removed almost immediately after applying the tint by walking over the glass with a rag or soft cloth.
Replacing the windshield of a VAZ 2107
Poor road surfaces are not only those roads that have potholes, but also those that have small pebbles. Experienced motorists know how dangerous even the smallest pebble can be if it flies out from under the wheels of an oncoming car. A small pebble that cuts into the windshield will cause a chip or small crack, while larger ones can cause a large portion of the glass to crack. It is not only impossible to operate a car with a cracked or broken glass, but it is simply impossible to do so. Cracks constantly distract the driver from the road, which can cause an accident. Even a small crack on a car windshield, as a rule, over time turns into a large one that runs across the entire surface of the glass, which entails the need to replace the product.
What is required for the work
If you decide to replace the windshield on a VAZ 2107, then, first of all, you need to purchase a new product. In addition, you will need to stock up on the following tools and materials:
- screwdrivers;
- textile;
- cord with a diameter of about 4 mm and a length of 5 m.
It is almost impossible to replace the windshield on a VAZ 2107 yourself, so you will need an assistant. You can ask a friend or family member. Next, let's find out where to start.
Removing the product
Before proceeding with the dismantling of a cracked product, a thorough inspection of the new one is required. Of course, this should have been done in the store, but a second inspection never hurts. Now you can begin the process of dismantling the product:
- Initially, you need to remove the lock from the spacer wedge located in the middle of the glass from the bottom. The process is performed using a flat-head screwdriver.
- After this, it is necessary to remove the wedge-shaped rubber insert. This is not difficult to do; to remove it you will need to walk around the entire perimeter.
- Place fabric on the hood. The softer the fabric, the better.
- After this, it is necessary to squeeze out the glass from the interior side. It is necessary to press on the upper corners of the product. An assistant must hold the glass from the back of the passenger compartment so that after squeezing it out, it does not fall on the hood. At the same time, do not forget to remove the wipers so as not to damage them.
- After removing the product, you need to remove the rubber seal and clean the installation groove on the car body. You can use a degreaser for cleaning. The presence of rust is unacceptable, so if necessary, areas of corrosion should be cleaned and painted over.
This is how the windshield of a VAZ 2107 is removed. After dismantling the product, the trim should be removed from it. Now you can proceed to installing the product.
Tuesday, February 19, 2021
How to remove and insert the windshield of a VAZ-2107
The windshield is removed when it is replaced, to clean or replace the seal, or to treat the body if corrosion occurs. We will need:
- Screwdriver flat and Phillips
- Blanket or similar
- Linen cord 5-6 m long, 3.5-4.0 mm in diameter
We move the windshield wiper arms with the brushes away from the glass. To facilitate dismantling, we remove the decorative edging and, if necessary, replace it with a new one after all the work.
We remove the decorative trims of the front pillars; it is not necessary to remove the remaining elements of the interior. Carefully use a screwdriver to pry up the seal in the upper corner of the glass from inside the passenger compartment and move it behind the body flange.
!If the glass has chips, cracks or other damage, you should work very carefully! By squeezing the seal with your fingers and simultaneously pressing on the glass, we remove its upper corner from the body opening, moving towards the opposite corner. We remove the top and side parts of the glass and remove it along with the seal and place it on a blanket.
We remove the seal, clean all grooves from dirt and rust, and wash them in soapy water. We clean and wipe the edge of the glass.
We clean the two drainage holes in the lower corners of the seal.
If mechanical damage or loss of elasticity is detected, the seal must be replaced. We clean the body opening from dirt, and if there is corrosion, we carry out paint and varnish work.
We put the seal back on the glass.
We insert the edging into the seal (it can be installed after installing the glass).
We insert the cord into the groove of the seal, with which it fits onto the flange of the body opening so that in the lower part of the glass the cord overlaps by about 20 cm and there are still free ends of 30-50 cm.
We attach the ends of the cord with tape to the inside of the glass.
To make work easier, you can lubricate the edge of the seal and the cord with soapy water. We insert the glass into the opening so that the groove of the seal where the cord exits fits onto the lower flange of the opening, and the ends of the cord are inside the body.
Slowly and carefully pulling out one end of the cord, and pressing the glass against the opening on the other side, we move the edge of the seal through the flange of the opening. If necessary, adjust the seal with a screwdriver.
We perform a similar operation alternately with the other end of the cord until it completely comes out of the groove in the middle of the upper side of the glass. We make sure that the edge of the seal has completely passed the flange and has no curls.
Align the seal from the outside along the perimeter of the glass, lightly tapping it with the edge of your palm. We make sure that the drainage holes in the seal coincide with similar recesses on the body.
We install the edging lock-plate.
We put the removed trim parts back in place.