The crankshaft position sensor of an internal combustion engine is necessary to determine when a current pulse is supplied to the spark plugs. If the sensor does not work correctly or is broken, the engine does not start or stalls when trying to start moving. The sensor is the only component of the electronic powertrain control system, without which the engine cannot function.
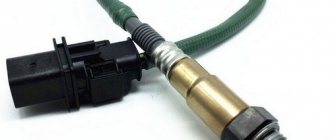
Crankshaft position sensor device.
What is a crankshaft position sensor
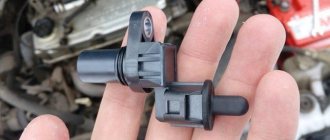
The classic sensor has a body of complex geometric configuration, made of chemically inert, heat-resistant plastic. The structural elements are filled with a compound that protects the parts from vibration and the effects of fuel vapors, engine oil and road reagents.
The housing has a hole with a metal sleeve that allows you to attach the sensor to the engine crankcase and send a negative power signal from the car body.
Purpose of the element
A car owner who independently maintains or repairs equipment should know why a crankshaft position sensor is needed. The element is designed to constantly determine the position of the pistons in the cylinders based on the angle of rotation of the crankshaft. The sensing element is connected by a wiring harness with a sealed connector to the motor control unit.
Signals from the sensor allow (directly or indirectly):
- supply current pulses to the spark plugs in a timely manner;
- adjust the ignition timing;
- change the duration of fuel injection;
- adjust the camshaft position (on engines with a variable valve timing system).
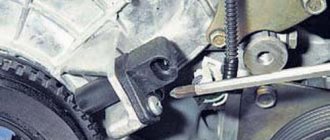
Crankshaft sensor location
If you have difficulty starting the engine, you need to check the condition of the sensor. The driver or technician should check where the crankshaft speed sensor is located.
The crankshaft position sensor is located on the flywheel housing of the car engine.
On most engines, the product is attached to the crankcase near the pulley. On some cars (for example, on the Nissan Laurel C35), the element is located on the gearbox bell and determines the position of the crankshaft along the flywheel ring gear.
How the device works
The operating principle of a classic inductive sensor is based on electromagnetic induction. A metal disk located on the toe of the crankshaft rotates, alternating protrusions and depressions causing jumps in the magnetic field around the magnetized core. A current is induced in the DPKV winding, which is recorded by the control unit and used to calculate operating parameters.
DPKV location
Even with a dense arrangement of components and assemblies of the car under the hood, manufacturers try to ensure the availability of DPKV for quick replacement on the road. Therefore, understanding where the crankshaft sensor is located is quite simple:
- it is located between the generator pulley and the flywheel;
- the wire is long enough to easily connect it to the on-board network;
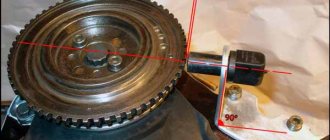
- There are adjusting shims on the seat to set the gap to 1 - 1.5 mm.
Crankshaft sensor location
Thanks to the turnkey head, even a novice driver can remove the sensor.
Types of DPKV
Sensing elements found in electric or piston engines include:
- using the Hall effect;
- working on the principle of induction;
- equipped with optical elements.
Types of crankshaft position sensors.
Hall Sensor
The speed sensor is based on a Hall chip located in a housing with magnetic cores. The rotating disk has magnetized protrusions; in the absence of rotation, the output current is zero. When turning the disk, an alternating voltage is generated, which is recorded by the controller. The element provides increased measurement accuracy, has a complex design and requires power from an external source to operate.
Magnetic
The timing sensor has a magnetized core around which a coil is mounted. When the disk with protrusions rotates, current pulses are formed in the winding, which are amplified and processed by the control unit.
The product has a simple design, is not afraid of dirt or vibration and does not require power supply.
Optic
To operate the product, you need a light flux emitter and a receiver, between which there is a perforated disk. During rotation, the beam is periodically interrupted, which causes the formation of a voltage pulse. The controller program takes into account the number of signals per 1 revolution of the crankshaft, which allows you to accurately determine its position. It is not used in automobile engines due to sensitivity to pollution.
Basic faults
Traditionally, for most on-board electrical appliances, some symptoms of a crankshaft sensor malfunction are determined visually. For example, if the Check light on the dashboard lights up, the driver has a device to read the error code, the controller will show a count of 19 or 35.
Much more often there are other malfunctions:
- spontaneous engine shutdown;
- no startup;
- emergency operation of nozzles/injectors twice as often as scheduled (failure of the air flow control valve).
One of the methods available for self-diagnosis in this case is “diagnosis” with a tester. The internal resistance of the sensor winding should be within the range of 500 - 800 Ohms.
Repair may be required if there is mechanical damage to the device. For example, if dirt or foreign objects get on the surface of the flywheel crown, the signal will be distorted by them.
The sync dial may accidentally become magnetized during diagnostics. In this case, the repair consists of demagnetization using a special technique using a transformer at a service station.
If the coil winding resistance does not meet the specified parameters, the car owner usually finds out about this by indirect signs:
- revolutions jump randomly;
- the dynamics of movement disappear or the power of the internal combustion engine is lost;
- at idle speed “floats”;
- detonations occur during operation.
Attention: Since these malfunctions can be caused by other reasons, it is better to visit a service station for computer diagnostics. As a last resort, you should check the crankshaft sensor using available methods.
Main symptoms of a faulty crankshaft sensor
The ability to start the power unit depends on how the crankshaft position sensor works. Periodic failures lead to increased fuel consumption or failures when attempting to accelerate. Since cars with electronic engine control are equipped with a diagnostic unit, if parts fail, an error code is entered into the controller’s memory (the type depends on the car manufacturer).
Signs of malfunction indicating a possible breakdown of the crankshaft sensor.
Loss of engine power
If the sensor does not work correctly, the engine may start, but when trying to accelerate, failures occur periodically. Some owners note that the malfunction occurs only when the gas pedal is pressed sharply. Other drivers pay attention to the appearance of engine detonation at high speeds, indicating an incorrect change in the ignition timing.
Similar problems arise when the throttle position sensor fails; only computer diagnostics can determine the faulty components.
Increased fuel consumption
Incorrect control signals lead to the supply of additional fuel through the fuel injector nozzles. Excess gasoline makes starting difficult and enters the cavity of the catalytic converter, causing accelerated wear of the honeycomb filler. The Check Engine light located in the instrument cluster may flash or turn on. Some owners note “shots” into the exhaust manifold when the engine is running, which occurs due to an incorrect ignition timing or an excessively rich working mixture.
Errors appear
Any electronic malfunction is recorded by the control unit in the form of a code, which can be read and deciphered by a diagnostic scanner connected to the OBD-II connector. In Russian-made cars (VAZ or GAZelle) or on the French Peugeot EP6 engine, an error of the type P0336 is recorded in the memory, indicating that the signal is outside the permissible limits. Indication P0335 may appear, signaling an incorrect determination of the number of teeth on the disk per 1 rotation of the crankshaft. The problem occurs when the harness or contacts are damaged.
Sparking
A small spark may occur at the site where the cable insulation breaks, causing damage to the metal core. The flash can only be noticed in the dark in a narrow speed range; the symptom does not closely match the sign of a breakdown of the crankshaft position sensor.
Engine failure
If the sensor coil breaks, the engine stops and it is impossible to start the power unit with the starter. There have been cases when the motor gives occasional flashes or starts to work, and after 1-2 seconds it stalls.
Crankshaft sensor failure. What happens to the car?
- The most truthful fact of the breakdown of this device is engine failure . It just won't start. This happens due to untimely supply of the fuel mixture, and incorrect choice of the moment of its ignition.
- Detonation disorders in the engine , leading to rapid wear of a number of parts and the engine itself. This is especially evident when the load increases (for example, driving up a hill at low speeds).
- Unstable operation of the engine in idle mode (spontaneous drop or increase in speed). The engine stalls during short stops (under traffic lights), or at full speed.
- Jumping, randomly changing speed when driving.
- Loss of power.
- The dynamic performance is noticeably reduced .
- There is a problem with starting the engine. It either stalls immediately or won't start at all. The spark may fire intermittently or not fire at all.
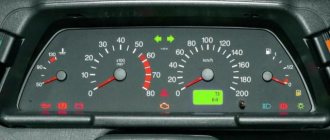
- «CHECK ENGINE» on the instrument panel.
It should be understood that failure of the DPKV leads to the loss of the ECU’s ability to set the correct characteristics of certain processes:
— accurately calculate the volume of a portion of the fuel mixture for injection into the engine fuel line
— determine the exact moment of ignition of the mixture in the combustion chamber
- change the camshaft angle
- detect the fact of ignition
Causes of problems with the crankshaft sensor
Common causes of incorrect operation of the crankshaft position sensor:
- Increasing the distance between the core and the disk. The parameter is 0.5-1.5 mm and is determined by a rigidly installed guide pin or a set of replaceable washers. When carrying out repair work or under the influence of vibrations, the gap is violated, which leads to interruptions in the operation of the sensor. The problem is aggravated by a coating of oily dirt; the current pulses become weak and are not picked up by the controller.
- Damage to the connecting harness or oxidation of contacts under the influence of road reagents or condensation. If the integrity of the insulation is violated, the wire may short-circuit to the car body.
- Broken winding of the coil located inside the induction sensor. The cause of failure is vibration or moisture penetration through a poorly filled compound. Water and reagents can damage the core, resulting in sensor failure or floating fault.
- Damage (cracks, bending or loss of a fragment) of the metal disk attached to the shaft toe. The rotating element may have a section without 1 tooth, which is provided by the design and determines the moment of passing the dead center in the first cylinder. On a number of engines, the pulley and disk are installed through a rubber torsional vibration damper; when the coupling breaks, the marks shift.
Methods for diagnosing DPKV
When determining the serviceability of the crankshaft position sensor, we are guided by the principle - from simple to complex. In other words, first an inspection, then checking the characteristics with instruments (ohmmeter, oscilloscope or computer). The absence of moving parts and the simplicity of the design of the element make it a fairly reliable part. Therefore, the crankshaft sensor in rare cases becomes unusable on its own. Most often, it receives mechanical damage during repair work under the hood of a car or as a result of foreign objects getting between the sensor and the gear wheel.
Before you begin diagnosing an electronic component, you need to note its original position on the motor. After dismantling, the device is checked for defects in external surfaces. If the DPKV is dirty or has corrosion on the contact group, then it must be cleaned with alcohol. If the inspection shows no defects, it can be diagnosed using special instruments. It is advisable to carry out the test using a multimeter, which can be switched to different modes.
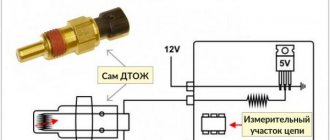
Ohmmeter test method
This method is simple and accessible, but does not guarantee detection of a breakdown. It is used to measure the resistance of the coil. To do this, it is enough to simultaneously touch the coil terminals with the probes. The polarity of the touch is not important in this case.
The resistance value depends on the characteristics of the coil and is usually in the range of 500-700 Ohms. To determine the resistance value of your sensor model, you need to look in the description of the DPKV or search on the Internet.
The multimeter is used as follows:
- We set the measured parameter (resistance) in a range close to the measured value, but not lower.
- We touch the ends of the sensor with the probes and look at the readings.
If the indicators are close to the standard values, then the coil is working properly. The disadvantage of this method is that it does not always indicate a faulty crankshaft sensor. Therefore, it is advisable to check using other methods.
Checking inductance values
When excited, all coils display an inductance indicator, including the coil located in the crankshaft sensor housing. The diagnostic method boils down to measuring this indicator.
When checking inductance, you must have a megohmmeter, a network transformer, an inductance meter and a voltmeter. To determine the indicator, carry out the following steps:
- Use a multimeter to measure the inductance of the coil (standard values are in the region of 200-400 mH).
- Using a megohmmeter, measure the resistance of the insulating layer between the ends of the DPKV (the data should be above 0.5 MΩ).
- A network transformer is used to demagnetize the sensor coil (deviations indicate the need to replace the part).
Video: Checking DPKV, it couldn’t be simpler. Injector diagnostics.
Diagnostics using an oscilloscope
The most advanced and accurate method of determining the health of a part is checking with an oscilloscope. Diagnostic work is carried out with the power plant running.
You can also use an oscilloscope to check serviceability on a dismantled crankshaft sensor. This requires an electronic oscilloscope and special software. In this case, the check is carried out according to the algorithm:
- Probes must be connected to the terminals of the crankshaft position sensor;
- Launch the software;
- Move any metal object near the part.
If the sensor is working properly, a graph is constructed on the device screen based on the DPKV readings.
If the part reacts to the movement of a metal object, then it is working. But the result of checking it on a running internal combustion engine will be more accurate.
The simplest, most reliable and fastest way to determine the performance of the DPKV is to install a known-good synchronization sensor in place of the one being tested. And if the problems with the car disappear, then the conclusion is clear - the part is faulty and needs to be replaced.
When installing, you should take into account the correct installation: maintaining the required gap between the DPKV and the flywheel. You can find out this indicator from the instructions for the sensor or from the Internet, but on average it is 0.5-1.5 mm.
How to check the crankshaft sensor
To check the status of the sensor use:
- test instruments (resistance meters or diagnostic scanners);
- laboratory equipment that allows you to determine the inductance of the product;
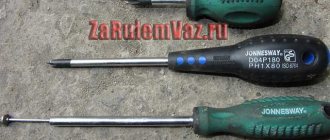
- available tools (for example, a wrench or a screwdriver).
Using an ohmmeter
The basic method is based on checking the integrity of the coil with a test device switched to resistance measurement mode. It is necessary to disconnect the plug, connect the probes to the contacts and test the circuit.
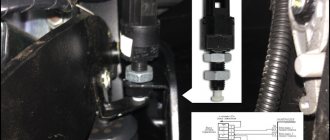
You can check the crankshaft sensor using an ohmmeter.
Before starting work, it is recommended to find out the operating parameters of the sensor; when testing most models of working sensors, the ohmmeter will show from 550 to 750 Ohms. If the value is above or below the tolerance range, then the sensor is faulty. Measuring the wire insulation should display a value of about 0.5 MOhm, which indicates no breakdown.
Diagnostic scanner
Before checking the crankshaft sensor with diagnostic equipment, you need to locate the OBD-II connector. The plug is located under the instrument panel cover, in the glove box or under a cover on the center console.
The scanner will read the memory of the control units and display the detected codes on the screen; decoding will allow you to determine the cause of the malfunction.
Inductance parameters
In laboratory conditions and at large service stations, sensors are checked using an inductance meter. The product is removed from the car and installed on a stand that simulates engine operation. The sensor is considered operational when the inductance ranges from 200 to 400 mH. At the same time, the coil resistance is measured; winding breakage or breakdown to the housing is not allowed.
Using an oscilloscope
To check using an oscilloscope you must:
- Install the device in the engine compartment or on a stand next to the car.
- Connect the probes to the sensor connector without violating the integrity of the insulation and rubber seal.
- Start the engine, an oscillogram of the current pulses will be displayed on the oscilloscope screen. Check the performance of the sensor under various loads and compare the graph with the base curve. If dips or deviations are detected, the sensor is considered faulty and must be replaced. The procedure is carried out in service centers that have similar equipment. An oscilloscope is rarely used at home.
An oscilloscope will help determine the performance of the DPKV.
Checking with a multimeter
To check with a multimeter, you need to set the device to resistance detection mode. The crankshaft sensor should be removed from the engine or the cable should be disconnected from the vehicle's on-board network.
Before starting work, you should check the pinout of the plug and then connect the probes.
If the parameter corresponds to the norm, then the winding is considered to be in good condition. For additional verification, it is necessary to hold a metal object near the core, simulating the rotation of the disk. The resistance will change, which is an indirect symptom of the correct operation of the crankshaft position sensor.
An additional test involves measuring the voltage between the sensor outputs. The test device is switched to voltmeter mode and connected to the block, and then the engine shaft is turned with the starter. A working sensor will show a voltage of at least 0.3 V (the parameter depends on the manufacturer). Otherwise, it is necessary to check the connecting wiring or install a new DPKV.
Using a multimeter, measure the resistance of the crankshaft sensor winding.
wrench
For a quick check, you can use any steel object (for example, a wrench or a screwdriver). You should remove the sensor from the mounting socket, turn on the ignition system and bring the tool to the core several times. With each contact, a whirring sound will be heard from the electric fuel pump located in the tank. To improve audibility, you will need to recline the back row of seats and a layer of carpet, in some cases you will need the help of a second person.
Verification methods
The symptoms described above may be signs of a malfunction of more than just the crankshaft sensor. Such symptoms also apply to spark plugs, displaced marks in the timing belt assembly, high-voltage wires, and ignition coil. Here it is important to know how to test the controller.
Checking the DPKV will help make sure that the fault is in it, and not in a skipped timing belt or a dirty engine throttle valve.
There are several diagnostic methods. Since most DPKVs are inductive, we will consider testing just such a controller on the shaft.
wrench
If the engine does not start and there are no measuring instruments or service stations nearby, you can check the position sensor with a wrench. For this method it is good to have a second person as an assistant:
- Open the hood and unscrew the sensor fixing bolt.
- Take the DPKV out and clean it of dirt.
- Turn on the ignition.
- Remove the cushion on the second row of seats so that you can better hear the operation of the fuel pump in the tank.
- Without removing the contact chip, apply a wrench to the end of the sensor.
- The second person should at this moment hear the fuel pump turning on.
Troubleshooting solutions
The car owner can correct the breakdown by:
- remove dirt with an organic solvent and a soft brush;
- checking and restoring the electrical wiring harness and connector;
- installation of a new DPKV that matches the characteristics of the standard element.
Cleaning the crankshaft sensor
One of the common causes of failure is dirt getting on the core and disk. A thick layer of oil and dust worsens working conditions, which leads to erroneous determination of the crankshaft rotation angle.
The crankshaft sensor should be cleaned periodically.
For washing, use gasoline and a soft brush or napkin, which is used to gently wipe the structural elements. If the procedure does not restore functionality, then the sensor is faulty and requires replacement.
At the same time, you should inspect the disk; damage or wear of the teeth is the cause of incorrect operation of the sensor.
Broken contact
Due to vibrations, damage to the wiring is possible; the cable life is affected by the location of the plug relative to the sensor body. If the tension is excessive, the thin copper strands break and the signal from the sensing element does not reach the control unit.
You should check the wires with a tester, determine the faulty area and carry out repairs. If a break occurs in the sensor housing, you will need to purchase and install a new DPKV.
Contact processing
The cause of the malfunction may be moisture or road reagents that have gotten into the connector. To restore functionality, disconnect the wire; to simplify maintenance, you can remove the sensor from the engine.
Metal contacts are cleaned with a special spray that dissolves dirt and traces of corrosion, and also prevents moisture from settling during further use. If the seal that is responsible for the tightness of the connector is torn, you will need to install new plugs or change the DPKV.
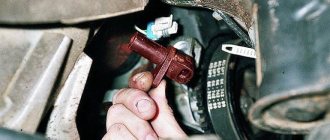
Complete sensor replacement
If irreversible damage occurs (for example, destruction of the housing or breakage of the winding), then the element will need to be replaced. To remove it, you need to unscrew the nut or bolt securing it to the crankcase or bracket, and then disconnect the electrical wiring plug. You can change the sensor in a garage in 10-15 minutes; no special tools are required. A new element is selected from manufacturers' catalogs, and assembly is carried out in the reverse order. The gap between the core tip and the disk is set automatically; no adjustment is required.
Trouble-shooting
The check may show the inability of the electric sensor to detect the condition of the crankshaft. In this case, if the failure of the DPKV is confirmed, it will need to be replaced with a new one. But if the breakdown happened on the road and the nearest car shop or service station is far away, you can try to find and fix the problem yourself. Sometimes the problem lies not in the coil of the induction device, but in the contacts.
Cleaning from dirt
For example, a common problem is contamination of the working part with grease from the flywheel. The latter flies onto the sensor and covers it with a thick layer of dirt. Dust and sand, as well as metal shavings, stick to the top. All this creates interference with the operation of the element. In this case, you will need to unscrew one or two holding bolts, remove the DPKV out and thoroughly wipe its body protruding after the stop. Then return the device back and try to start the engine again.
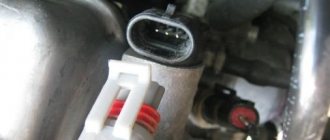
Dirty PCV sensor
Broken contact
Another common problem is a broken wire. It often happens before the contact chip. At this point the wires bend, which leads to gradual refraction. Visually, a violation of the integrity of the conductor may not be noticeable, since the outer insulation remains intact.
To resolve the problem, remove the connector and pull the contact pins lightly towards you. The tattered one will come out and remain in your hands.
Repairs will require stripping the insulation and tying off the exposed ends. Then the area is insulated (you can use cambric or electrical tape). But this measure is temporary and will require subsequent soldering.
Contact contamination
Although the connector is protected by a rubber seal, it gradually loses elasticity and tightness. Because of this, moisture and dust penetrate inside. The corrosion process begins. The contacts oxidize and the circuit is interrupted. As a result, a serviceable DPKV ceases to detect the condition of the crankshaft and the engine stalls.
Dirt on DPKV contacts
To solve the problem, try cleaning the contact pins. They are located in the recesses and can be reached with a thin file or sandpaper rolled into a tube. Blow out any dust that has accumulated inside, restore the connection and try to start the engine.
Related Issues
If the DPKV “rings” and there is no violation in the integrity of the contacts, the breakdown may be associated with missing teeth on the flywheel. The electric sensor simply “confuses” the ECU, responding to additional “tags” formed. Only a mechanic at a service station can determine this. To repair, you will need to replace the flywheel crown.
The MAF (determines the mass air flow) also affects the operation of the DPKV and causes deviations in the readings. The problem is diagnosed in the service.
A figure-eight bend of the flywheel can mislead the crankshaft electric sensor, and this will require removing the box and replacing the deformed part.
Source