Replacing brake pads on a VAZ 2107
The timeless “classic”, although left behind the Togliatti assembly line, continues to be in demand on the secondary market.
The secret is simple - the car is extremely cheap, and its maintenance can be done almost entirely on your own due to its extreme simplicity (if not to say primitiveness). Changing the brake pads on a VAZ 2107 with your own hands, as on any other car of the “classic” family, is not difficult.
The only problem that may be encountered is corrosion of the joints, which can be solved with a regular penetrating lubricant such as WD-40.
What to do with classics and Niva
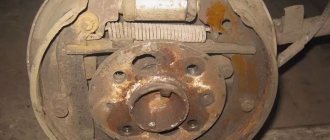
On the “classic” VAZ, problems often arise with the rear disk units, since the drive here is from the rear wheels, and they are more loaded. Let's figure out how to remove a defective brake drum on a VAZ 2107.
We will need:
- wrenches;
- jack, wheel wrench;
- rubber hammer;
- penetrating lubricant "VD".
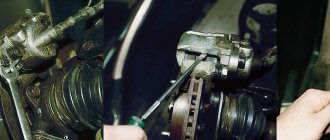
- First of all, we jack up the rear on both sides, make linings and remove the desired wheel.
- We treat the connections of the studs and the assembly to be dismantled with penetrating lubricant.
- Unscrew the guide pins.
- We start the engine, accelerate the rear wheels to speed 4, then apply sharp braking.
- The disk element should break free.
- Turn off the engine and knock down the part with a rubber hammer.
This instruction is relevant for all modifications of the “classics”. Therefore, if, for example, it is not clear how to remove a defective drum on a VAZ 2106, you need to contact her. She points out one of the tricky ways to remove a part. Next we will consider a slightly different method.
More precisely, we’ll figure out how to remove a defective brake drum on a Niva. To do this, let's take:
- jack, wheel wrench;
- set of sockets and keys;
- two long bolts of suitable diameter;
- penetrating lubricant "VD".
Signs that replacement is needed
The brake drum must be replaced when signs of deformation or cracking of the part appear. Another reason for replacement is wear on the drum walls. To check this, you need to get to the working surface of the part and check the internal diameter. The latter increases as the drum wears out. The maximum permissible internal diameter is 251 mm. If the measurements give a higher value, the drum needs to be replaced immediately. To do this, you need to know how to remove the brake drum of a VAZ 2107. Significant wear on the working surface of the drum also makes it difficult to remove it from the hub. This is due to the appearance of a lip along the edge of the inner surface of the drum there. The brake pads grind down the working surface, and in the place where they do not contact the drum, the metal remains intact. Over time, the difference in diameters becomes so large that when the drum is removed, the side clings to the brake pads.
Useful tips
Finally, we will give some tips regarding replacing drums:
- Nowadays this part is often offered, made of aluminum. In fact, there is no practical sense in such a replacement;
- When you have the drum removed, do not press the brake pedal. This will damage the slave cylinder.
As you can see, there are no special rules or difficulties here. Knowing how to remove the brake drum on a VAZ 2107, you can easily complete this job, saving on a trip to a car service center. When performing any repairs, always check the operation of the brakes after completion; this must be done.
Removing the brake drum VAZ 2107
Before removing the drum, you must hang the car or the rear wheel on which you want to remove the drum, and be sure to lower the handbrake lever. If the work is not done on a lift, it is necessary to put shoes under the wheels so that the car does not roll or fall off the jack. Otherwise, you can not only damage the jack, brake mechanism or car body parts, but also cause serious injury.
When the car is raised and secured, the further sequence of operations is as follows:
- Remove the wheel from the car.
- Using a spanner or regular wrench, unscrew the guide pins, which act as fastening the drum to the wheel hub.
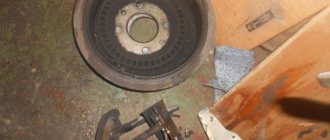
- Remove the drum evenly, without distortions, pulling it off the hub and pads.
Note: if the drum cannot be removed, you can use an improvised puller made of two M8 bolts. To do this, you need to insert them into the holes on the drum and screw them in smoothly. Resting against the hub, they will push the drum out of its seat. This should be done carefully, as there is a possibility that the lip on the inner surface of the drum will damage the brake pads.
Causes and signs of rear brake failure
The rear brake mechanism of the VAZ 2107 has one extremely unpleasant feature: it easily overheats. This is due to the design of this mechanism, which is very poorly ventilated. According to the manufacturers, the rear brakes of the “Seven” can be guaranteed to last 60 thousand km without repair, while the front brakes can only last 30 thousand km. In practice, due to the above overheating, the mileage of the rear brakes is slightly lower, about 50 thousand km. After this, the driver will inevitably have to deal with the following phenomena:
- the pads in the brake mechanism wear out partially or completely, and wear can be observed on one side or on both;
Rear pads are worn down almost to the ground - the seals in the working cylinder crack due to high temperature, as a result of which the tightness of the device is broken, which leads to brake fluid leaks and a sharp drop in braking efficiency;
- the return springs in the brake mechanism rust heavily (in especially severe cases, one of them may break, which can lead to the rear wheel jamming);
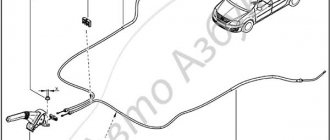
- The handbrake cable wears out. When the cable wears out, it stretches and begins to sag a lot. As a result, after putting the car in handbrake, the brake pads put much less pressure on the drum wall, and the rear wheels are fixed very precariously.
Taking into account all these points, it is strongly recommended to check the rear brake mechanism every 20 thousand km and, if necessary, carry out its maintenance. Particular attention should be paid to the rear brakes if the following warning signs appear:
- when braking, a strong vibration of the car appears, which the driver feels literally with his whole body;
- after pressing the brakes, a strong squeaking sound occurs, which over time can turn into a deafening grinding sound;
- when driving there is a strong “beating” of both the steering wheel and the brake pedal;
- braking efficiency has dropped significantly, and the braking distance has become much longer.
All these signs indicate that the brakes need urgent repairs or serious preventive maintenance. It is absolutely forbidden to drive with such brakes.
Brake drum cracks
Cracks are a real scourge of all brake drums, not only on “sevens”, but also on many other cars with drum brakes. The vast majority of the warning signs listed above appear precisely after the drum cracks. This happens especially often with cast iron drums. The fact is that cast iron is an alloy of iron and carbon, which contains more than 2.14% carbon. Carbon gives cast iron incredible hardness, but it also makes cast iron brittle. If the driver does not have a careful driving style and really likes to ride with the breeze over potholes, then cracking of the brake drums is only a matter of time.
Drum crack caused by metal fatigue
Another reason for drum cracking is so-called metal fatigue. If a part is subjected to cyclic alternating loads for a long time, accompanied by an abrupt change in temperature (and the brake drum operates precisely under such conditions), then sooner or later a fatigue microcrack will appear in such a part. It is impossible to see it without an electron microscope. At some point, this crack propagates deep into the part, and the propagation occurs at the speed of sound. As a result, a large crack appears, which is impossible not to notice. A cracked drum cannot be repaired. Firstly, welding cast iron in a garage requires special equipment and skills, and secondly, the strength of such a drum after welding will be significantly reduced. So the car owner has only one option: replace the cracked brake drum with a new one.
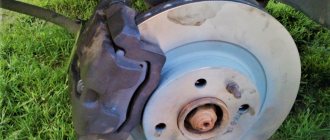
Wear of the inner walls of the drum
Wear of the inner walls of the drum is a natural process, the results of which are clearly visible after the car has covered the above-mentioned 60 thousand km. Since the inner walls of the drum are periodically subjected to the frictional force created by the friction linings on the brake pads, the inner diameter of the drum inevitably increases over time. Braking efficiency is reduced because the brake pads are less pressed against the drum. The effects of normal wear are eliminated by regrooving the brake drum and then adjusting the brake mechanism to ensure proper contact of the pads with the inner walls.
Grooves on the inner surface of the drum
The appearance of grooves on the inner surface of the drum is another common problem that owners of “sevens” often encounter. The fact is that the rear brakes on the “seven” are designed in such a way that dirt and small stones sometimes get into the drum, especially if the driver drives mainly on dirt roads. One or more stones may become lodged between the brake pad and the inner wall of the drum. When the block presses the stone against the inner surface of the drum, it is pressed deeply into the friction lining on the brake shoe and remains there (the material of the friction linings is quite soft). With each subsequent braking, stones stuck in the block scratch the inner wall of the drum.
Large scratches are visible on the inner wall of the drum
Over time, a minor scratch turns into a large groove, which will not be so easy to get rid of. The way to solve this problem is determined by the depth of the grooves that appear. If the driver noticed them early and their depth does not exceed one millimeter, then you can try to get rid of them by grooving the drum. And if the depth of the grooves is two millimeters or more, then there is only one way out - replacing the brake drum.
Removing and installing the drum
If during the diagnostic process you decide that it is necessary to remove the drum, you should figure out how to do it correctly. In fact, this work is not difficult, but it requires a certain skill. Or rather, you just need to understand what to do and why. First, prepare the necessary tools. You need to understand that having everything you need on hand will greatly simplify the repair procedure.
It will also be convenient to carry out work if there is an inspection hole. But this is optional. You can do without it.
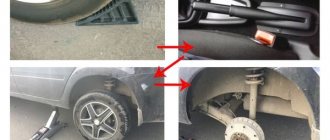
Withdrawal occurs in the following order:
- Loosen the wheel screws of the wheel chosen to replace the drum;
- We jack up the car on this side. We install the stand and lower the jack a little. Our task is to ensure that the bottom lies tightly on the stand. In this case, the car will definitely not fall during further actions;
- Remove the wheel completely;
- Fill the guides with liquid key and wait a little;
- We unscrew the guides, for this you will need a key 13 for new cars, and 15 for older cars;
- Having unscrewed the guides, you can proceed to removing the drum. It can only be dismantled by knocking it off the bridge. But, do not forget that it is made of cast iron, so you cannot hit it with a hammer. You need to do the following. We take a wooden block, place it on the edge of the drum, and hit it with a hammer several times. We repeat the action on the opposite side. As a result, the drum will be removed from the support disk.
Separately, it is worth considering the process of installing the drum. This is not always an easy task. This is usually hampered by the pads, which are wider than the drum. Therefore, they need to be brought together. To do this, open the bleeder fitting slightly and use a pry bar to compress the pads together with the cylinder. As a result, you will be able to put the drum in place without much difficulty.
Troubleshooting methods
Before we talk about ways to remove the rear brake drum if it is stuck, you need to name the reasons why this can happen:
- Heating the brake pad causes the metal that makes up the drum to expand, causing the cover to stick to the body.
- Dirt accumulated between the cover and body.
- Rapid heating of the element during braking, and then sudden cooling (for example, in a puddle of water).
All this leads to sticking of the brake drum. Note that dismantling it is quite difficult. Therefore, experts do not recommend resorting to sharp braking in rainy weather, which is quite difficult to dismantle when replacing the pads. Now let’s talk about the most acceptable ways to remove a stuck drum.
If car service technicians cope with this task almost effortlessly, having sufficient experience and the necessary tools, then an ordinary motorist who decides to do such work on his own needs to stock up on a certain tool. Moreover, for each specific case this tool may be different.
But you will always need WD40, which is used when repairing various vehicles.
Brake drum lubrication
Sledgehammer to help you
Using this method requires reliable fixation of the car. It is better to perform all actions on a lift (a car jack is not able to provide maximum stability to a raised car). In addition, a metal goat designed to support the machine, or an ordinary stump from a large tree, may be suitable for this. Let's move on directly to the sequence of actions when dismantling the brake drum. You will need:
- Remove the wheel.
- Using a wire brush, clean the cavity from any accumulated dirt.
- Spray the surface generously with WD40.
- Gently tap the drum collar at the bottom until it becomes movable. There is no need to strike too hard - this can lead to damage to car parts.
But it is advisable to warn that this method has one significant drawback - not everyone has a sledgehammer and not everyone knows how to handle it. Therefore, it is advisable to consider other options for solving this problem.
Brake drum removed
Extreme way
This method involves absolute fixation of the machine . Before starting work, you should check everything carefully, because if the car comes off, the risk of serious injury increases by almost 100%. Having chosen this option for removing a stuck drum, you will need to perform the following steps:
- Get behind the wheel.
- Turn on the ignition.
- Engage 2nd (3rd) gear and release the clutch.
- Rotate the engine to medium speed.
- Shut down the power unit and remove the drum.
The meaning of this method is to spin the moving part of the axis, and therefore the drum itself, using centrifugal force. In this embodiment, the drum will simply be descaled.
Removing the brake drum
Radical measure
If suddenly the methods described above did not lead to the required result , in addition, the brake system cylinder is jammed, then it is advisable to take radical measures. To complete the work you will need a drill with a drill (diameter size 2-3mm), a medical syringe, and a sledgehammer. Here's what to do if all else fails:
- Make several holes at the junction of the axle shaft and the drum.
- Use a syringe to pour brake fluid into the holes and at the same time gently hit the drum with a sledgehammer.
To simplify operations, use a special removable key (you can buy it or make it yourself). After performing these steps, the stuck drum should come off. But, if you still can’t do this, then you need to visit a car service center. Here the craftsmen will certainly be able to handle the removal of the brake drum. Of course, you will need to pay for the service, but it will be cheaper than buying a new hub or steering knuckle if it breaks.
Replacing a brake drum on a VAZ 2101-VAZ 2107
Welcome! Brake drum - it consists of metal, although at first glance (if you do not pick it up) you might think that it is entirely made of plastic or any kind of plastic, over time this drum (namely its working surface) wears out, due to with this, the car begins to brake a little worse (This is very difficult to notice, because when braking, the entire weight of the car is transferred forward and thus all the loads are handled by the front brake system, and not the rear).
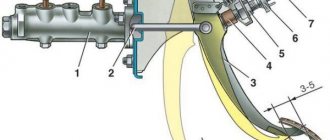
Design and principle of operation of drum brakes
1 — brake shield; 2 — wheel cylinder; 3 — upper tension spring of the pads; 4 — brake pad; 5 — pad lining; 6 — brake drum; 7—locating pin; 8 — guide spring; 9 - lower tension spring
The drum brake consists of two main parts:
Brake drum. This part rotates with the wheel and also plays the role of a housing for the brake mechanism. The drum is made of metal; on its outer side there are threaded holes for studs with which the wheel is installed.
Brake mechanism. It is mounted on the brake shield, which, in turn, is fixedly fixed on the wheel hub. The mechanism consists of the following main parts:
- Brake pads with friction linings;
- Double-acting brake cylinder (has two pistons located on opposite sides);
- Tension springs;
- Parking brake cable;
- Lever for manual brake pad drive.
This mechanism has two pads - front and rear (they got their name from their location relative to the car), between them in the upper part there is a brake cylinder, and the pads are also tightened by springs at the top and bottom. The parking brake cable and a number of other parts are also located here.
The operating principle of drum brakes is very simple. The increase in brake fluid pressure caused by pressing the brake pedal causes the pistons of the wheel brake cylinder to move apart, which in turn pushes the associated pads apart. The pads rest against the drum, under the action of the piston they are pressed against its inner walls, and stop the rotation of the wheel. When the pressure in the system decreases, the force created by the cylinder drops, and due to the tension springs, the shoes move away from the drum.
Brake drums are subject to strict requirements for reliability, strength, geometry, as well as the coefficient of friction of the internal surface. Today, VAZ-2101 – 2107 vehicles use two types of drums:
- Cast iron drums;
- Drums made of aluminum alloys with cast iron insert.
It is cast iron that optimally combines strength, reliability, an acceptable coefficient of friction, as well as low cost and ease of manufacture. However, this metal is quite heavy and fragile, so lighter and stronger drums made of aluminum alloys (precisely alloys, since pure aluminum is too soft) are often used, but have a cast iron insert on the inside against which the pads rub.
What types of drums are there?
The brake drum is a critical part, and the demands placed on it are extremely high. Particularly important parameters are the following:
- accuracy of drum geometry;
- internal wall friction coefficient;
- strength.
Another important parameter is the material from which the brake drum is made. This material can be either cast iron or an aluminum-based alloy. On “sevens”, depending on the year of manufacture of the car, you can find both cast iron and aluminum drums.
Cast iron drums for this car are considered optimal (the early versions of the VAZ 2107 had cast iron drums). Cast iron has the best combination of strength, reliability and high coefficient of friction. In addition, cast iron drums are affordable and easy to manufacture.
To solve this problem, the VAZ 2107 manufacturers took the next step: they began installing drums made of aluminum-based alloys (and specifically alloys - in its pure form, this metal is very soft) on the later “Sevens”. And to maintain a high coefficient of friction of the internal walls, cast iron inserts began to be installed in aluminum drums.
Signs that replacement is needed
The brake drum must be replaced when signs of deformation or cracking of the part appear. Another reason for replacement is wear on the drum walls. To check this, you need to get to the working surface of the part and check the internal diameter. The latter increases as the drum wears out. The maximum permissible internal diameter is 251 mm. If the measurements give a higher value, the drum needs to be replaced immediately. To do this, you need to know how to remove the brake drum of a VAZ 2107. Significant wear on the working surface of the drum also makes it difficult to remove it from the hub. This is due to the appearance of a lip along the edge of the inner surface of the drum there. The brake pads grind down the working surface, and in the place where they do not contact the drum, the metal remains intact. Over time, the difference in diameters becomes so large that when the drum is removed, the side clings to the brake pads.
Brake system diagnostics
Before removing the drum, it makes sense to diagnose brake system faults. This will allow you to purchase everything you need for repairs in advance. This way you will significantly save your time spent on repairs. It would be optimal to visit a service station and check the brakes on a stand, but you can do without it. Let's look at the main points that you should look at when checking:
- Pay attention to the behavior of the brake pedal. It should not be too soft or fall down when pressed;
- Stand on an incline and lift the parking brake lever. If the car starts to roll backwards, you should tighten the brake cable or replace the rear pads. Take precautions when checking. Make sure there is no one further down the slope;
- Check for brake fluid in the reservoir. If it is not enough, check the system for leaks;
- Visually inspect all hoses; they should not have any damage;
- We should also consider diagnosing the condition of the drums. First of all, inspect the part; it should not have cracks or other visible damage. When viewed from the inside, the bead should show even wear. Also measure the inner diameter of the drum; it should not exceed 201.5 mm
.
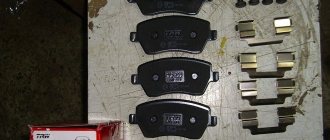
Required spare parts
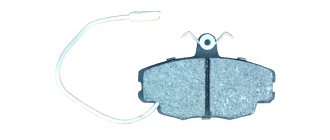
On the Russian market, rear pads for “classics” are offered in a wide range. But practice shows that you should not purchase Chinese parts. They are of low quality: ferodo has a low coefficient of friction, and the linings come off quickly. It is advisable to purchase parts with the following article numbers: 2101-3502090-55, 21010350209055, 2101-3502090, VR311, BS-T 1001 N, 13.0460-2966.2, 602966, 2101-3501089, 2101-3 501800-82, 21010350180082, 2101-3501089. These are Russian and European products, the price varies from 500 to 1100 rubles, but you will put really high-quality parts on the car that will last a long time.
Signs that replacement is needed
The brake drum must be replaced when signs of deformation or cracking of the part appear. Another reason for replacement is wear on the drum walls. To check this, you need to get to the working surface of the part and check the internal diameter. The latter increases as the drum wears out. The maximum permissible internal diameter is 251 mm. If the measurements give a higher value, the drum needs to be replaced immediately. To do this, you need to know how to remove the brake drum of a VAZ 2107. Significant wear on the working surface of the drum also makes it difficult to remove it from the hub. This is due to the appearance of a lip along the edge of the inner surface of the drum there. The brake pads grind down the working surface, and in the place where they do not contact the drum, the metal remains intact. Over time, the difference in diameters becomes so large that when the drum is removed, the side clings to the brake pads.
Disadvantages of the design
For all its advantages, such a braking system has a low response speed, unlike its disc counterparts.
There are also certain difficulties in setting up; the design has low stability. When the rear brake drum gets hot, it happens that the pads “stick” and braking performance deteriorates significantly. If the air temperature is too low, it is not recommended to use the handbrake. There are many situations when the pads simply freeze to the drum. Because of these troubles, most modern expensive cars prefer to avoid this mechanism.
Rear brake drums are more often seen on budget models, on city runabouts, where they are installed at the rear. This system is also installed on trucks.
Signs that replacement is needed
The brake drum must be replaced when signs of deformation or cracking of the part appear. Another reason for replacement is wear on the drum walls. To check this, you need to get to the working surface of the part and check the internal diameter. The latter increases as the drum wears out. The maximum permissible internal diameter is 251 mm. If the measurements give a higher value, the drum needs to be replaced immediately. To do this, you need to know how to remove the brake drum of a VAZ 2107. Significant wear on the working surface of the drum also makes it difficult to remove it from the hub. This is due to the appearance of a lip along the edge of the inner surface of the drum there. The brake pads grind down the working surface, and in the place where they do not contact the drum, the metal remains intact. Over time, the difference in diameters becomes so large that when the drum is removed, the side clings to the brake pads.