Operating principle of hydraulic compensators
The principle of operation of hydraulic compensators is a proportional change in the valve clearance with a linear change in the length of hydraulic compensators, the price of which is quite reasonable. The system is designed in such a way that all transformations occur automatically.
The movement of the associated elements of the system occurs due to the supply of high-quality motor lubrication and the operation of the engine spring mechanisms.
What it is
Hydraulic compensators are parts for tuning a car engine. The device automatically adjusts the valve clearance.
The GKK was never installed by the factory on the old sevens. Some cars of that time had mechanical type regulators. But the efficiency of their work left much to be desired.
Owners of the VAZ 2107 must manually adjust the valve clearance every ten thousand kilometers. To do this, you have to dismantle the cover and use a feeler gauge to set the gaps.
Built-in mechanical elements are subject to wear. An incorrectly adjusted gap leads to increased engine noise. As a result, the car's dynamics decrease and fuel consumption increases. After 50 thousand mileage it is necessary to install new valves.
Hydraulic compensators on the VAZ 2107 are free of these disadvantages. The part lasts a long time: it works properly for up to 150 thousand kilometers. The gap is set automatically and is constantly maintained at the desired level.
The engine responds positively to such care, which is reflected in an increase in engine life, its power and in a decrease in gasoline consumption.
Hydraulic compensators VAZ 2107
Hydraulic compensators are devices that independently adjust the valve clearance. The part is a more advanced product compared to the mechanical type regulator that was used on older cars. On the VAZ 2107 and other “classics” hydraulic compensators (GKK) were not installed. As a result, every 10 thousand km. mileage it was necessary to adjust the thermal clearance of the valves. The adjustment procedure was carried out manually, i.e. it was necessary to dismantle the valve cover and set the gaps using a special feeler gauge.
Description: why hydraulic compensators are needed and how they operate
The mechanical elements that are responsible for adjusting the gap wear out over time. If the gap is not adjusted in a timely manner, engine noise will appear, dynamics will decrease, and gasoline consumption will increase. As a result, with a mileage of 40–50 thousand km. the valves themselves need to be replaced. To put it briefly in terms of mechanical adjustment, this design is far from perfect.
When equipping the engine with hydraulic compensators, you do not need to think about the need to adjust the valves. The hydraulic support itself will set the required gap, which has a positive effect on the life of the power unit, increasing power, and reducing fuel consumption. In addition, the part is characterized by a fairly long service life - about 120-150 thousand km. mileage To fully understand how hydraulic compensators work on the VAZ 2107 and any other car, it is worth considering their operating principle.
Motor oil enters the hydraulic element through a special valve in the form of a ball. The lubricant extends the GKK piston, changing its height. As a result, a position is reached in which the hydraulic part minimizes the valve clearance in the gas distribution mechanism. After this, oil does not flow into the hydraulic compensator, since there is a certain (maximum) pressing moment. When a gap forms between the valve and the hydraulic element, the valve mechanism opens again and pumps oil. As a result, high pressure is always created in the GKK, providing maximum compression.
In addition to the listed advantages, hydrosupport also has disadvantages:
- the need to use high-quality oil;
- repairs are more complex and expensive.
Signs of malfunctioning hydraulic compensators and their causes
Like any other car part, hydraulic compensators fail over time and there are characteristic signs of this:
- the appearance of a knocking sound;
- reduction in power of the power unit.
Clunking noise under the valve cover
The main sign indicating a problem with the hydraulic mount is an extraneous knocking sound (clattering sound) after starting the engine, coming from under the valve cover. Since the noise and the reasons for its appearance may differ, you need to learn to distinguish the nature of the knocks and only then draw the appropriate conclusions.
- Knock in the engine when starting. If the noise disappears a few seconds after starting the power unit, then this effect is not a sign of a problem.
- The appearance of a knocking sound from the hydraulic mounts on a cold and warm engine, while the noise disappears when the speed increases. The probable cause is wear of the check valve ball, which indicates the need to replace the main valve. The problem can also occur when the hydraulic element is dirty. To fix the problem, resort to cleaning.
- The knock is only present when the engine is warm. This type of noise indicates wear of the hydraulic compensator elements. The part must be replaced.
- Knocking noise when the power unit operates at high speeds. The problem can be either too much or too little engine oil. In this case, it must be monitored and brought to normal. The reason may also be related to problems with the oil receiver, which will have to be eliminated.
- Constant presence of knocking. The likely cause is clearance between the camshaft lobe and the rocker. The problem is eliminated by cleaning or replacing worn-out parts.
Are there hydraulic compensators for the VAZ 2107 injector?
Messages: 500 Registered: Apr 07, 2010, 00:00 From: Tyumen Experience: 2008 Car: Mitsubishi Lancer IX
Thanked: 1 time
Post by Another23 » Sep 23, 2011 10:56 am
Messages: 2407 Registered: May 16, 2007, 00:00 From: Tyumen Experience: 2007 Car: Kopevar : Awards: 1
Thanked: 91 times Thanked: 120 times
Post by Zloy_alex » Sep 23, 2011, 11:08 am
Messages: 261 Registered: Nov 30, 2008, 00:00 Experience: 2004 : Awards: 1
Post by maks72t » Sep 23, 2011, 11:10 am
Messages: 824 Registered: May 15, 2008, 00:00 From: from there Experience: 500,000 Car: ZAZ 968M/Porsche : Awards: 1
Thanked: 5 times Thanked: 2 times
Post by Kenny_tmn » Sep 23, 2011, 11:33 am
They are not there and never will be.
if it’s true that someone had nothing to do and they were put there.
Messages: 3366 Registered: June 28, 2007, 00:00 From: from there Experience: since 2016 Car: mortar with broom : Awards: 1
Thanked: 8 times Thanked: 37 times
Post by gorodovoy » Sep 23, 2011, 11:40 am
oh-oh-oh-oh-oh. then she will trample unrealistically
P/S/ if you didn’t buy the shaft, write in a personal message. otherwise we accidentally bought it for a VAZ 2101, but sold the car, now it’s lying there
Replacing rocker arms on a VAZ 2107
Rockers (rocker arms) are one of the elements of the valve timing mechanism of the VAZ 2107 engine. The purpose of the part is to transmit energy from the camshaft cam to the valve stem. Since the rocker is constantly exposed to mechanical and thermal stress, it wears out over time.
Rocker arms are designed to transfer energy from the camshaft lobe to the valve stem
Determining the suitability of rocker arms
If during operation of the “Seven” there is a decrease in engine power or a characteristic knocking sound is heard in the cylinder head, then the likely cause is a broken rocker arm. During repair work, it is necessary to clean the rockers from dirt and carbon deposits and check them for wear and damage. If any defects in parts are found, they are replaced with new ones. If the rocker arms are in normal condition, install the products on the cylinder head.f
If the rocker arm is heavily worn or there is visible damage, the part needs to be replaced
Is it possible to level the rocker arm?
When adjusting valves or repairing the cylinder head, you may notice that the rocker arms are slightly at odds with respect to the camshaft, i.e., the distance between the rocker plane and the camshaft journal is not the same. To eliminate this nuance, some owners of “classics” align or change the springs that press the rocker arms, or replace the rocker itself, but the problem may still remain. In fact, on all classic Zhiguli models, including the VAZ 2107, misalignment is not as bad as incorrect valve clearance
Therefore, it is the gap that deserves attention. The main thing is that the parameter is adjusted properly and is 0.15 mm when cold
When the rocker arm is skewed, some motorists change the part itself, the springs, and sometimes the camshaft, but they do not achieve the desired effect
How to replace a rocker arm
If there is a need to replace the rocker arms on the “seven”, for example, 1 part in case of its breakdown, then it is not necessary to dismantle the camshaft. To do this, it will be enough to pry the spring with a screwdriver, remove it, and then remove the rocker itself. The new part is installed in the reverse order. If all the rocker arms are being replaced, then it is wiser to dismantle the camshaft.
Video: replacing the rocker on a “classic” without removing the camshaft
Equipping the VAZ 2107 engine with hydraulic compensators improves its operation and characteristics. Installing the mechanism will not take much time and effort, but will require material costs. Therefore, whether there is a need for such an engine modernization or not, each motorist decides for himself.
Operating principle of hydraulic compensator
A ball-shaped valve supplies engine oil to the hydraulic element cavity. Under the influence of lubricant, the piston of the device extends, which leads to an increase in the height of the hydraulic valve. This leads to a reduction in the valve clearance in the gas distribution mechanism to a minimum level.
The oil stops flowing when it reaches the maximum compression level. When production occurs, the valve again releases the required amount of oil. Thanks to this, pressure is constantly maintained in the GKK, which reduces the valve clearance.
If you decide to install a compensator, be prepared to use only high-quality oil.
The need to use additives
Replacing the VAZ 2112 hydraulic compensators, a video about which is presented in the article, should be done only after the car owner knows what changes occur when using additives. They promise that they can reduce noise and clean channels and holes in hydraulic compensators. Be careful when purchasing generic additives. Read the instructions carefully. What type of engine is the additive intended for, what oil is it used with. Inattention can damage the engine.
After the VAZ 2112 hydraulic compensators (16 valves) have been replaced, a video about which you can watch in the article, you should inquire about the quality of the additives that are designed to change the properties of the oil. That is, improve the quality in order to achieve the effect we need at the moment. There are additives that improve the sliding effect. Rubbing parts with additives have a lower coefficient of adhesion. Due to this assistance, the engine increases power.
Hydraulic compensators on the VAZ 2109 should be used with additives that can increase the coefficient of adhesion. In automatic transmissions, it is necessary that the two wheels of the turbine transmit torque better. The hydraulic compensator must receive oil constantly and in the required quantity. If these conditions are violated, the operation of the hydraulic compensator is disrupted. This means that the gaps in the gas distribution mechanism will also be compromised. Not only knocks appear, but the normal operation of the engine is also disrupted.
The installation of hydraulic compensators on a VAZ 2107, a video about which you can watch in the article, must be accompanied by the use of the correct additives that will eliminate the consequences described above. If they are really high quality, then the desired effect will be achieved. The channels will be cleaned, the knocking will disappear.
But this effect will happen if the additive is original and not a fake. There are a great many low-quality additives on the market. Buy with caution, it is better to double check. Liqui moly Hydro, for example, is one of the most popular. If you also use oil from this company, you really get the effect. What the manufacturer promised, he delivered.
Now Hado has appeared on the additive market. It can be purchased at an affordable price. This is a product of the Ukrainian chemical industry. According to consumer reviews, there are no particular complaints. Additives really eliminate noise. Whether or not to use these compounds to eliminate noise and flush hydraulic compensators is up to everyone to decide for themselves. The main thing is to first make sure you need it, and then purchase it. When purchasing, pay special attention to the manufacturer. You can't allow counterfeits to come in. A fake can lead to complex and expensive repairs. But the price should not be too low, since in this case you risk purchasing a fake. The acceptable cost is 900 rubles.
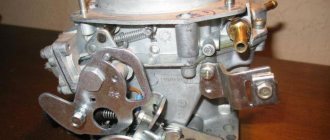
One of the options for improving the VAZ 2107 engine is the installation of hydraulic compensators. This part not only reduces noise from the operation of the power unit, but also completely eliminates the need for periodic adjustment of valve clearances. Installation of hydraulic compensators is possible in a garage, for which you will need to prepare the system elements and the necessary tools.
Installation of hydraulic compensators
Car enthusiasts often ask how to install hydraulic compensators on a VAZ 2106, and what tools are needed for this. Before installing hydraulic compensators on the “six”, you need to prepare a set of driver’s tools and a set of “Hermes” or other hydraulic compensators (HC). Some reckless drivers install “Nivovsky” GKs.
To install hydraulic compensators on a VAZ “sixth model”, the following steps are required:
• Dismantle the housing part of the air purification filter along with the replacement element; • Remove the accelerator linkage and the over-valve casing; • Flare the control washer of the camshaft sprocket; • We install it in such a way that the marks match; • Unscrew the star fastener and secure it with wire; • Remove the camshaft bed fasteners; • We dismantle it together with the camshaft; • We dismantle the ronkers, lay them out in such a way as to remember them for installation in their original places • We unscrew the cams and very carefully remove the bushing of the adjustment bolt; • Using a saw, we level the tide near valve II to compare with the height of the nests; • We degrease and clean the surfaces with kerosene or white spirit, the surfaces of adjacent nests are ground for tightness using a sharpener with the finest abrasive composition; • When tightening the bushings, remember their positions; • We press the support-type cylinder head washers using a special-purpose mandrel; • We press the rings - seals into the distribution plate. If the seat and the seal do not match, you can try installing rings from another set, after which we mount the mechanism with bushings; • We mount this mechanism in the cylinder head; • We check the free movement of the plungers by loosening the bushing, after which we install the spring elements; • We mount the plungers on the seats; • We correct the plunger stroke, for which we set IV, VI, VII and VIII valve drive levers; • Next, we install the bed with the camshaft installed according to the instructions; • We install a special device for measuring the plunger stroke; • If it is necessary to fine-tune the plunger stroke to normal action, it is necessary to place washers of various thicknesses with the bed removed, after which we trim them with a mandrel; • In the indicated place, drill the oil line in the bed with the camshaft removed and cut the threaded connection; • For a strictly vertical position of the tube, cut the thread to a certain distance, followed by bending it to the required angular value to align with the hole of the cross; • Having purged and cleaned the bed and camshaft, we reassemble in reverse order; • We install lubrication system pipelines. Fill the system with oil. close the filled bushings with your fingers; • We install the ball valve and plunger, for which we test the valve for leaks; • To carry out this procedure, a ball is placed in the plunger and it is purged, while it must “hold” air. If the result is negative, you can change the ball. We also test the correct installation of the valve on the seat, and the plunger should provide visible resistance when pressed into the sleeve; • We fix the levers in their seats, the bed with the camshaft exactly in the starting position, tighten the nut fasteners with a torque wrench, install the camshaft sprocket followed by fixing the washer - stopper, mount the over-valve casing and the air purification filter housing with a replaceable element.
On our Internet resource you can watch a production video “hydraulic compensators for the VAZ 2106”. If we talk about the cost of hydraulic compensators, then it is within acceptable values and is affordable for the average Russian car enthusiast.
Installation of hydraulic compensators on a VAZ 21214
To work you will need:
— Clean motor oil
— Tweezers (can be replaced with a slotted screwdriver)
Before installing the HA, they must be disassembled and thoroughly washed in gasoline. Dry and put back together. After that:
- We check the hydraulic supports. To check, you need to press your thumb on the assembled hydraulic support; it should squeeze and move apart freely (without jamming)
- The next step is to install the oil supply ramp and screw in the dry hydraulic mounts by hand
- Using a torque wrench, tighten the hydraulic mounts (22 N per m). Again we check that when pressed it is pressed all the way, and then returns to its original position. If it sticks:
a) swap the hydraulic support with the neighboring one
b) reduce the moment to 18 n per m
c) replace with a new one
!All hydraulic clamps must be tightened to the same torque
4. Next, you need to fill each hydraulic mount with oil. To do this: take out the plunger and put it in a clean place, use tweezers to take out the piston with the ball and also put it aside; We fill the engine oil into a syringe and fill it into the hydraulic support housing to the brim, after which we lubricate the piston and insert the piston into the housing, pressing the valve ball with an awl. Fill the plunger with oil and insert it into the body.
All steps have been completed and the hydraulic mounts have been installed, then you need to get the engine into working condition. After that you can safely start!
Source
Why do hydraulic compensators knock?
To begin with, I would like to note that if the compensators are knocking, this indicates that they are not working correctly, most likely they are out of order, or something is wrong with the engine lubrication.
Actually, the main reason lies in the quality and level of the oil, although there are a lot of mechanical faults.
- Not enough oil. This also happens, it is not pumped effectively into the channels and therefore is not pumped inside the plunger pair, that is, the required pressure is not created inside
- The channels in the cylinder head or the hydraulic compensator itself are clogged. This happens due to untimely oil changes, it burns and deposits form on the walls, which clog the channels; the oil cannot effectively pass into the compensator.
- The plunger pair has failed, often it simply jams
- The plunger ball valve has failed
- Carbon deposits on the outside of the plunger body. He physically does not allow him to rise and compensate for the gaps
Of course, sometimes they knock because there is carbon deposits in the system, then you just need to remove them and wash them, and their performance may be restored. BUT with high mileage, they break (depletion appears) and require replacement.
I want to repeat again - you need to understand that the operation of the hydraulic compensator depends on the quality of the oil and its timely replacement. You need to pour only high-quality synthetics and my advice to you is to change the lubricant a little more often than prescribed, for example, after 15,000 km, change after 10 - 12,000 km. They will last longer.
Now let’s watch a short detailed video.
I’ll end here, sincerely yours, AUTOBLOGGER.
( 41 votes, average: 4.61 out of 5)
Similar news
Timing chain or belt. What is better, which mechanism drive to choose? .
The timing chain knocks (rattles), whether cold or hot. How to determine.
Why does a car drive poorly in hot weather? Details + video version
Let's summarize
The operation of installing new hydraulic compensators is quite simple; even a beginner who knows how to handle the tool can handle it. It should be understood that new parts also tap first. But this shouldn't last long. If the sound does not stop, you need to determine the cause. In order not to carry out the procedure often, monitor the quality of the oil used.
See this video for the sequence of replacing hydraulic compensators on the VAZ 2110 and other models:
Checking the functionality of the “six” hydraulic compensators
Test drives were carried out for about 3-4 years, while individual sets worked for over 100 thousand km.
Main conclusions:
- Increased requirements for the functionality of the motor and lubrication system. It is important to change consumables and oil on time in order to avoid the plunger “hanging” when encountering solid fraction elements. It is necessary to avoid operating the vehicle when there is insufficient oil in the engine crankcase.
- The use of hydraulic compensators on the VAZ 2106 greatly changes the sound of the noise. The high-frequency sounds characteristic of the operation of the timing belt disappear, and the small noise of the camshaft chain drive is detected.
- Reduced wear of timing components is observed.
- The necessary installation of hydraulic compensators did not affect the dynamic characteristics of the car.
- The main components work practically without wear.
Basic faults
Hydraulic compensators, like any car part, tend to wear out and break. They are constantly under load. But they work for a long time: from 120 to 150 thousand mileage. Sometimes they fail ahead of time.
Two circumstances indicate a malfunction:
Engine knock
The main sign of wear of a spare part is the appearance of a clattering sound. Since extraneous knocking noises can occur on the VAZ 2107 for various reasons, you need to check what is its source. To do this, you will have to open the hood and start the engine.
A characteristic clattering sound comes from under the valve covers and does not disappear while the engine is running. At the same time, the sound may have interesting features.
Reduced power of the power unit
If the hydraulic compensator malfunctions, this inevitably leads to a decrease in engine power. You will feel that the dynamic characteristics of the VAZ 2107 have decreased. And this is not surprising!
Lada 2106 ドリフトオタク › Logbook › Installing hydraulic compensators on classics.
Of course, you can adjust the valves yourself if you do everything according to the book, but here you will need skill. The valve is a delicate matter and requires the motorist to have experience in this matter. On the other hand, you can contact a service center, where they will adjust the valves for you for a symbolic 2200 rubles (+ cylinder head cover gasket). This is of course good, but I had to adjust the valves every 10tkm. I contacted one hundred, then I started doing the adjustment myself, but in the end I got fed up with all this and decided on an expensive timing belt modernization.
1. What is needed to install hydraulics on a classic head?
Let's look at cylinder heads 2101 and 21213 (21214 st.b. until 2008). So, the seats for the adjusting bolts are the same. The cylinder heads are identical, as a result, their timing parts are interchangeable (although AvtoVAZ does not recommend installing hydraulic compensators on Zhigulis during the WARRANTY period).
Therefore, to install hydraulics on a classic engine, we need to purchase: Hydraulic compensator 21214 of the old model (21214-1007160), Camshaft assembly 21214 (21214-1006008-00), Hydraulic compensator oil supply ramp 21214 assembled of the old model (21214-1007180SB).
It would also be a good idea to stock up on a torque wrench (0-100nm), a 21mm socket, a new valve cover gasket, and an aerosol carburetor or caliper cleaner.
2. Pitfalls when installing hydraulic compensators on a classic engine:
Mistake #1 Buying counterfeit products. Alas and ahh, but the problem of counterfeit spare parts for classics remains relevant. So buy original spare parts in stores such as Baltkam, Dvizhkom, Avtopiter, AutoAll.
Mistake No. 2 Dirt and old oil deposits when installing hydraulics. After dismantling the old clearance adjustment system, BE SURE to clean the installation areas of the hydraulics from old grease and oil deposits using a carburetor cleaner and compressed air. It is also necessary to blow out the oil rail of the hydraulics with compressed air to avoid clogging it with foreign small particles.
Error No. 3 Installing hydraulics without removing the retaining rings. Folks, these rings on the hydraulics are for transportation purposes; before installing the hydraulics on the engine, they MUST BE REMOVED!
Error No. 4 Violation of the tightening torque regulations for the threaded connections of the cylinder head and timing gear. So, if you tighten the cylinder head and timing belt by hand, at a discount, by eye, yes, I’ve done this 1000 times, everything will be ok, I promise, I answer with my mother... know, there is a special place in hell for you! Now live with it)
Based on the technical regulations: - the hydraulics are tightened in 2 broaches, the first with a force of 15 nm, the second with no more than 25 nm (from 20 nm to 25 nm); — the camshaft assembly with the pastel is tightened in 2 broaches: the first 20 nm, the second no more than 30-35 nm.
If you overtighten the hydraulics, they can wedge or become completely jammed, but if you don’t tighten the hydraulics, they will unscrew.
Error No. 5 Installing Niva rockers. So, the classic and Niva rockers differ in shape and size, the 2121 rocker is larger than the 2101. Therefore, after installing the 2121 rocker, many people start to jam their valve stem seals. The only correct choice would be to keep the old rockers.
3. Pitfalls when operating hydraulic compensators on a classic engine:
Stone No. 1 The quality of the engine oil and its replacement frequency. Hydronics like to work on synthetics and semi-synthetics. I leave the choice of oil manufacturer brand to your discretion. I use semi-synthetic 10w40 both in summer and winter. To make your choice easier, I’ll give you the following information: a 4L canister of the small one I use costs about 2000 rubles. I oil it approximately every 6-7tkm, along with filters and spark plugs.
Stone No. 2 Warming up the engine before starting to drive. Before you start driving, you must let the car idle (no more than 2000 rpm) for 5 minutes in summer and 15 minutes in winter. This is necessary to pump the hydraulic oil system.
Additional recommendations from the author of the article:
Recommendation No. 1 When installing hydraulics, be sure to install camshaft 21214.
Recommendation No. 2 If you want to get an increase in power, then it will also not hurt you to install a split gear and install any other improved camshaft from a 214 Niva like an Estonian or OKB.
Recommendation No. 3 When changing oil, use flushing and flushing oils, this will extend the life of hydraulics.
Recommendation No. 4 Additionally, it will be necessary to install an automatic chain tensioner (this will be discussed in a separate article)
Recommendation No. 5 Before the first start, get ready to adjust the ignition; for me it ran 100 degrees counterclockwise.
1. Now I am not bothered by the noise of the valves. While the engine is running, you can hear the chain and rotation of the gearbox input shaft. 2. Lack of constant maintenance of the timing mechanism. 3. The car began to start better and switched to diesel when the ignition was turned off.
That's all) If you have any questions, please contact us! I will answer them with pleasure)) Thank you all for your attention! Sincerely, DkMC008)
source
How to install a hydraulic compensator on a VAZ 2107
Before starting work, prepare the following tools:
- new parts;
- set of keys and sockets;
- torque wrench;
- Screwdriver Set;
- rags;
- New timing cover gasket.
Follow these steps in order:
- Remove the air filter.
- Remove the carburetor.
- Remove the distributor. The valve cover must be completely free to operate.
- Using a 38mm wrench, rotate the crankshaft so that the camshaft mark aligns with the protrusion on the bearing housing.
- Secure the chain to the sprocket with a wire to prevent it from falling into the engine.
- Bend the bolt stopper on the camshaft sprocket and unscrew the fasteners.
- Using a socket, unscrew the camshaft mount and remove it.
- Remove all rocker arms and springs. Find a way to label each rocker so you can put it in place when you assemble it!
- Unscrew the adjustment bolts and their bushings.
- Blow out the oil rail with a compressor.
- Remove the locking elements from the hydraulic compensators.
- Install the CV joints through the ramp and tighten them slightly.
- Tighten the hydraulic compensators to a torque of 2 to 2.5 kg/m.
- Install a new camshaft from 21214.
- Remember to place the oil rail ring on the first stud.
- Follow the camshaft tightening sequence as shown.
- Make sure that the oil line takes a shape that does not interfere with the installation of the valve cover.
- Install and tighten the camshaft gear.
- Install the carburetor, distributor and air filter.
As you can see, the work can easily be done with your own hands in the garage. An experienced master will take no more than two hours to complete everything.
There are quite a lot of supporters and opponents of installing hydraulic compensators on the VAZ 2107. Each group has its own reasons and arguments. The main arguments of supporters of the installation of a hydraulic valve: the engine does not require periodic adjustment of the valves, the engine begins to run softer, the noise of the engine is reduced (although the noise can be reduced by using engine sound insulation).
In addition, it is believed that the slightest shock loads on timing parts are excluded. But this is if the hydraulic compensators on the VAZ 2107 work like clockwork and do not knock even when starting a cold engine.
The main argument of opponents of the installation of a hydraulic system is that the conventional system for adjusting thermal gaps installed on a car already copes with its functions.
In addition, the requirements for oil quality are significantly increased.
Installing hydraulic compensators on a VAZ 2107 is not such a simple operation. It does not come down to algorithms. Everything is somewhat more complicated. And certain difficulties and nuances may arise that require not only tightening and unscrewing nuts, but also drilling holes, cutting threads and certain adjustments.
What you need to pay attention to when installing hydraulic compensators on a VAZ 2107:
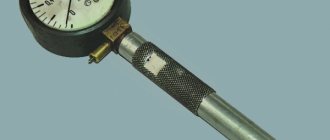
• During disassembly, timing parts must be placed according to numbers; • When unscrewing the adjusting bolts, try to work carefully so as not to tear off the flats; • Opposite the second valve there is a small area that will need to be cut down with a fine file; • It is advisable to rub in nests located nearby; • Bushings do not always tighten perfectly. They may need to be swapped; • O-rings do not always fit perfectly. You have to swap them around or carefully adjust them to fit; • The stroke of the plungers must be adjusted. For this, a micrometer with a pointer and a dial is used; • To adjust the exact stroke of the plunger, adjusting washers of different thicknesses are used; • When drilling a hole for the oil drain in the camshaft bed, only use a drill press and not a hand drill. Otherwise, you may break the hole and not cut a normal thread. Which can then result in oil leakage and seal failure.
Having decided to install hydraulic compensators on a VAZ 2107, it is advisable to change the camshaft in advance. A certain wear has already formed on the working surfaces of the old camshaft, which can negatively affect the proper operation of the hydraulic compensators. Although formally all formed workings on the surface must be compensated by hydraulics of the hydraulic system.
In addition, you need to drain the oil, flush the system, add new oil and replace the oil filter.
Before installing a hydraulic compensator, you need to weigh everything and decide whether you can handle it on your own. If you have even the slightest doubt about your own capabilities and skills, it is better to abandon the installation yourself and turn to a knowledgeable mechanic who has experience and the necessary tools.
Immediately after installing the hydraulic system, a knocking noise is possible on a cold engine, which should completely disappear after filling the system with oil. Experts say that a slight knock when starting the engine is normal.
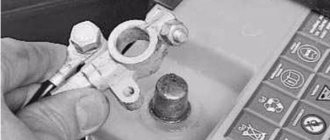
Diagnosis of GCC
Listening to knocks and monitoring the dynamics of the VAZ 2107 engine is, of course, a useful habit. But you still have to roll up your sleeves and drive the car into the garage. After all, for an accurate diagnosis, you need to get the device and inspect it personally.
- Remove the valve cover.
- Using a special wrench, rotate the crankshaft so that the cylinder piston is in the compression stroke.
- Try pressing the rocker arm on the intake valve.
If the rocker arm easily gives in to your efforts, the hydraulic compensator requires replacement.
You can also check the functionality of the hydraulic supports using a screwdriver. If you press on a faulty mechanism, it will give play.
What is required to install on the seven
To install the elements on the “seven” yourself, you need to have the following tools and accessories on hand:
- Torque wrench.
- A set of wrenches (socket wrenches, socket heads, open-end wrenches).
- Drills and electric drill.
- Copper and steel wire.
- New gasket for the timing cover.
- Angle grinder or some files.
- Rags.
- Fine abrasive grinding disc.
- Set of hydraulic compensators.
- Frame for block head washers.
- Mechanism for replacing plungers.
Even before checking the hydraulic compensators, you need to prepare a special tool - without it it is quite difficult to carry out all the work.