The dashboard does not light up when the ignition is turned on
Hi everybody.
This problem happened out of the blue. Yesterday at 22-00 I parked it after 300 km of run, and in the morning I came - and such a problem. Klaxon, interior lighting, door lights, the clock is working, the hazard lights on the dash (lights and relays click) - this means the battery is alive (12.5 V in the voltmeter in the cigarette lighter). The first few times you turn the key, the relay above the glove compartment under the dashboard clicks, and the heater fans spin as usual. But after 5 times it all starts to be silent. Only the starter turns, but to no avail. Also “silent” are, in addition to the lights on the dashboard: the LPG button and the fuel pump. And one more thing: when I sit in the car and turn on the alarm from the remote control, and then remove it from the alarm, the LED on the antenna previously stopped blinking when two things happened: the water opened. doors and turning the ignition key. Now only from the waters. doors. Everything comes together at the ignition switch, but that’s it...
P.S. I checked the 1st relay under the hood (pulled it out and put it in)
I ask for help and advice. I unscrewed and screwed in the battery light on the dashboard. I watched the previous ones. Where to dig? The lock? So it was changed 2 years ago, though to a Chinese (Turkish) one.
Update: the problem turned out to be in the chip (block) of the ignition switch.
The charging lamp does not light up, search for reasons.
What should you do if the charging lamp does not light up when you turn on the ignition? How to quickly find a problem? All subsequent actions regarding the warning lamp do not apply to the VAZ 2101 (2103, 2106).
The first step is to determine the faulty location, that is, the generator or control lamp with wire is faulty. To quickly determine, you need to disconnect the thin wire from the generator that comes from the control lamp, connect it to the vehicle ground and turn on the ignition. If the lamp lights up, then the generator is faulty. Possible malfunctions
There may be a break in the generator winding, a malfunction of the voltage regulator, wear of the armature brushes or slip rings, and so on.
Checking the serviceability of the lamp and wire.
If the charge control lamp does not light up, you need to check the serviceability of the lamp and wire. For this check, you do not need to remove the instrument panel and pull out the lamp to examine the integrity of the filament. It is enough to connect one probe of the multimeter, in voltmeter mode, to the disconnected wire, and the second to the car body. Instead of a multimeter, you can use a test lamp with a power of no more than 1 W.
If the circuit is working properly, the multimeter will show the battery voltage, and the control lamp will glow at half-glow. In this case, the charge control lamp burned out. If the voltmeter reading differs greatly from the battery voltage, then there may be an open circuit in the circuit from the control lamp to the generator.
If we consider a similar situation for the VAZ-2106 (2101, 2103), then the situation here is somewhat different. It's all about the presence of the P-702 relay, which supplies power to the battery charge monitoring lamp and is located under the hood on the right wing. In this case, checking the circuit and the serviceability of the lamp itself is enough to connect the supply wire to the relay with the wire from the control paw. If everything is in order, the lamp will light up. To check the lamp relay, you need to measure the voltage on the yellow wire with the engine running. The voltage must be at least 6 V. If the voltage is lower, then the generator is faulty, otherwise the relay.
Checking the generator.
If the charge control lamp does not go out when the engine is running, it is necessary to check the functionality of the generator. This also needs to be done in the case of a semi-incandescent lamp. In any case, to check the operation of the generator, it is necessary to check the voltage at the battery terminals with the engine running. The voltage readings should be in the range of 13.5 - 14.5 V. The check is carried out at medium engine speeds with the high beam headlights on. When the engine is running, the charge indicator lamp lights up to the floor, possibly due to current leakage through one of the additional diodes of the rectifier bridge or a malfunction of the diode in the instrument panel. In this case, the generator will work normally and does not need repair.
Why doesn't the battery light come on when the ignition is turned on? List of trivial problems
Why doesn't the battery light come on when the ignition is turned on?
There may be several reasons for this behavior of the light bulb. Some of them are harmless, others indicate serious problems. Below we will look at the most likely reasons for this phenomenon. To troubleshoot, you will need a multimeter and a color wiring diagram of the car.
A fairly common cause of this problem is lamp failure. This is perhaps one of the simplest breakdowns, but it is not always harmless. It is advisable to replace the light bulb as quickly as possible. If there are problems with it, you will not be able to identify the problem with the generator in a timely manner. Which will lead to the battery being discharged at the most inopportune time. Thus, driving with a burnt-out lamp is highly not recommended.
You should also consider the design features of your car. Most generators have a built-in resistance. This allows you to generate energy even when the charge control lamp is burnt out. On some cars, the lamp itself plays the role of resistance. This can be found on some modifications, as well as on many older foreign cars. In this case, when the light bulb burns out, the generator stops producing current. If your car has this structure, you should always have a spare lamp.
A failed dashboard light may be caused by a blown fuse. In this case, several devices usually fail at once. If such a symptom appears, you just need to check the fuse. It is located in the mounting block. You can find it using the diagram on the block cover. To check, the fuse is removed from the mounting block.
Monitoring the battery charging process
To correctly understand the reasons for the unstable operation of the lamp that controls the charging progress of the battery, you need to understand the interaction of the generator and the direct current source. When the engine is running, the battery is constantly charged with a voltage of 13.6 to 14.2 volts. The charging current is generated by the generator. The voltage of the output electricity depends on the speed of the generating device. The higher the speed, the greater the voltage. To limit the voltage within specified limits, a regulator is connected to the rotor winding circuit. It is this that stabilizes the output voltage, which is then supplied to the battery terminals for charging.
If the charging current is constantly supplied within the specified limits to maintain the battery in working condition, the battery charging indicator lamp should not light up. A constant glow of the light indicates that the generator is not working or that the supply wires are broken. The most common cause of generator failure is a weakened or torn drive belt.
Video: car battery charging system
Generator circuit
The operation of the generating device is based on the principle of electric magnetism. Structurally, there are two main parts with the help of which alternating current is produced.
The rotor and stator generate current into the vehicle's on-board network
These are the stator and the rotor. The rotor is driven by a drive belt from the engine crankshaft. The stator is stationary and consists of windings that are attached to the generator housing. Together they form a structure in which the rotor is centrally located inside the stator. There is a gap between them, which allows the rotor to rotate at enormous speed.
Scheme of operation of the generator and connection of the charging control lamp
The stator includes 3 windings that form a three-phase current system. The terminals from the windings are connected to the diode bridge separately, as in the diagram above.
The rotor consists of many electromagnets, which together create a powerful magnetic field. It crosses the stator windings, and a three-phase alternating current is generated in them. The output voltage depends on the speed and is controlled by a regulator, which is built into the system for supplying current to the rotor. To convert alternating current into direct current, a diode bridge consisting of diode rectifiers is used. They only allow current to pass in one direction.
Current is supplied to the electromagnets of the rotating rotor using two copper-graphite brushes in contact with copper slip rings located on the rotor shaft. As the speed increases, the relay-regulator reduces the current in the rotor, thereby reducing the magnetic field.
The battery charging control lamp is connected to a set of diodes that are connected in parallel to each of the three stator windings. This is a separate circuit and the amount of current here is small, but sufficient to light the LED indicator. So, to the light bulb, on one side there is a positive wire from the general network of the charging system, and on the other contact there is a positive wire from the ignition switch. If equal voltage is applied to both sides, the light bulb does not light. If there is no voltage on one contact, the light comes on. If the charging current begins to pulsate or decrease, the light begins to flash or light up with less brightness.
Fuse
A failed dashboard light may be caused by a blown fuse. In this case, several devices usually fail at once. If such a symptom appears, you just need to check the fuse. It is located in the mounting block. You can find it using the diagram on the block cover. To check, the fuse is removed from the mounting block.
The easiest way is to install a known good fuse. If this is the reason, then the light should light up when the ignition is turned on. You can also check the fuse by measuring the resistance with a multimeter.
Battery charging lamp malfunctions: causes and solutions
The battery indicator on the dashboard is designed to monitor the correct operation of the battery-alternator circuit and the condition of the on-board power supply elements. When the ignition is turned on, the battery charging lamp should light up - the absence of an indication warns the driver of a malfunction of any component or mechanism. To properly diagnose a malfunction, it is necessary to understand the structure and functions of all components in the system.
- Battery
- Diode to minus.
- Control diode.
- Generator.
- Diode to "plus".
- Stator.
- Relay-voltage regulator.
- Rotor.
- Capacitor jumper.
- Fuse box.
- Charge indicator with light bulb.
- Voltmeter.
- Ignition coil distributor relay.
- Ignition coil with lock.
While the generator is operating, the battery is charged through a diode bridge and relays, which provide a constant voltage of 13.2 - 14.6 Volts. When you turn on the ignition - turn the key in the lock, the excitation circuit in the on-board network components is activated, equalizing the voltage values at the terminals of the generator and battery. After the phase voltage has equalized, the control light goes out and the system operates in normal mode.
Attention! The battery must be in a charged state during its entire service life - if left for a long time with a low charge level, rapid sulfation of the plates and loss of capacity occurs.
In modern cars, there is no provision for a voltmeter on the instrument panel - the state of the circuit is controlled by an electronic control system: sensors take readings and send data to the unit controller. The ECM analyzes failures, recording them as error codes in the memory log. Typical breakdowns can be identified independently by checking each element sequentially in a certain area.
Source
How to check the generator regulator relay? Let's do it right
All modern cars are equipped with ABS sensors that include Brake Assist Control. This is one of the delicate systems that often fails on budget machines. In Europe, for several years now, manufacturers have been required to equip any production cars with this safety system, and manufacturers of cheap cars are clearly saving on high-quality ABS by installing systems that are not very durable and practical. Sensors of this system are installed on all four wheels, they are activated when sudden braking occurs and a wheel locks. In this case, the system unlocks the wheel, allows it to turn and gradually slows down.
In fact, it turns out that cheap ABS not only does not help to brake more effectively, but also lengthens the braking distance. There is another serious problem - after several years of operation, when the car is out of warranty, on many cars the ABS light comes on for no reason. Firstly, it is inconvenient to drive with a light constantly on on the dashboard, and secondly, if you have a clear impression that something is wrong with the car. Interestingly, a lit ABS light does not always mean a problem with the anti-lock braking system. There may be other problems.
Why does the ABS light even come on?
In a normally running vehicle, this indicator shows you that the wheels have been unlocked. In this case, everything works fine, the sensors sensed the need to turn on the safety system, initiated its operation and demonstrated to the driver that some assistance was provided when braking. When you see the ABS light on while braking, it is better to release the brake pedal a little and take over control of the car. If you have an expensive, high-tech car, you can trust the well-thought-out systems and let ABS+EBD do the job. In other cases, the light may be on for the following reasons:
- the sensors are clogged, the on-board computer indicates that the diagnostic error code should be read;
- Dirt or rust got on the sensors, which caused the anti-lock braking system to turn on incorrectly;
- there is a problem in the on-board electrical system, which is demonstrated by random lights coming on;
- the wheel bearing has failed, which forces the sensors to constantly turn on the anti-lock braking system by mistake;
- the fuses in the unit responsible for the ABS system have failed and are passing the signal directly;
- There was an error in the computer that caused the ABS light to come on.
Also, sometimes troubles occur with the generator and other elements of the machine’s electrical circuit, which can result in the lighting of the diagnostic system light or warning lights of any type. For example, on a Volkswagen car produced in the 2000s, the anti-lock braking system light comes on even if there is an error in completely different components. Therefore, self-diagnosis is only a partially acceptable method of solving the problem, because often the driver does not have special tools at hand for a good investigation.
What can you check yourself if the ABS light comes on?
The first thing you can do on your own in such a situation is to go to a car wash and ask for a good wash of the rims. Often, this intensive pressure washing can clean the ABS sensors located near the brake discs. On your way to the car wash, you can perform another simple test. Accelerate to a speed of 80-90 kilometers per hour, close the windows and turn off the music. If in this driving mode you hear a slight or annoying hum in the area of the wheels (front or rear), the likely cause of the light is a failure of the wheel bearing. There are several other things you can do:
- inspect the fuse box and replace the module that is responsible for the operation of the anti-lock braking system;
- if possible, read the diagnostic error code and read about it on the forums;
- to a specialist, describing your situation, and then try to correct the error yourself;
- get to the ABS sensors yourself by jacking up the car and removing the wheels to check their cleanliness;
- inspect the electronic control unit located under the hood, check that there is no liquid in it or on it;
- the best solution is to go to a service station and pay for diagnostics of the car's anti-lock braking and electrical systems.
No charging
Auto seven 2010 injector. The battery has failed to charge. When you turn on the ignition, the light on the dashboard lights up, when you start the engine, it blinks at half-glow, when you give it gas, it lights up brighter, but there is no charging at all. It appeared periodically at higher speeds, but now it has disappeared altogether. The Akum is fresh, charged, the light in the instrument panel is working. What could be the reason for watching first?
- Why might the new generator fail? – 6 answers
- Why does the VAZ 2107 battery drain quickly? – 6 answers
- The voltage regulator fails on a VAZ 2107 - 5 answers
- What causes the charging current to decrease as the speed increases? – 4 answers
- Why, when warming up, does the voltage from the VAZ 2107 generator drop? – 4 answers
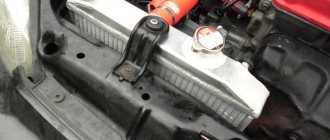
Remove, disassemble, change the rectifier, eliminate antifreeze leaks from under the thermostat pipes.
Generator, diodes probably burnt out
check the diode bridge, the charge relay may not work due to the diodes, a weak glow is evidence of a broken diode on the bridge
Check it yourself so you know what to change.
Thank you very much to everyone, especially Nikolaevich. The answer was 100% correct. Antifreeze was leaking from the thermostat to the generator. I took it apart and saw the following picture: the winding is attached with 3 wires to the diode bridge and one of them burned out completely and the fastening on the diode bridge burned out. I installed a new one, soldered the contact and everything worked. Thank you all for the advice - everything was correct and to the point! Great site!
Subscribe
to our channel in
Index.Zen
Even more useful tips in a convenient format
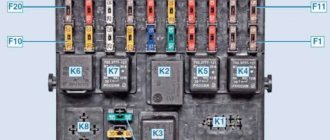
Power fuses
The power fuse box is located under the hood and is located between the battery, strut support and coolant reservoir. Looks like a vertically mounted box. By removing the top cover, access to the power fuses appears.
F1 (50 A) - electric power steering . If the steering wheel turns hard, also check fuse F32.
F2 (30 A) - heater fan
F3 (60 A) - generator . If the battery discharges quickly or the discharge lamp is on, check this fuse, as well as the operation of the generator itself and its brush.
F4 (60 A) - generator
F5 (30 A) - low beam headlights . Also check relay K9 and fuses F12, F13.
When troubleshooting any electrical problems, use caution. Replace fuses and relays only with the engine off and the ignition off.
If your fleet contains not only Grants, you can also read about Kalina fuses and relays.
I’ve already written more than once, the dashboard lights don’t come on at all, i.e. it sometimes lights up for a couple of seconds (once a month) and goes out, the problem has been around for a long time, I thought, I recently transferred it from another car, one of them doesn’t light up, I changed the fuse, I changed the cigarette lighter, I changed the relay, has anyone encountered this? It’s clear that it’s easier to go to an auto electrician))) But suddenly someone has already encountered this. Thank you))
Relay and fuse box
The fuses in the Lada Kalina are located under the dashboard, in a block located to the left of the steering wheel. To get to it, you need to open the cover in which the headlight switch is built in. The lid has latches; if you pull it towards you by the upper part, it will open and fold down (its lower part is fixed on an axis).
F1 (10 A) - immobilizer, dashboard lamps and sensors, reversing light, turn signals . If any of the gauges on your dashboard stop working, or one or all of the warning lights stop lighting up, check that fuse, as well as the gauges or bulbs themselves. If the rear white light does not come on when you engage reverse gear, it could also be this fuse or the reverse switch.
The reverse switch is located on the transmission, to change it you will most likely need to remove the engine cover to get to it. Located on the left side in the direction of travel on the rear of the gearbox. If the turn signals do not work and this fuse is intact, also check relay K5, the turn signal control knob, its connector, as well as the turn signal lamps themselves.
F2 (30 A) - electric windows . If the power windows stop working, check this fuse, as well as relay K2. If the fuse and relay are good, there could be a number of reasons. First, try pressing the power window button and slamming the door. If the mechanism “bites” when the glass is raised, this may help.
Otherwise, you need to disassemble the casing and look at the mechanism. When disassembling, you need to check the serviceability of the gears and all components of the window lifter, including the motor brushes. It could also be a problem with the power window module. It is located in the left rear door; if there is something wrong with it, then most likely you will have to change this module to a working one.
F3 (10 A) - alarm.
If the emergency lights do not work and this fuse is good, check relay K5. If your left or right turn signals come on and are constantly on, even when you turn off the ignition, this is a factory defect. In this case, it is necessary to replace the body electronics control unit. This can be done in official salons.
F4 (20 A) - windshield wiper, heated rear window . If the windshield wipers do not work and this fuse is intact, also check relays K4 and K6. The issue may be in the windshield wiper motor or its mechanism. Check the wiper switch and its connector.
If the rear window heating does not work, check fuse F8, the heater terminals, their contacts, as well as the contacts of this fuse and relay K6. Another issue could be poor contact on the body. The wiring ground is connected to the body under the dashboard. If there is poor or oxidized contact in this area, it can also cause problems with the correct readings on the panel instruments.
F5 (25 A) - heater, electric power steering, windshield washer . If this fuse and relay K4 are intact and the stove does not work, the problem may be in its electric motor (brushes) or the power button, as well as its contacts. If the electric power steering does not work, this fuse and fuse F31 are intact, then it is better to contact a workshop, because it will be difficult to find and fix this malfunction yourself.
F6 (20 A) - sound signal.
If this fuse and relay K8 are working, but the signal does not work, check the horn itself. It is located under the front bumper near the radiator. Sometimes it is enough to turn the tone adjustment screw. The location is inconvenient because water can easily get into it; alternatively, you can reinstall it in a higher place, or install another horn that is less sensitive to water and moisture.
F7 (10A) - LCD dashboard indicator, brake lights, interior lighting . If your brake lights don't work, check this fuse. If it is intact, check the brake light switch, which is located at the base of the brake pedal; it is a round piece with two wires connected to its terminals. If this is the case, then replacing it will help. Costs about 100 rubles. Also check the bulbs in the taillights. If one brake light does not light, then the lamp is most likely burned out. If both signals do not light up, then most likely the problem is in the relay, fuse or switch.
Other types of battery faults
Often, the battery ceases to perform its direct function due to various types of deformation of its body, which lead to the battery heating up, charging poorly, wires leaving the battery (losing contact) and connections to other vehicle mechanisms. If so-called bridges form between the electrode terminals, it is necessary to thoroughly rinse the battery using ordinary water, and then moisten a rag in a soda solution and wipe the battery.
If cracks appear between the fastening parts and the battery terminals, there is no need to try to repair it yourself. Believe me, the effectiveness of your actions will be minimal. Moreover, they can lead to the battery becoming completely unusable. Immediately go to a service station, where this malfunction will be quickly eliminated.
Very often the battery gets hot (sometimes you can even see that it is swollen) due to the fact that there is not enough ventilation in its case. You can undoubtedly cope with this problem yourself. You just need to clean the holes in the battery plugs intended for its ventilation. The more difficult problems to deal with are those that cause electrolyte leakage through the vents mentioned above. This may indicate the following phenomena:
- Hydrolysis (in other words, evaporation of the electrolytic composition). By hydrolysis we mean, in general, a normal process that leads to unexpected difficulties in the operation of the battery only when it is accelerated as a result of critical discharges, leading to the fact that the electrodes begin to sulphurize. You can cope with hydrolysis by charging the battery for a long time, and at a current strength that is five percent of the battery capacity.
- Electrolyte evaporation resulting from poor-quality fixation of the housing and the voltage relay. The relay needs to be replaced or adjusted.
- Electrolyte evaporation due to the fact that too much charging current comes from the generator (the battery heats up). It is necessary to inspect the charging system, as well as all electrical equipment, using a voltmeter. Connect it to the “plus” of the generator. The device should display no more than 14.2 V.
- High electrolyte level. Unnecessary liquid must be drained. Be guided by the fact that there should be no more than a few centimeters above the plates.
If the battery is severely swollen or any mechanical damage appears on its body, it is recommended to contact specialists who will advise you what to do with the battery. It may be possible to repair it by ensuring the required contact between the battery cells and restoring the integrity of the case. And perhaps the battery will have to be replaced.
Circuit fault
The reason the light bulb does not light may be a problem with the circuit powering it. There are several nuances here:
- Problems with contacts
. Quite a common problem. Usually appears after winter. During the cold season, moisture accumulates on the connectors, which causes the formation of oxides. The contact becomes significantly worse, as a result, the light bulb stops working. Typically, this problem manifests itself extremely unstable. One time it doesn't light up, the next time it works as usual. Clean all connectors and treat them with grease intended for this purpose; - Open circuit
. To identify the problem, you need to check the circuit using a multimeter. Perhaps there was a break somewhere. Find the faulty area and replace it; - Relay problem
. Some car models have a relay that controls the battery charge light on the panel. If this relay fails, the lamp will not light up. To check, use a multimeter to measure the voltage at the positive terminal of the relay. If there is a problem with the generator, the voltage will be less than 6 V; if the voltage is higher, the relay is faulty. It needs to be replaced. In detail about this, we wrote an article “How to check the generator regulator relay?”.
Troubleshooting
If you have identified the reason for the activation of this indicator, it’s time to start eliminating it. Below are the main problems and methods for solving them:
- You can eliminate the weakening of the belt or its rupture by adjusting the degree of tension or resort to replacing it;
- in order to clean oxidized terminals, it is enough to clean them using fine-grained sandpaper;
- in the event that the battery is discharged as a result of prolonged operation of electrical appliances with the engine turned off, it is enough to recharge it;
- If there are various internal damages, you should contact a specialist.
Faults such as failed “brushes” and generator wires, as well as broken windings or broken relays cannot be eliminated by repair. In this case, it is advisable to replace the spare part.
conclusions
By carefully monitoring the dashboard readings, you will be able to independently identify problems in the operation of your vehicle at first and avoid serious consequences. We also draw your attention to the fact that you can always order the parts you need from our company. We offer competitive prices and will help you save not only money, but also time, because you will not need to look for the necessary spare part in stores. We guarantee high quality and excellent performance. To place an order, call the contact phone number.
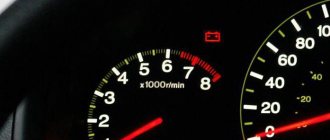
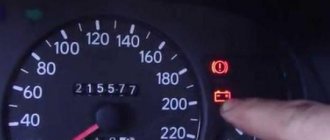
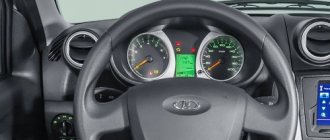
About the battery light
It is more correct to call the battery light an indicator of generator operation. When it lights up after half a turn of the ignition key, we can conclude that everything is in order. However, if the light comes on while the car is moving, the generator is clearly not working, and the on-board network is powered by the battery. If this happens, then this is a reason to stop by the nearest car service center.
Thus, the indicator should light up as soon as the driver turns the ignition key half a turn and go out as soon as the engine starts.
But it also happens that the light does not light up when the ignition is on and the engine is off. Find out why this happens below.
Video about the reasons why the battery on the Lada Kalina does not charge
The other day the charge indicator started blinking; when warming up at idle, charging disappeared; if you turn it up to 2500 rpm, it will charge. The next day there was no charging at all. It was decided to open the gene. You can't do without a pit; all the work had to be done from below. There is nothing left of the 60t brushes - 2 mm instead of the required 5 minimum. I replaced it and everything was fine, with a hungry 14.3 with all consumers, when warming up - 14...13.9 v.
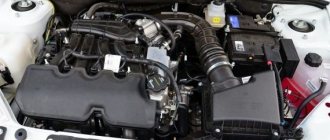
Generator faults
- Wear of copper-graphite brushes.
- Development of rotor slip rings. In this case, the contact between the brushes and the rings is broken; often the brushes hang for a while, which is why the excitation of the rotor windings periodically disappears.
- Short circuit/break in the stator winding.
- Failure of the rectifier bridge.
- Malfunction of the relay regulator (also called a chocolate bar).
- Short circuit/break in the stator winding.
- Loss of contact in the places where the relay-regulator and diode bridge are attached. In such cases, sometimes the battery light comes on when the engine is cold, but goes out after warming up. When heated, the parts expand, causing contact and charging to be restored.
We looked at those electrical faults that cause the generator to not charge. There are a number of mechanical breakdowns that can cause extraneous sounds in the engine and cause failure of the unit.
Reasons why the indicator does not light up
It is extremely important to be able to independently find out the causes of the problem, as well as study ways to eliminate it. In fact, there are many reasons why a light bulb fails. However, you will have to check all the options in order to come to the only correct decision.
As a rule, the initial knowledge of an auto electrician is enough to carry out the inspection. As mentioned above, there are several reasons, but they are divided into two categories: harmless and dangerous.
A dangerous cause that requires immediate repair is a circuit malfunction or breakage. As for harmless reasons, this is a banal light bulb burnout, battery discharge, etc.
Along with this, the same reason can turn from harmless to dangerous. And this is important to understand.
Battery discharge
If, at the same time that the battery light does not light up, the dashboard instruments do not turn on or are dimly lit, then this is a clear sign of a low battery. The problem can be “cured” by simply charging the battery.