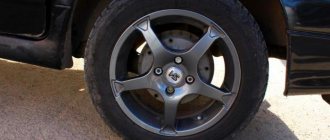
How often do you have to deal with bad weather on the road? Given the peculiarities of the domestic climate, probably quite often. If so, you are of course using deflectors, which not only help protect your side windows from small stones and dirt, but also allow you to open them slightly when it rains, eliminating the possibility of moisture entering the car, even in strong crosswinds.
Deflector - types and principles of operation
The main task of the deflector, or as it is also called the “cut-off”, is to prevent air flows carrying dirt, small stones and moisture from entering the car interior. This task is accomplished by using them to create a certain aerodynamics of the car body, which does not allow dust flows to get inside the car.
Such a “cutter” is always installed in the upper part of the side window, thereby creating a semblance of a visor, thanks to the shape of which dirt and dust do not enter the cabin not only from the front, but also from the sides. Well, in addition, it ensures uniform ventilation of the cabin even during high-speed driving, which is usually accompanied by strong air currents entering the cabin.
Depending on the cost of the products, there are 2 methods of attaching them: based on double-sided tape (cheaper) or plug-in (more expensive). The method of fastening also affects the safety of the car's paintwork - cheaper products often spoil it.
Preparing to dismantle the deflector - necessary materials
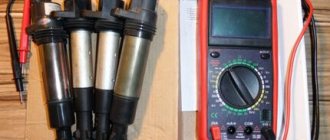
Before removing the side window deflectors, you need to prepare the necessary materials for this. As we have already said, the methods for dismantling the cutter will vary significantly, depending on the method of its attachment. However, first things first.
So, if your deflector is attached to the door using double-sided tape, to remove it you will need:
- Construction or regular hairdryer.
- A utility knife or strong fishing line, which is better.
- Solvent, white spirit or regular alcohol.
- A plastic ruler or scraper for removing ice from glass.
- Unnecessary rag (rags).
- Enthusiasm, direct hands and 30–40 minutes of free time.
If, however, your car has plug-in deflectors, when dismantling them you will have much fewer problems, and you will lose much less time than when removing the invoices. For these, all you need is:
- Screwdriver.
- 10 minutes of your time.
How to dismantle deflectors with your own hands
So, after determining the method of fastening and preparing the necessary tools, we proceed to dismantling. If the deflectors are attached to the door frame with tape, then in order to remove them safely, you should strictly adhere to the following algorithm of actions:
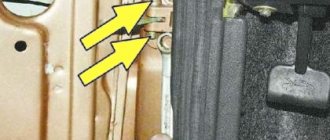
- The first thing you need to do is open and secure the car door from which the cutter will be removed.
- After that, you should thoroughly warm up the junction of the door and the deflector using your existing hair dryer. When going through this stage, it is important not to overdo it, since there is a high probability of damage to the paintwork.
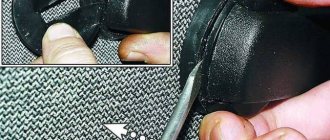
- We pry up the heated corner and thread the fishing line into the peeled cavity.
- Along the thickness of the tape, in the direction opposite to the heated corner, we pass the threaded fishing line, thereby cutting off the deflector from the door frame. This manipulation should be carried out carefully so as not to damage the coating. If necessary, continue warming up.
- If there is no fishing line, a stationery knife should be used for the above manipulations and separating the deflector from the adhesive base. When working with it, you should be even more careful, since it is much easier to damage the coating with it than with fishing line.
- After removing the deflector, remove the remaining double-sided tape.
- We generously moisten the unnecessary rag with solvent, alcohol or other available solvent liquid, methodically saturate the remaining adhesive base with it and, using a scraper or ruler, remove it.
- We admire the excellent view of our car.
What are deflectors and the reasons for their failure?
Before considering the main topic of how to remove the air ducts of a VAZ 2114 and their nozzles, you should first briefly talk about what they are.
The deflector (otherwise called an air duct nozzle or air deflector) is designed to reflect the flow of air moving from the stove through a special channel (air duct) and deflect it in the desired direction (in the direction that the driver or passenger wants; for this, it is possible to deflect the deflector guides) .
Due to the peculiarities of their design and location, side deflectors are often damaged as a result of mechanical stress (for example, when accidentally pressed). In addition, they can break if you try to clean them with a hard object (screwdriver or knife) using significant force.
How to Remove Deflectors on a VAZ 2114
We understand how to delete partitions on a VAZ 2114
Very often, motorists are faced with the question of how to remove sections on a VAZ 2114 ? This happens because they are handled carelessly (for example, by trying to force them out) and they break or shrink inside. We will discuss how to correct this situation in today's article.
What are deflectors and the reasons for their failure
Before discussing the main topic of how to remove air ducts from a VAZ 2114 and their attachments, first let's talk briefly about what they are.
The deflector (otherwise called a nozzle or air deflector) is designed to reflect the flow of air moving from the plate through a special air duct (air duct) and direct it in the desired direction (in the direction that the driver or passenger wants, the deflector guides can be deflected to achieve this).
Due to their design and layout, side deflectors are often damaged by mechanical stress (eg accidental impact). They can also break if you try to clean them with a hard object (screwdriver or knife) with considerable force.
How to remove central deflectors and install new ones
Deleting a partition may be necessary in one of the following cases:
- they become clogged and need to be cleaned;
- deeper cleaning of the system with removal of air ducts is required;
- the partitions were pressed into the air duct;
- The partitions are broken and need to be replaced.
How to dismantle central deflectors and install new ones
Removal of deflectors may be necessary in one of the following cases:
- they are clogged and require cleaning;
- a deeper cleaning of the system with removal of the air ducts is necessary;
- the deflectors were pressed into the air duct;
- The deflectors are broken and need to be replaced.
In any case, whatever the reason for dismantling them, it is quite simple to do and does not require a lot of free time or special tools. The entire process of removal and reinstallation takes place in just a few steps, the first of which is removing the dashboard panel.
In order to do this, you need:
- disconnect the battery;
- remove the receiver/radio tape recorder, disconnect the cable harness from it;
- remove the center console screens;
- remove the cigarette lighter by disconnecting the harness of suitable wires;
- remove the ashtray light bulb and disconnect the wires that go to it;
- remove all protruding buttons and adjustment knobs (to do this, carefully pry them off with a screwdriver);
- Use a Phillips screwdriver to unscrew the screws holding the instrument panel panel (one each on the left and right);
- Unscrew two screws located above the dashboard and two screws located under it;
- pry and remove the rear window heating plug;
- Unscrew the self-tapping screw located under this plug with a Phillips screwdriver;
- move the panel back and to the right;
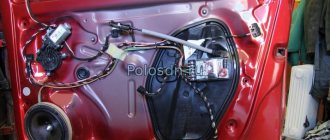
- disconnect all blocks with wiring harnesses from the switches and on-board computer.
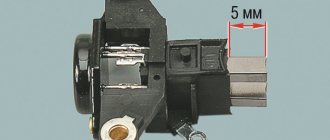
Heat from side deflectors
We return heat from the side deflectors
using pliers. VK group: Instagram: .
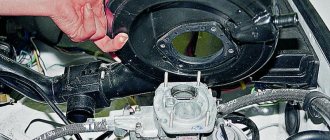
How to remove double-sided tape and replace window deflector
Once the panel is completely detached, the deflectors themselves can be removed. To do this, you need to unscrew the three screws responsible for fastening the central deflectors. One of them is located under their body, the other two are on its sides. After this, all that remains is to remove the deflector , clean it (if necessary), and install it back.
Assembly of the front panel and its installation are also carried out according to the above described scheme, but in the reverse order.
Before installing the deflectors in their place, it will be very useful to cover their perimeter with sound-absorbing material, such as modelin.
How to Install a Hood Deflector on a VAZ 2114
Content
The trend that has become a prestige for every small business to go to a car dealership is unfounded. When asked how to install a deflector on the hood, there is no need to seek advice from specialists and spend money on it. At least some car owner is quite capable of such a procedure. To do this, simply select the flywheel, read the note in detail and spend almost 10-15 minutes on installation.
Buy deflectors. money well spent
Deflectors on a car, be it the hood, door or hatch, naturally change their appearance. A well-known tuning kit from a well-known manufacturer cannot make changes in appearance. The main purpose of glossy plates is to protect the car. The front of the hood, faux grille and bumper are the most vulnerable places for sand, pebbles, and insects that mercilessly bombard paint materials while driving. What does a flycatcher do:
- it is a physical obstruction that reflects high solids content;
- changes the airflow path that removes debris from the hood and windshield.
READ Bmw E60 Signal Not Working
The secret to success with the right choice of “fly agaric”
The correct and accurate installation of the hood deflector depends practically on the choice made. Deflectors. These are model only devices, in other words, you need to buy products designed only for a specific car model. Next you need to understand the installation methods. You can find the following types of mounts for sale:
- bolts through holes;
- gumming;
- installation via clamp clamps;
- screwing into ordinary technological holes.
The first two options should be canceled immediately as they completely kill the paintwork on the hood. If you have to remove the deflector one day, the holes or adhesive residue will be left in the most visible place with elastic bands that are almost impossible to wash off. Two others deserve attention.
How to install a deflector on a hood with clips
One of the most common ways to fix flycatchers is to use what are called clamps. Their peculiarity is that they are worn on the edge of the hood, like clips. Having a soft padded material inside saves paint. The installation looks like this:
- the car hood is washed and dried;
- the deflector is released from the packaging and tries on the hood;
- then secure the nozzle to the partition and repeat the fitting, marking the location of their installation on the hood;
- Having removed the fasteners, they should be installed on the edge of the hood;
- the deflector is installed and secured to the brackets;
- The fasteners are attached with screws to the hood frame inside (if provided for by the design).
READ How to Install Engine Heater on Toyota Corolla
How to install a hood deflector without brackets
Manufacturers of tuning parts began to produce deflectors that do not have fastenings. This is especially true for new car models. The deflector has three curved blades at the front bottom, the holes on which exactly match the holes for attaching the rubber seal on the front edge of the hood. Installation in this case becomes even easier:
- Having opened the hood, you need to unscrew and remove the plastic supports from the holes in the protrusion of the deflector petal;
- Insert the plastic fasteners into the holes;
- the deflector is put on the protrusions of the plastic fasteners and secured with screws;
- due to the round shape of the holes in the slabs, you can move the entire structure relative to the drawing strip for precise alignment;
- screws are tightened.
Tips to help new car enthusiasts
Another reliable assistant for the modern car owner is the network. An incredible amount was deducted on how to install a deflector on a video recording hood. You can usually find a video about a specific car model and the available air vents.
Source
Replacing side deflectors
Now let's look at how to remove the VAZ 2114 interior air deflectors located on the sides (and this is quite easy to do; they are attached without the use of screws at all, but are held in place by eight latches). The first 4 of them are located on the outside, two in the upper part under the overlay and two in the lower part.
In order to squeeze them out, you should use a thin screwdriver or a strong knife blade. Also, in order to avoid scratches on the surface of the reflector, you should place a soft cloth under the instrument. Once the outer latches are open, all that remains is to disconnect the deflector housing from the duct body (which is held in place by the remaining four latches) and remove it.
Installing the reflector in place is done in exactly the same way, but in the reverse order. A very useful action before installation (both in the case when replacing the heater deflectors of a VAZ 2114 with new ones, and when installing old ones in their original place after cleaning) would be to glue the entire perimeter of their body with a noise-insulating material, which at the same time plays the role of a seal (for example, modelin or its analogues).
VAZ 2114 how to remove heater deflectors
The torpedo is standard, car 2114.
There are a lot of dry leaves behind the deflector, so I don’t want to pick it with tweezers. I want to take it out. Lots of disassembly? How is it removed?
Are there leaves right in the cabin? Or by the fan? although if in the cabin, then the stove also needs to be cleaned. In the cabin it’s easy to pick it up and pull it towards you; under the hood you’ll have to pull out the heater fan, shake out all the guano and pull on the tights.
ZZY Women's tights ZZY Size doesn't matter
There’s one deflector right in the cabin that’s a little broken, I think I’ll buy a new one and from it I’ll understand, while it’s in my hands, how it holds onto the dashboard or the air duct.
Good idea about the tights. I looked at the book and it doesn't seem difficult to remove the fan under the hood.
Re: > I looked at the book and it seems like it’s not difficult to remove the fan under the hood.
Everything in the book is always simple. especially - “assembly in reverse order”. in fact, removing the fan takes about 10 minutes with your arms outstretched (another thing is that you don’t need to take it off to put on tights). and tights are not a panacea. Better buy a filter.
Very often, car enthusiasts are faced with the following question: how to remove the deflectors on a VAZ 2114? It occurs as a result of the fact that when they are handled carelessly (for example, when trying to clean them with force), they break or are pressed inward. How to correct this situation will be discussed in today’s article.
Dismantling of air ducts
Sometimes, in addition to removing the deflectors, you also have to remove the air ducts themselves (this may be necessary if they are damaged or severely clogged).
In order to dismantle them, you need:
- remove the deflectors (how to do this was described above);
- remove the dashboard by unscrewing the fastening screws;
- disconnect the side air ducts (left and right) by unscrewing two screws securing them to the central air duct;
- disconnect the central air duct by unscrewing three screws, one in the center and two at the edges.
After the air ducts have been cleaned or replaced with new ones, their installation and assembly is carried out according to the specified scheme, but in the reverse order.
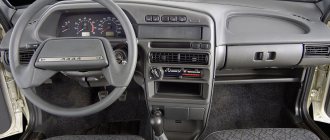
The dashboard of a modern passenger car is an independent part of the car’s interior. Moreover, one of the most important components, which must meet two requirements and solve two important problems. Provide the highest functionality and create a feeling of aesthetic satisfaction, combined with an awareness of the comfort provided by a particular panel, through conveniently located storage drawers, cup holders, instruments and control buttons, as well as pleasant, non-straining lighting.
Dashboard VAZ 2114
Dashboard VAZ 2114
Cars of the Samara 2 family are equipped with a modern VAZ 2114 instrument panel, which is also called the “European panel”. The designers worked on it so that it allows for good forward visibility, a pleasant appearance, combines information content and ergonomics, and at the same time helps the driver cope with ordinary everyday needs. And they mostly succeeded. A block of instruments and sensors installed in front of the driver’s eyes, behind the steering wheel, provides him with the maximum possible amount of information:
- In the central part there are two dial instruments, on the left there is an engine speed indicator, by which the driver determines what load the power plant is working with at a particular moment and, if necessary, corrects this process by switching speeds; in the window under the arrow there is a digital clock. On the right is a speedometer or an indicator of the current speed of the car, in the window under the arrow there are digital readings of the kilometers traveled for the entire period of operation of the car and for the last trip;
- In the upper part, between the dial instruments, there is a turn signal indicator lamp with green arrows pointing left and right;
- In the lower central part there is a red “stop signal” triangle, and below it CHECK ENGINE is a red signal for engine emergency conditions according to information from the electronic on-board unit;
- In the left middle part of the instrument block there is a dial gauge for the engine temperature, or as it is called in the literature, a coolant temperature sensor, above it there is an icon that lights up when the engine overheats. Below it are icons for the throttle, oil pressure, handbrake and battery;
- In the right middle part there is a dial indicator for the presence of fuel in the fuel tank, above it is an icon for a fully filled tank, below it is an icon for the minimum amount of fuel in the tank, as well as icons for low beam, low brake fluid level and high beam.
Ergonomics is ensured by the convenient arrangement of instruments and information icons for visual perception of information, as well as keys, buttons and levers for manipulating them. A standard on-board computer is installed in the central part of the panel, usually a Gamma, Multitronics, Prestige or State computer. The location for its installation was chosen very well and with its help the driver receives expanded information about the state of the operating engine systems and vehicle components.
This information is reflected not only on the BC display, but is also transmitted through other control or information lamps and signs located on the instrument cluster and in other places on the dashboard. In addition, the on-board computer display displays other information, for example about the timing of the next inspection or maintenance.
The glove box, which can be closed, is conveniently located and has a backlight and a fairly large niche underneath it. The central beard also has a niche for storing something and an ashtray. The air duct outlets are quite well made, allowing for efficient glass blowing and preventing fogging.
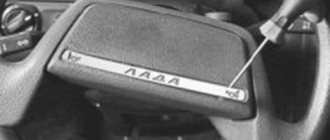
During the operation of a car, problems constantly arise with malfunctions or failures in various systems. In order to get to some of them, it is necessary to remove the VAZ 2114 panel. Even to remove the instrument panel, you need to figure out how to remove the dashboard on the VAZ 2114 (instrument panel).
In addition, on the VAZ 2114 the panel must be removed completely if there is a need to repair air ducts and the stove, or the car owner wants to completely glue and seal the joints of the panel structure so that it does not creak.
Installation of windshields (deflectors) on a VAZ 2114
0:7 The decision to install windshields (deflectors) on the VAZ 2114 came to me a long time ago. There is a small child in the family, and when you open the windows during a trip, there is a constant draft blowing through it; when it rains, you can’t open the window either, all the drops fly into the cabin. In addition, I liked their appearance; they gave the car some kind of individuality. From a distance you will look as if there is nothing, and without them the view is somehow incomplete.
0:756
1:1261
The only question is which one to choose: plug-in or overhead. I decided to go outside and watch other cars, that is, those with windshields installed . In front of me, some guy on the nine was opening the windows, and at that time his deflectors . They were plug-in. It turns out that my choice has been made, all that remains is to buy and install a deflector on the glass. It turned out that it was not so easy to do this, since this element began to go out of fashion; there are not so many of them in stores anymore, the choice is not wide, and there was still no suitable model for me. I had to go to another city in order to purchase them. Finally, I found what I needed, brought it home, drove the car into the garage, washed it, and degreased the surface of the area where I will apply the glue. Then I applied glue to the windshield and glued it in place. It turned out smooth and nice, I was pleased with the work. I rode around so carefree for a couple of days. then I began to notice that he began to come unglued from the door. The glue was of poor quality and could not withstand vibration and shaking. In order not to lose such an expensive deflector, I began frantically looking for options on how to secure it. The answer came by itself; I noticed paper clips on the desktop.
1:3461
2:504
Then it dawned on me, because they clearly have no place here, they were created to hold windbreakers. I polished up this system a little, did it right and voila! Everything is in place, nothing is loose, a problem may arise after wintering, the holder will rust, but replacing it is a five-minute task. Moreover, I impregnated it with varnish, so it shines like a cat’s eggs. It holds up perfectly and performs its functions properly, the windshield is in place, which also copes with its task. The child stopped getting sick, although the windows are often open, the muting sound of the wind is not particularly audible, and rain and dust do not get into the cabin. It seems that the outdated element of car tuning was very useful for the VAZ 2114; following my example, my friends also began installing it on their cars. They have been decorating the car for two years now and absolutely nothing has happened to them, except for a small crack that occurred due to a stone hitting it. Even here he helped me out, saving the integrity of the glass, because replacing it is not the most pleasant pleasure, especially since it is not cheap. I took a couple of photos that you can see below, where I showed the installation process and how it actually looks. I will be glad if this information is useful to someone.
2:2747
3:504
Photos were taken from the site Drive2.ru
3:576 next article:
Lambo doors on VAZ 2114
Drawings of Lambo doors are here. The entire finished Lambo door mechanism on the VAZ 2114 weighs approximately 10-15...
4:1373
Rating 0.00 [0 Vote(s)]
10852
Kia Rio
But with this model you will have to seriously tinker. Since the deflector is attached to screws that are hidden by the visor. It must first be removed.
The tools you will need are Phillips and slotted screwdrivers, a flashlight and a construction spatula.
The process involves some combination of activities. Watch in detail how this work is done in the video.
Video: removing the instrument panel visor on a Kia Rio
;
Only then can you remove the central deflector. It is attached to pistons and screws. Two screws at the top, two pistons at the top and one at the bottom. After the deflector is removed, you need to disconnect the plug.
Before dismantling the left deflector, remove the left panel and the panel under which the fuse box is located. The deflector is attached to the side with two self-tapping screws. Before dismantling the right panel, open the glove compartment and remove the right panel, unscrew the screws. Now, by prying with a screwdriver, you can remove the deflector.
Video: dismantling the central and side heating deflectors
This is how the air duct deflector is removed on different cars. Of course, within one article it is impossible to give complete instructions for all car models. From all of the above, we can conclude that the amount of work that needs to be done to remove the air duct deflector is not the same. In some cars, the deflector is removed simply by pulling it out (Renault Logan), in others you have to remove the dashboard or other large elements (Lada Vesta, Kia Rio).