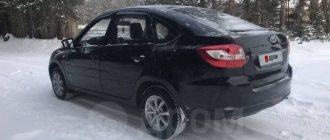
How to remove the tidy on a Grant sedan and liftback
Removing the torpedo with your own hands on cars of the specified versions before and after 2013 is simple. To do this, you only need a Phillips and flathead screwdriver.
The sequence of actions looks like this.
- Initially, you should turn off the power to the car and place it in a stable position.
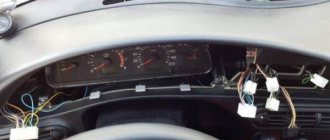
- Remove the cover of the interior fuse box.
- Next, you will need to find the mounting screw and unscrew it. The fasteners for the instrument panel trim are also unscrewed.
- Now the decorative trim can be removed and the mounting of the tidy itself can be exposed.
- There are two screws at the bottom of the console that hold it in place. The screws need to be unscrewed and the tidy lifted.
- Next, you should reach under the panel and remove the wire terminal block from its back.
Removing the front panel of Granta Lux
Before removing the center console, you will need to arm yourself with a plastic spatula or a flat-head screwdriver wrapped in electrical tape. You will also need to find several clips in case the standard ones are broken during disassembly.
- Turn off the power to the car - all manipulations with the device are performed only after disconnecting the battery.
- Using a plastic spatula or screwdriver, remove the radio/radio plug.
- Pull the heater and air duct controls towards you. The procedure must be performed with extreme caution. There is a risk of damaging the regulator.
- Next you will need to remove the facing plastic of the beard by prying it off with a screwdriver. The design contains plastic latches that are easy to break. During reassembly, new ones are put in their place.
- At the end, you will need to lift the tidy and disconnect the contact groups of wires from the reverse side.
How to remove the radio on the Lada Kalina 2
To remove the MMC of the new Kalina, first remove the plastic panel trim (see above), and then remove the fastening screws.
Now you can familiarize yourself with the sticker on which the radio model is indicated, and based on this, select the appropriate firmware. You can also disassemble the MMC to replace the standard amplifier chip with a more powerful analogue. Don't forget that you can connect a rear view camera or amplifier to the standard radio.
Keywords: cassette player Lada Kalina | Lada Kalina torpedo
Granta FL
The modern version of Fl 2021 differs little structurally from its prototype. The car tidy is removed in the same way. Similar fasteners and identical clamps are used here.
How to remove a panel on a Grant to install a radio
In most configurations it comes with a plastic plug instead of a tape recorder.
Next, you will need to reach into the resulting groove and find a standard terminal there for connecting a sound reproduction device. It needs to be taken out.
After this, a short shaft is placed on the panel, intended for mounting a modern radio. At the end, the device is connected to the on-board network and inserted into the prepared shaft.
How to remove the center console in a luxury package
Let's say it was decided to dismantle the panels located on the center console. You can see that there are two of them. One is the front panel of the air conditioner, the second protects the radio and contains air duct grilles in its design. These two parts are not connected to each other. However, it will not be possible to remove the radio panel unless you first remove the climate control panel. Below it are metric screws (A, B) that secure the media center shield from below.
Analysis of the Grant panel
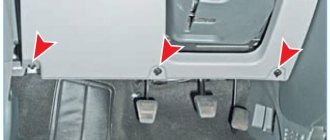
To completely disassemble the tidy, you need to follow a sequence of actions.
- Disconnect power from the battery.
- Remove the glove compartment cover and fuse box.
- Next, you need to unscrew the fastening screws of the instrument panel trim and in the glove box.
- Now you should proceed to removing the steering wheel and column cover.
- The MUS, the transmission tunnel, is also removed.
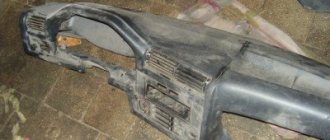
- After this, the center console trim is pryed off and removed from the car.
- Now you need to remove the instrument panel and the heating and ventilation system controls.
- After this, you should unscrew the screws securing the torpedo and lift it from its seat.
- Next, all wire chips and contact groups are disconnected.
- Now you can completely remove the dashboard from the car.
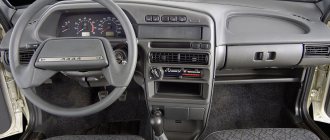
Removing the panel (dashboard) of Lada Granta
Required tools: flat and Phillips screwdrivers, 13 and 24 socket heads, marker.
Disconnect the negative cable from the battery. Remove the cigarette lighter (squeeze the lock and remove the cigarette lighter socket, disconnect the block with wires). Remove the head unit of the audio system (radio tape recorder) and disconnect the block with wires from it.
Remove the central panel trim (dashboard). Remove the glove compartment cover and remove the screws securing the inner panel.
Remove the pillar trim. Then remove the central tunnel. Then remove the steering wheel. Remove the steering column cover and steering column switches. Remove the exterior lighting control unit (first remove the fuse box cover, then unscrew one screw and disconnect the connector.)
Remove the headlight hydraulic corrector regulator (remove the handle, unscrew the fastening nut, remove the hydraulic corrector regulator).
Remove the instrument cluster. Then.. Remove the 4 screws securing the air duct damper control unit to the instrument panel. Remove the 18 screws securing the decorative panel to the frame (Figure 11.13). Move the decorative panel away from the frame as far as the air ducts attached to its inside allow.
| Place your hand under the panel and use a long Phillips screwdriver to remove two screws No. 1 (Figure 11.14) (one on each side) securing the front side glass air ducts to the decorative panel. Remove the ends of the air ducts from the nozzle pipes No. 2, and then remove the inner ends of the air ducts from the pipes of the heater body. |
Pull the panel towards you, and bending air duct No. 4 of the windshield, transfer it through box No. 2 (Fig. 12.1) for supplying air to the central deflectors on the heater body. Remove the decorative instrument panel.
| To make it easier to reinstall the panel in the future, remove two screws No. 3 (Figure 11.14). |
- Remove air duct No. 4 (Fig. 11.14) of the windshield.
- Remove the two bracket nuts from the panel brackets.
- And move them to the air duct brackets - this will allow you to install the decorative panel in place without the air duct, and secure the air duct to the panel after its installation by screwing in the screws from the interior side.
Figure 11.13. Location of Lada Granta panel screws.
Figure 11.14. Decorative instrument panel (view from the inside):
Kia Rio
But with this model you will have to seriously tinker. Since the deflector is attached to screws that are hidden by the visor. It must first be removed.
The tools you will need are Phillips and slotted screwdrivers, a flashlight and a construction spatula.
The process involves some combination of activities. Watch in detail how this work is done in the video.
Video: removing the instrument panel visor on a Kia Rio
Only then can you remove the central deflector. It is attached to pistons and screws. Two screws at the top, two pistons at the top and one at the bottom. After the deflector is removed, you need to disconnect the plug.
Before dismantling the left deflector, remove the left panel and the panel under which the fuse box is located. The deflector is attached to the side with two self-tapping screws. Before dismantling the right panel, open the glove compartment and remove the right panel, unscrew the screws. Now, by prying with a screwdriver, you can remove the deflector.
Video: dismantling the central and side heating deflectors
This is how the air duct deflector is removed on different cars. Of course, within one article it is impossible to give complete instructions for all car models. From all of the above, we can conclude that the amount of work that needs to be done to remove the air duct deflector is not the same. In some cars, the deflector is removed simply by pulling it out (Renault Logan), in others you have to remove the dashboard or other large elements (Lada Vesta, Kia Rio).
Wind deflectors on the Grant Liftback are not included as standard. The owner installs the accessory himself, having previously purchased it at a car dealership.
The gluing process is not complicated and intuitive. Every driver can cope with the task. Contacting the service center is not necessary at all. If you have accessories and rags, the work will take no more than ten minutes.
Removing the Lada Granta instrument panel
Tools:
- Open-end wrench 10 mm
- Ratchet wrench
- Extension
- 8 mm head
- 10 mm high head
- 13 mm head
- 21 mm head
- Torx T20 socket
- Medium Phillips screwdriver
- Large flat screwdriver
Parts and consumables:
- Technical capacity
- Coolant
Notes:
Carry out work if it is necessary to replace the instrument panel, panel wiring harness and elements of the heating and ventilation system.
1. Disconnect the wire terminal from the negative terminal of the battery.
2. Drain the engine cooling system as described in this article.
3. In the engine compartment, remove the heating and ventilation system filter as described here.
4. Using a Phillips screwdriver, unscrew the four self-tapping screws securing the heating and ventilation system filter casing to the instrument panel and remove the casing.
5. Loosen the clamps securing the heater inlet and outlet hoses and remove the hoses from pipes 2 of the heater radiator. Using a 10 mm high socket with an extension, unscrew nut 1 of the stud securing the flange of the heater radiator pipes to the front panel.
6. Inside the car, remove the mounting block cover as described in this article.
7. Remove the instrument cluster as described here.
8. Remove the floor tunnel lining as described in this article.
9. Disconnect the steering column from the instrument panel frame and lower it to the floor or remove the button completely, as described in this article.
10. Remove the instrument panel center trim as described here.
11. Remove the seals for the right and left door openings at the installation locations of the instrument panel and the A-pillar upholstery.
12. After overcoming the resistance of the clamps, remove the left side trim of the instrument panel.
13. Similarly, remove the right side trim of the instrument panel.
14. Use a screwdriver to pry up the upholstery of the left front pillar and, overcoming the resistance of the pistons, remove the upholstery.
15. Similarly, remove the right front pillar trim.
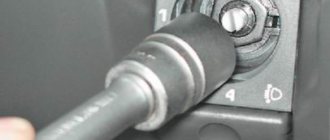
16. Remove the headlight beam adjustment knob by pulling it towards you.
17. Using a 21 mm socket, unscrew the nut securing the regulator to the instrument panel and remove the nut.
18. Remove the headlight beam adjustment control from the instrument panel hole.
19. Using a screwdriver, press out the two latches on the glove box and remove the top edge of the box from the instrument panel.
20. Open the glove box to a large angle and, applying the necessary force, pull the four split hinges of the box from their axes.
21. Near the opening of the left door, use a 10 mm socket to unscrew nut 1 securing the tip of the “mass” wire and remove it from the stud.
22. Using a 10 mm socket, unscrew the two nuts securing the ground wire lugs to the right bracket of the instrument panel console and remove the wire lugs from the studs.
23. Using a 13 mm socket, unscrew the bolt securing the right bracket of the instrument panel console to the body bracket.
24. Similarly, unscrew the bolt securing the left bracket of the instrument panel console to the body bracket.
25. Squeeze the two clips and disconnect the wiring harness connector from the brake light switch.
26. By pressing the latch, disconnect the wiring harness block from the gas pedal module.
27. Disconnect the instrument panel wiring harness connector from the clutch pedal position sensor wiring harness connector.
28. On the right side of the instrument panel, pressing the latch, disconnect one block of the wiring harness from the controller.
29. Using a screwdriver, use a screwdriver to slide the block clamps and disconnect the two wiring harness blocks from the fuse and relay mounting block.
Review of the dashboard of the Lada Granta Review of the dashboard of the Lada Granta
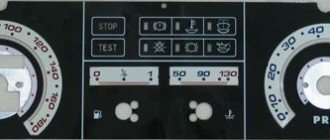
For the high-quality functioning of all vehicle systems, it is necessary to ensure correct and reliable control over a number of basic parameters. This is the instrument panel on the Lada Grant. It clearly and timely informs the driver about the operating status of all components of the machine, the speed of movement, and the equipment currently turned on.
Lada Granta - icons on the instrument panel
When buying a car, maximum attention is paid to this detail of the car’s interior. Proper placement of all elements indicates that all the needs and position of the driver have been taken into account.
Panel Features
Even if this is your first time driving a Lada Granta, the signs on the instrument panel will be informative and understandable on an intuitive level. The manufacturer tried to take into account the wishes and requirements of the car owners. The standard tachograph-speedometer pair is distinguished by large, clear numbers that are easy to read. At night, a soft green backlight is provided that does not strain the driver’s vision.
The assembly of the entire panel is satisfactory:
- Smooth and minimal gaps show the accuracy of the fitting of the elements. There are no cracks or distortions, which is so often characteristic of domestic cars.
- High-quality, pleasant to the touch, soft plastic.
- The pleasant design of the new instrument panel on the Lada Granta in classic black also pleases with its excellent assembly.
- The absence of squeaks and crunches, even after long-term use, does not irritate and does not create extraneous sounds in the cabin.
The panel is assembled securely and is well fixed in the cabin.
Designation of icons on the Lada Granta instrument panel
The dashboard diagram shows all the icons, sensors and indicators responsible for the operation of the car. Limited quantity - 39 pieces, does not clutter the instrument cluster. At the same time, the dashboard is very informative.
Designation on the Lada Granta instrument panel:
- Tachometer - designed to display the number of revolutions of the internal combustion engine. The area highlighted in red indicates a dangerous situation in the motor load.
- Sensor of a faulty motor control module. The lamp lights up (orange) when the ignition is turned on. After the engine starts, the indicator goes out. If it is constantly burning, it is worth checking the functionality of the elements of the entire motor control system.
- Signal lamp for left turn signal on.
- The engine oil pressure sensor is activated (red) when the ignition is turned on. When the required pressure is reached, the sensor goes out. A constantly active indicator (more than 5 s) shows problems with the pump, cylinder-piston system, and low oil level.
- ABS system indicator light - if it does not go out after 2 seconds, then there are problems with the traction control system. Lights up when the ignition is on (orange).
- Immobilizer indication lamp - standard anti-theft system. An orange light indicates the vehicle's security status.
- The coolant temperature indicator is on for no more than 5 seconds after starting the engine (red lamp). A light that does not go out indicates a high refrigerant temperature (above 115 ℃). The motor may overheat. When the temperature drops below 110 ℃, the lamp will go out and the sound alarm will stop sounding.
- The brake system emergency indicator turns off (red) after starting the engine. When the light is constantly on, it is worth checking the fluid level in the tank. The minimum mark indicates that it is necessary to add brake fluid to the container.
- The right turn signal indicator light is green arrow.
- Battery charge level indicator – turns on when the ignition is activated. The light goes out after starting the engine. If this indicator on the Lada Granta instrument panel is constantly lit, it means there is no charging current as a result of a faulty operation of the voltage regulator or generator. This option is possible if there is insufficient tension (break) of the generator belt.
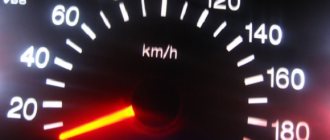
- Speedometer – displays the current speed of the car.
- Stability sensor - lights up when the ignition is turned on. The indicator should go out after the engine starts running. But if it is constantly on, then the directional stability function is disabled. Flashes or lights up while driving – there is a malfunction in the system.
- Gear shift indicator – signals the impossibility of upshifting.
- The high beam light is on.
- Indicator that the rear fog lights are on.
- Low beam light.
- Indicator that the front fog lights are on.
- Daily mileage reset key – used to reset daily mileage or select modes for displaying daily or total vehicle mileage.
- Route controller display – trip data, current time, mileage, air temperature and more are displayed. The difference may depend on the vehicle configuration.