The secret of 99 - how is people's love justified?
The car, whose history goes back almost four decades, is still considered one of the most successful VAZ assemblies. Until 2004, all VAZ 21099 models had a carburetor engine type, and only after 2004 did manufacturers replace this device with an injector. So the carburetor 99, a symbol of the dashing 90s, is today found on the roads of post-Soviet countries no less often than modern cars.
The car has front-wheel drive, a 1.5 liter 4-cylinder engine. A VAZ car can accelerate to 160 km/h with its 70 hp. Some models have a 1.5i engine with 76 hp, although not many of these cars were produced. The carburetor of model 21099 is very economical, the average consumption of the VAZ 21099 reaches 7–7.5 l/100 km. Fuel consumption on the highway with high-quality fuel and average speed is 5.5 liters.
Checking the ignition system
To check the ignition module of a car with an eight-valve injection engine, you will need the following items:
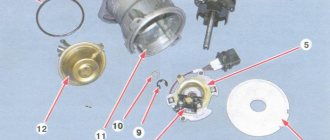
Ignition module with injection engine
Adjusting the VAZ 2109 carburetor with your own hands. Quickly and efficiently.
Do not rush to check the ignition module before testing the entire system. It should work correctly and properly, with all devices connected. If necessary, turn on the ground and ignition. After this, gasoline should begin flowing into the system. If the red indicator is on, diagnose problems on the VAZ-on-board computer 21099
to which the laptop is connected.
READ Connecting the carburetor 402 GAZelle engine
After all preparations have been made, check the throttle valve. To do this, turn on the ignition and use a tester to determine the voltage value of the on-board computer sensor. There should be the following indicators: on-board system voltage - greater than or equal to 12 volts, sensor - at 0.5 volts, damper opening degree - up to 1 percent.
Press the gas pedal. The indicators should change - within 4.5 volts and from 90%, respectively. For better results, it is better to increase the throttle system indicator to one hundred percent. After all this, turn off the additional air supply regulator and achieve 50 percent opening. The last stage is to adjust the throttle system until it is completely closed.
Carburetor design - what's inside?
The VAZ 21099 carburetor is technically very well made and is not picky about fuel quality. The device consists of 2 chambers in which fuel is distributed and further injected into the car engine. The operation of the first chamber of the carburetor ensures a smooth transition from idle to throttling mode. The main process of supplying the fuel mixture occurs in the second chamber of the device. The fuel in the chamber rises up through the tubes and mixes with air.
The main action in the operation of the second chamber is performed by the econostat - when the throttle valves are open while driving at high speed, it enriches the fuel mixture. The starting device is responsible for preparing a saturated combustible mixture when starting a cold engine. The air damper in this device is offset and opens with a flow of air, as a result of which it retracts the throttle spring and ensures uniform mixing of the mixture.
A device called an economizer is responsible for idling in the VAZ 21099 carburetor. It consists of a switch mounted on an adjusting screw, an electromagnetic valve, a control unit and a switch. The economizer shuts down during forced idle, during sudden braking of the car engine, when changing gears and while the engine is running on an incline.
This device is very useful as it prevents the release of carbon monoxide into the atmosphere. When operating at forced idle, the engine speed increases and can reach 2100 rpm. In this case, the solenoid valve is activated, which acts on the power control unit and turns it off - the fuel supply in the idle system is stopped.
Why is carburetor tuning done on a VAZ 2109?
The answer is obvious. This gives a serious increase in the dynamics of the car and its power. Typically, not everyone does tuning a VAZ 2109 carburetor with their own hands. For this, there are special workshops that seriously engage in tuning the VAZ 2109.
Work on the carburetor is carried out as part of a set of measures to improve the power unit and ignition system. But not everyone has the means to do this.
Let's describe the simplest methods. So, you have started tuning the VAZ 2109 whose carburetor you are planning to “pump”. What is needed first for this?
Of course, setting up a VAZ 2109 carburetor is not the easiest task in the world. But the simplest actions to increase power are available to everyone.
- We get to the second chamber of your carburetor. There you need to remove the spring from the throttle valve vacuum drive. What will it give? With a slight increase in fuel consumption, you get a guaranteed “plus” in the car’s dynamics. Cheap and cheerful.
- The second thing that can be done to improve it is to slightly modify the same vacuum drive. To do this, you will need to insert a ring of wire under the nut that secures the damper drive levers in the second chamber. What is the result? And this is what we get - we now have a protrusion located between the wire and the other lever. After this, you just need to tighten the nut. Again, we get an increase in dynamics, and an increase in consumption to a minimum.
In general, when it comes to tuning, always expect higher fuel consumption. And the more you modify the carburetor, the higher the final figure will be. If this doesn’t scare you, then let’s continue.
The following are the methods:
- Replacing the diffuser. If the standard diffuser of the primary chamber is marked 3.5, then, without hesitation, set it to 4.5. You will be happy. Or rather, growth.
- Further more. You need to change the pump nozzle. The usual one costs 30. Throw it away and set it to 40. Progress will be noticeable.
A separate conversation is tuning the VAZ 2109 Solex carburetor. Precise adjustment of the Solex VAZ 2109 carburetor in workshops is quite expensive, but it will pay off with interest.
Here, some fans of “pumping” even manage to install two carburetors at once. Experts, taking a repair kit and an adapter manifold, manage to quite successfully synchronize the opening of the dampers. I think there is no need to explain what kind of increase you will get with two carburetors.
You can also read on this topic:
Full test drive of the Lada Vesta car
Tuning the VAZ 2109 engine on your own
Tuning Volkswagen Golf 2: optics, bumpers, skirts and radiator grille
The VAZ 21074 injector can easily be called an “updated seven”
UAZ Patriot Devolro may receive Mercedes and Toyota engines
Alex S December 2nd, 2013
Published in: Russian cars
Tags: Our cars, Tuning, Tuning VAZ
Causes of failure - we make a diagnosis
Very often, owners of 99 VAZ are faced with the problem of poor engine performance, which can occur in both warm and cold seasons. One of the main reasons for this problem is malfunctions of the carburetor. The symptoms that arise during malfunctions are very easy to notice - the car does not start well, the speed on the tachometer fluctuates, unusual sounds in the form of pops can be heard from the exhaust pipe.
While driving, the VAZ 21099 may stall when changing gears. During acceleration or releasing the gas pedal, jerking and failures in operation are possible. Fuel consumption increases noticeably.
If you find problems with the operation of the VAZ 21099 carburetor, then in case of minor damage it can be repaired or replaced with a new one, if the problems are more serious. Repairing a carburetor is a delicate matter and requires experience in the work. For self-repair, you will need a standard set of tools and, preferably, a book on the maintenance and repair of this type of device.
Adjusting the float system
The free play of the float varies between the following values: 6.5 mm on one side and 14 on the other. This can be adjusted using a checking template by placing the camera vertically. In this case, the float lightly touches, but does not press, the valve ball.
If the distance is less than 6.5 mm, then you need to slightly bend the valve tongue (needle-shaped), which is shown in the figure as the letter “A”.
After this, we adjust the degree of opening of the needle valve, which allows gasoline to flow into the float chamber. When the float rises, the fuel supply decreases; when you sharply press the gas pedal and open the throttle, the fuel consumption increases and the float drops.
Now we adjust the deflection of the float in the other direction. To do this, we move it away from the lid as much as possible and check it with a template, the thickness of which is 14 mm with a certain tolerance.
If the distance does not match, you need to bend the stop of the float mounting bracket and make it no more than 14 mm.
Now, after adjustment, the free play of the float is about 8 mm. Adjusting the VAZ 2107 carburetor also involves checking the incoming grids and fuel filters to maintain a full flow of fuel.
Operation “K” - we repair the carburetor
The VAZ 21099 carburetor is located under the car's air filter cover. If you buy a new carburetor, then you should not try to disassemble or adjust it, since it is already set to the required function from the factory. Every time after you remove or replace the carburetor, it is worth washing it, as dirt can get into the internal channels of the carburetor.
To get the carburetor, you need to use a 10mm wrench to unscrew the air filter cover and slide the four latches that hold it in place. Next, you should loosen the clamps that are attached to the air filter and unscrew the four studs that hold the filter housing and carburetor. After this, you need to loosen the carburetor fuel system clamps and carefully remove them. Next, disconnect the contact wire of the solenoid valve and unscrew the carburetor cover. It must be removed in such a way as not to catch the walls of the float chamber.
Place all unscrewed screws in a separate box - searching for lost fasteners will take a lot of time, and not every store has them freely available. After disassembling the carburetor, you need to check the positions of the floats in the chamber and, if possible, adjust them. The chamber floats should be parallel to the imprint of the chamber walls; this parallelism is clearly visible on the cardboard gasket of the lid. If it is not there, then you need to dilute or reduce the floats to the desired result.
After performing this procedure, the floats should move freely in the chamber and not touch its walls. The distance between the protrusions on the floats and the cardboard spacer should be on average 1 mm; it is best to measure this distance with a caliper.
If there are significant deviations, then the fuel level in the chamber is incorrect. The fuel level should correspond to the red stripes that are in the chamber; it is best to look at them immediately after removal, so that the gasoline does not have time to evaporate. You can also navigate along the ribs in the fuel chamber; to do this, you need to bend or bend the float tongue and pump fuel into the chamber manually. This method is also very good and has proven itself in practice.
How to clean a carburetor
I continue to clean the carburetor. I will clean it with carburetor cleaner. Since my carburetor is very dirty, I’ll take a paint brush for work. Let's get started:
- I cover the hole (diffusers) with a clean cloth;
- I spray the aerosol over the surface of the carburetor; I wash off any heavy dirt with a brush;
- I take the fabric out of the diffusers and try not to get any debris in there;
- I spray all the holes on the carburetor with detergent;
- after which we disconnect the choke rod by unscrewing the bolt securing the cable;
- Using a Phillips screwdriver, I unscrew the 5 screws securing the carburetor cover;
- the next step must be done extremely carefully so as not to bend the floats;
- I remove the top cover of the carburetor and very carefully turn it upside down with the floats;
- I inspect the cover and floats for corrosion, bent, I also look at the gaskets;
- I put the lid in the same position to the side so that it does not interfere;
- I look into the carburetor and use a syringe to remove gasoline from there;
- I take it and spray the entire carburetor; I also spray the jets;
- I spray all the holes where I can spray.
There is detergent collected in the chambers, I pick it up from there as well. I reassemble the carburetor in reverse order. Then I try to start the car. I know that after this procedure the car should not start quickly. It didn't work the first time. It only worked 4 times. There is no idle, it does not work without suction. It pours candles into the chamber. Again I dug through a lot of information. And the reason turned out to be simply funny. You don’t need to pull the choke out too much. I start the car with the choke, warm up to 70 degrees, and slowly begin to remove the choke. It doesn't stall. I'll start adjusting the idle speed. To do this you need a tachometer, a thin slotted screwdriver and a little effort:
- From the beginning I turn the quality and quantity screw all the way.
- After which I make three turns on both screws (I do it slowly).
- I start the car to 80 degrees and remove the choke.
- I turn the quantity screw (plastic wheel), achieving 600-700 revolutions on the tachometer.
- Then I take a screwdriver and unscrew the quantity screw, achieving 1000-1500 revolutions on the tachometer.
- I turn again to the quantity screw and make 900 revolutions.
- Next, I set the quality screw to 750-800 rpm.
My setup was successful. By the way, the setting is done with the headlights and heater on.
Setting the ignition using a strobe
Checking and subsequent adjustment of the ignition of the VAZ-2109 ( carburetor)
) only if the engine is warmed up to its operating temperature (in the range from 80 to 90 degrees). All further actions must be performed in accordance with the instructions below:
- Start the engine and set the crankshaft speed to 800–900 rpm.
- Remove the vacuum hose from the ignition timing vacuum corrector fitting and, turning off the engine, close the gap in the hose.
- Using a “10” wrench, unscrew the three nuts that secure the breaker-distributor.
- There is an inspection window on the gearbox housing, closed with a plug, after removing which the flywheel ring gear is revealed. Rotate the flywheel until you see the alignment mark, which, when placed opposite the center mark on the scale located at the edge of the inspection window, will place the first and fourth pistons at top dead center. It would be useful to check the correct location of this mark - to do this, find the same mark on the crankshaft pulley and make sure that it is aligned with the mark on the timing cover.
Make sure the marks match
) can be considered completed.
Using this method will allow you to configure
Do-it-yourself ignition is as accurate as possible without the participation of a specialist.
The main thing is that you should at least know where to loosen the nuts of the electronic ignition distributor so that it can rotate, and I will explain the principle of adjustment.
In principle, this method of ignition adjustment can be applied to any make of car, GAZ, VAZ 01-07, etc. The main thing is to understand the principle.
I’ll explain right away, almost everyone confuses valve knocking with detonation or very early ignition, if the engine runs without knocking, but when you press the gas pedal, a knocking sound appears when the car accelerates, then disappears when the car accelerates, almost everyone thinks that it’s the valves knocking. No, this is detonation in the piston group, which is trying to break the pistons of your car, the valves have nothing to do with it, if you drive with such detonation, it will achieve its goal and break the pistons of your car. Another sign of very early ignition, black smoke coming from the muffler. Also, detonation in the piston group may occur due to low-quality gasoline; if this happens and you have filled with bad gasoline, accelerate the car smoothly so that there is no ringing in the engine.
On these cars, it is easiest to adjust the ignition without any instruments, which is good on the VAZ 08-09, it is impossible to set it incorrectly, the main thing is that the camshaft belt is installed correctly and the marks match exactly.