Page 1 of 2
Removing and installing the front door
If electrical equipment is installed in the door, disconnect the wires before removing
We recommend that you use two people to remove and install the front door. When replacing a door, you must remove all the hardware from the old door and replace it with the new door.
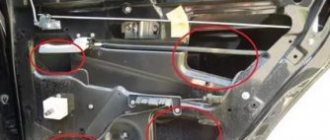
Open the door and remove the two bolts securing the limiter bracket to the A-pillar.
Unscrew the bolts securing the upper and lower door hinges to the A-pillar and remove the door.
The door is installed in the reverse order of removal.
Before final tightening the bolts securing the hinges to the A-pillar, close the door and adjust its position so that the gaps in the openings around the entire perimeter are the same.
Then carefully open the door and finally tighten the hinge bolts.
Replacing door trim
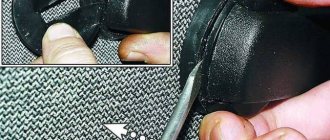
Insert a thin screwdriver between the socket and the window handle trim.
Press the socket with a screwdriver and move the trim so that the protrusion on it disengages from the socket
Protrusion on the facing of the window lifter handle.
Remove the window handle trim.
Remove the window handle
Remove the window handle socket.
Using a thin screwdriver, remove the two plugs from the armrest handle.
Unscrew the two fastening screws and remove the armrest handle
A pad is installed under the upper end of the handle
Remove the two screws securing the door pocket.
Unscrew the door lock button.
Using a thin screwdriver, press and disengage the socket latch of the inner door lock handle.
Pull the handle towards you and remove the socket.
Using a screwdriver, press the trim so that the fastening pins come out of the holes in the door.
Location of the pistons in the door trim.
To remove the upper upholstery fastening pins from the holes, bend the edge of the seal
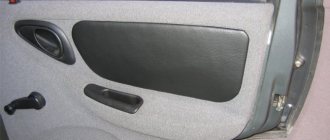
Remove the door trim
The upholstery is installed in the reverse order of removal.
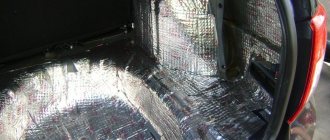
Do-it-yourself door noise
Before starting the procedure, it is recommended that you familiarize yourself with the catalog of materials used to soundproof doors. There is a lot of information about this on the Internet, reference books and other literature. We will devote some space to this issue in the article.
Materials
Sound insulation of front doors
As you know, it is customary to use 2-3 types of materials to carry out this operation. Vibration and noise insulating materials are required - they are used to roll the first two layers. As for materials that eliminate squeaks and rattles, they are placed in a third layer as desired. So, let's start with vibration materials:
- Vibroplast is the main material in this category. It is most often used for processing metal surfaces;
- The material is similar in appearance to a sheet consisting of construction putty rolled out on foil;
- As a rule, almost all known materials must be heated before application, but not Vibroplast. It can be glued this way - this is the peculiarity of this material;
- It is usually not recommended to overlap Vibroplast;
- Vibroplast is inexpensive and quite popular in our country.
Doors with increased sound insulation
The next most popular material can be called Vizomat, characterized by the following features:
- This is already a synthetic material that is similar to linoleum, only it is harder;
- Has an adhesive composition;
- Ideal for processing plastic components;
- There is no point in gluing thin Vizomat onto iron, only 2 mm or more;
- The Visomat requires mandatory warming up, even in the heat. In addition, it must be placed on grease-free surfaces;
- While Vibroplast reproduces complex shapes and reliefs well, the same cannot be said about Vizomat. This material is best placed on flat surfaces;
- Vizomat has poor “floating” properties if applied to heat-loaded areas.
Note: Although the performance and vibration absorption coefficients of both materials are the same, experts advise choosing Vibroplast.
The following material is Bitoplast:
- Externally similar to foam rubber;
- Impregnated with bitumen, has an adhesive layer;
- Ideal for processing car dashboards and other plastic interior elements, doors;
- Doesn't creak;
- Impregnation with bitumen gives the material adhesive properties
Sound insulation of door trim
So, let's get started with the operation:
- We remove the window regulators from the doors;
- We remove the Movil from the surfaces, since it won’t be possible to glue it on them;
- We try on the material, measure and cut pieces of the size needed.
Note. It is important after removing the door trim, do not forget to thoroughly vacuum the inside and clean everything from dust and dirt.
There are many other materials that have their own individual characteristics.
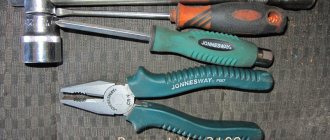
Tools
As for tools, it is advisable to stock up on the following:
- A technical hair dryer that ideally heats metal surfaces and the adhesive side of the material;
- Cutter with replaceable blades;
- Scissors, which must be periodically lubricated with machine oil;
- Material leveler - you can use an ice scraper wrapped in several layers of material.
Glass replacement
It is better to buy glass and a glass holder as a set for replacement.
To replace, you need an extension, a wrench, an 8 and 10 mm socket and an assistant.
The side glass is blocked with a screwdriver to prevent it from falling out. The door trim is removed. A felt-tip pen marks the places where the glass frame is attached to the door on the frame and on the door. The bolts securing the glass frame to the window regulator are turned out.
The window regulator bar must be fully raised. The cable on the roller from the bottom of the glass is dismantled. Then the seals (velvet covers) are carefully removed.
Hold the glass during this time so that it does not fall out. After removing the seals, the glass is lowered down about 10 cm, tilted to the side and removed from the groove.
The new glass is installed in the reverse order. Apply WD-40 or a similar lubricant to the glass frame, insert the glass and leave to dry. After the grease has dried, the glass is installed in the door. New glass is installed in the seals.
If the seals have become unusable, new ones are cut out of rubber, while the old ones are used as patterns.
The glass with seals is inserted into the groove, aligned and lowered into the stopper. The window lifter handle is lowered to its lowest position. The glass is fixed with bolts and the cable is installed in its original place.
The operation of the window regulator is checked and, if necessary, the cable tension and the position of the seals are changed.
Removing the door trim of the VAZ-2109 model
Tuning a car is a difficult task, which, however, motorists try to solve on their own. But in this case it is necessary to do everything as efficiently as possible. It is worth noting that very often it is necessary to remove the decorative door trim of the VAZ-2109. This situation may arise when they are replaced with new ones, since the old ones are completely worn out, or when performing certain repair work, in which it is simply necessary to remove the decorative cladding. If necessary, then it is better to contact specialists so that they can do everything efficiently and quickly.
To remove the casing, you will first need to prepare a standard set of tools. In addition, you will need to purchase new plastic holders for the trim. At the same time, replacement is quick and easy.
The first thing you will need to do when removing the decorative trims on the doors is to remove the window handle from its place. To do this, use a flat screwdriver to pry up and remove the latch, followed by removing the handle.
After this, you need to remove the armrest handle from its place. This also needs to be done with a flat screwdriver, having first removed the decorative plugs of the fastening screws. It is worth remembering that a metal spacer will be fixed under the upper end of the handle mount.
As soon as the first two elements have been removed from their place, you need to continue repeating the same actions with the remaining parts and hanging decorative elements. The lower storage pocket is removed after unscrewing the two screws that secure it to the body. You will also need to unscrew the button responsible for locking the door from the rod.
The next step is to remove the interior car door lock trim from its place. To do this, you need to move it to the “open” position, and then pry off the cover with a flat screwdriver.
The last stage of dismantling the casing is its direct removal. To do this, you will also need to use a flat-head screwdriver, which you will need to pry it around the entire perimeter of the casing and wait until all the latches of the clamps are removed from their places. This was the final stage in removing the door trim on a VAZ-2109 car. work on its reinstallation is carried out in the reverse order after first replacing the damaged fasteners. (Don't forget to vote) Loading…
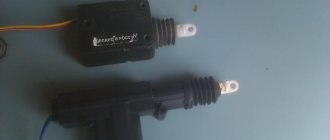
Replacing the window regulator
To replace the window regulator, you need an extension, a wrench and a 10 mm socket.
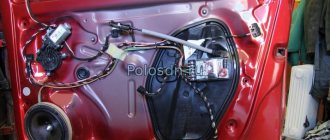
Having freed the front door from the trim, remove the 2 bolts securing the glass to the bar. Usually they are tightened tightly, so it is more convenient to use the head as a lever.
Remove three nuts securing the electric motor, one nut under the glass, two in the center and one nut at the bottom of the door.
After removing all the nuts, disconnect the power plug from the electric motor.
The window regulator is removed from the studs and taken out of the cavity into the technological hole in the center of the door. Installing the window regulator occurs in the reverse order.
After removing the structure, the electric motor is first checked. If it is faulty, it is replaced. If the cause of the breakdown is not obvious, replace the window regulator.
How to replace the door trim on a VAZ 2108-VAZ 21099?
Removing the window handle:
1) First, insert a screwdriver between the socket and the handle trim, and after threading, slightly bend the “blue arrow” handle trim from the “red arrow” socket, bend it until the protrusion of the trim comes out. (See below for where the trim lip is located!)
Note! The protrusion that is present on the cladding is indicated by a red arrow, and it is due to this protrusion that the cladding is kept in place!
2) After bending the facing, remove it from the handle.
3) And after removing the cladding, remove the handle together with the socket.