Category: Auto repair
Vehicle characteristics: The dimensions of the car are as follows: length - 3950, width - 1100, height - 1409 mm. The wheelbase is 2668 mm. Ground clearance 112 mm. The car is equipped with a hybrid power unit. The 4-cylinder engine is equipped with a system that provides engine power output. There are 4 valves per cylinder. The diameter of one cylinder is 70 mm, the piston stroke is 75 mm. The engine crankshaft accelerates to 8000 rpm. Maximum torque is maintained up to 4000 rpm.
Posted by admin: at Noya's request
Watch the VIDEO about how to fold out the rear seat of a VAZ 2114.
Rating of a car owner named Quint: Road grip is 5+. There is almost enough power (I like to drive) There is plenty of space in the cabin, especially for rear passengers.
Original title: Jak rozlozit operadla vaz 2114
Release date: 24.10.2021
Laughter in the topic: At the psychiatrist. - Doctor, my hands are shaking. - Do you drink? - Drank. - Smoke? - Smoked. - So, you quit? - No, I just decided. - You see, but the body is already scared.
Note! From this article you will learn how to adjust the position of the front seats of your car, as well as remove the headrests from them, and in addition to all this, unfold and fold the back seat of the car!
Adjusting the front seats of your car:
1) In order to move the front seat of the car, back or forward, use a special lever, for this:
1. First, lift the lever to the upper position, and then, by moving the seat back or forward, adjust its position; after completing the adjustment, lower the lever to the very bottom, until it stops.
2) Next, adjust the backrest angle you need by grabbing the rotating backrest position knob and adjusting its position to suit you.
Removing the head restraints:
1) First, grab the lower or upper part of the headrest, whichever is most comfortable for you.
2) And then, using force, pull the headrest sharply upward from the seat, and then remove it.
Rear seat layout:
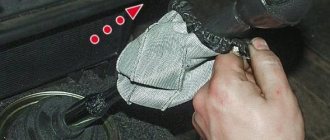
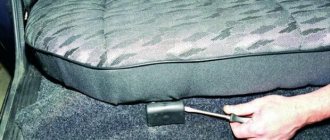
1) First, find a small loop, which is usually located under the central part of the seat, and then remove it from there.
2) Then, by pulling this same loop, raise the rear seat to the maximum possible level.
Note! There are times when the rear seat cannot be raised fully because the two front seats are in the way, but if this happens to you, then move both front seats forward until they stop! (see Adjusting the front seats)
3) Next, move the center seat back lock lever to the far left position.
Read also: How to choose an ultrasonic bath
4) And then fold the back of the rear seat as far as possible.
Below watch the video about how to fold out the rear seat of a VAZ 2114 and express your opinion about it in the reviews to the article.
Video quality: SATRip
The video was uploaded to the admin from the user Avigdor: for immediate viewing on the portal.
To give the correct answer to the question How to fold out the rear seat of a VAZ 2114, you need to watch the video. After viewing, you will not need to seek help from specialists. Detailed instructions will help you solve your problems. Enjoy watching.
Humor on topic: - Tell me, Borya, is your relationship with my Alla really serious? - Roza Markovna, I beg you, our relationship is so serious that we have never smiled.
Auto → Vaz 2114 → How to remove the rear seat
for VAZ 2114
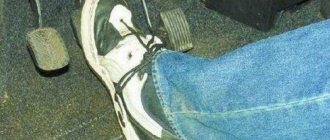
If in an awkward place (at a railway crossing, in the center of a large puddle, in other words, at an intersection) the engine stalls and does not want to start, engage first or second gear, not using the starter, and roll your car to a more comfortable place.
VAZ-2114 “Lada 2114” is a 5-door hatchback from the Volzhsky Automobile Plant, made on the basis of the VAZ 2109 car. How to replace tie rods on a VAZ 2106. How to remove and clean injectors on a VAZ 2110; Like on a VAZ 2110. Replace the fuel pump on a VAZ. Made during the 90s as part of the development of the Samara-2 family. Such a car is a modified VAZ-21093 with a front part from the well-known VAZ-2115 model (optics, radiator grille, front spoiler) with a slightly modified design of the rear part of the body (the rear bumper has been changed, an additional brake light has been installed). How to remove the back seat on a VAZ 2114 The bumpers are painted to match the body color, moldings and sill fairings are installed along the edges of the body. How to remove the ignition switch on a Daewoo Nexia Instructions for removing the ignition switch on a Daewoo Nexia (Daewoo Nexia) auto, auto, car, cars, review. The interior of the VAZ 2114 is equipped with a brand new device panel (the so-called Europanel), an adjustable control column, a steering wheel from the tenth family, and a heater of the latest design. When the rear seat is folded, the car transforms into a cargo-passenger version, similar to a station wagon. The car is equipped with electric windows, tinted windows, fog lights, heated seats, central door locking, and alloy wheel rims.
The first copies of the VAZ 2114 were assembled on the factory assembly line in 2000, and a pilot production batch was assembled in 2001. 50 cars. Cars VAZ-2115i-14i-13i. I did everything as in the picture, install the rear seat in. Serial production of the car began in April 2003.
How to remove the rear seat on a Hyundai Solaris video: let’s look at it in detail
A modern car has a complex structure. The set of spare parts is so confusing, and the fasteners are disguised and hidden. Even a simple, at first glance, question of how to remove the rear seat on a Hyundai Solaris can turn into an insoluble puzzle. After our article it will become easier, and you can perform this procedure yourself.
How to unfold the back seat of a VAZ 2113 (2114, 2108) if you missed the rope?
Removing the seat
on
VAZ 2114
.
The aerodynamics of the VAZ-2114 are similar to the VAZ-2115, in which Cx has decreased slightly, the lift force has decreased and its distribution along the axes has noticeably improved. How to check the DMRV for a VAZ 2110; Repair of the VAZ 2108, 2109 steering rack, How to check the steering rack. The drag coefficient Cx of the updated hatchback decreased only slightly - 0.45 versus 0.46 for the regular “nine”. How to remove the front bumper on a VAZ 2114:. But the balance of lifting forces has changed radically: the total lifting force has increased slightly, but it is now distributed evenly along the axes. And this promises more balanced behavior of the car at high speed.
The car is equipped with a 1.5 liter injection engine. (VAZ 2111) with distributed fuel injection, providing increased dynamic properties and improved fuel efficiency.
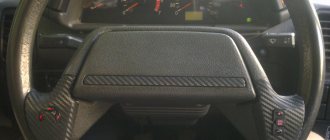
Since 2007, the car has been equipped with a new 1.6-liter engine (VAZ-11183) of the Euro-3 environmental class, the model receives the VAZ-21144 index. Distinctive features from the old engine - the catalyst is located not under the bottom, but near the engine, a plastic decorative cover is put on the engine, instead of an aluminum receiver, a plastic one is installed. In addition to the new engine, the car receives a new dashboard (the upper part does not have a glove compartment, which increases strength and reduces the occurrence of extraneous noise), a new instrument panel with an on-board computer function (shows the temperature outside, the voltage in the on-board network, the current time and other parameters).
Available in 2 configurations. "Standard" or "Lux". How to remove and install the front bumper on a VAZ 2114. Externally, the “luxury” versions are distinguishable from the “standard” ones only by fog lights and wheel covers. How to remove the interior lamp on a Ford Focus 2. In the interior - the headrests of the rear sofa. How to remove the rear seat on a VAZ 2114 In addition, the seats and doors have more pleasant (but at the same time easily soiled) upholstery, and instead of a plug on the center console, a trip computer is installed that records fuel consumption, travel time and average speed.
Secure fixation
When choosing new seats for your VAZ 2114, pay attention not only to their price and convenience, but also to the method of fastening. Some seat models are very difficult to fit into the cabin, although they may suit your preferences. Improperly securing the seats can cause injury, especially at high speeds or in accidental collisions. If you have found a suitable model of seat, but it is not securely attached to its future installation location, take the car to a workshop where all the work will be carried out for you.
As mentioned earlier, it is better to take the recommended models of seats from foreign cars for replacement from Ford or Audi. Many drivers have noticed that Opel seats are also excellent for replacement and require a minimum of additions. Even chairs from Hyundai can become a more or less comfortable and quite acceptable option, if you slightly alter the design of the frame and fastenings.
When is it necessary to remove the rear seats?
Over the years of use of the car, all elements of the interior wear out. The seats are upholstered in fabric, so they need to be cleaned periodically to remove dust and dirt. It is best to do it after dismantling them, in this case the cleaning will be really high-quality and effective.
Rear seat removal may also be necessary for repairs in the following situations:
- after an accident;
- if the backrest lowering mechanism breaks down;
- if the armrests are faulty;
- for tightening fastening mechanisms.
Rear seats.
They are used primarily for boarding and transporting passengers. The rear seat is wide and soft enough to provide comfortable seating for three people. But periodically the mechanism requires repair. Before folding the rear seats on a Chevrolet Niva and removing them, you need to study the design in detail and understand the purpose of all components. We should also pay attention to the installation of head restraints in the rear seats.
The rear seats of the Chevrolet Niva consist of 2 components - the seat and the backrest. They are removable and can be easily dismantled if necessary. During vehicle operation, they are rigidly attached to the body to provide comfort for rear passengers. The seat itself is made of steel mesh, which is mounted on a steel frame. There is special padding inside these components. It usually consists of molded foam. The backrest consists of 2 parts that can be folded independently of each other. The side facing the luggage compartment is covered with a metal plate to provide additional rigidity.
When creating cars, design engineers are guided by three basic principles:
- passenger convenience
- giving a beautiful decorative look
- passenger safety while driving
Additional replacement options
For all city cars, the front seats should be quite comfortable. If you are going to update your interior, pay attention to anatomical seats. A correctly selected anatomical seat will allow the driver to find a comfortable position for driving the car. It might seem like a small thing, but it relieves unpleasant back and neck pain, as well as stiffness in the limbs during prolonged sitting.
Among seat manufacturers, it is recommended to look at products from UNP.
Removing an old car seat can be much easier than installing a new one. Choose a replacement carefully, do not rush, because your comfort during the trip will depend on this choice. The optimal choice is an anatomical seat for driving on city roads. Depending on the number of functions, the price of an anatomical model may vary, so you can always find something suitable for you
My LADA 2110 “Red Swallow”
Many people have their own cars, of various brands, configurations, tuned and simply “gray” cars for everyday driving. Some make various gadgets for cars with their own hands, some send them to special services, and others simply admire how people do it. Actually, this is what I would like to talk about - tuning!
I didn’t have a car before and somehow didn’t need one, but in my heart I always wanted to sit, steer and enjoy the speed. The first step to buying a car was getting a driver's license, which I also went to study for spontaneously. In general, I studied for 3 months in DOSAAF and 29.
On 02/2008 I received my driver's license. From time to time there was a desire to buy a car, but there was no money to buy it, and I began to think about it – where should I go?
Time passed, years flew by, rumors circulated about a crisis. By that time, we had managed to save a little cash, which we finally decided to invest in some kind of automobile before it disappeared.
One wonderful morning, we got ready and went to the car market in Saratov to choose a car for me.
I had to borrow a considerable additional amount of cash from friends, otherwise my savings were not enough.
We set off on the road, drove and drove, and finally arrived. Let's go to the market.
There were a lot of cars in Saratov, some not for our money, others too dead, in general, we wandered and wandered and saw a red VAZ2110 (my favorite color). After some time, after a lot of walking, it was finally decided to buy the first car I liked and finally go home.
The path to home was not close, about 200 km. At first, I thought that my friend would drive and drive my car to my native Kamyshin, but I still drove it back myself.
This is my very first time when I drove for so long, because the last time I held it in my hands was back in February and that was for about 10 minutes. For the first 10-20 minutes I couldn’t come to my senses that I was sitting behind my own car, My hands were shaking a little and I still couldn’t believe that I was going.
Literally, after driving 50 kilometers, I already began to feel much more confident, fell back on the seat and began to enjoy the trip.
Everything would be fine, but in Krasnoarmeysk at the traffic police checkpoint we were stopped to check our documents. And I stupidly took only my license with me, and the rest of the documents remained with my mother, who drove ahead in another car with a driver. Luckily they stopped about 300 meters from us.
The inspector had to wait for some time, to which he made a menacing expression on his face. They brought the documents, checked everything, but still got to the bottom of the fact that there was no first aid kit, fire extinguisher and sign.
And the fact that the car even had transit license plates and had just been purchased did not bother him; he had to pay some fine to the Inspector’s fund. We got into the car, refueled and hit the road.
We got home quickly, we drove for about 3 hours in total, although it could have been longer, but I was still a beginner at that time, and the car was not tested, you never know what would break down, so I kept the speed around 100-110 km/h . But still there was a desire to experience the drive and therefore I accelerated once to 155 km/h, the car behaved amazingly on the road, I remained satisfied throughout the journey.
Here is a short story about the steps to buying my first car, which is with me to this day and makes me happy. From time to time I do something for the soul in it, a little tuning, etc. what I will tell you about in my Logbook
.
Express your opinions about my work, and just like that, we can discuss something, further work, plans...
Source: https://lada110atricom.ru/index.php?content=remoont&id=22&class=2110&number=5
Useful video
You can find more information in the video below:
Not all Lada car seats are equally comfortable. One of the main requirements for the driver's seat is height adjustment. The owners of Lada XRAY were the luckiest in this regard, because... All crossover configurations have this useful option. Other Lada models have a driver's seat lift only in richer versions, or not at all. Let's look at how you can modify the driver's seat with your own hands.
Owners of cars that do not have seat height adjustment can raise the cushion themselves in one of several ways:
1. Place a piece of plywood on the bottom of the seat between the springs and the cushion (the safest and fastest way).
2. Place nuts under the front part of the slide (most often they are raised by 2.5..5 cm). Only the front part of the chair rises.
3. Place a profile pipe under the slide. The front and back of the seat lifts up.
In the last two cases, you will have to use longer mounting bolts, which may have a negative impact on safety. To lower the seat, you can remove part of the fastening (vertical pipe) using a grinder and welding.
All these modifications to the seat allow for height adjustment, but do not allow the chair to be lowered or raised at the same time. That is, if the car is driven by more than one person (for example, a husband and wife), you cannot do without the “seat lift” function. In this case, there are two correct ways:
- Conversion of Vesta or Largus to a higher configuration, installing seats from the “comfort” or “luxury” version, respectively;
- For owners of Granta, Kalina, Priora or Niva 4x4, install seats from a foreign car or from modern Lada models.
Removing the rear seats of Lada Priora
Required tools : 10mm socket, Phillips screwdriver.
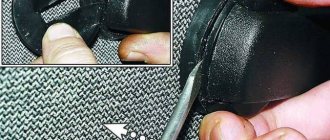
- Release the latch by pulling the loop.
- Fold the right side of the seat back forward and unfasten the fastening buttons for the trunk trim.
- Pull the backrest hinges out of the body hooks and remove the right side of the backrest.
The left side of the seat back is removed in the same way.
- Press the latches on both sides of the seat cushion.
- Remove the pillow.
- Unscrew the 2 screws of the upper fastening of the plastic partition using a Phillips screwdriver.
- Unscrew the 2 nuts securing the armrest hinges to the body using a 10mm socket.
- Remove the armrest.
- Remove the plastic partition.
Installing the rear seat of the Priora is carried out in the reverse order.
Remove and wash or thoroughly clean the upholstery of the front seats on the VAZ-2114.
Because You are not logged in. To come in.
Because you are not a trust user. How to become a trustee.
Because The topic is archived.
Because You are not logged in. To come in.
Because you are not a trusted user (phone number is not verified). Enter and confirm your phone number. Read more about trusts.
Because The topic is archived.
Because You are not logged in. To come in.
Because you are not a trusted user (phone number is not verified). Enter and confirm your phone number. Read more about trusts.
Because The topic is archived.
Because You are not logged in. To come in.
Because you are not a trusted user (phone number is not verified). Enter and confirm your phone number. Read more about trusts.
Because The topic is archived.
Because You are not logged in. To come in.
Because you are not a trusted user (phone number is not verified). Enter and confirm your phone number. Read more about trusts.
Because The topic is archived.
Because You are not logged in. To come in.
Because you are not a trusted user (phone number is not verified). Enter and confirm your phone number. Read more about trusts.
Because The topic is archived.
Because You are not logged in. To come in.
Because you are not a trusted user (phone number is not verified). Enter and confirm your phone number. Read more about trusts.
Because The topic is archived.
Tuesday-Friday removal, dismantling, washing, drying, assembling the rear seat. 2.5 hours in the evening, with “smoke breaks”. Removing it took 10 minutes, putting the vent back on was not a problem, I had to fiddle with the backrest - it’s not very convenient to line up the holes in the bolts and nuts alone. Saturday - all day for the front passenger, Sunday - driver. all day because while everything was drying, at the same time I vacuumed and slightly sealed the air ducts to the rear.
conclusions. 1. There’s nothing to do without a tool. 2. an alternative creative came up with the design and assembly technology, nothing less. Moreover, a person with ingenuity was forced to take on the assembly line - a stupid robot will not assemble this damn puzzle. and I’m writing this the next day after fiddling with the front seats. 3. next time it’s easier to throw it away and buy new ones, immediately re-upholstering them in something more suitable than fabric on foam rubber. 4. It’s clean not where they clean, but where they don’t litter.
The cleanliness of the cabin was worth it. -) It turns out I’ve already forgotten what color the seat upholstery actually is - much lighter))) And the smell in the cabin from “some kind of pink crap that is added during washing” is nothing but pleasant.
Because You are not logged in. To come in.
Because you are not a trusted user (phone number is not verified). Enter and confirm your phone number. Read more about trusts.
How to remove the rear seats on a VAZ 2110 and 2112? When you really need it
Before removing the rear seats on the VAZ 2110 and 2112, check all the nuances of this work. This is not difficult to do, but it has its own peculiarities. Although this model is the progenitor of several models, from 2111 to Lada Priora, it still differs from its brothers in some elements. True, not too much. At one time, the Ten was positioned as a completely modern car. For the first time, a carburetor with automatic choke and many other new products were used on domestic cars. How to remove the rear seats on a VAZ 2110 and 2112 is a question often asked by the owners of this car. The design of the seats and their fastenings is as simple as possible, but at the same time reliable. This allows you to remove the seats at the right time. At one time, entrepreneurs who used the car for work pulled out the seats when they needed to travel for goods. After which they were easily and quickly put back.
Removal and installation of front seats
And so, let’s look at the question - how to remove the front seats on a VAZ 2114.
- flat screwdriver;
- ratchet;
- knob;
- 8 mm head (or Torx 10 - in late models);
- 13 mm socket or a simple 13mm wrench.
Read also: Wheel bolts for Mazda 3
The front seats are dismantled according to the following scheme:
- Disconnect the heated seat wiring harnesses (if equipped).
- Using a 13mm wrench, unscrew the four nuts securing the front seat tube.
Installing the seat in the car is done in exactly the same way, but in the reverse order (it should be noted that this diagram is relevant for both front seats - the driver's and the passenger's).
When purchasing new front seats, the best option would be to give preference to the so-called anatomical ones, which allow you to feel comfortable behind the wheel even on long trips.
Installation of torsion bars for the front seats of Priora
We place the taller plastic bracket (No. 1) closer to the threshold, and the less tall one (No. 5) to the floor tunnel. In this case, the hooks (No. 2) of the brackets should be directed towards the front of the car. We insert the short end of the torsion bar (No. 3) into the hole in the bracket (No. 5) and insert the torsion bar (No. 3) into the hook (No. 2) of the bracket (No. 1). Then use a mounting spatula or a powerful screwdriver to place the long end of the torsion bar (No. 3) behind the hook (No. 6) of the pillow base post. We install the torsion bar (No. 4) in the same way. The long ends of the torsion bars should be directed towards the front of the car.