Print this article Font size 16
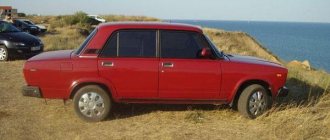
The VAZ 2110 car itself is quite nice. An important advantage of the model is that it interacts well with various tuning methods. This car is literally made to be customized.
Moreover, the improvement should be not only technical and external. Many people do the right thing when they decide to replace their door trim. So the interior looks richer, more interesting, newer, the inside looks no worse than modern foreign cars. The most important thing is that you can do all this yourself. More about this in our article today.
What you can get
Tuning
After finishing removal, clean the cards from dust using a vacuum cleaner, and begin tuning yourself.
First of all, measure and cut the necessary “patterns” for all door cards, taking into account an allowance of 5 or even 7 centimeters for each side.
This is so that during the process of gluing the sheathing material you do not have to install patches or redo everything all over again.
The glue must be applied to the cards with brushes one at a time so that it has time to dry a little, but not dry out. Having coated the doors with glue, we proceed to the cut piece of vinyl or fabric, which we also coat with glue on the back side, and set aside for 10-15 minutes.
After this time, we proceed directly to gluing the upholstery to the door cards. Vinyl stretches well, filling door “cavities”, but for this it needs to be heated with a hair dryer and smoothed over each cavity and bulge with your hands, preferably with gloves. The edges need to be carefully folded inside out and trimmed.
We subject the remaining doors to the same procedure. In addition, it is advisable to paste the same material over other parts of the interior so that it is in the same style.
These include door handle inlays, the glove compartment lid (if you want to highlight it), triangles at the mirrors, and the top cover of the steering casing. In places of various fastenings, you need to cut small holes using a stationery knife.
When reinstalling, do not forget to replace damaged pistons.
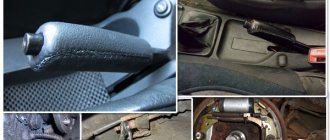
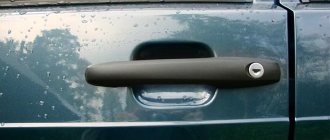
Removing the door trim of a VAZ 2110
To begin replacing doors, you first need to remove the trim from the door. For this:
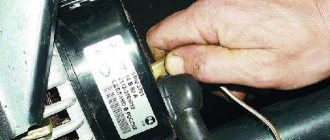
- Using a Phillips screwdriver, unscrew one self-tapping screw in the upper part of the lining and three in the lower part. Remove the cover.
- We release the lock of the window lifter handle. Pull out the lock and remove the window handle.
- We take out the plug for the armrest handle.
- Using a Phillips screwdriver, unscrew the 2 screws securing the armrest handle.
- We take out the handle, removing the inner door handle from it.
- Unscrew the lock release button.
- We pry up the upholstery with a screwdriver, disconnecting the 8 pistons, and take it out.
Door hinge repair options
Failure or severely deformed hinges are repaired using the following methods:
- Complete door replacement. It is complicated by the fact that it is not always possible to find new VAZs for old ones. You have to buy old elements that are partially worn out.
- Inserting new hinges. A good option, but you will have to make additional adjustments and eyeliner. When inserting new ones, you will need a welding machine; for cutting, at least an impact drill, but a gas cutter is better.
- Replacing old fingers. It will only work if the hinges themselves remain intact and undeformed, and only these metal pins are bent (or come off the axis).
Replacing door hinges, as well as fingers, is the most rational option in this case. It's inexpensive and relatively easy to do. If necessary, additional equipment can always be rented at a service center or automotive supply store. The cost of the hinges themselves for the VAZ 2110 and similar models is only about 300-500 rubles. You can also find old, used ones for sale. You will have to pay less for them. But new VAZ 2110 doors will cost several thousand rubles. And they are sold, as a rule, without glass and cladding. Their installation is an additional waste of money.
Replacing the entire hinge
If the door is sagging, then the likely cause is deformation or mechanical wear of the hinges. It is corrected by completely replacing them, along with the fingers. You don't have to buy them. You can make it yourself if you have a metal cutting machine. Such repairs will be cheap - you will only have to pay for the purchase of high-quality metal plates.
It is recommended to cut the loops strictly along the boundaries of their wedging. Fingers are placed last. And again, you need to lubricate them, hammer them, and lock them, as the manufacturer himself recommends. Replacement without taking into account their manufacture (if you do it yourself) will take at most several hours, including removing and reinstalling the doors. All that remains is to make the adjustment. And you should understand that in the next few days the noose may fall. This is shrinkage. The door may creak and may not always slam shut normally. If necessary, readjustment is performed.
Tags: VAZ-2110 door repair
Comments 19
body kit with “foliage” - what is it? Are the door parts available for sale separately?
Interesting solution) In the summer I’ll try to repeat something similar with my father.
interesting article. I’ll try it in the summer
Well, that’s still normal)) I can get the doors in color for cheap, it’s just that mine from the previous owner were broken normally, but it’s about the same as in this picture, only from the wing side i.lada-forum.ru/uploads/post-32358 -1234273012.jpg and I don’t know what to do, look for something that’s not rotten or take this one and come up with something. I have no welding experience, I asked my friends, they say think for yourself, can you weld this piece? What can you tell me about this?
you can't do it well without experience
In general, is there any point in cooking a corner like this, I have friends who know how to use it, I just don’t know if I should buy it, no, otherwise I have deep scratches on the driver’s side of two doors
Removal
Dismantling work is the beginning of your journey to replacing the door panel trim. It's nice to know that this task is quite simple. This is especially true for the front doors.
We will tell you separately about the nuances of dismantling the front and rear door trims of your VAZ 2110.
Disassembled cards
Front
Let's say right away that the likelihood of damaging the standard clips is very high. But this is not scary, since new products are cheap, and their installation is much simpler than repairing old caps.
If you are installing Euro panels, you will have to remove the lever from the window regulator.
The process is performed according to a certain algorithm:
- Using a thin screwdriver, pry the window handle trim away from the socket. Direct it in such a way that it disengages. Now remove the lining. This item is not relevant for those whose car is equipped with electric windows;
- Remove the socket now;
- Using a screwdriver, press out the latch on the plug for the inner handle of your armrest, and then remove it;
- Remove the handle mounting screws;
- Press the inner handle of the lock and turn the armrest handle up. This way you can remove the element;
- Next, unscrew the button that blocks the door lock;
- Remove the screw that secures the exterior mirror control mechanism. It must be removed from the lever;
- Remove the triangular trim. To do this, the fastening pins are removed from two holes in the door.
Upholstery in all its glory
Rear
The rear trim is removed slightly differently. But this does not make the procedure significantly more complicated.
- Remove the three mounting screws;
- Remove the trim;
- Using a screwdriver, press out the upholstery. This will allow the pistons to pop out;
- Try to keep the screwdriver as close to the piston as possible to avoid breaking the holders;
- Don't forget to also remove the spacer sleeve from the window lift shaft.
Self-upholstery
Now we can begin to create a new look for your interior by independently reupholstering the dismantled door panels.
Preparations are in full swing
Before starting work, be sure to clean the cards, go over them with a vacuum cleaner, and replace the door seals if necessary. This will allow them to close better, without unnecessary noise.
The job of re-upholstering yourself is not difficult. Especially if you already have experience working with fabric or leatherette in or outside the car.
- Measure and cut the pieces from your chosen fabric or vinyl to size.
- An allowance of 5-7 centimeters must be provided for each side. This is necessary in order to avoid the use of patches when covering.
- Gradually apply adhesive to the cards, letting it dry a little. Just be sure to make sure that the glue does not dry completely.
- When you have coated the doors, use the same glue to treat the surfaces of fabric or leatherette, depending on what you choose. Let these elements sit for about 10 minutes so that the glue dries a little, but does not dry out.
- After the specified time has passed, begin gluing elements of the material onto the door cards. Vinyl is good because it stretches well and fills all the differences and depressions in the card structure.
- To ensure that the vinyl stretches and fills all the gaps, preheat the material using a hair dryer.
- Smooth the material by hand, but it is better to wear gloves for this.
- The edges with the allowance are carefully folded to the wrong side, after which they can be trimmed.
- Do the same with all the doors of your VAZ 2110. As you can see, there is nothing complicated here.
- Experienced car owners and fans of comprehensive tuning of domestic cars note that some other interior elements should be covered with the same material in order to achieve an ideal picture of the car’s interior. This could be the glove compartment lid, a triangle near the mirrors, a steering casing, etc.
- When reassembling cards with new skins, use pistons. To install them, you will need to make appropriate holes in the casing. This is where a sharp utility knife comes in handy.
Dismantling
Front doors
Removing door trims is not at all difficult. The only unpleasant thing is that the clips are often damaged.
They can, of course, be repaired, but it’s much easier to stock up on ready-made ones without fooling yourself. There are some peculiarities: if you have euro cards, you need to dismantle the window lift lever (if your VAZ has one).
But we will tell you about the basic algorithm for dismantling door trim with your own hands:
- It is necessary to use a thin screwdriver to press the trim of the manual window lift handle away from the socket, guiding it so that it disengages and remove it. If you have electric windows, then naturally skip this point;
- Remove the socket;
- Using a screwdriver, release the locking mechanism for the inner handle of the armrest and remove it;
- Remove the screws securing this handle;
- Press the inner handle of the lock, turn the armrest handle up and remove it;
- Unscrew the button blocking the door lock;
- Unscrew the screw securing the outside mirror control mechanism and remove it from the lever;
- Remove the triangular trim, removing the pistons for its fastening from the two holes in the door.
Rear doors
Removing the rear door trim of a VAZ with your own hands has some differences.
First you need to unscrew the fastening screws (there are 3 of them) and remove the cover. Using a screwdriver, press the upholstery so that the pistons bounce off.
When doing this, keep the screwdriver close to each piston so as not to tear off the holders. It is also necessary to remove the spacer sleeve from the window lifter shaft.
Installation of a ready-made kit
If you decide to buy a ready-made set - VAZ Euro trim panels Lux 2, you will get a more stylish version of the interior.
In addition, such plastic panels improve sound insulation, which is always important for VAZ.
You can also install them yourself.
Door trim VAZ 2110 Lux
We have already talked about how removal is carried out, and now about some of the subtleties of installing Lux 2 upholstery:
- The kit usually includes only the upholstery panels themselves in the amount of 4 pieces. Everything else for them - caps, meshes for the speakers - needs to be purchased.
- Don’t really believe sellers who claim that the Lux 2 upholstery will exactly fit the doors of the VAZ 2110. Don’t be surprised if some of the clips don’t fit, usually 2 of them in the front door, and 1 in the rear.
- Be sure to secure the bottom of the casing with long self-tapping screws.
- If your front doors are not equipped with power windows, you will have to make holes for the handles.
- With conventional window lift handles, a gap will form in the rear doors, which will need to be masked, for example, using a piece of hose. However, it would be better to immediately install electric windows on all doors - it’s convenient, plus the trim panels will fall into place without problems.
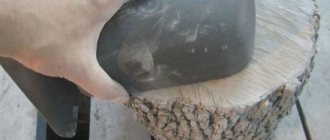
Repair of the bottoms of VAZ 2110 doors
Technology and photos, detailed in the on-board race report, which I supervise
And whoever is too lazy to look there, keep it here) For doors with a intact outer panel, but a rotten interior!
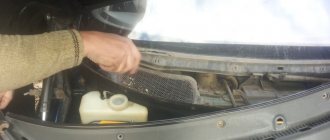
All work is done on the removed door. It is advisable to completely disassemble
First, wash everything, pre-roll the bottom rolling and cut out rot and deep corrosion
Then process either by sandblasting or electrochemical method
Blow off, degrease and paint with epoxy primer
These are small lesions, that’s enough, you can paint them (with epoxy primer!), now the inside of the doors will be free of rust for about 5 years, the main thing is to thoroughly anticorrode the inside and keep the drains clean and open
it can’t be healed like that, because the door panel under the rolling is already “turned to dust”
The only option is to amputate it. Look - it’s just terrible what’s going on underneath, but this is after electrochemical cleaning, the remains of the rye literally fall off. Otherwise you need to sandblast these places
Unnecessary body parts with similar curves are suitable for repair inserts
Deep beetles must also be amputated and patched; when treated on one side, the rust will feed through the micropores on the other side and recover very quickly
The lower part of the belt insert, where moisture is possible, should be treated with epoxy primer and joint sealant, and the higher part can be puttied (just be sure to treat the patches with sealant and anti-corrosive agent on the reverse side!)
I will drill the gutters after I have rubbed off the putty so that less stuff gets inside.
Result - 4 doors were made in a day, one of which was clearly going to be thrown away
And a little chaotic video)
So hurry up and throw away those rotten doors!
Plus a hint - a body kit with “foliage” on the door is cheaper than new doors) Therefore, it’s easier to fix the doors and arches and install the body kit; the price will be almost the same as new hardware, but the look is not in comparison more beautiful and there will be no problems with installing new rolled door panels will.
What to choose?
Sometimes you are amazed at the imagination and thoughts of those who are trying to save money on car repairs. If we talk about rubber seals, some advise using drip tubes instead, others go the other way, inserting window seals.
Do not follow such advice under any circumstances. They won't lead to anything good.
There are several truly correct and effective options, which we will introduce you to using the table.
| Option | Peculiarities |
| Ready-made kits from the manufacturer | They are designed specifically for the VAZ 2110 model. These are mass-produced rubber bands that fit perfectly on the dozen doors. Their design is double-circuit, which allows you to install additional seals if necessary. |
| Measuring rubber bands for VAZ | In stores you can purchase ready-made or soldered seals for each door. Or a solid tape, from which they will cut you a piece of the required length |
| Seals from Priora | Experts believe that these are the most effective and reliable seals. This is due to the three-chamber design with a steel fixing strip and high quality. These elastic bands do not wrinkle and keep their shape perfectly. |
| Rubber bands from GAZelle | A frequently encountered option that has similar characteristics to the standard elements for the dozen. The price is about the same |
When choosing the length of the required piece of seal, measure the internal length of the installed rubber bands on both doors separately. Take it with a reserve, because you can always cut off the excess.
The fixing elements should be caps and high-quality, effective glue. When purchasing the rubber itself, they will tell you which glue is best to use.
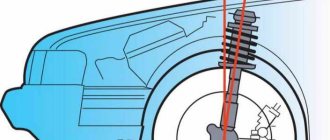
How to lift a door
If the structure continues to sag, it needs to be raised. We list the main methods:
- Open the door, loosen the hinge bolts. Grasp the edge of the body with your hand. Gradually lift until the fragment is in place. Tighten the hardware.
- Use a jack to raise the blade and then lower it with a sharp movement.
- Buy washers with a diameter of 20x10 mm. The greater the sagging, the greater the width of the part should be: from 1 to 2 cm. The screw of the lower hinge is unscrewed, a washer is inserted onto its post, and the mechanism is tightened.
An integrated approach is recommended during adjustment, so you should carefully study all the information before undertaking independent repairs.
Source
Working with ready-made kits
Do-it-yourself upholstery is good, cheap, and the interior will be a source of pride for you, since you decorated it with your own hands.
But still, not every car owner is well versed in fabrics, knows how to sew, or has mastered all the nuances of a pattern. So the result does not always live up to expectations.
Therefore, we advise you to pay attention to ready-made kits. Factory VAZ panels Lux 2 are in great demand, they create an excellent appearance of the interior
An important advantage of Lux 2 type kits is the presence of an additional sound insulation effect, which is very important and useful for the VAZ 2110. It is not necessary to contact specialists, since the installation can be done by yourself
It is not necessary to contact specialists, since the installation can be done by yourself.
- The kit often includes only panels - 4 units. But the grids for the speakers, pistons and other elements will have to be purchased separately.
- You should not trust sellers who claim that Lux 2 fits perfectly on the doors of the domestic top ten. Some of the pistons probably won’t want to be installed where they are supposed to be. This is because they slightly do not match the car model.
- Fastening from below must be done using long self-tapping screws.
- If your doors do not have power windows, then you will have to slightly change the configuration of the panels yourself by cutting holes in them for the “oars”.
- The problem of the gap that is formed as a result of installing Euro panels on a model with manual windows can be solved by masking it with some object. Although the best solution is to re-equip the car by installing electric windows.
Example of a finished banner
Price issue
Finally, we invite you to familiarize yourself with the current prices for ready-made upholstery kits. This is a set consisting of 4 panels. Clips and podiums will have to be purchased separately.
| Name | Price |
| Standard door cards | 2400 rubles |
| Panels Lux | 3100-3300 rubles |
| Panels Lux 2 | 3300-3500 rubles |
| Plastic podiums for standard upholstery | 300 rubles |
| Specialist services | From 3000 rubles and above |
Prices may vary depending on the sales region and the specific auto parts and accessories store.
Whether to change the trim for your doors or not is up to you. But this is one of the most inexpensive and effective ways to improve the appearance of the interior and transform your own car from the inside.
Loading …
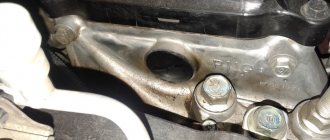
Replacing pins in hinges
So, if the repair only involves replacing the fingers, then the first thing you will need to do is remove the door to gain access to the hinges (3-4 fasteners are simply unscrewed, depending on the model). Next, the fingers are knocked out. If they do not come out due to corrosion or deformation, then you should first thoroughly fill everything with WD-40 to remove the rust and repeat the operation. If this fails, you will have to drill out the pins or replace the hinges completely.
When installing new pins, be sure to lubricate them with grease or oil, and after installation, adjust the door (lower or raise it a few millimeters through a tightening rod). The door should fit accurately into the catch when closing without additional physical effort. Otherwise, the wear and tear on both doors and hinges will be much higher. After 1-2 years of such operation, you will have to completely replace the door along with the hinges.
The main difficulty in repairing VAZ door hinges is to correctly knock out the pins (the same fingers). It’s most convenient to just rivet it and then straighten the loop if necessary. The most aesthetic method is to drill out each end of the finger, after which its edges are ground off or simply squeezed. The drill is immediately taken to the minimum size, then gradually increases literally by millimeter. This will take quite a lot of time, but the loop will not be damaged.
If the finger has other deformations, it may be necessary to make a through hole through the pins. This will not prevent the use of new fingers in the future. For this purpose, either an impact screwdriver or a powerful drill with a high-quality drill bit (carbon steel is ideal) will be useful.
Final door adjustment
Adjusting a door after replacing pins or hinges is about aligning the locks to the normal level for precise closure of the catch
If you plan to replace them, then it is better to focus on the so-called silent locks. They cost slightly more, but allow the closing mechanism itself to not wear out so quickly
When installing them, you can select any level. They work on the principle of a classic latch. At the moment of closing, they do not create additional resistance, so the door will close even with a slight push. The lock will no longer be able to open while moving.
If yes, you can start adjusting. It is best to do this from a clamp. Everything with it is quite simple - we move it a little higher and towards the cabin. You can do this a few millimeters at a time until the closing force is minimal.
Before replacing pins or hinges, you should determine exactly what is causing the doors to be beveled. It may be enough to just make an adjustment, or maybe you will have to completely change the fasteners.