Hello. Chassis repair is perhaps the most common work that a car owner has to do, or more accurately, “our” car owner has to do. These constant knocks and squeaks seem impossible to completely “defeat”, and after one is put in order, another goes out of order. In general, this is not strange, given the state of the roads in Russia. Constant loads and driving on uneven roads have the most unfavorable effect on the chassis. In principle, it would probably be wrong to blame the roads alone; part of the problem certainly lies with the designers of AvtoVAZ, who, despite problems with the roads, continue to produce cars with flimsy suspension and chassis. Well, enough of the ranting, I think, we need to get to work.
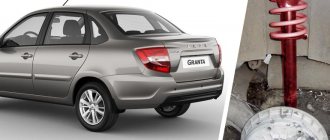
Today, dear readers of VAZ Repair, you will learn how to replace the support bearings on a Lada Granta, and not just replace them, but replace them without removing the struts. I wonder how? Then continue reading.
I’ll say right away that before replacing the support bearings, you need to make sure that they are really faulty. Read about how to check support bearings here.
Those who have ever encountered the need to replace support bearings know that to perform this work it is necessary to remove the struts along with the springs, which certainly complicates the task. However, as you know, laziness sometimes works wonders; in addition to being the “engine of progress”, it also often allows you to make your life easier. This photo report will clearly demonstrate to you how to replace the support bearings without removing the strut and you will be able to see that sometimes laziness can work wonders :-). Joke!
To work you must have:
- Set of keys: “13, 14, 17, 22”;
- Hexagon (to fix the rod from twisting);
- Two jacks or supports for the car;
- Special spring ties;
- Actually, the support bearings themselves.
Replacing support bearings on a Lada Granta without removing struts - step-by-step instructions
- We hang the wheel, then remove it.
- We unscrew the bolt securing the stabilizer strut, and then remove it so that it does not limit the travel of the strut.
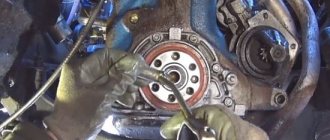
- Next, take the hexagon and, holding the strut rod with it, loosen the fastening nut.
- We install the jack under the ball pin, and jack the rack, thereby removing the load from the second jack. At the same time, the stand will begin to “play” a little.
- We take the spring ties and attach them to the coils. We tighten the spring quite a bit, and then lower the jack installed under the ball. After these manipulations, the stand should go down.
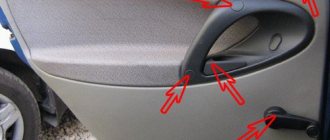
- Now you need to unscrew the support bearing and rod; to do this, lower the rod down and pull out the “support” through the resulting void.
- We clean the rubber band and support cup from dirt. If you are going to install SS-20 supports, then the lower cup will not be useful to you.
Further assembly is carried out in reverse order. I recommend lubricating the bolts and nuts with “graphite” or at least working off, and after completing all the work, do not forget to tighten everything properly. We put the wheel in place and do the same with the second “support”, after which you can safely check the work. As you can see, in order to replace the support bearing on a Lada Granta, it is not at all necessary to completely dismantle the shock absorber struts.
That’s all I have, I hope this “life hack” will be very useful to someone and will significantly “make life easier.”
Replacement for Volkswagen Polo II
Video: Replacing the support bearing and strut support (right strut, removal)
But on the Volkswagen Polo II there is no support plate. In addition, the wing space allows replacement operations to be carried out somewhat faster and easier. The sequence of work on this car is as follows:
- First, unscrew the nut securing the upper support washer. After the car is jacked up and the wheel is removed. In order not to disconnect the strut from the hub, you need to jack up the car as high as possible.
- Next, the tie rod end is disconnected. After this, it will be possible to lower the stand together with the hub down. Next, the hub is turned to the side, which allows you to remove the strut from under the wing and put it to the side.
- The springs are secured with ties, after which the inner nut securing the support is unscrewed and removed.
- A new support is installed and assembly is carried out in the reverse order of disassembly.
At this point, work on replacing the upper support along with the bearing is completed. If the assembly is done correctly, then there should be no knocking noises when driving the car in the future.
Replacing the front wheel bearing without removing the strut, attempt 1
2) I will carry out all the work on site, so you MUST place a safety stop under the car. I used a removed wheel and a couple of wooden blocks as a stop.
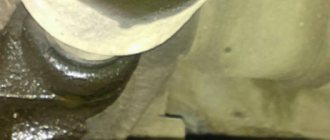
At the same time, I decided to check how the jack was holding - that is, I left a distance of about a centimeter to the safety stop. 3) Unscrew the hub nut. I took the beard and, driving it into the groove in the shank of the CV joint, opened it with a hammer.
4) Now we have reached a difficult moment. To unscrew the nut, you need a 30mm wrench and a lever (a pipe at least 1 meter long). But that's not the problem. The tightening torque of the nut is very high (I can’t give the numbers). In order for the applied force to be used to unscrew the nut, and not to turn the hub, you can put a wheel on the hub with the decorative cap removed. Lower the car from the jack and then unscrew the nut. But even with the car lowered and the anti-roll stop, the wheel can slip on the floor (I had this happen.) Therefore, I use a device to fix the hub from turning. It is a faceplate (like a classic one) with fittings welded to it.
5) I put the clamp on the hub so that when the nut is unscrewed, it rests with a hook against the brake caliper bracket, resisting rotation. And tighten a couple (or all) of the wheel bolts.
6) I take a 30 socket wrench (I have a piece of pipe welded to it), put a lever on the shank - a pipe and unscrew the nut.
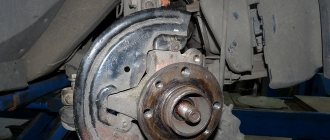
7) Now that the nut is unscrewed and the clamp does not need a bracket for the stop, I take an extended 17 socket, an extension and unscrew the two bolts that secure the caliper bracket.
 By inserting a stronger screwdriver between the back of the brake pad and the inside of the brake caliper, we push in the piston of the brake cylinder (We use the screwdriver as a lever) so that it does not interfere with removing the caliper from the brake disc.
9) unfasten the brake hose from the mounting to the rack. (I warn you right away, be sure to return the hose to its place after assembly, otherwise when you turn the steering wheel, the hose will rub against the wheel and become worn out)
Bearing check
Considering that it accounts for a significant part of the load on the car, I always monitor its condition with special care. It is important not to miss the first signs of damage. Why is this a big deal? If only because a bearing failure leads to a disruption in the wheel alignment mechanism. Which, as is known, affects driving safety, contributes to faster wear of the shock absorber strut.
If the support bearing is faulty, a knocking noise is typical when turning the steering wheel. It can also occur when overcoming small obstacles.
I noticed an uncharacteristic metallic sound as I passed a speed bump. The knocking was not constant, disappeared from time to time, but then resumed again. In the cold season, the characteristic knocking sound is more distinct. Actually, from my own experience I know that it is worth checking the condition after every 20 thousand kilometers of the car. The verification has never caused me any difficulties - the process is quite simple.
I grab the prop with my hand and rock the car slightly. If you hear an uncharacteristic knock, the part has become faulty and should be replaced. If you are not sure of a breakdown, you can remove the protective caps and press the upper part of the A-pillar rod with your fingers, while rocking the car by the wing.
With these actions, if the bearing is worn out, a distinct knock will be heard and play will be felt. If there is someone to ask for help, then this person can be placed on the steering wheel and asked to put their hands on the coil of the front spring and turn the steering wheel. In case of wear, a click will be heard and there will be a noticeable impact in the palm. Those who do not notice the knock until the last minute and do not check the serviceability of the support will be in for an unpleasant surprise. Its breakdown in this case will cost a tidy sum, because in addition to everything else, you will also have to change the hood (the pillar will pierce it).
Replacing the bearings without removing the strut is possible. | Topic author: Victor
I want to change the support bearings on a VAZ 2110, people say that you don’t even need to remove the strut and the camber doesn’t go astray, who has experience.
Ruslan Without removing it - no, but removing the strut along with the steering knuckle is possible, and the alignment will remain unchanged.
Gregory experience EE)
Arthur Dim sucks at climbing, quickly remove the stand. In order not to do the camber, I remove the entire assembly, only unscrew the calipers and the steering rod.
Pavel Well, you should ask people how this is done.
Polina What's the problem?
Zinaida You don't have to do the alignment even if you remove the strut. The main thing is not to unscrew anything unnecessary.
Kirill, you can’t, you’ll have to remove the entire stand.
Lyudmila, the main thing is not to unscrew the steering tips, compress the spring with zip ties, push the shock absorber down and move the strut towards you a little and the support will be removed - difficult but POSSIBLE
Replacing the front shock absorber strut support: VAZ 2110.
6 Jul 2015 – 6 min. – Added by user Carville: production of auto parts and accessories TRIALLI strut support was used in the video. When replacing the support, you will need to remove the shock absorber strut. . Replacement .
How to open a Kia Spectra without a key video in Russian
How does a heated steering wheel work on a BMW 760 Long 2004
How to change a lamp in a Ford Focus 2 headlight
How to change the support bearing on a VAZ 2109 without removing the strut: comments
I absolutely agree with you. This is a good idea. Ready to support you.
As a specialist, I can help. I specifically registered to participate in the discussion.
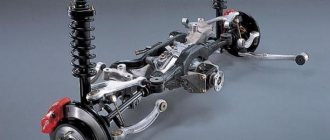
In any passenger car, regardless of design, the suspension must provide a smooth ride, good handling, each element of the chassis plays its role, and there are no unnecessary spare parts. The support bearing is a part of the front suspension, without which it is impossible to imagine a front-wheel drive car; if it were not there, the steering wheel would turn very tightly, with a terrible squeak, and it would be impossible to drive the car.
How to replace the support bearing of a Renault Logan car and video of work processes
As practice shows, in most cases, when a faulty OP is detected on one side, parts on both sides are changed. They explain this by pure rationality - so as not to dirty their hands twice.
Preparatory moments
In some videos on replacing a faulty support bearing on a Renault Logan, technicians tell you what tools are needed for the job:
- Jack.
- Balloon wrench.
- Open-end wrench “13”.
- Key with 18mm head.
- Special tie for springs.
- Hex key “6”.
Work algorithm
The volume of work performed is, of course, greater than when changing antifreeze on a Renault Logan, but it is still within the capabilities of almost any car enthusiast. It is enough to adhere to the proposed algorithm and not rush.
When starting the procedure, the car should be securely secured using boots and a hand brake. The further process is performed in the following sequence:
- Using a wheelbrace, loosen the wheel mounting bolts on the work side.
- Install the jack and raise the car.
- Completely unscrew the bolts securing the wheel and remove it.
- The stage is carried out on a spar. Using a 6mm hex key, hold the shock absorber rod from turning and slightly loosen the nut securing the strut to the cushion.
- Disconnect the brake caliper without disconnecting the hose and move it to the side.
- Using a 18mm socket, unscrew the bolt securing the strut to the steering knuckle.
In some videos on replacing the support bearing of a Renault Logan car, you can see that the craftsmen do without special spring ties. At the very beginning of the process, they unscrew the shock absorber rod nut while the wheel is still in place. However, to perform such a technique, you must have some experience in repairing the chassis of a car. After changing the part, wheel alignment should be checked and adjusted.
Which OPs are suitable for Renault Logan?
The manufacturer installs bearings with the original article number 60 01 547 499 on its cars. On Logan models, the use of analogues is acceptable:
- Febi 10089.
- Kayaba MB1504.
- Lemforder 31407 01.
- Sacis 4005300.
- Monroe L25908.
About 3 months ago I began to notice an extraneous sound from the front suspension, which began to stress me out, and since I noticed an increased gap (under the hood at the front struts) of about 0.8 cm, although up to 1-1.5 cm is considered acceptable, I decided to change these rubber bands + support bearings myself as later it turned out in vain (the noise was from worn out ball joints)
for this measurement we need a 21.27 wrench and a 6 hexagon
rubber bands and supports took LEMFORDER 3134601 there is a LEMFORDER support + SNR bearing on the car are exactly the same and in general this kit comes as the original, at the same time I lubricated the caliper guide pins with MC 1600 grease and turned the bolts securing the struts over so that the next disassembly does not remove the caliper
the gap has decreased (now a small one has appeared again) With this replacement, I advise you to start on the right side (gain experience)))) and on the left you need to be extremely careful so as not to pull out or touch the capricious drive, which can leak in the area of the box and which will then have to be replaced entirely
There were also difficulties in putting the stand in place (I couldn’t lift it up to the holes) I had to farm with two jacks and a support in the form of a key
The old supports would still be similar, but now I changed it so I changed it
Renault Logan, like a budget car, has its own breakdowns, which occur most often. If the car has a fairly high mileage, then its owner on a rough road will be able to hear knocking noises in the area of the front suspension. They can most often be heard on the right. In most cases, the cause of this is the support bearing. This element powers the entire suspension and shock-absorbing system of the car.
Why do you need a support bearing?
The question of why a support bearing is needed is asked by many novice car enthusiasts, but before you figure it out, you need to understand how shock absorber struts work and are installed. Shock absorbers in a car are designed to ensure a smooth ride, smooth out shocks and vibrations when driving on uneven roads, bumps and potholes. On front-wheel drive cars, the struts are attached to the body at the top, to the so-called “glasses”, and at the bottom they are connected to the steering knuckles. The support bearing (PU) is often called the upper shock absorber support; this generally simple device plays a very important role in the suspension of the car, and if it is faulty, it will become difficult to drive the car. It is necessary to monitor the condition of the supports and replace them in a timely manner - we must not forget that traffic safety depends on them.
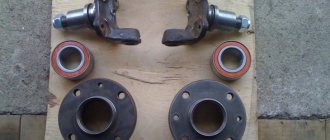
A typical OP consists of three parts:
- an upper metal plate with fasteners (most often these are three studs);
- lower base;
- directly to the bearing itself.
The lower and upper plates are rigidly connected to each other, the bearing itself is usually pressed into the body of the support, and the design options for the OP can be different; each automaker uses its own design solutions. With the help of a support, the shock absorber strut is fixed to the body; due to the OP, the shock absorber rotates smoothly relative to the body, with no play.
Part selection features
The market offers a fairly wide range. However, it is clear that preference should be given to original products. But there are options: there are manufacturers that produce parts that are not inferior in quality to “conveyor” ones, while their price is slightly lower compared to the original. Below are the most popular companies offering this suspension component:
- SNR: a French company that produces its products in Europe and China;
- SKF: international company headquartered in Sweden;
- FAG: produces bearings for the engineering industry and concerns such as Mercedes-Benz;
- INA (Germany): the company bought FAG and today is in second place in terms of the volume of bearings produced;
- Koyo: A leading Japanese manufacturer that produces products of high quality, but at a high cost.
What types of support bearings are there?
The upper shock absorber mounts on different car models can differ significantly in design and mounting;
- with two or three studs;
- with threads in the body of the cup for screwing in bolts.
To dampen oscillations and vibration, shock absorber cups often have a rubberized surface or separate elastic elements, and the bearing itself can be pressed out and replaced.
What other support bearings are there? There are car models on which the upper support is not attached to the body “glass” with studs or nuts; the shock absorber is held in place by the upper steel plate. A wide metal washer is secured here with a nut screwed onto the shock absorber rod; to ensure a soft connection, a rubber spacer is placed under the plate (a similar design is found on the Chery Amulet car).
In some designs, the upper support consists of several parts; they may contain separate upper and lower cups, rubber buffers, and the bearing itself. When assembling the shock absorber strut, all parts are installed in a certain order; they must not be mixed up.
Design Features
The support bearing is located between the upper shock absorber cup mount and the upper strut mount. The main purpose is to provide a movable connection between the upper support of the shock absorber strut and the car body.
The unit is a regular ball bearing. In some designs, the bearing may be attached to a plate that rests on the upper spring seat. This is exactly the design used on the Opel Astra F, but this does not make a fundamental difference in the replacement process.
Tool
- spanners, sockets and hexagons of the required size;
- slotted and Phillips screwdrivers;
- spring ties;
- a wire brush for cleaning bolts before unscrewing, penetrating lubricant (WD-40 or its equivalent).
The steering tip can be removed with a special puller or using a hammer. Also, a hammer and an adapter of the required diameter may be required if the outer CV joint is stuck on the splines to the hub (methods for replacing bearings without removing the axle shaft are mentioned in the video, but in most cases it is actually easier to unscrew the hub nut).
Keep in mind that small sets of universal sockets will likely not cover all your needs. For example, when unscrewing the top nut of the shock absorber rod, the rod itself must be held with a hexagon. To prevent the stabilizer link pin from turning, there may be, for example, a recess in it for a Torx, so you won’t be able to unscrew and tighten the stabilizer with a regular head - you need a spanner. Also, in some cars, the CV joint nut may not be the usual hexagon type, but a special multifaceted shape. Be sure to check these points before repair, so that during disassembly the tool is not found to be missing.
The dimensions of the fasteners, as well as the requirements for clamping forces, can be found in the repair and operation manual for your vehicle. If you do not have plumbing experience and a refined muscular sense of the degree of tightening of the nuts, we recommend that assembly be carried out only using a torque wrench. Of course, you won’t be able to undo the threads of the hub nut, but you can ruin the threads that secure the caliper guides.
Removing the shock absorber strut
On cars whose suspension parts have not been separated for a long time, we recommend that the day before repair, clean the fasteners from dirt and fill them with penetrating lubricant or brake fluid.
The described instructions and video will be devoted to replacing support bearings using the example of Skoda Fabia.
- Loosen the hub nut and wheel bolts. Since the clamping force is quite high, it will be extremely difficult to unscrew it alone after lifting the car. Unless you are changing the brake discs along with the support bearings, then you can afford to insert a screwdriver into the disc stiffeners, thereby fixing it in the caliper. The nut can be loosened by asking someone to press the brake pedal firmly. Of course, all these options require more labor than loosening the nut when the car is still on wheels and can be secured with wheel chocks and a hand brake.
- Raise the car and secure it on strong supports. Under no circumstances should the car be constantly hanging on a jack! Wheel chocks must be installed under the wheels.
- Remove the wheel.
- Unscrew the nut securing the stabilizer link to the telescopic strut. Be sure to thoroughly clean the recess under the Torx from dirt. Otherwise, if you mistakenly insert a smaller head due to deposits packed inside, you risk damaging the internal edges when unscrewing the nut.
- Unscrew the mounting bolt of the brake hose mounting bracket.
- Unscrew the steering tip nut. If you do not rotate the tip around its axis, you won’t have to do a wheel alignment after the repair. To remove the tip, use a puller or hit the post pivot arm several times with a hammer.
- Unscrew the hexagon socket bolts securing the caliper to the steering knuckle.
- Rotate the caliper slightly and pull it out of its seat along with the brake pads. Secure the caliper in a suspended position or place something under it. Under no circumstances should it hang on the brake hose!
- Remove the brake disc.
- Unscrew the hub nut.
- Unscrew the ball joint mounting bolts. If the ball is riveted to the lever, you need to unscrew the upper mounting bolt, after which it is best to remove it with a puller. If the distance from the end of the bolt to the CV joint does not allow the nut to be unscrewed, the rivets will have to be drilled out and then replaced with bolts with nuts and washers.
- Knock the drive shaft out of the splines in the hub. The video shows an effective removal method using a hammer drill in jackhammer mode.
- Unscrew the upper bolts securing the front strut support. It is better to do this with an assistant, since nothing holds the stand except these nuts.
Removing the slewing bearing
- Slightly tighten the spring with zip ties. Use only high-quality screeds! Since the compression force required is high, a flying spring can cause serious injury.
- While holding the rod with a hexagon, loosen the nut securing the upper strut support.
- Retract the spring until the support bearing is released.
Installation Features
All you have to do is install a new support bearing and reassemble the shock absorber strut in the reverse order of removal. Some nuances:
- the shock absorber rod nut can be tightened only until the rod begins to rotate, since after installing the strut in place, it will be much more convenient to completely tighten the nut, holding the rod with a hexagon;
- after unclamping, the spring should “sit” in special seats for the last turn;
- It is not recommended to tighten the shock absorber rod nut with a wrench;
- Before installing the caliper guides, be sure to lubricate them with special grease;
- do not forget to cotter the hub nut if manual cottering is necessary;
- Lubricate all threaded connections, conical seating points of steering tips, ball joints, and stabilizer bones with graphite grease. This will make the disassembly process much easier in the future.
Owners of cars with inclined strut supports should pay special attention. If installed incorrectly, the new support bearing will bite. For trouble-free installation, during the assembly process, paint or scratch marks on the strut support and on the body of the upper spring seat.
General recommendations
In the video, the master mentions the need for preventative replacement of strut cushions on some VAG-Group car models, which does not apply to support options without built-in threads.
As practice shows, the support bearings of the front struts have approximately the same service life. Therefore, if, when diagnosing the car suspension, you find a faulty support bearing, we recommend replacing both support bearings at once. After all, with a high degree of probability it is possible to predict the imminent failure of a still serviceable element. We recommend reading the article on diagnosing the chassis of a car, in which you will find guidance on checking support bearings, strut supports, shock absorbers, steering ends, ball joints, silent blocks, wheel bearings, etc.
Front shock absorber support bearing faults
Like any parts in a car, OPs wear out and break over time; these suspension elements have their own service life. For each car model, the shock absorber supports have their own service life; on average, parts can last from 50 to 100 thousand kilometers without replacement. But for various reasons, support bearings can fail prematurely; the main causes of failure are:
- driving a car on bad roads;
- poorly performed repairs (for example, during installation the nuts were not fully tightened);
- low quality of spare parts or defects, most often non-original parts are of poor quality;
- destruction of the OP as a result of an impact (when hitting an obstacle or due to an accident);
- ingress of dirt and moisture onto the parts of the “support”; on many car models these parts are not protected in any way.
To make sure that the upper support is faulty, it is necessary to carry out diagnostics; in general, checking the support bearing is not difficult, but it is better to diagnose the suspension together.
Video instructions for replacing front struts on Kalina
- ✅ Contents of the article:
- 1. Checking the support bearings on Kalina
- 2. Front pillar structure
- 3. Removing the strut and dismantling the support bearing
- 4. Installation of a new part and assembly of the unit
- 5. Replacing the support without removing the rack
- 6. Selection of supports and bearings, suspension reinforcement, useful videos
The support bearing of the front strut of the Lada Kalina is a rolling element in the upper support, located between the lower and upper cup. This part is designed to rotate the front strut and absorb axial dynamic loads, so this element is very important in a car suspension. Replacing the support bearing is a frequent event for Kalina, the reason for this is the design feature of the product.
The support bearing housing in the factory version is made of plastic; inside there are balls, a separator and races with raceways. The presented material describes the reasons, as well as signs of failure of the “support”, if detected, the front strut and upper support should be diagnosed, and then repaired and replaced. This article provides detailed replacement instructions, as well as a complete answer to the question “Which support bearings are best for Kalina?”
How to check the serviceability of the front strut support
The OP check is performed when the car is parked on a level surface; there is no need to hang the wheels. Diagnosis is carried out as follows:
- one of the inspection participants in the front rocks the car up and down;
- another person performs a visual inspection to see if there are any gaps.
Additionally, you can turn the steering wheel and observe the behavior of the shock absorbers, put your hand on the upper support while rotating the steering wheel or rocking the car - if there is play, you will feel it with your hand; clicks and squeaks may also be heard. Another diagnostic option is to grab the top cup protruding above the glass and try to rock it from side to side, in this case the play will also be noticeable.
Recommendations for strengthening the front pillars and supports of the Lada Kalina
1. Buy and install strut support reinforcements for the Lada Kalina. These special metal stands for supports are installed to strengthen the body cups, which makes the suspension stiffer. 2. Look in auto parts retail chains for versions of the “support” in a metal case. 3. Place a spacer under the hood between the supports, this practice is used in sports cars.
Good afternoon I want to know how to replace the Kalina support bearing? Which ones are best to install? Some say that the ss-20 is the best to date. Others praise Asomi. I heard a knock on the right side of the suspension and a bearing flew off. It needs to be changed. What is better to put??
In 20,000 km I have already changed the support bearing twice. The first time was under warranty, the second time I did it myself. I installed Asomi, so far the flight is normal
Hello. Now I will tell you how I managed to replace the support bearing without removing the strut. What is good about this method is that after all the work has been done, there is no need to adjust the wheel alignment. You just get behind the wheel and drive.
Personally, my problem started as follows: at first, a knocking sound appeared from time to time on the right side of the suspension, after which it became constant. Replacing the support bearing on the Lada Kalina is quite easy.
Support bearing cost
The upper support of the front strut is a relatively inexpensive part; the cost of a spare part depends on the car model, brand, design features; it is no secret that car shops can sell the same spare parts at different prices. The approximate price of a shock absorber bearing is from 150 to 2200 rubles; for prestigious foreign cars, parts usually cost significantly more; you can buy cheaper ones from non-original production. As you can see, the range in prices for these spare parts is quite large; the most expensive bearings are sold for cars:
- Mazda 3;
- Toyota 4Runner/ Avensis;
- Nissan Juke;
- Honda CR-V;
- Mercedes W204;
- Lexus RX300;
- BMW X6.
At a very affordable price you can purchase support bearings for such car models as:
- Chevrolet Lacetti;
- Daewoo Matiz;
- Honda Fit;
- Nissan Almera;
- Chery Amulet;
- Hyundai Accent.
Support bearings for Chinese and Korean cars are generally inexpensive; spare parts for brands such as BMW, Audi, Lexus, and many purely American cars are almost always more expensive.
What is it needed for?
As is easy to understand from the name, the support bearing serves as a kind of support. The front strut support bearing is needed in a car to dampen vibrations that occur in the suspension spring when driving and ensure reliable operation. The support bearings used in the front shock absorber are designed for its movable connection with the body. The front support is an important part of the chassis of a vehicle, which is an elastic unit made of rubber-metal. The main task of the front supports is to provide primary isolation from noise and vibration of the body.
The front support bearing provides softness, elasticity in the axial direction and rigidity in the radial direction. This prevents negative kinematic changes and absorption of loads on the body.
Replacing the support bearing
Changing a support bearing is not very difficult, and almost every driver can do the job if he has the necessary tools and at least a little plumbing experience. It is more convenient to replace the OP in a pit or a car lift, but it is also possible to carry out repairs on a flat area, for example, in a garage or on the street near the house.
What kind of keys are required for repairs depends on the specific car model; in addition to combination and ring keys, sockets with collars, hexagons and sprockets are often used. To change the support bearing, it will be necessary to remove and disassemble the shock absorber strut, so in any case you will need:
- hammer;
- screwdrivers;
- pliers;
- mount;
- set of spring ties;
- remover of ball joints (steering rods).
Cars such as Mitsubishi, Renault or Chevrolet often require keys of non-standard sizes - 16, 18, 21 and 23.
Replacing a shock absorber without zip ties
If there are no ties, you can try to replace the shock absorber without using tools, but it should immediately be noted that this method is quite risky, although with due care and attention everything should work out. Here the disassembly order is as follows:
- open the hood, unscrew the nut securing the cup above the support bearing;
- remove the wheel, jack up the steering knuckle from below, it is necessary that the spring compresses, the shock absorber rod rises from above along with the nut securing the support bearing;
- Having unscrewed the fasteners from above, unscrew the bolts and nuts securing the steering knuckle to the shock absorber strut, lower the jack, knock out the bolts - first the top one, it will come out freely, when knocking out the bottom bolt, the shock absorber strut will jump down a little under the remaining spring tension. But the spring will not shoot strongly, since it is almost free and can be rotated quite easily by hand;
- Now all that remains is to remove the shock absorber by pulling it down. The spring and support bearing will come off immediately, since the nut does not connect them to the strut; it is already unscrewed.
Disassembling the shock absorber strut without ties is not too difficult; it is more difficult to install the shock absorber in place by tightening the spring using a jack. But the master who managed to disassemble the shock absorber in such a way can figure out on the spot how to install all the parts in place. The most important thing is to compress the spring so that the bolts fit into the holes in the steering knuckle. It may be necessary to remove the tie rod and ball joint from the steering axle to allow the knuckle to move further down.
How to change the support bearing on a VAZ-2115 car
To replace the OP without a lift, the car will have to be jacked up; before starting work, stops should be placed under the rear wheels. Next we perform the following steps:
- unscrew the hub nut, for this purpose you will need a 30mm head with a wrench or pry bar (depending on the design of the head);
- remove the front wheel on the side where the bearing will be replaced, hang the car on a jack, and install a stand under the threshold to secure it (you can use a wooden block);
- Having pulled out the cotter pin with pliers, unscrew the nut holding the steering tip, using a puller, disconnect the tip from the shock absorber strut;
- unscrew the two caliper bracket bolts (13 wrench), if necessary, hold the caliper guide with the “17” wrench;
- move the caliper to the side on the brake hose;
- disconnect the ball joint (two bolts) from the steering knuckle, move the assembly with the axle toward you, freeing the hub from the CV joint splines;
- from above, under the hood, tighten the three nuts of the upper support (13 wrench);
- Having removed the rack assembly, use zip ties to compress the spring evenly on both sides;
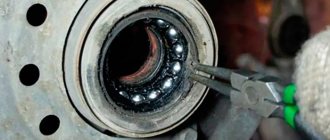
- Having fixed the shock absorber rod in a stationary position with a special wrench, use a 22 mm head to unscrew the nut that holds the entire structure, including the support bearing;
- Next, remove the old bearing from the rod, install a new bearing without removing the couplers, tighten the nut to 22 until it stops;
- loosen and remove the ties and assemble.
Some car owners recommend using a gas wrench instead of a special wrench to hold the shock absorber rod, but this is not recommended; you can scratch the mirror surface, and then the shock absorber will leak.
Since many VAZ models have an identical suspension design, exactly the same as on the VAZ-2115, replacement is carried out on cars 2108-09-099, 2110-11-12, 2113-14. Due to the fact that with this sequence of operations the steering knuckle is not disconnected from the shock absorber strut, wheel alignment is not necessary after repair.
Required tools for replacement
To replace the support bearing you will need several hours, a set of tools and the help of a partner. Tools required for work:
- Jack, stand.
- Spring tie.
- Key "6" (hexagonal).
- Heads on “13”, “18”.
- Standard set of tools.
- New spare parts: support bearing, shock absorber support, wheel nut.
When you have all this, you can start working. Preparatory work:
- Jack up the car.
- Remove the front wheel (on the side where the replacement will be done).
- Clean the front suspension strut from dust and dirt.
Let's look at:
- Using a “10” key, unscrew the bracket located on the rack (it supports the brake hose).
- Under the hood of the car, find the brake fluid reservoir and open the cap. Press the brake pads to remove the caliper.
- Using a key “18”, unscrew the caliper fixing bolt, at the same time loosen the lower fastening element. Move the caliper to the side, releasing the brake disc.
- Remove the two bolts securing the strut to the knuckle bracket. To do this, you need a key set to “18”. To avoid the load on the CV joint, the fist needs to be “tied” to the car body (temporarily).
- Next, under the hood, unscrew the control nuts that hold the strut to the spar cup (hexagon at “6” and head at “21”), and then remove the support strut along with the spring element.
- Loosen the spring tension until there is free movement in the upper and lower rack cups.
- Use a hexagon set to “6” to unscrew the nut securing the rod to the car support and a similar head with a wrench set to “27”.
Disassemble the rack, removing the elements one by one:
- Support bearing.
- Bumpers.
- Cups.
- Shock absorber boot.
- Buffer damping the strut stroke.
Check the integrity of the elements, replace them with new ones if necessary. In addition, check the stroke of the shock absorber rod. Assembly:
Place the following elements on the rod:
- Boot, buffer with bumper.
- A spring.
- Rack plate (upper).
Make sure that the spring is positioned correctly: the edges of the coils should rest against the protrusions located on the upper and lower plates.
- Insert the bearing into the support and push it into place.
- Secure the nut holding the spring with plates on the side.
- Unclench the spring tensioner and at the same time tighten the nut until it stops.
- Attach the assembled rack structure to the body spar cup, and then install it in its original place.
Next, collect the elements:
- Fix the strut on the steering knuckle to the bracket.
- Reinstall the bracket holding the brake hose and caliper in its original place.
- Tighten the control nut securing the strut to the car body using a torque wrench.
- Next, attach the wheel.
After removing and installing the front shock absorber strut, the camber angles remain unchanged. So, bearing replacement on Renault Logan is completed. The whole process will not take much time if you prepare the necessary tools in advance and strictly follow a certain algorithm.
Every vehicle owner knows that a car needs to be serviced regularly. However, many drivers do not know how and when to change the support bearing. He really does not play the first fiddle in the design of the car.
But it carries certain functions. Untimely replacement can cause problems with the upper shock absorber support, increase the noise level and lead to failure of the Renault Logan clutch. The car will require expensive repairs.
Today we will look at the characteristics of the element. Let's find out how to choose it correctly. Let's look at the reasons for its malfunction. Let's get acquainted with the replacement process and tell you what tool you will need for independent work. Let’s summarize the results and draw appropriate conclusions.
Some Tips for Replacing the Front Shock Absorber Upper Mount
- When disassembling, the hub nut should be loosened before you remove the wheel; if the car is already suspended on a jack, it will not be easy to move it.
- If you do not have a ball joint and tie rod remover, the steering tip can be knocked out by hitting the joint joint with a heavy hammer, the blows must be sharp and precise. Even if the tip seriously “boils” in the connection, after several attempts it will still come off.
- To make it more convenient to disassemble the shock absorber strut after removal, you can immediately (while the shock absorber is still on the car) loosen the shock absorber rod nut.
- To make the nuts and bolts easier to turn off during the next repair, it is recommended to treat the fasteners and threads with graphite lubricant during assembly.
- When removing the shock absorber assembly with the hub and steering knuckle, it is a good idea to check the condition of all suspension parts on this side of the wheel. Such diagnostics will save your money and time, because it is often discovered that along with a defective support bearing, for example, a shock absorber is also faulty, or the outer CV joint has a large amount of play.
- You need to compress the spring with ties gradually, squeezing the coils little by little on one side and the other. The spring is compressed until the upper support begins to rotate freely; too much compression of the coils is not required, and in general it is unsafe.
In general, replacing the support bearings on the front struts is quite simple; to make a replacement, you don’t have to go to a car service center; you can do the work yourself.
Catalog numbers and prices of Renault Logan shock absorbers
Place it on a secure support and then remove the wheel. Now you see the front shock absorber on the Renault Logan in all its glory; all that remains is to dismantle it and install a new one in its place.
Removing the Front Pillar Once you have access to the front strut, you need to remove it. After the repair, you will have to adjust the wheel camber.
Unlike domestic cars, toe-in on Logan is not affected when installing new struts. Sequence of actions for dismantling the strut: Unscrew the nuts that are located on the bolts securing the strut to the steering knuckle.
How to properly assemble the front struts of Renault Logan
Remove both bolts using a thin drift and hammer. To remove the lower bolt, you will have to partially remove the caliper.
Loosen it at the bottom and completely unscrew it at the top. After this, carefully turn the caliper down. Remove the shock-absorbing strut assembly with bearing and spring from its seat.
If you purchase a front strut assembly for a Renault Logan, then simply install it in place of the old one. This is done so that after all the work has been carried out, it is ideal to carry out the wheel alignment operation.
Tools and equipment for replacement In order to replace the front struts on a Renault Logan, the following spare parts will be required: Bump stops - ensures the shock-absorbing properties of the strut. Self-locking nuts - for attaching the new strut to the lever.
Removing the Renault Logan front shock absorber strut and disassembling it
New springs for the shock absorber - they should be replaced only in cases where the old elements are broken or no longer meet the technical requirements. Such a kit should be purchased only when all elements require replacement. Also, to carry out such work you will need the following tools: A set of spanners and open-end wrenches. WD lubricant or liquid wrench.
Replacing Renault Logan front struts: video instructions
With such a small set of tools, you can easily replace the racks. All that remains is to remove the rack one by one on the right and left.
First, remove it from its seat. To remove the factory springs in Renault Logan, you will need ties. We install them in the opposite position. The spring is removed until the housing stops rotating. Loosen the rod nut with a wrench. Look at the new elements and install the necessary parts on them.
Tags: front, polo, sedan, racks, Volkswagen
« Previous entry
Next entry »