To remove the rear door trim we will need the following tools: a Phillips screwdriver and a sharp tool (I use a knife). We need to remove the following elements: door lock button, glass lift handle, door opening and closing handle.
To remove the glass lift handle, you need to slightly move the fixing ring with a sharp tool to release it from the hook.
Pull out the retaining ring as shown in the picture. After removing it, remove the handle.
Unscrew and remove the rear door opening handle.
Using a sharp tool, remove the plugs securing the door closing handle.
Unscrew the 2 bolts securing the handle.
Unscrew the door lock handle counterclockwise.
This is what the completely removed elements on the door look like.
Now the door trim is held in place only by clips; without fanaticism, we begin to tear off the trim from below. And we remove it completely.
Assembly is carried out in the reverse order; it is advisable to replace the door fixing clips.
Removing and installing the rear window regulator on Kalina
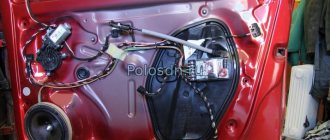
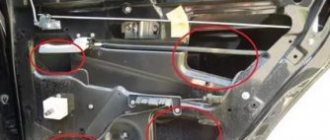
Before starting this procedure, the first step will be to remove the rear door trim, since the entire mechanism is located directly under it. After this, all the nuts securing the window regulator to the inside of the door are clearly visible.
- two nuts on the bottom
- one on top
- three on the side - mounting the coil of the lift mechanism
- two screws securing to the glass
The upper and lower nuts must be unscrewed with a 10 mm wrench:
And the side ones with an 8 mm wrench:
The glass is attached to the lift frame using bolts that are unscrewed with an 8 mm wrench. Of course, you first need to fix the glass by placing something under it, or placing something between it and the door.
The main point is that before removal it is necessary that the pins securing the mechanism go inside the door. To do this, press on them with a little force, adjusting the structure from the inside, if necessary, and thread the pins inside.
It is necessary to achieve such a position of the lift inside so that all its pins are removed from the holes in the door. This is clearly shown in the photo below.
Now you can remove the window regulator from the rear door of Kalina, turning it in the desired position so that it can easily come out through the lower right technological hole.
And the final result of this repair is demonstrated below.
Installing a new one occurs in the reverse order of removal. It is worth noting that the price of a new one, even if it is mechanical, is quite a lot, namely, its price can be from 500 to 650 rubles. Of course, this will be far from factory quality, even if the manufacturer is AvtoVAZ. I talk about this very often, since many people know the quality of conveyor parts and the quality of spare parts supplied to stores.
You can buy a real original with low mileage at a car dismantling center from Lada Kalina Blog: https://vk.com/razborkaavtostaryjoskol. You can arrange delivery to any city or town in Russia by mail or transport company at the buyer’s expense. There are a lot of really new cars with mileages up to 50 thousand km; there have already been cars from 2007 to 2012.
If you have anything to add to the material, leave your comments below.
Replacing the rear door window lift mechanism
Putting the handle on the shaft, set the glass to the upper position, and then remove the handle.
Remove the vibration damping element from the window handle shaft.
We fix the glass in the raised position by installing two wooden wedges between the glass and the inner door .
Using a 8-mm socket with an extension, unscrew the two bolts securing the glass holder to the guide slide of the window lift mechanism.
Using a socket or a size 8 wrench, unscrew the three nuts securing the window lift mechanism.
Using a socket or a 10mm wrench, unscrew the three nuts securing the guide of the window lift mechanism.
We remove the window lift mechanism through the lower technological hole in the inner door panel
Rear door window lift mechanism
Install the rear door window lift mechanism in reverse order
Install the rear door window lift mechanism in the reverse order.
How to remove the Priora window lifter handle
The work of dismantling the handle includes several steps:
- insert a thin flat screwdriver between the handle washer and the handle lock on the side opposite the handle;
- Carefully press the latch and remove it;
- pull the window lifter handle towards you and remove it from the slots;
- Remove the window handle washer.
Installing the window handle
Installation is done as follows:
- put the washer of the window lifter handle on the axle;
- Holding the washer with your hand, place the window lifter handle onto the slots;
- raise and lower the glass once or twice, rotating the handle so that it fits tightly onto the slots;
- insert the clamp between the handle and the washer.
Reasons for handle breakage
Often, replacing the power window handle will only temporarily fix the problem. Soon the new handle also fails. The reason is that the glass goes down and up too tightly, so you have to put excessive stress on the rather fragile plastic part. In this case, you must first eliminate the cause of the stuck glass or window regulator, and then change the handle.
It’s easy to check the operation of the mechanism - just raise and lower the window.
There are several reasons for the mechanism to jam:
- twisted drive cable;
- glass distortion;
- poor lubrication in the mechanism;
- freezing of ice (in winter).
If the window regulator works hard, you need to remove the door trim, find and eliminate the cause: change the lubricant, melt the ice or replace the faulty mechanism.
Another reason for handle breakage is worn-out window drive splines. In this case, it is necessary to replace the window lifter mechanism with a new one and only then change the handle.
Kalina.Lux. The power windows don't work.
#1 antrop66
- APC-Users
- 1445 messages
- Yekaterinburg city
- Gender: Man
Hello. Please tell me.
VAZ Kalina. Luxury equipment. APS6.1 installed
Power windows, mirrors, and central locking do not work. I checked the wiring, it's intact.
According to the diagnosis, error B1200 Immo is not disarmed.
Immo was not activated. The windows worked, etc.
Why do the power windows not work, due to error B1200?
- Top
- Nickname or quote
Design and types of window lifters
Kalina front window lift
Window regulators are a device designed to raise or lower car windows.
At the moment, there are a huge number of options for these devices, but the design, despite the differences in component parts for different models, is similar, it includes:
- grooves that hold the glass by the side edges
- so-called “rails” that ensure the movement of glass
- Seal and damper, glass movement limiters in the up and down direction.
A window regulator of any design consists of two main elements:
- drive unit
- lifting mechanism - transmitting vibrations of the drive movement to the glass, and thereby ensuring its movement.
The drive is divided into two types:
- Mechanical, known to us from Soviet cars, where in order to lower or raise the window, you need to turn the window lifter handle.
- Electric, typical of modern cars, where to move the glass you just need to press the window button. The electric drive consists of a reversible electric motor with a worm-type gearbox.
In addition, window regulators differ depending on the mechanism of glass movement:
Each option has its pros and cons and technical features. All these device options have one thing in common: one day they fail; this problem especially often occurs in a model that is so popular today as the Lada Kalina.
There can be dozens of reasons why power windows malfunction, but the most common are the following:
- The commutator brushes of the electric motor, which is responsible for the glass movement process, freeze. This happens, as a rule, due to overheating of fragile graphite brushes, unstable to sudden temperature fluctuations, and this factor starts a chain reaction: overheating of the brushes begins to melt the nest, which is made of plastic in all Kalinas, and not of the best quality. For this reason, the brushes lose mobility, and the device can only be brought into working condition using a hammer. At the initial stage of the breakdown, it is enough to give a good knock or two on the door trim , but after a couple of weeks, this method stops working, and then you will have to disassemble the window regulator to repair it.
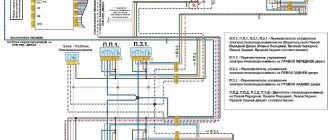
- Another cause of failure, typical of the Lada Kalina, as well as many other VAZ models, is the ill-conceived electrical circuit. The contacts cannot withstand the load placed on them, there is no unloading relay, which is why all the window regulators fail at once, and then it is necessary to repair not only the window regulators themselves, but also the remote control.
When it is impossible or too problematic to repair the device, it is more advisable to replace it with a new one. are suitable for the Lada Kalina :
- electric window lifter Garnet VAZ – 530 rub.
- electric window regulator Ningbo – RUB 1,699
- electric window lift AUTO-GEO – RUB 3,300.
Of course, the price is directly related to quality, but if the budget is limited, then the domestic option is not bad.
Now let's talk about how to install window regulators yourself.
Removing the power windows
Let's start with the front mechanisms
Before proceeding with repairs, it is necessary to dismantle the defective device. But in order to remove the window regulator, you will first have to remove the door trim.
So, for work we need:
Now let's get down to business.
- The first step is to lift the glass all the way and secure it at the highest point with tape.
- Then, using a wrench, remove the two bolts that hold the glass in place (1 in the picture). Also, you need to unscrew the bolt of the inner handle of the lock.
- The next step is to disconnect the device motor and wires (2 in the figure).
- We unscrew all the nuts on the device (there are 11 of them in total) and remove the window regulator (2 in the figure).
The front window lifters have been removed, let's proceed to dismantling the rear ones (if the problem lies in them too).
Here we need:
- two keys, 10 and 8
- masking tape.
- Just as in the case of the front window lifters, raise the glass all the way and secure it with tape.
- Using a size 8 wrench, unscrew the three nuts securing the mechanism.
- Take a 10mm wrench and remove 2 bolts and 3 nuts.
- Now it will be easy to pull the device out through the hole at the bottom of the rear door.
Dismantling has been completed. Carefully examine the condition of the device; if it cannot be repaired, replace it with a new one.
Replacing rear door glass
We lower the glass so that we can unscrew the screw securing the decorative glass trim.
READ Renault Megane 2 Doesn't Start Starter Spins
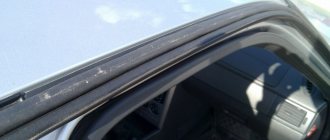
Use a flat-head screwdriver to pry up the edge of the inner glass seal.
We lift the seal up, applying the necessary force, and remove the inner glass seal from the inner door panel.
Having bent the edge of the seal, use a Phillips screwdriver to unscrew the self-tapping screw securing the decorative glass trim.
Using a slotted screwdriver, press out the upper corner of the decorative trim and remove it.
Remove the lower part of the seal from the door.
Using a 8mm socket, unscrew the bolt securing the glass guide at the end of the door.
From the outside of the door, use a slotted screwdriver to pry up the decorative retainer of the glass seal.
To avoid damaging the paint, place a soft material under the screwdriver, for example, a piece of fabric folded several times.
Pull the retainer out of the outer seal and remove it.
We remove the outer glass seal by pulling it off the front decorative clamp and lifting it up.
Using a 8mm head, unscrew the two bolts securing the glass holder to the window lifter slider
We remove the glass from the door. Install the rear door glass in reverse order
Installation
As you can already guess, installing the window regulator is carried out in exactly the reverse order of dismantling it; the only thing is that you first need to treat the guide of the device with lubricant.
The installation procedure for the front lifts is as follows:
- We fasten the new device with nuts (11 pieces);
- We connect the wires and the motor;
- We find the bolt securing the inner handle of the lock and tighten it, using a key, tighten the glass fasteners.
- We remove the now unnecessary tape and check the work.
You need to look at how the window opens and closes, whether there are any distortions, whether all the screws are tightened well. If a mistake was made, what to do, you will have to repeat the work again. If everything goes well, you can praise yourself for a job well done.
The rear window lifters are installed in the same way, in the reverse order.
- Through the niche at the bottom of the back door, we put the device in place of the old one.
- Using a 10mm wrench, tighten the bolts and nuts.
- Using a size 8 wrench, secure the mechanism with three nuts.
- We remove the tape.
Replacing the rear door lock and outside handle
The outer handle can be changed without removing the lock.
Using a 8mm socket with an extension, unscrew the nut and bolt securing the handle
To remove the door lock, disconnect the wire terminal from the negative terminal of the battery
Using a Phillips screwdriver, unscrew the screw securing the intermediate lever of the locking rod, and remove the lever together with the rods from the rectangular protrusion, removing the locking rod from the plastic holder (shown by the arrow).
Using a Phillips screwdriver, unscrew the screw securing the base of the inner door handle and remove it. together with traction from a hollow pin.
Remove the decorative glass trim and take out the glass guide.
Using a Phillips screwdriver, unscrew the three screws securing the door lock.
We remove the electric lock through the technological hole in the inner door panel
Squeezing the two clamps of the wiring harness block, disconnect the block from the electric drive and remove the lock with rods.
Rear door lock with electric drive and rod assembly
Install the rear door in the reverse order.
Sources:
https://autoservice-mekona.ru/raznoe/poshagovaya-instruktsiya-po-remontu-i-zamene-ruchki-dveri-na-kaline.html https://autoruk.ru/lada-kalina/kuzov-lada-kalina /remont-zadnej-dveri-lada-kalina
Why is the door trim removed?
Most often, the trim of the rear or front doors is dismantled in order to get to the internal cavities where the window lift mechanisms are installed. Although during the entire period of operation of the car there are other situations when it is necessary to remove the trim:
- for installing acoustic speakers built into door cards;
- in case of failure of the electric window lift buttons;
- for dismantling glass for the purpose of tinting or replacement;
- to repair or lubricate window lift mechanisms;
- to replace facing panels that have become worn or scratched over the years of use of the machine.
Front door cards Lada Kalina
It is also necessary to remove the trim during body work, when it is necessary to weld rotten elements, renew the car’s paintwork, or carry out anti-corrosion treatment.
Note. Many motorists remove the upholstery to make additional vibration and sound insulation of the body themselves.
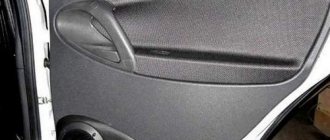
Lada Kalina rear door trim
Removing the grant door handle video
Replacing the outer door handle on Kalina and Grant
Lada Granta - replacement of external door handles with Luxury ones in body color.
Door handle repair — LADA GRANTA
How to remove the passenger door trim on a Lada Granta
Eliminating dangling handles and removing the window lifter handle on the Lada Granta
[BR-GAVS] Removing and installing the rear outer handle Granta Liftback and Kalina 2
Kalina When door handles dangle. Body repair.
Eliminating rattling and play in door handles
Lada Granta - reupholstery of interior door handles with film.
Adjustment and repair of Lada Granta door handles
Also see:
- Decoding video chords
- Replace the cooling radiator on a Chevrolet Niva video
- Video of Mitsubishi Lancer Cedia
- Honda SBF 600 s reviews video review
- UAZ patriot off-road latest video 2013
- Pierre Edel and Sofia Rubina Hunter video
- Transportation of cars by sea video
- Car Nissan Qashqai 2014 video
- Replacing the front strut of Renault Kengo video
- Test drive Volvo s60 2001 video
- Do-it-yourself Toyota Corolla generator repair video
- Master class on a tank video
- Chevrolet Niva won't start reasons video
- All Hunter and Gordon videos
- Coffee candle master class video
Home » Clips » Removing the grant door handle video zapchastibu.ru
Preparation for dismantling
To unscrew the fasteners and remove the door trim, you need to prepare a simple set of tools:
- screwdriver with cross slots;
- long flat screwdriver;
- a pointed tool, such as an awl.
Door disassembly tool
Since the door card of the Lada Kalina car is held on by plastic fasteners (otherwise known as clips, pistons), there is a warning regarding the working conditions. It is strictly not recommended to dismantle door trim in the cold, when the plastic becomes brittle and easily destroyed. Hence, there is a risk of breaking all the clips during the process of removing the decorative panel. Therefore, in winter, perform this operation in a heated garage or box.
This is interesting: Removing dents after hail
In the summer, there are no requirements for premises; remove the casing even in the open air. There is only one recommendation: in windy weather it is better to drive the car into the garage, otherwise a lot of dust will be brought into the interior when the doors are open.
This is what the door card lock looks like
Advice. In cars that are 5 years old or more, the plastic from which the retainers are made dries out and becomes brittle. When separating the trim from the door of such a car, you will probably ruin some of the clips. So it’s worth buying new ones in advance, there are 8 pieces in the front door, and 10 pieces in the back door.
Instructions for removing the cladding on Kalina
The first three operations are performed the same way for all Lada Kalina doors. The exception is the trunk hatches of hatchback and station wagon cars, where the disassembly procedure is much simpler. Here's what to do:
- By hand, unscrew and pull out the cap of the latch designed to lock the door lock from the inside.
- Using a Phillips screwdriver, remove the 4 screws holding the music system speaker.
- Remove the speaker and disconnect the wires from it.
Unscrewing the blocker and acoustics
Advice. The acoustics can be attached either to the door card itself or to the metal door frame. If, after removing the speaker, you observe the first option, then during assembly it is better to redo the fasteners by drilling holes for self-tapping screws. The acoustics should be mounted to the door, not to the upholstery.
Attaching the speaker to the casing is wrong
The further procedure of work differs depending on the location of the door that you are disassembling.
Front passenger door
Here the decorative panel is held on by 8 clips, 2 screws securing the internal handle and two self-tapping screws located under the plastic pocket. The algorithm for dismantling it is as follows:
- Using an awl, carefully pry the edge of the plastic plug hiding the screw in the door handle and remove it. Remove the second screw cover in the same way.
- Remove both handle screws.
- Pull the door opening handle towards you, unscrew the fastening screw and remove the lever. After which you will be able to remove the entire handle.
- Unscrew the 2 screws at the bottom of the door card, under the plastic pocket.
- Take a flat head screwdriver and pry the top right corner of the trim panel to disengage the first tab. Grab the casing with your fingers and release the remaining pistons manually.
- After separating the panel from the door, disconnect the wires coming from the power window button. To do this, pry the connector tab with a screwdriver and pull the block out of the button block. Dismantling of the cladding has been completed.
Passenger side panel removed
Advice. When prying up the edge of the door card with a flat-head screwdriver, you should place a rag under it so as not to scratch the paintwork on the inside.
Photo instructions for disassembling the door trim on a Lada
Video: How to properly remove the trim
Nuances of disassembling the driver's door
On this side, the decorative panel is removed in the same order as on the passenger side. But due to small differences in the design, it is necessary to take into account the following nuances:
- To make the trim easier to remove, you need to remove the plastic panel covering the rear-view mirror adjustment lever;
- the first screw for securing the armrest is located under the plug, and the second is in the recess of the handle;
- the door opening handle is located on top of the armrest and is removed after unscrewing the fastening screw.
The plastic socket for the mirror drive can be easily removed by hand
The panel on the rear view mirror adjustment is removed using a flat screwdriver, which is used to pry it off from below. On vehicles equipped with electrically controlled mirrors, there is no adjustment lever, and instead there is a plug on the panel.
On the driver's side, the screw is hidden in the armrest
Reference. Some drivers unknowingly try to pick out this plug to disconnect the panel. The action is useless, since the element is easily removed by hand, but unsuccessful attempts leave unsightly scratches on it.
Screw securing the lever for opening the door
Removing the driver's side trim - video
Rear door trim
Here the upholstery is pressed to the door by 10 plastic clips and 2 screws securing the handle. The disassembly technology is as follows:
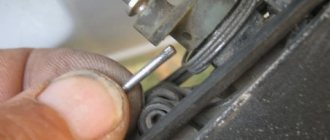
- The first step is to remove the mechanical window lifter handle. Use an awl to pry up the plastic half-ring that secures the lever to the axle. Pull it out and remove the handle.
- Pull out the 2 plastic plugs on the door handle and remove the fastening screws. After this, the element will be easily removed.
- Using a flat-head screwdriver, pull out the lower far corner of the decorative panel and snap out the first piston.
- Grab the door card with your hand and remove it, releasing the remaining clips along the contour. The casing has been successfully dismantled.
Scheme for dismantling the decorative panel
Note. Please note that the opening handle lever on Kalina 1 will have to be unscrewed and removed, but on Kalina 2 there is no need to remove it, since it is screwed directly to the door and is not connected in any way to the decorative panel.
To remove the window lifter handle, you need to pull out the half ring
Otherwise, the upholstery on the doors of the second generation Lada Kalina car is removed in the same way, there are no differences.
How to remove rear door panels - video
Replacing the door handle of Lada Kalina
The door handle on Kalina is loose! How to repair the Kalina door handle, what should I do to prevent it from swaying? Thank you.
- Modification of the rear handle on the VAZ 1118 Kalina - 1 answer
The handle begins to wobble due to the fact that the metal petal with the “groove” unbends during operation. This is the peculiarity of the mechanism.
To fix this, to repair Kalina’s door handle, you need to remove the door trim, and then tighten the screw with a Phillips screwdriver and then try to bend the shaped petal.
It happens that the thread on the handle breaks off (if you overtighten the nut). To fix it, you need to remove the handle and grind off the screw head, then drill out the remaining parts from the petal into a cone. Next, you need to select a suitable countersunk screw and solder it.
Removing the rear door trim on Kalina is quite simple. To do this you will need: a flat screwdriver, a small piece of rag, a knife or a super thin screwdriver. This work is not very difficult, you can easily do it without outside help, even if you have no experience in car repair.
And so, having obtained everything you need, you can begin to remove the casing. First, let's remove all the decorative trims - two on the handle and the cap on the lock lock. To remove the first ones, it is best to use a thin knife or flat-head screwdriver.
New Lada: Repair and maintenance manual for Lada Kalina VAZ-1117, VAZ-1118 and VAZ-1119 » Car repair and tuning, auto portal
We gained access to the 2nd bolts - unscrew them. Now comes the fun part. You need to remove the window lowering/raising handle. It is secured with a plastic retaining ring. It's up to you to pull it out. This ring has a latch on the back. We insert a knife or screwdriver behind the locking ring, pull it towards you and pull it up.
Often, removing this handle causes difficulty for everyone. But, as you can see, it’s nothing complicated if you know the design.
Now all that’s left to do is to tear off the trim from the door. Wrap the screwdriver in a rag, insert it between the trim and the door itself and pull. The entire rear door trim on Kalina is attached using clips. So push on, don’t be afraid. It’s just advisable to have several of these clips in reserve, in case something goes wrong.
Once the rear door trim has been removed, you can perform basic repair work. This includes replacing the outside door handle.
The handle is secured with one nut inside the door and one bolt outside.
We unscrew them. First, we pull out the part of the handle that is closer to the center of the door. Now we pull the entire handle towards the center of the door, lift it up a little, pull the bottom towards us and pull out the handle completely.
The new rear door handle and trim are installed in the reverse order.
We will show you how to replace the outside door handle on Lada Kalina and Lada Granta cars. I think many owners have encountered this problem: the front doors open from the outside without any problems, but to open the rear doors, you have to put in at least twice as much effort to get the lock to work. You have to pull the handle very hard, as a result the mechanism does not hold up and the metal tongue breaks off on the inside. In such cases, the entire handle assembly is usually replaced.
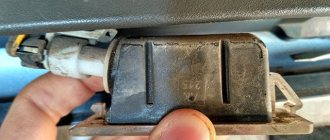
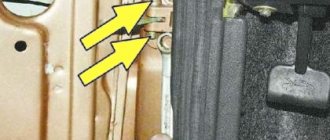
In our case, after removing the door card, the following detail was found:
This is the same metal “tongue” that sets the door lock rod in motion. From the inside, unscrew one nut 8:
Now the handle can be removed from the outside, one part of it can be removed without problems, but the second part will require a little fiddling. A new pen costs around 300 rubles, which is not so expensive that you have to bother with repairing the old one.
When the new handle sits in place, but is not secured. it is necessary to move it as far as possible towards the rear of the car, i.e. back so that the tongue, which was broken off, would engage with the door lock mechanism. In this position, you need to check how the door opens; if everything is fine, screw the handle.
Video of replacing the outer door handle in Lada Kalina, Granta:
Backup video on how to replace the outer door handle in Lada Kalina, Lada Granta: